Pottery Barn Knock-Off Christmas mirror
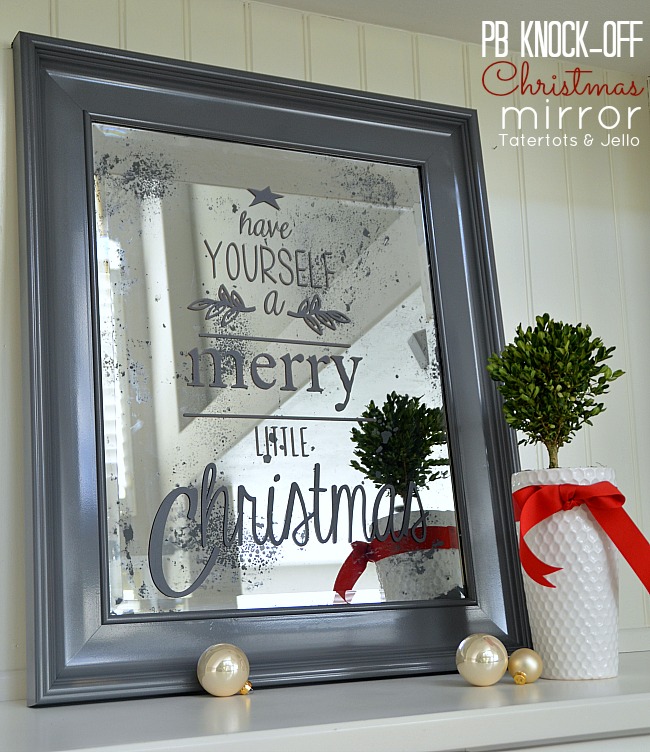
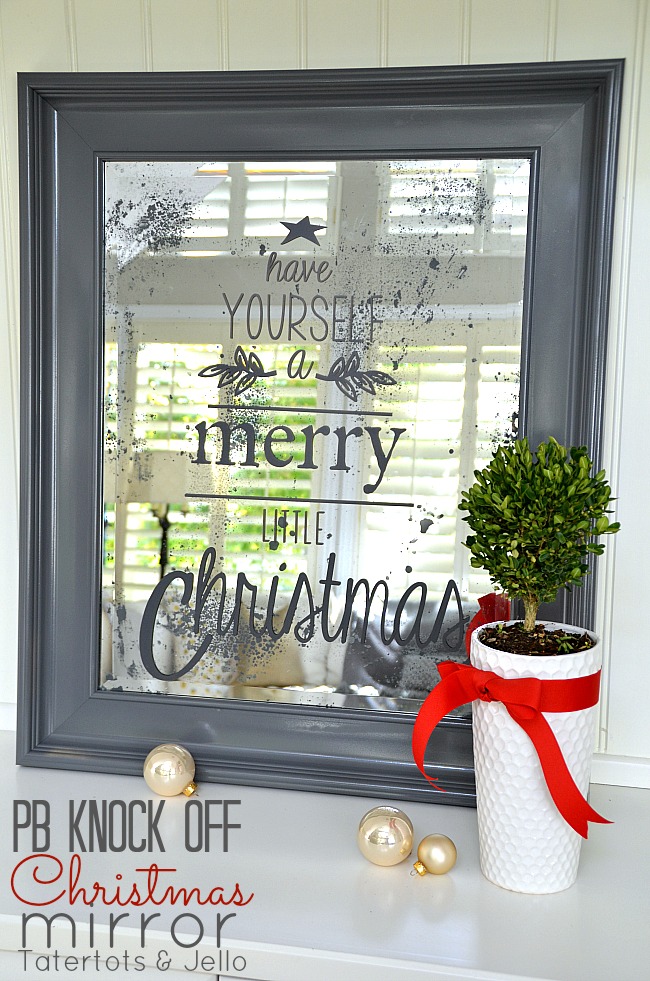
I love a good Knock-Off Project!! So when Lindsay from Makely said that she was hosting a Knocktober DIY series – I was so excited to take part in the fun!! Check out this Pottery Barn Christmas mirror!

Welcome if you are stopping by from Teal and Lime. Isn’t Jackie’s mirror fabulous? I love it!!
I made a mirror too! I am starting to think about the holidays, and so I decided to try remaking this DIY Holiday Mirror. It is on the PB website for more than $129 plus shipping — and I was able to make a similar version for under $40. Yay!! And I wanted to do a grey version that would go better with my home’s holiday decor too.
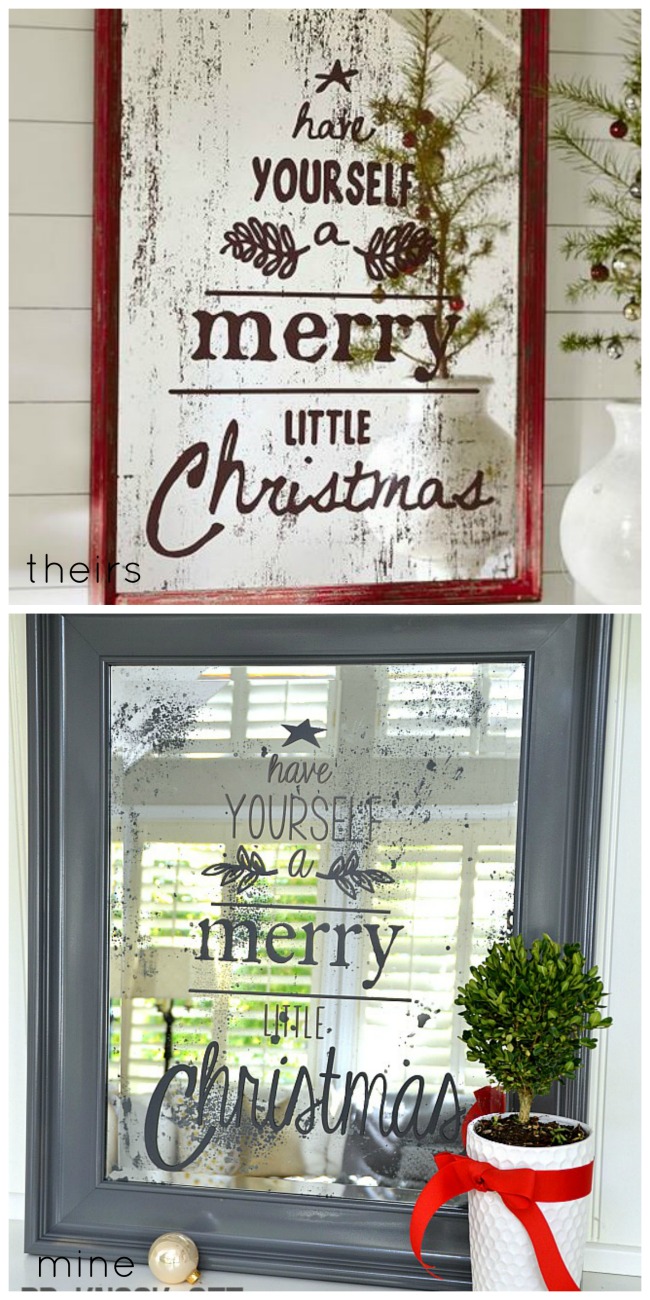
Here’s how I made the PB knock-off:
I found a mirror on clearance at Lowes for $20.
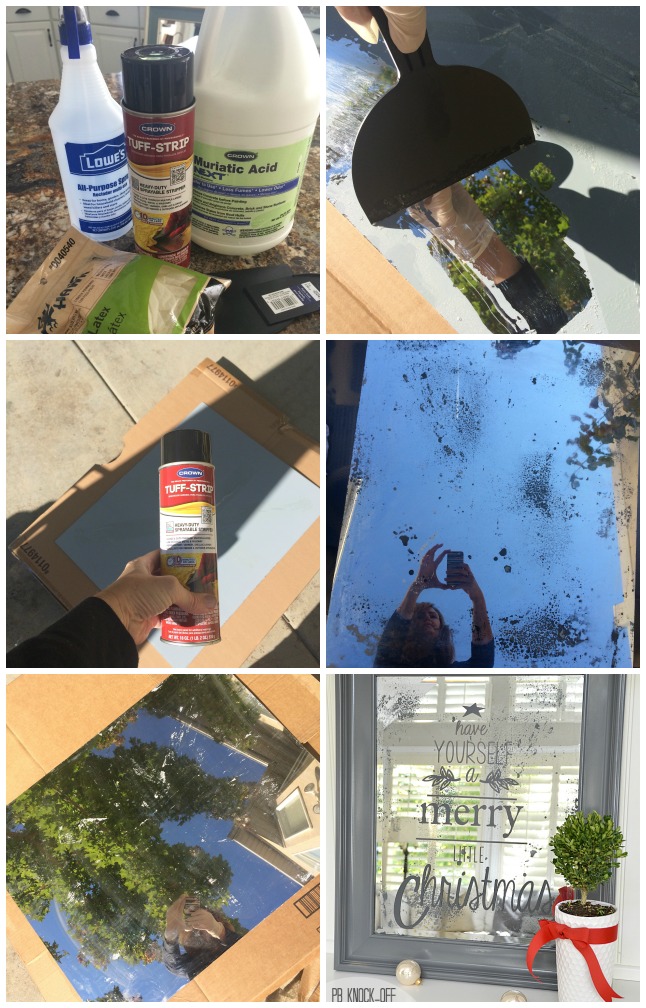
I used Layla’s tutorial on how to distress a mirror. The only major change was I used a lower-strength of Muriatic acid. And instead of only waiting a couple of minutes to take effect, I had to let the solution stay on the mirror for about an hour.
- The first thing I did was I took the mirror out of the frame.
- Then I sprayed the paint stripper spray on the back of the mirror and let it sit for about 10 minutes. I used gloves, a mask and eye protection when I used the paint stripper and muriatic acid.
- Once that spray took effect, I used plastic scrappers and scraped the paint off the back of the mirror.
- Then I took the muriatic acid and put it in a spray bottle. I then sprayed the edges of the mirror back with the solution and let it sit for about an hour — until I could see the the marks were transparent.
- Once the mirror looked distressed enough, I wiped the excess Muriatic acid off with a clean, damp cloth.
- Then I took the same Grey Gloss Spray Paint and painted the frame of the mirror and the back of the mirror the same grey gloss color.
- Once it was all dry, I put the mirror back in the frame.
- And then I printed off the lettering with my Silhouette machine. I applied the vinyl and now I have a beautiful Christmas focal point. The original price is $129+ and I made mine for under $40!!
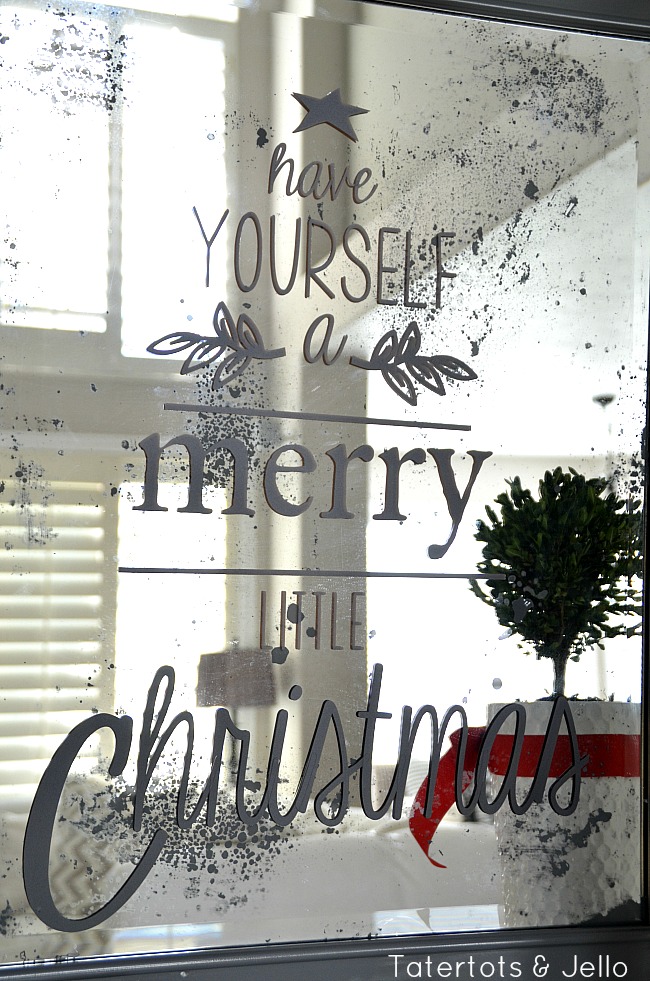
Here’s a close up of the way the mirror looks distressed now. I love the look!
Be sure to check out the other AMAZING DIY Knock-Off ideas this week!!
The next Knocktober project is from Carmel at Our Fifth House. Her project is amazing!!
Be sure to check out the rest of the ideas from Day 2 of Knocktoberfest too!
Donna from Funky Junk Interiors
Jess and Monica from East Coast Creative
And here are the idea from Day 1 Knocktoberfest —
Makely School For Girls – CB2 Clock
Home Stories A2Z – PB DIY Chalkboard Pillow
Shabby Creek Cottage – Zinc Door Outdoor Rug
Infarrantly Creative – PB Oversized Flashcards
Decor Chick – World Market DIY Chalkboard
Shabby Nest – Land of Nod DIY Felt Trees
There will be 27 projects total – you can find the full line up at Makely! I can’t wait to see them all!
Have a Beautiful Day!
xoxox

PS: The handwritten fonts I used are from the fabulous Kimberley Geschwein, and they’re free for personal use.
The script font is KG Eyes Wide Open (named after the lovely Gotye song, I suspect), and the printing one is KG Skinny Latte.
The distressed serif font is IM Fell Great Primer Pro.
The leafy things are from the Silhouette Studio library.




I just stumbled onto your website and love it! I LOVE your version of the Pottery Barn mirror absolutely stunning. I too would be interested in purchasing the vinyl letters if possible. Please keep me posted as I would love to do this project with some girlfriends and have this mirror as part of my holiday decorating next Christmas. Thanks for sharing,,,,:)
Just did this project at a class Jen! Love how it came out!
Susan
So, have you ever thought about selling these? I have 2 small children and am never going to find the time to make this, but I am in love with it. Any chance you might be selling them?
I am probably the only guy reading this blog, but my wife was dying to get the PB Mirror. Seeing it was sold out I searched high and low and found this spectacular site. Jen, are we able to buy the vinyl lettering? I see you posted several times you were checking with a friend of yours and I am having issues getting the font lined up. Thanks
I am so anxious to make (try) one of these mirrors I am replying to myself. Jen what size was the mirror and what font size did you use for the silhouette vinyl (assuming your friend is not selling the pattern). Thanks and have a great day! – Dean
What fonts did you use?
What fonts did you use? (never mind – i just saw that you posted at the end of the blog 🙂 )
Wow, wow, wow, I LOVE your mirror much better than the original!! Kudos to you and TFS.
What is a silhouette? Can I use my cricket? And why did you remove the back of the mirror?
You remove the back of the mirror so you can access and remove the coat of paint put on the mirror to protect the silver mirror coat. Once you carefully remove the protective paint you spray on the acid to eat the area you mist (with acid) and the silver coating. Then you blot up the excess very carefully and wait for it to dry. Clean gently, let dry again and re-paint and seal the back of the mirror to protect the remaining silver. That is what gives it that aged look.
you could have a lot of time and trouble…….just by replacing the glass with plexiglass…….I have painted of plexiglass for years and had no trouble with it …….saves on glass breakage also…….just a little hint…..fro an old 30 yr sign painter………
do you sell the ‘have yourself a merry little christmas mirrors?
Could you just start with an old piece of glass since you removed all the mirror part and then put it back on? I have some smaller picture frames lying around.
What she did was use the chemical to remove just bits of the “mirror” and then paint the back of it to match the color of the frame and lettering. You could just use glass and paint it with “mirror” paint, but then you would just use the chemical to take off a little bit to get that look. Hope this helps. 🙂
I love this mirror — so cute! You did a great copy. I like the vintage quality of it and good call on the grey.
Your knock-off mirror is gorgeous – I have to say I like it better than the PB version. My husband and I visited the International Furniture Market in High Point this month and there were distressed mirrors everywhere, so I don’t see this trend going away anytime soon!
Yours is WAY cuter!!! Love it!
Love yours even more than theirs! Wow! Great job 🙂
awesome!!! totally love it!
WOW I like yours better. Bigger frame makes it pop. Great job! I am going to do this.
I love this project! Definitely pinning this and hoping to make one too. Thanks for sharing!
This is amazing! I have two mirrors. I think one for Christmas, and one for all year – maybe a Bible verse! Thank you!
WOW!!! Love yours way better than the store version! Great job!
I too, like your mirror better than the PB one! I like a thick frame around a larger mirror. I don’t own a silhouette … going to Michael’s today … there may be a silhouette in my future 😉 Thank you for sharing!
Your version is wayyy better!! I love it <3 <3
Fotini
LOVE this! I love yours way better than the Pottery Barn one. Thanks so much for sharing.
The leaf is called branch and leaves by A Little Hut if your searching in the SIL store 🙂
Thanks Joelle! Yes, that’s right!
xoxo
Would you mind sharing which image you used for the star and leaves from silhouette so I can purchase them? thanks!!
I just found them! Thanks!!
The Christmas mirror is beautiful. Thank you for sharing your talent with so many of us!! I am just starting this “sign craft thing” and wondering between a Cricut and a Silhoutte. Do you have any pointers for me about this. Thank you so very much.
If you purchase a cricut you also have to purchase all those cartridges. But if you purchase the Silhouette you can make up your own designs. I own a Cricut wish I would have spent a little extra and got the Silhouette.
I heart this frame so much! I can’t wait to try making this or using the distressing technique. Also, thank u so much for listing the font. I wish this whole design was on the sil store. Have you ever thought about becoming a shape designer?? You should look into it. You got skills!
Your version is beautiful, Jen! I love it in gray and great job on the antiquing!
I do like yours better.
Oh my gosh!!!! Yours is even better than the original!!!!
What a beautiful mirror! Such a fresh and inspiring post. I was surprised to see the lettering was vinyl – it certainly doesn’t look that way! I can just see this on my mantel:) Thank you for sharing this. One quick question – do you think the looking glass, mercury type method would work also?
I really love this!
Love your project Jen! so much better than the real thing. I did a mirror thing a couple of weeks for the mystery box (krylon) I tried to age it without the acid….didn’t work. 🙁
super job girl!
gail
Absolutely LOVE the mirror! In fact, I like yours better than the one from Pottery Barn. 😉
What Kimberley Geschwein font did you use for the leaves? I have looked on her website and cannot seem to find it. Thanks for this wonderful tutorial. It looks so much better than the PB version!!
Updated the post: the leafy things are from the Silhouette library!
I absolutely adore anything Pottery Barn, although I never buy…(too expensive!) I love what you have done with that mirror. Thanks so much for the tutorial!
Well, well. Ms. SpoolTeacher thinks your version is so much nicer than PB and she didn’t get the pop in your face pop-ups to have to get around to see yours. Great job. Now she knows how to make a mirror look old. Thanks.
I love this! I am also loving the whole Knocktober series! You did such a great job! I want to make one now! xo
Gorgeous! I like yours better than PB’s, too.
Love it simply LOVE IT! I will be trying this! Victoria
HI: This is a really cute project. I downloaded the fonts that you specified, but I am having a hard time figuring out which ones are which. Do you think you could say which words are in which font? And also where is the little leave design from. Thanks so much.
I like yours better than theirs! Love it when that happens!
I love this! The new/old mirror looks so good and it is going to be amazing in your holiday home. Wow, you are really making a jump start with that aren’t you.
Love this project! I need to try that mirror technique!
Thanks Carmel! I think you will love it. It really makes a mirror look like it has character!
xoxo
Yours is tons cuter than the original!! Love it.
Thanks Beth!! You are so sweet!
xox
Oh my gosh, YOURS is beautiful. I would probably not have thought twice about the “real ” one but now I WANT. I also do not have a die cutting machine and would love to know how much you would charge or IF you would be willing to sell the sentiment.
Thanks Heidi!!
I have a friend with a vinyl business and I am looking into seeing if she can sell the vinyl for anyone that wants to buy it 🙂
xoxo
Hi Jen. I love, love, love this project, but I too, do not own a Silhouette cutter. Can you tell me if your friend with the vinyl business would be willing to sell the lettering?
Would you be willing to sell the vinyl? I’d love to make one of my own!
Please sell me the decal. I want to try this mirror. Yours look so much better than PB.
It’s gorgeous! See, yet another reason for me to get a vinyl cutting machine, though I suppose I could stencil it if I reeeeallly had to.
Now I want one!
So, so fabulous!
Thanks Dina!
xoxo
Hi Jen, This is just SO cool. Pinned it & would love to give it a try. Congrats on a great result!
Warmly, Michelle
Thanks Michelle!! You are so sweet!!
xoxox
I love the mirror!! Is the vinyl clear or slightly colored?
Hi Sherry!
The vinyl I used is a dark grey – it matches the grey spray paint I used on the frame and the back of the mirror.
xoxo
Hey I was just curious what fonts you used on your mirror! I love my silhouette but its so hard to find cute fonts that I love sometimes! Thanks!
I updated the post (see the PS) with the fonts I used!
Jen
This is gorgeous! I’m hoping to make it for a Christmas gift. Did you wear a mask when working with the chemicals? Wondering what kind I would need to buy! Thanks!
Thanks for reminding me — I updated the post to specify that. Ask at your hardware store, but I just used one of my sanding/painting masks that I buy in big packages :). I used standard latex gloves and my pink safety glasses. I looked impressive!
I really like how thses come out and its a lot easier to distress a mirror then I thought. Will have to try this in the up coming holidays. Thanks for sharing
Hi Courtney!
It was really fun distressing the mirror. I am excited to try it on another project!
xox
I would love to know what fonts you used so that I can make this using my silhouette! Is the vinyl is removable if I wanted to put it on my mirror that hangs in my dining room year round?
I added the fonts as a PS — and yes, the vinyl’s removable!
I love your so much better than theirs – I thought it was the original one before I scrolled down! I wish I had a Silhouette machine, I’ve already seen like three different projects I want to make that call for one. I love this mirror!
Thanks Alyssa!!
I really do love and use my Silhouette so much.
xoxo
I was so sure that the red mirror was the knock-off until I read the entire post. Sometimes you can just tell which was a copy. But yours blew my mind. It is far more beautiful than the one that is for sale for $$ at Potterybarn. Good job!
Thanks so much Paula!
xxoxo
Same as another person – I don’t have a vinyl cutter – any suggestions or where I could buy something similar? Thanks!
Amazing! Theirs looks like the knock off! Please consider selling the vinyl and/or sharing the fonts 🙂
Thanks Darlene!
I updated the post with the free fonts that I used. I also asked a friend of mine with a vinyl shop if she would consider selling the vinyl. I will let you know!
xoxo
I’m not at all surprised, because I am a huge T & J fan, but your mirror looks a lot better than the PB one! I just got a huge mirror at a thrift shop. I’m gonna have to try this.
Aw Heidi!!
You totally made my day!
xoxox
I think yours looks MUCH nicer too! good job
Thanks Amy!
xx0x
Oh Jen!! I love yours so much more! It’s gorgeous! It looks like the lettering was hand painted so I was surprised to hear it was vinyl! Your choice of fonts was so key to making this shine as a hand done piece. Beautiful!
Oh Donna!
I adore you!! Your lamp was super amazing. You are so talented!!
xoxox
I think your knock off looks way better than Pottery Barn! Yours looks even more expensive because your frame is wider than theirs.
Thanks Tammy!
I was so happy to find that frame, and for such a great price!! It really is so pretty!
xox
Oh I just love it. I’m already thinking about Christmas as well- placed my first of many orders online for the kids yesterday. AND so it begins. 🙂
Thanks my friend!
xoxo
Love it!!! Such a great idea, super cute, and way cheaper than the original. I’ll have to add this to my list of crafts to make for Christmas 🙂
Jen you rock! Love how it turned out. As always. And that Lindsay is pretty fabulous. I need to spend more time around you two so your DIY skills can rub off on me. (since I have NONE!)
Aw – love you MIque – you are amazing. I feel the same way about YOU!
xoxo
This is really pretty, and a great idea. I love that it is Christmas, without being red and green. Would you be able to share the fonts that you used? Thanks for sharing your project.
Hi! I just updated the post with the free fonts that I used.
xxo
Jen, Would you consider selling your vinyl saying for this project for all us gals that don’t have a vinyl cutter?
Hi Brenda!
I have a friend with a vinyl business and I am looking into whether she can sell thevinyl. I will let you know.
xoxo
Any news on the possibility of buying the vinyl? I would also be interested. I LOVE this project! You did a fantastic job.
I would buy it too…any updates?
Oh my gosh, yours is A-MA-ZING! I love it a hundred times more than the PB one. Love it, want it. NOW! =)
Jeanine
Thanks Jeanine!!
That means so much to me!
xxox
This is gorgeous! Would you be willing to share what fonts you used?
Hi Jacqueline!
I updated the post with all of the fonts 🙂
xoxo
Love the mirror!!!! Also, that cute plant! Perfect for Christmas! Where is that from?
Thanks Bailey!!
The vase is from Lowes in their Christmas department. I just took a little outdoor shrub I found in their plant department and planted it in the vase 🙂
xoxo
Jaw. Drop. Floor. Jen, I think this is so beautiful! Great job!
Thanks Lindsay!!
And thanks so much for letting me be a part of this awesome series. I really appreciate it so much!
xoxox
i love this – a great gift idea for family or friends for the holidays! the only question i have is the step where you apply the words…how does that magic happen?
Hi Erica!
I downloaded some free fonts into my Silhouette Studio file and cut them out with my Silhouette Cameo.
xoxoxo
Yes, I would also like to know some ideas on how to do the lettering. It is beautiful!
Wow Jen this is amazing!! I LOVE how you put this on a mirror, I love this more then the original. You did a fantastic job!
Jen, I love your version so much better! The gray is so sophisticated. Hooray for saving a bunch of money and making it a better fit for your house in the process!
Thanks Jackie!!!
I am in love with your mirror. It is fabulous!!!
xoxoxo
I like yours even better than the PB version! Thanks for the instructions! I love the look of antiqued mirrors!
Thanks Rachel!!
It really was so fun to antique the mirror. I want to make another one so I can experiment with distressing. I think you should try it!
xoxo
Wow! What a great job! Dare I say, I like your version better! I like the chunkier mirror – well done!
That is awesome.. just as lovely as the original!
Thanks so much Tina!
xoxo