
I have had a few people ask me to post a tutorial for my Spring burlap runner. So here it is!
{Spring Ruffled Table Runner}
Materials:
Burlap
Fabric scraps or fat quarters
Fabric for back of runner
Ribbon or quilt binding
Quilt batting
Sewing machine and thread
Pins

Here’s what you do:
First decide how long you want your runner to be. I wanted mine to be 60 inches in length by 17 inches wide. Then cut your burlap to that size.

Once the burlap is cut, cut your fabric for the backing. I used two different fabrics that I alternated for the back — two panels of each fabric. If you are making panels for the back, sew them together so they are the same size as the burlap piece.

Then cut your quilt batting to the same size. Lay all three pieces together, with the quilt batting in the middle. Pin it in place, then sew around the perimeter — sewing the three layers together. Then lay the runner out on your work surface. Decide where you want your big ric rac to be on the quilt. I measure to the center of the runner, and then I measure the middle of that total and put the ric rac in that space — 1/4 of the way on each side. Pin it in place, then sew it.

Now take your ribbon or quilt binding material and fold it in half, fitting the edge of the runner in the fold of the ribbon. Start the ribbon on one side of the runner — not at a corner. Pin in place all the way around the runner. At the corners, make a 90-degree fold and pin in place. Make sure to fold the end of the ribbon under so there are no fraying edges. Now sew the ribbon in place.

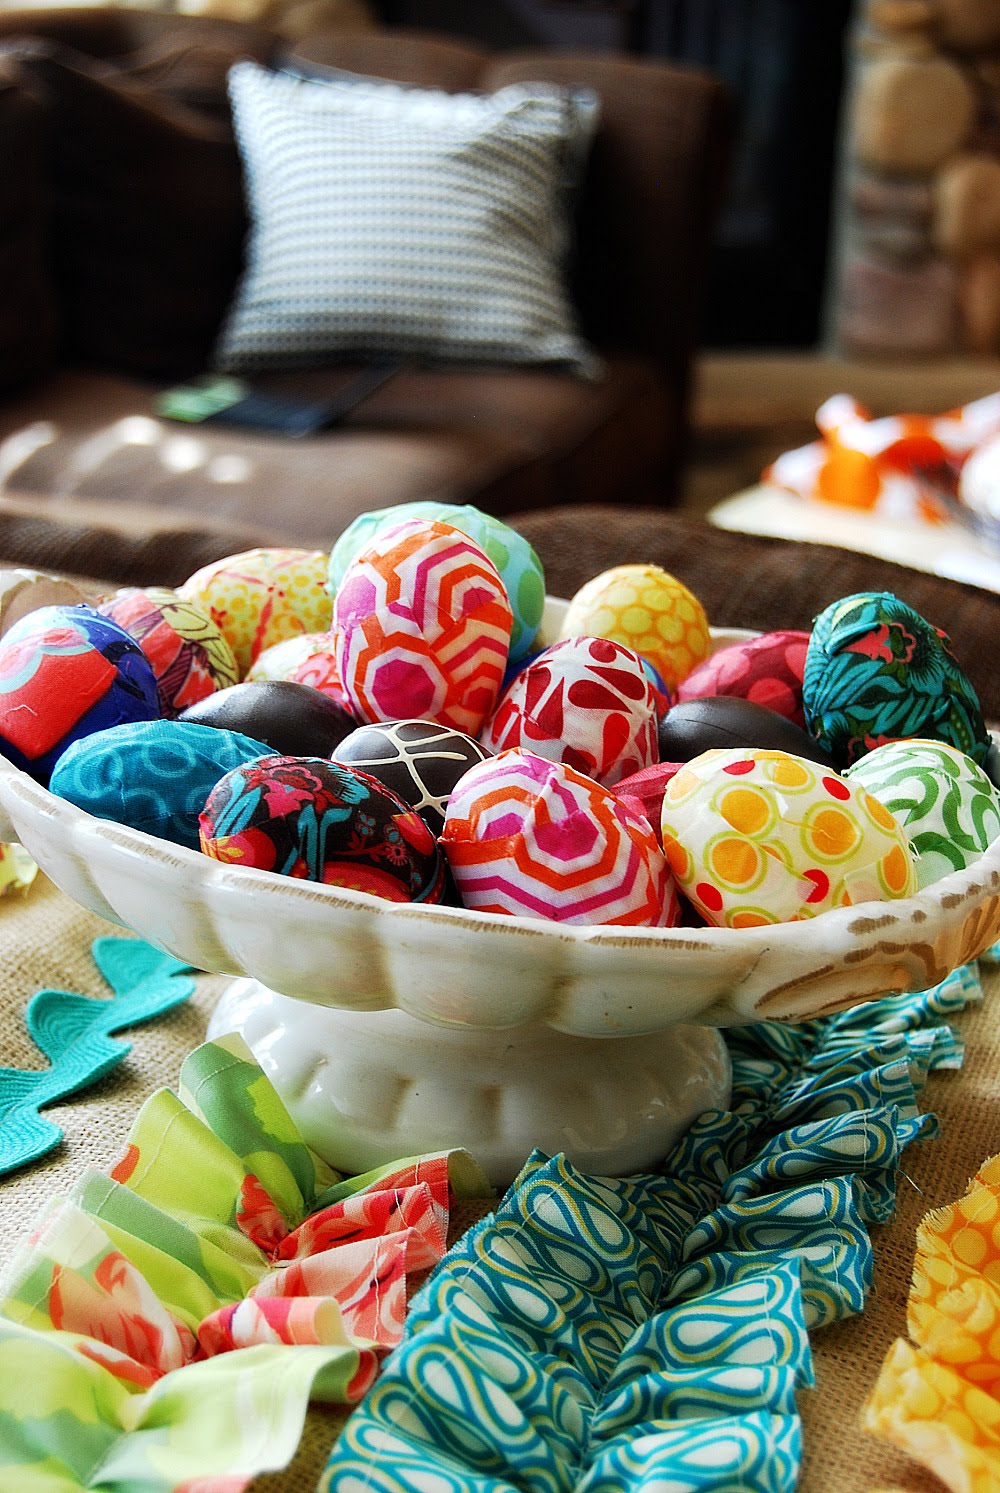
Now it’s time to make the ruffles. I made mine 3.5 inches in width. I double the length of each fat quarter — 36 inches. I cut each fat quarter into two 3.5 inch wide sections, then I sewed the two pieces together. Then I sewed around the edge of each fabric strip. This keeps the fabric from fraying too much. Once I sewed around each fabric strip, I then sewed a wider strip down the entire length of each strip — making sure to back stitch at one end and not the other. Then I took the exposed ends of thread and pulled, creating a ruffle. Then I took each ruffled strip over to the runner and fit it to the width of the runner — making the ruffles uniform. I did this for each fabric strip. For a 60 inch runner — I had 13 ruffles plus the two strips of big ric rac. I spaced each of the ruffles about 3/4 of an inch apart. Once all the fabric strips were ruffled, I laid them out on the runner and then pinned them in place. It takes a little bit of patience, because you might have to rearrange the spacing so that it is all uniform.

Then I sewed each of the ruffles onto the runner. Once the ruffles were sewn, I frayed the edges of each ruffle for a little interest.


And I was done!

Now I have a fun, ruffly runner to brighten up my kitchen! And, it matches my ruffly burlap banner!


I am linking up to these fabulous parties:


Thanks for coming over and have a Fantastic Day!
XOXO


This is beautiful! Love the ruffles and the colors are gorgeous! Another amazing project!
So cute. Jen…you have the CUTEST fabric ever!!!
~Amanda
So cute, cute, cute! I love those colorful ruffles on it!
Manuela
This is one of the cutest things EVER!
I am SO behind on blog reading, and this was such a nice "welcome back" present! Your colors and fabrics are gorgeous! Love it!
LOVE LOVE LOVE that runner!!
LOVE LOVE LOVE that runner!!
You do such cute things with burlap! It seems to be all the rage lately and I want to jump on the bandwagon – just wondering where you get your burlap – is that something you can buy at a fabric store? the local feed store? A special burlap store? Thanks! Mandy, http://www.craftedition.blogspot.com
Oh my gosh! So freakin' cute! I definately need to make the table runner. I am so excited! What a great idea!
Too cute! It is so fun and springy!!
~Morgan
Meet Virginia Crafts
Meet Virginia's Etsy Shop
Ahhh, this is one of my TOP favorite things you've done!! You should sell them for people like me who don't sew. :p
I'm a big fan of the ruffles. So pretty!
I love this, so cute!
I love it! It's so pretty!
R
Well, this is over my head…but I loved reading about it. Sewing involved…not possible for me. I read back through the posts, the wristlets are darling!
We brought mom home today. She has a lot of strength building to do, but she is so much happier at home. I'm sticking around here for a few weeks…should be able to get back a bit to blogging.
Sue
cute, cute, cute, love that table runner!!!
THAT IS SUCH A CHEERY LITTLE TABLE RUNNER!!!
I can totally see this idea in more than one way for a little girls room…you could go ruffle crazy!!!
GREAT JOB!!!
That is super cute–I love the fun bright ruffles against the rustic burlap!
what a pretty idea to cover a table..
this is TOO CUTE!!
Wow! Look at you go today with these cute Spring projects! So cute! And thanks again for featuring the Birthday Contest on your sidebar, I have had many submissions from your blog! 🙂
Kami
I LOVE your runner! adorable! Thanks for sharing…I am just LOVING all the burlap tutorials out there right now!
p.s. – I can't wait for my giveaway next week!
{Brittany}
Ca-ute runner!! Thanks!
This is just perfect for Spring. I just love all of the colorful fabric you used. I need to make a run to the fabric store for sure!
Chelsea
You must want to spend all your time in your living room! So fun and colorful. 🙂
i am sooo ready for spring! this just screams spring is here! (we had snow last night and we might have somemore this afternoon)
wonderful job!
You make it seem so easy, Jen! That runner is seriously one of the cutest things I've seen in a long time. I love it!♥
YOU are so adorable. 🙂 ty for this tutorial.
I'm falling in LOVE with burlap. 🙂
This is just so sweet and adds a lot of color! 🙂 Very spring like! I came over from Tip Junkie's "tip me tuesday" 🙂 Have a good week!!
This is darling!!
Stop over for my giveaway when you get a chance
Lovely Jen! Just like everything else you do 🙂 I love all the ideas that use scrap fabric – I knew I was saving it for something!