Tatertots and Jello

COLORFUL HAPPY HOME -- Daily DIY, Decor, Craft and Recipe Tutorial

  • My Home
    • 1905 Cottage
    • Daybreak House
  • DIY
    • DIY Projects and Ideas
    • Organizing
    • Tutorials
    • Printables
  • Decor
    • Spring Projects
    • Summer Projects
    • Fall Projects
  • Crafts
    • Kids Crafts
    • Painting Projects
    • Paper Projects
    • Sewing
    • Wreaths
  • Holidays
    • Valentines Day
    • Easter
    • Halloween
    • Thanksgiving
    • Christmas
    • HAPPY Holidays Series!
  • Recipes

Explore

  • my home
  • diy
  • decor
  • crafts
  • holiday
  • printables
  • recipes

Connect

Home » Wonderful Wednesdays: Boden-inspired Bracelet

Uncategorized · April 7, 2010

Wonderful Wednesdays: Boden-inspired Bracelet

Tatertots & Jello is a participant in the Amazon Services LLC Associates Program, an affiliate advertising program designed to provide a means for sites to earn advertising fees by advertising and linking to amazon.com.
 Welcome to the second Wonderful Wednesday, where I highlight a fantastic crafter. Today I would like to introduce you to the amazing  
Lei @ My Many Colored Days!
****

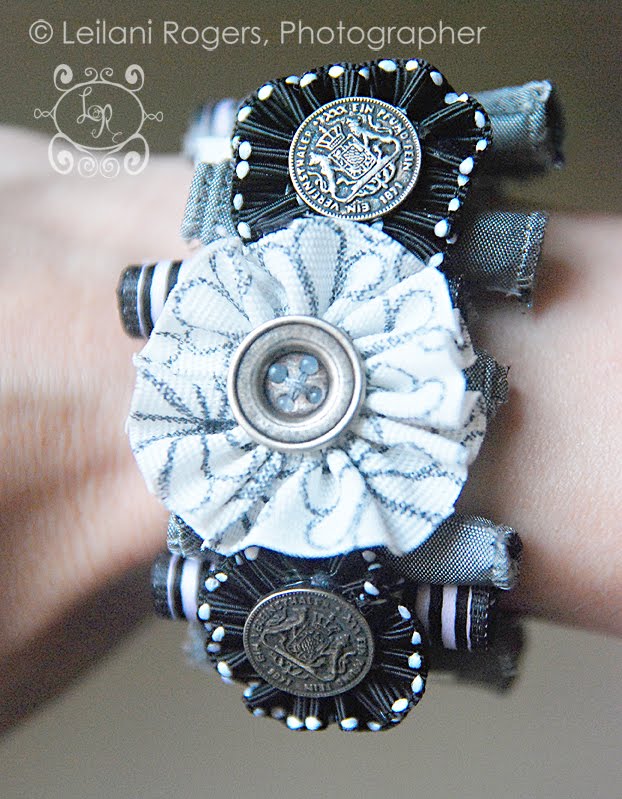
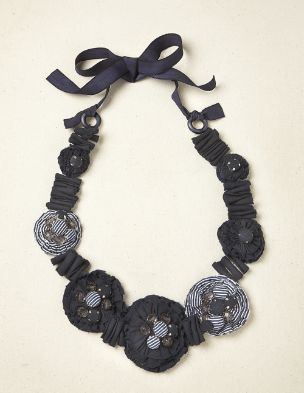
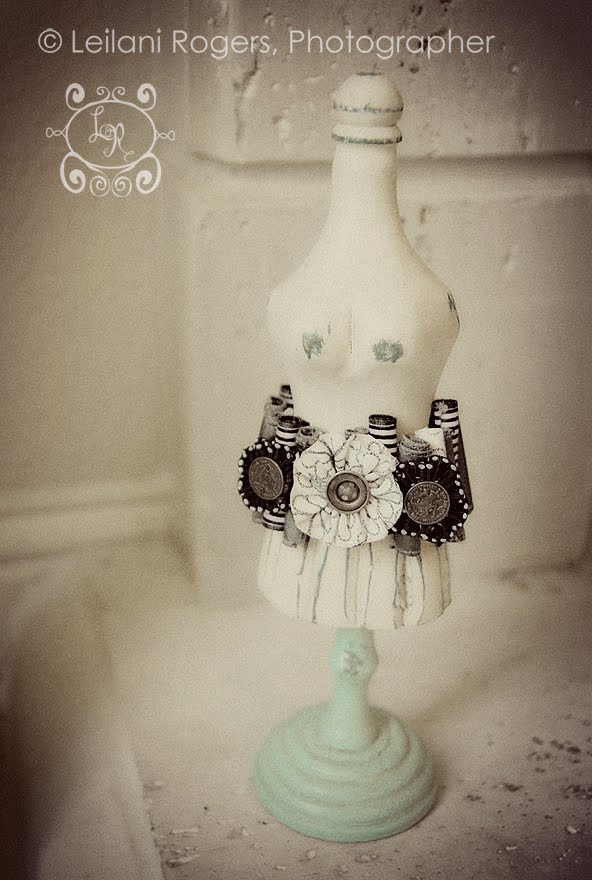
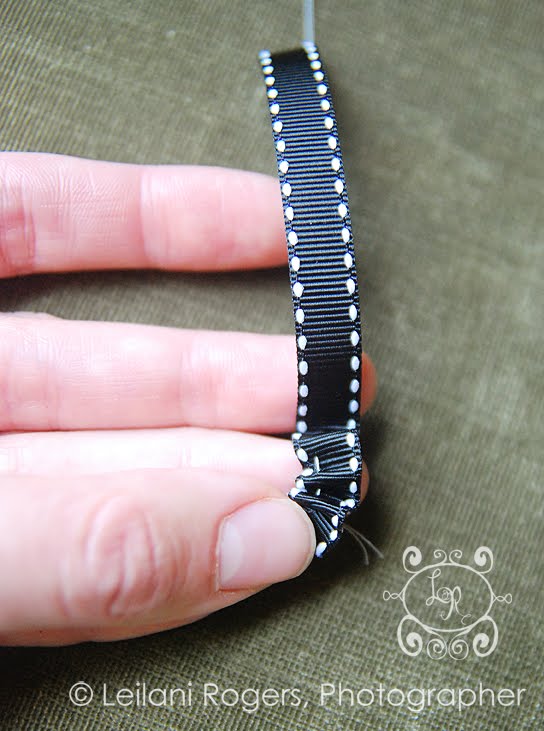
Hey there everybody!  My name is Lei.  I come from a land called My Many Colored Days.   I’m a mom to 4 colorful children and I live a wildly colorful life… I love running, reading, writing, mothering, creating, photographing, baking, teaching, yoga and playing the violin/viola.  Not all at once though –  haha!  I am really excited to be here at Jen’s place today sharing this fun tutorial with you.  Hope you have a ton of fun with it! My inspiration for this project came from a necklace I saw in the Boden USA catalog (photo below). Boden is a collection of clothing and accessories which I love… but is too pricey for me.  Since it was love at first sight with this necklace, I knew I needed to tried to try and recreate a likeness of it for myself  – but for much less money!

Here is how I switched it up and made it my own.  I went with a bracelet rather than a necklace, and mixed and matched the fabrics to make it a little funkier.  I loved the gray color scheme, so I stuck with that.  But I will definitely be trying this with some more colorful fabrics as well!  Heaven knows I love me some color.
Here’s what I used:
snippets of ribbon and fabric – for the tubes, about 2 in. long, and varying widths
needle/thread
hot glue
ribbon and fabric for the flowers, 8-10 in. long
buttons
chain link bracelet to attach the tubes to
And here is what I did.  First, I formed the tubes.  I rolled about 2 in. of both fabric and ribbon for mine.  
*Note: the fabric was easier to work with and the tubes came out a little cleaner.*  To secure the tubes I used hot glue.  (Fabric glue takes too long to dry.)  I suspect that Boden stitched their’s (you can sort of see a stitch in the center of their tubes).  But because I wanted a true tube I chose to hot glue mine.  If you go this route, do not hot glue right on the edge of your ribbon, leave a bit of a tail – like this:
And here’s why :  as you continue to roll the tube closed the glue will ooze outward giving you a more secure seal.  If you don’t leave a tail, the hot glue will leave a sloppy, goopy looking seal.
(Geez, is everyone’s hot glue gun as grody as mine is?  It is definitely not in picture form!  Lol.)
After I formed my tubes and decided which pattern I wanted them in, I formed the flowers.  Again, I used both ribbon and fabric for a more eclectic look.  I love the finished edge of ribbon for flowers and corsages.  But a ragged, shabby edge is fun too!  If you don’t know how to make these flowers, here is a quick review.  
Stitch along one side of the ribbon or flower, like so:
As you go, cinch the ribbon/fabric to form pleats or ruffles:
When your flower has reached the fullness you would like, stitch it closed to form a circle.  And voila, a flower.  Once the flowers were formed, I hot glued a button to the center of each of them (I made 3).  
The final step is to assemble the bracelet.  Again there are a few ways you could do this.  I happened to have a very plain and simple chain link bracelet that I never wear.  So I threaded my tubes together (staggering them a bit for fun) and attached the string of tubes to the bracelet… a few stitches every couple of links reinforced with a dab of more hot glue.  You could just thread them together and attach some kind of closure or make a ribbon tie like our original.  Since it’s kind of a chunky bracelet, I didn’t make the ribbon closure (even though I love it!).  I just thought it might be too much. 
Here is a photo of the back of my bracelet so you can get an idea of what I did:
You could also thread the flowers between the tubes.  I mounted mine on top of the tubes with, you guessed it, hot glue. 😀
And here is the finished product!

Aren’t those tubes cool lookin’?  I love them!  Many a fun project could be made using tubes… 😉

Thanks so much Jen for letting me share.  I love getting ideas from others as well!  So please stop by My Many Colored Days sometime and say hi so I can come see your fun projects as well!
Thanks so much for guest posting today Lei!  
GO over to Lei’s wonderful blog and give her some bloggy love!!!
Lei, feel free to take this button for sharing your tutorial with us!!!
XOXO

Tweet

Posted By: Jen · In: Uncategorized

Spring Project: Ruffled BURLAP Runner Tutorial!
Not Your Grandma’s Doilies: Doily Art

You’ll Also Love

Good Witch Tea Party Ideas{Good} Witch Tea Party!! [and free Halloween Printables]
Favorite S'More ideas and Lighting!Favorite Things of the Week: Light Fixtures & S’mores Parties!
tatertots and jello favorite things of the week - projects, craft tools and people I love to followFavorite Things of the Week: My Favorite Craft Tools & More!

Comments

  1. Vivienne says

    April 9, 2010 at 5:06 PM

    OHMYGOSH! This is adorable! TFS

  2. Susan says

    April 8, 2010 at 3:11 PM

    That is just the cutest darn thing. I love it! Not sure I'm brave enough to try it.

  3. brown paper packages says

    April 8, 2010 at 1:20 PM

    love it, lei!! fantastic job, as always!

  4. michelle b @ every little thing says

    April 8, 2010 at 5:32 AM

    cool looks simple enough!
    i would love for you to feature my striped bias cut ruffle collar dress tutorial…!
    and unrelated, but i would love if you could stop by my blog and help me name my charming girlie-sofa!! a little gift for the perfect namer too!! 🙂

    http://missbblogs.blogspot.com/2010/04/new-girl-in-town_06.html

  5. [email protected] Beautiful says

    April 8, 2010 at 5:18 AM

    I love it…what a cool idea! Thanks for sharing it with us Lei.

    ~Amanda

  6. Kristi says

    April 7, 2010 at 9:55 PM

    These are just so pretty! I am not a jewelry 'person' (as in I only wear my wedding band & engagement ring everyday) but these are lovely to look at….and they might tempt me into wearing one 😉

  7. Stacey @ The Blessed Nest says

    April 7, 2010 at 9:29 PM

    Super cute & super fun!! Great project :)!
    Blessings,
    Stacey

  8. Fleur de Bee says

    April 7, 2010 at 8:14 PM

    I darling Jenn! How DARLING is this! I am so going to make one…Shabby Chic style of course! I'll post it when done!

    xo Molly

  9. Megan says

    April 7, 2010 at 8:10 PM

    oh lots of fun! 🙂

  10. FleaMarketTrixie says

    April 7, 2010 at 7:41 PM

    cute, love it!

  11. jennykate77 says

    April 7, 2010 at 6:20 PM

    OHmyGeez! All these adorable bracelets! I just can't stand it. I sorta think I might could…maybe…pull this one off. She's just using a needle and thread, surely I could use a needle and thread. I definitely know my way around a hot glue gun, so there is a shimmer of hope. 🙂

  12. KRISTINA CIPOLLA PHOTOGRAPHY says

    April 7, 2010 at 5:51 PM

    LOVE the tubes! Very cool texture and awesome fabrics! The whole thing looks chunky…which is my FAV! 🙂 Great design! Thanks for sharing!

  13. Denissa says

    April 7, 2010 at 5:09 PM

    OOOOH!! LOVE it! And even more b/c I don't need a sewing machine!! lol 🙂

  14. Andrea says

    April 7, 2010 at 4:02 PM

    That is VERY pretty! Nice tutorial!

  15. Krissy says

    April 7, 2010 at 3:16 PM

    That bracelet is so lovely, thanks for sharing it and the tutorial.

  16. [email protected] says

    April 7, 2010 at 3:08 PM

    I love that you share such great talent with us all!! I love stopping by and seeing what great craft you have found to show! Love this!

    Hugs,
    Victoria

  17. jenjen says

    April 7, 2010 at 2:26 PM

    I just fixed the link to her blog. So feel free to go over and say hi to Lei!

    XOXO
    Jen

  18. Yvonne says

    April 7, 2010 at 2:14 PM

    I love it.

    Thanks, lei.

  19. Flutterby says

    April 7, 2010 at 2:07 PM

    Fun project! Just so you know, the link to Lei's site is misspelled (blgospot) so it doesn't take you there. Love the bracelet!

  20. Jingle says

    April 7, 2010 at 1:16 PM

    This is amazing! I love the tubes! So neat!!!

  21. Lei says

    April 7, 2010 at 12:49 PM

    Thanks Jen! It was my pleasure. What's a great idea if you can't share it with others? You know what I'm talkin' about! I have some praise for you on my blog today. 🙂

  22. Stephanie @ Minutes to Spare says

    April 7, 2010 at 12:19 PM

    I am not one for big chunky jewelry, but this I have got to make. Love it.

  23. Kelli @ RTSM says

    April 7, 2010 at 11:59 AM

    Very cute! I love the buttons!

  24. Jennifer says

    April 7, 2010 at 11:46 AM

    Wow…love it!!!

  25. amrita says

    April 7, 2010 at 11:26 AM

    BELLISSIMO!GRAZIE!

Hi! I'm Jen Hadfield. I'm a mom of 5 restoring an 1891 home in the heart of Salt Lake City. I love being creative and sharing simple ideas to make your life easier and more beautiful!

Receive the Latest Crafts, DIY, Recipes and More in your INBOX!

Follow us on Pinterest! It's awesome!

Top Posts & Pages

Copycat Panera Spinach and Artichoke Egg Soufflés - SO good!
DIY Black Painted Window Frames
How to Change a Recessed Can Light into a Pendant Light with No Remodeling!
DIY Secret: How to Print on Post-It Notes (and Free Printable Template)
12 Must-Have Items to Pack on an Alaskan Cruise!
How to Make a Simple Garden Planter Box


Popular Posts

  • Copycat Panera Spinach and Artichoke Egg Soufflés - SO good!
    Copycat Panera Spinach and Artichoke Egg Soufflés - SO good!
  • DIY Black Painted Window Frames
    DIY Black Painted Window Frames
  • How to Change a Recessed Can Light into a Pendant Light with No Remodeling!
    How to Change a Recessed Can Light into a Pendant Light with No Remodeling!
  • DIY Secret: How to Print on Post-It Notes (and Free Printable Template)
    DIY Secret: How to Print on Post-It Notes (and Free Printable Template)
  • 12 Must-Have Items to Pack on an Alaskan Cruise!
    12 Must-Have Items to Pack on an Alaskan Cruise!
  • How to Make a Simple Garden Planter Box
    How to Make a Simple Garden Planter Box
  • Spruce up Your Outdoor Space with a DIY Recirculating Fountain! (tutorial)
    Spruce up Your Outdoor Space with a DIY Recirculating Fountain! (tutorial)

As seen in


Amazon Affiliate

Tatertots & Jello is a participant in the Amazon Services LLC Associates Program, an affiliate advertising program designed to provide a means for sites to earn advertising fees by advertising and linking to amazon.com.
  • About Me
  • Advertising
  • Get Featured

Copyright © 2023 Tatertots and Jello · Privacy
This site is a place for positive discussion and ideas. Negative talk, comments that disparage others, and similar are not welcome and may be removed.