Tatertots and Jello

COLORFUL HAPPY HOME -- Daily DIY, Decor, Craft and Recipe Tutorial

  • My Home
    • 1905 Cottage
    • Daybreak House
  • DIY
    • DIY Projects and Ideas
    • Organizing
    • Tutorials
    • Printables
  • Decor
    • Spring Projects
    • Summer Projects
    • Fall Projects
  • Crafts
    • Kids Crafts
    • Painting Projects
    • Paper Projects
    • Sewing
    • Wreaths
  • Holidays
    • Valentines Day
    • Easter
    • Halloween
    • Thanksgiving
    • Christmas
    • HAPPY Holidays Series!
  • Recipes

Explore

  • my home
  • diy
  • decor
  • crafts
  • holiday
  • printables
  • recipes

Connect

Home » diy » Instagram Magnetic Bookmark Valentines (with free printables)

diy, free printables, gift ideas, guest tutorials, holiday, tutorial, valentines day · February 5, 2013

Instagram Magnetic Bookmark Valentines (with free printables)

Tatertots & Jello is a participant in the Amazon Services LLC Associates Program, an affiliate advertising program designed to provide a means for sites to earn advertising fees by advertising and linking to amazon.com.
Love this magnetic instagram bookmark!
Hi everyone! I am beyond thrilled to be a here on Tatertots and Jello today.

My name is Kara and I blog over at Happy Go Lucky.  I’m a 6th grade reading teacher, Navy wife and mother to a very energetic 4 year old.  I love sharing easy and inexpensive craft ideas, DIY projects and activities the entire family can enjoy.


Today I’m going to share an easy Valentine gift – Instagram Magnetic Bookmarks!

I love these bookmarks for two reasons:

Instagram is AMAZING!  It makes all my pictures look so much better and helps me feel like I’m actually a good photographer:)

And I love giving personalized gifts!

Want to make a few with me?

You will only need 5 things:

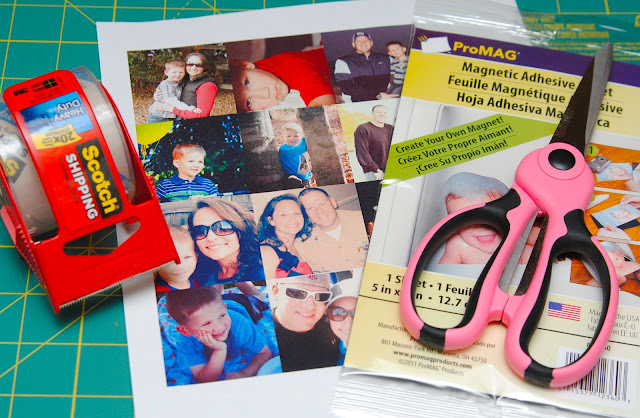
  • Instagram photos printed 2 inches by 2 inches (they don’t have to be Instagram pictures)
  • adhesive magnet sheets
  • scissors
  • packing tape
  • Printable Valentine bookmark holder (download HERE)

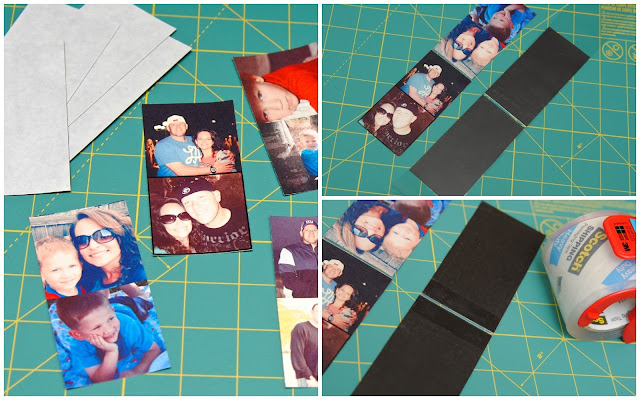
Step 1:  Cut out your pictures.  I cut mine in strips of two.

Step 2:  Cut magnet sheets into 2 inch by 4 inch strips.  Remove paper from magnet sheets and adhere your pictures to the magnet sheets.

Step 3:  Place a piece of packing tape sticky side up and lay one strip of pictures so that the tape covers the pictures not the magnet.  Then lay your other strip of pictures on the same piece of tape so that the images are facing the opposite direction.  Make sure you leave a small space between the two strips for the fold.

Step 4:  Place a small piece of tape on the inside of the fold of the bookmark (magnet side).

Step 5:  Now fold and admire your fun bookmark.  I promise it will make you smile every time you see it.  I use it as a bookmark in my planner and I can’t help but smile every time I open it up.

My son will be giving one to both his grandmothers this year and I also made one for my hubby.  

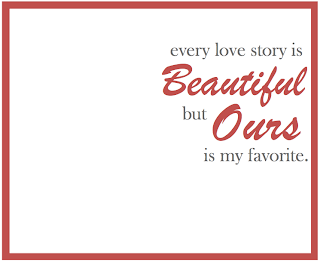
And since I love creating fun little printables, feel free to download the bookmark holders HERE to attach your bookmarks to if you want to give them as gifts.

I hope I’ve inspired you to make your own magnetic bookmarks.  I would love for you to visit me at Happy Go Lucky and share any bookmarks you make that are inspired by this tutorial.

Thank you Jen for having me today!  It is truly an honor to be your guest.


Kara – those bookmarks are SO fun!! 
I love Instagram and I can’t wait to make some of those!! 
Here are some awesome ideas from Happy Go Lucky:
Peanut Butter Oreo Cheesecake Truffles
Old Plastic Bin Turned Into Jute Wrapped Toy Bin
Weekly Meal Planner and Printable
Make a DIY Monogram for your iPhone
Be sure to head over to Happy Go Lucky and give Kara a big TT&J hello!!! 
Have a Happy Day!! 
xoxo
PS — I am working on a BUNCH of big DIY projects this week. 
I can’t wait to share them with you!!! 


Creating with the Stars

And, entries just opened up for Creating With The Stars at East Coast Creative. 

There are tons of awesome prizes to win! 
Head over and find out how YOU can join in the fun!! 

Posted By: Jen · In: diy, free printables, gift ideas, guest tutorials, holiday, tutorial, valentines day

Printable Valentine Bingo Cards AND Matching Printable Bag Toppers!
Sprinkled With Love Valentine’s Day Breakfast Printables!

You’ll Also Love

Last-Minute Valentine’s Day Ideas
Tissue Paper Valentine Tree Centerpiece. Use inexpensive sheets of tissue paper to create a sweet valentine tree for a centerpiece of focal point!Tissue Paper Valentine Tree Centerpiece
Valentine’s Day Decorating Ideas

Comments

  1. 邓州吧 says

    August 8, 2013 at 1:33 PM

    Its such as you read my thoughts! You appear to grasp a lot about this,
    like you wrote the guide in it or something. I believe that you simply could do with
    some percent to force the message home a bit, however other than that, this is wonderful blog.
    A fantastic read. I will certainly be back.

  2. Jen says

    February 6, 2013 at 12:18 AM

    Thanks for guest posting, Kara. I love your idea. SO fun!!

    xoxo

    • Kara Harvey says

      February 6, 2013 at 4:23 AM

      Thanks for having me as your guest! You and your awesome readers rock!!!

  3. mom2maddie99 says

    February 5, 2013 at 11:45 AM

    I love this idea… I better get started on making them soon. Those truffles look amazing too!! I think I saw a Valentine’s Day t-shirt you made on Pinterest the other day… I am adding that to my “must make now” list.

  4. Angelina Fracchiolla says

    February 5, 2013 at 10:16 AM

    What a great idea!!! This would be a great gift for the Grandparents 😉
    Thank you so much for sharing.
    xo
    Angelina

  5. laura b says

    February 5, 2013 at 9:39 AM

    These are super cute and look easy. I think I’m going to make a few for my loved ones. Thanks for sharing!

Hi! I'm Jen Hadfield. I'm a mom of 5 restoring an 1891 home in the heart of Salt Lake City. I love being creative and sharing simple ideas to make your life easier and more beautiful!

Receive the Latest Crafts, DIY, Recipes and More in your INBOX!

Follow us on Pinterest! It's awesome!

Top Posts & Pages

Copycat Panera Spinach and Artichoke Egg Soufflés - SO good!
Kids Outdoor Easter Scavenger Hunt - with printable clues!
Spruce up Your Outdoor Space with a DIY Recirculating Fountain! (tutorial)
DIY Black Painted Window Frames
DIY Secret: How to Print on Post-It Notes (and Free Printable Template)
How to Change a Recessed Can Light into a Pendant Light with No Remodeling!


Popular Posts

  • Copycat Panera Spinach and Artichoke Egg Soufflés - SO good!
    Copycat Panera Spinach and Artichoke Egg Soufflés - SO good!
  • Kids Outdoor Easter Scavenger Hunt - with printable clues!
    Kids Outdoor Easter Scavenger Hunt - with printable clues!
  • Spruce up Your Outdoor Space with a DIY Recirculating Fountain! (tutorial)
    Spruce up Your Outdoor Space with a DIY Recirculating Fountain! (tutorial)
  • DIY Black Painted Window Frames
    DIY Black Painted Window Frames
  • DIY Secret: How to Print on Post-It Notes (and Free Printable Template)
    DIY Secret: How to Print on Post-It Notes (and Free Printable Template)
  • How to Change a Recessed Can Light into a Pendant Light with No Remodeling!
    How to Change a Recessed Can Light into a Pendant Light with No Remodeling!
  • How to Make a Simple Garden Planter Box
    How to Make a Simple Garden Planter Box

As seen in


Amazon Affiliate

Tatertots & Jello is a participant in the Amazon Services LLC Associates Program, an affiliate advertising program designed to provide a means for sites to earn advertising fees by advertising and linking to amazon.com.
  • About Me
  • Advertising
  • Get Featured

Copyright © 2023 Tatertots and Jello · Privacy
This site is a place for positive discussion and ideas. Negative talk, comments that disparage others, and similar are not welcome and may be removed.