
This month Lowe’s challenged their Creative Network to make something beautiful and functional in our outdoor space.
This was a great challenge. I enjoy indoor projects more than outdoor ones for some reason. So this month’s challenge really made me put my thinking cap on.

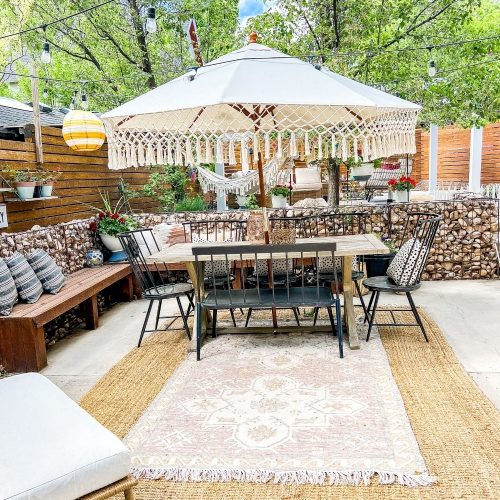
I was inspired by the FOUR old closet doors that were sitting in my garage. I recently switched out the closet doors in my daughter’s room and in the new guest room. Instead of sliding doors, I installed two doors that can be opened wide. It’s great for being able to utilize the most out of closets possible. But then I had four old closet doors sitting in my garage. I really didn’t want to throw them away. So decided to make them into an Outdoor Privacy Screen. This screen can have many uses. You might need a little privacy from your neighbors. Or you might have something by your patio or porch that is a little unsightly — like a power box, water meter, etc. Or maybe your patio faces a street.

I also bought a Tile Saw!!! Yay!! I had a great time cutting tiles for this project. Here’s a tip I discovered — if you are going to cut subway tiles, cut them with the wrong side facing up. Otherwise the smaller side of the tile you are cutting will get a little chip on the side. I have a BIG tiling project coming up in August, and I wanted to experiment and see if I could figure out how to cut the tiles. It turns out that it’s much easier than I thought. And check out my new safety goggles — I am rocking the DIY. LOL!!

I think it’s a great to start with a smaller job first and get experience before tackling a really complex project.

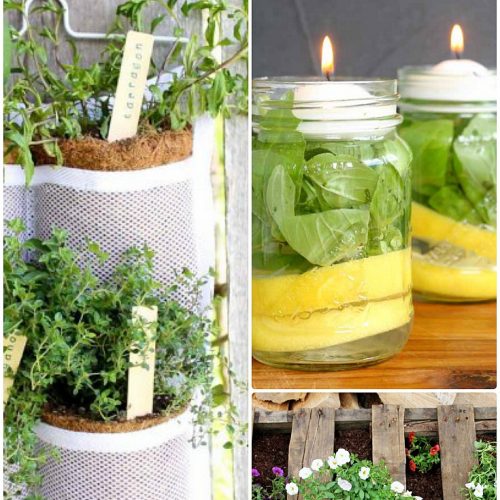
Here’s what I did to make the Subway Tile Planter Boxes:

- I handmade these planter boxes and a tutorial on how to make them yourself is coming up. It will save you all kinds of money!!
- Lay the tiles in the space you are looking to tile. I centered my tile and then had to cut tiles for both sides. You will need to insert some spacers too.
- Then cut the tiles to fit within the space. There are some wax pencils you can buy at Lowe’s for your tiling projects.
- The next thing I did was I took the tile from the planter opening and laid it out on my patio table.
- Then I spread on the adhesive with the trowel and then laid the tile right on top of it.
- Make sure to press down on the adhesive.
- Once the adhesive is dry, then it’s time to grout!!
- I used a sandy grout and I discovered that I love the smooth finished grout better.
- To apply the grout you use a grout float. This is a tool that kind of “smushes” the grout into the spaces around the tiles.
- Let the grout set overnight and then clean it off with the big sponge.


To make the Privacy Screen:

- Take the doors and add hinges to connect the doors.

- Then if you want to hang flowers on the doors, buy a couple of shelf brackets and screw them into the door. My doors are hollow, so I bought extra-long screws that go all the way through the door with washers on the other side. I wanted to be sure that the brackets would hold up the flower baskets.

- The last thing you might want to do is screw the planters onto the front of the screen. And of course, plant some pretty flowers in your planter boxes.
**Note — if you don’t have old doors sitting around, you can put an ad on Freecycle for someone elses old doors. I have put ads on there and got all kinds of great things for FREE. Like my chandelier in my Board & Batten bathroom. It’s a great resource!!

So there you have it. You can take something old and make it into something new with a new purpose.
I was thinking about painting each door a different color. What do you think?? I can’t decide. And if you are looking for more planter box ideas, Kate @ Centsational Girl has made some beautiful ones on her blog. And another fun idea to do with old doors can be found from Stacy at Not Just a Housewife.

Also, I have a part 2 to this project that will be coming up in July AND a $100 Lowe’s gift card giveaway. So stay tuned for that!! And be sure to check out the Lowe’s Creative Ideas Magazine.

Have a Terrific Day!
xoxo
PS — I’m linking up to:
Amanda’s Weekend Bloggy Reading Party – come check it out!!


How did u make the planter boxes?
Did you use mastic or thin-set to place your tiles? I ask because the adhesive container looks similar to the mastic that I just used for my kitchen backsplash. Be careful about leaving our planters outside and exposing them to the elements…mastic will reabsorb water and the tiles will pop off after a while. You’re supposed to use thin-set in applications where tiles will be exposed to water. Might be worth a note in your post to clarify!
Have you ever posted a tutorial on making these planter boxes? I would so love to make these for my front porch this spring. They are so beautiful! Especially after I priced out pre-made planter boxes today, yikes!
I love your idea.. maybe ill try one and i wish i can do just like yours…
There are a great deal of things to contemplate ahead of getting one particular. One of the factors to think about is the variety of supplies to use for your outdoor screens.
Designer Screens
I love this Project and am going to use doors as a privacy screen also. I would like to build my own planter boxes, but cannot locate your instructions for that. Can you give me the link?
Thank you
I’m interested in knowing this as well.. 🙂
I want to know too!
i’m going to do the same project – use old doors to make a privacy screen for outside. 1 question – what kind of sealer did you put on the doors so they will hold up to the elements, hot sun, rain, etc….i don’t want my doors to warp or rot or fall apart if i do this project.
Another good question… I am interested in knowing this as well! 🙂
Jen, I love this project and am especially digging those black hinges on your white doors. Nice choice. 🙂
I love this! I love that they are all white. It is stunning. And I never would have thought to put tile on a planter box. Genius!!!
Aw – thanks my friend!! I am still so in love with your colorful doors. Such a beautiful idea!!!
xoxoxo
This is gorgeous! the curly shelf bracket and elegant hinges really make those doors sing. So cute and practical – I could see using this all kinds of ways!
LOL – me too Jessica. It’s sad!!
xoxox
I love this! I even have some old doors. 🙂
Marcie @ IGottaTryThat.com
marcie – let me know if you make one, I would love to see it and feature it!!
xoxxo
Love, love, love it! I have two doors in my garage…hmmm.
I noticed you DIY in your pretty clothes…I do the same thing…can’t tell you how many outfits I have ruined!
Great idea, I super love it! One real question….do you seriously look that cute in a matchy-matchy outfit when you are doing diy projects…I look like hud.
Awesome and you are a cutie! 🙂
Nat 🙂
doodlecraft.blogspot
LOL!!! I am lazy and forget to change a lot of the time. I get so into a project. I was considering putting on an apron but didn’t. hahahaa! The other half of time I am in my yoga paints with no shower and looking terrible.
xoxoxo
WOW! These are so creative and simple, I’m surprised I haven’t seen more subway tiled planter boxers. I’m usually a silent reader of your blog, but I just had to comment on these.
Oh thanks so much for commenting!! I love subway tile. I really wanted to learn how to cut tile and make some projects with it. Thanks so much for stopping by!!
Great Idea and your model is adorable!
Thanks Kimberly!! The flowers make that space so much prettier now 🙂
xoxo
Wow Jen, just incredible! Your creativity never ceases to amaze me, what a fresh and fabulous corner of your yard and repurposing at its best! Thanks for the shout out sweet friend!
Kate
Thanks Kate!! I loved your planter ideas. You are amazing!!
xox
What a cute little space! Love it Jen, you’re so handy 🙂
http://www.mygirlishwhims.com
Thanks Rebecca. It was so fun using the tile saw. I am working on another project with it right now. It’s one of my favorite power tools so far!
xoxoxo