Thanks, Jen for having me over. I’m so glad to be here. For those of you who don’t know me, I’m a fun-loving creative gal. When I’m not teaching this is pretty much what you can find me doing. I have clock business on the side, hence my blog name, memorable minutes, but enough about that for right now..
Okay, this has been sooooo hard. I mean what do you “guest post” at Tatertots and Jello? Tatertots & Jello! I mean, Jen has like thousands of readers. I have like 25. Not that I’m complaining at all. But it’s like going out there into the major leagues. I mean you guys are big timers. What if you see my idea and you’re like, “ha, no kidding, we knew that!!!”
Well, I had to tune all of that out. It was literally making this so hard. I mean my friends ask me to make them stuff all the time, so I must be good at something…so I went with something I was going to be in need of. Something for the beach.
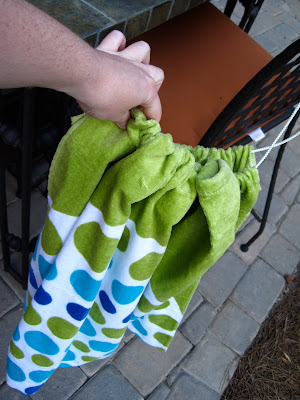
How about a towel that has a little pocket across the top to hook across the top of the beach/lounge chair?
That way you don’t have to constantly keep readjusting your towel throughout the day and pulling it up? I’m talking something like this:
Personally, I had never seen this until a friend of ours was at our pool on Father’s day and had one. I scoffed and was like, I can make that!
Now, for all of you sewers out there, you will immediately see how this project can be improved upon. For all you non-sewers – WELCOME my friends! I didn’t sew a single stitch. There I said it. For those of you who want to click to another page I understand. Still with me? Wow. Ok well, I’ll go ahead and let it out that I didn’t measure either. Go ahead, I can’t watch.
Wow, okay so some of you are still reading, be still my heart. Well, then here we go.
Here’s what you need:
a beach towel, or 2
scissors
iron
ironing board (that’s right people that’s a counter top one and it’s the very first one I’ve owned, have you lost all respect?! – I’m a big fan of take it out of the dryer and shake shake shake!)
Steam-A-Seam
Velcro (optional)
*sunglasses (totally optional, but they get you in the mood)
I did take my towel outside to the lounge chair. I put it on it, an I sat on it making sure I had enough pulled up over the top of the chair. I had this to look at, so it wasn’t bad inspiration.
I didn’t even have any pins or safety pins with me because I’ll confess, it’s not my pool. I’m staying at a friend’s housesitting. Fortunately, I had just received a package from the Pleated Poppy and there were a few safety pins in there. Literally, I am talking three. So I used one on each side (the two sides and the top) to pin the towel, just so I did have some type of marking. Then I came inside and got to work with my Steam-A-Seam. I just followed the directions for that (and yes, I’m even ashamed to admit that it was my first time working with it).
And TA-DA! I’ll be honest, I was impressed with myself, even though it’s like a very simple thing!
And even after this, I questioned its adequacy for Tatertots & Jello – so just for you I took another towel and folded it in half. I took the pieces across each top and created a hem (again with the Steam-A-Seam) leaving room to wiggle a rope cord through. I then also closed up the sides almost like a pillowcase. Thus, we have a drawstring bag made out of a towel.
1. It’s a big bag – it can hold the towel we made plus many others. 2. It matches! 3. and this was truly most important for me – when you open it completely and lay it on the bottom half of the chair it is multifunctional. It served as a bag, coming and going, and while there, it provides a place for your feet (I’m a freckle-faced, redhead so as much as I love the sun, it doesn’t love me, and I wind up having to stay covered). Plus it’s nice little bonus to tuck your cell phone or whatever else, so it’s not in the blaring sun!
Now my live & learn
– yes, it’d be better to sew. or top stitch. or I even wonder about stitch witchery vs. steam-a-seam
-i’d also use bigger cording for the drawstring, and I probably will replace it.
Hope you enjoyed this and I hope you’ll stop by my own blog sometime and create some memorable minutes of your own! Have a super weekend!
Thanks Sydney! What a cool idea – a perfect Summer project! Here’s a button for sharing the tutorial with us.
and here are a few other great ideas that I love from Sydney’s blog. Be sure to check it out!
Happy Friday!
XOXO
PS – Get your projects ready — the Weekend Wrap Up Party starts tonight at 8 PM {MST}. See you then!





That was an awesome tutorial. I can't wait to do this! Thanks so much for having her here!
How cute!
Cute and fun feature, you always have some great ones! Thanks for sharing! Have a great day Jen! Hugs, Jen
Very cute project. 🙂 I love the colors in that beach towel!
How adorable! I love the fish. 🙂
Thanks again for letting me share, Jen. I had so much fun!
🙂 Sydney
This is adorable and a great idea!
Very cute!
This is such a great idea! I hate when my towel slides down on the chair, so I really think I need one of these:)
Great ideas Sydney. I like how simple these are especially since I don't own a sewing machine. I also really enjoyed your writing style. Very funny. So I will for sure be visiting.
Hi Jen, Hope you are enjoying the summer. I wanted to comment on the towel. I saw these for the first time this year and my first thought was I can make that. Well I bought 2 towels at walmart for $5 each then I was in Kohls one day and found some already made at a 50% off. So for $12 I got one that was bigger, fit over the back and all the way to the end with a pocket on the side for stuff. So check out your local Kohls for those sales.
Pam