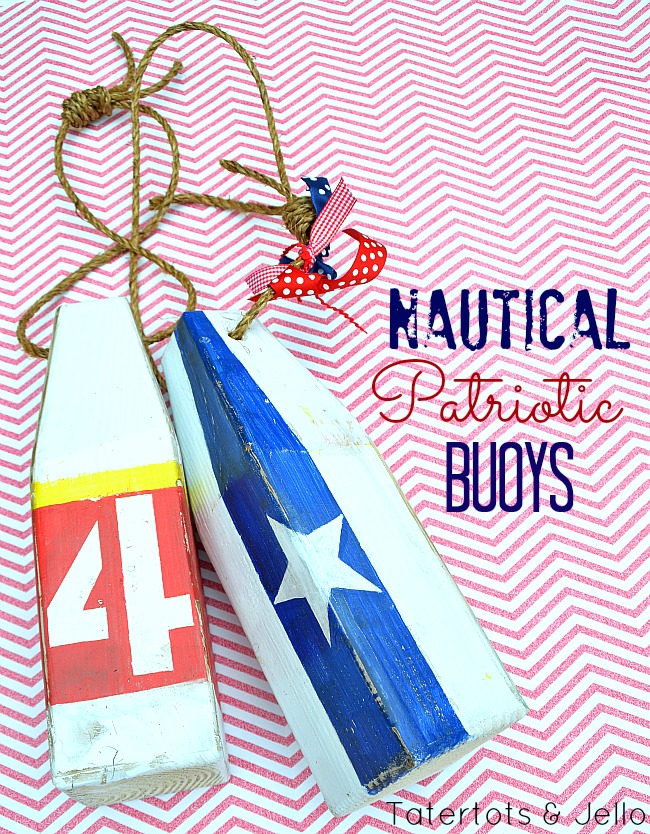
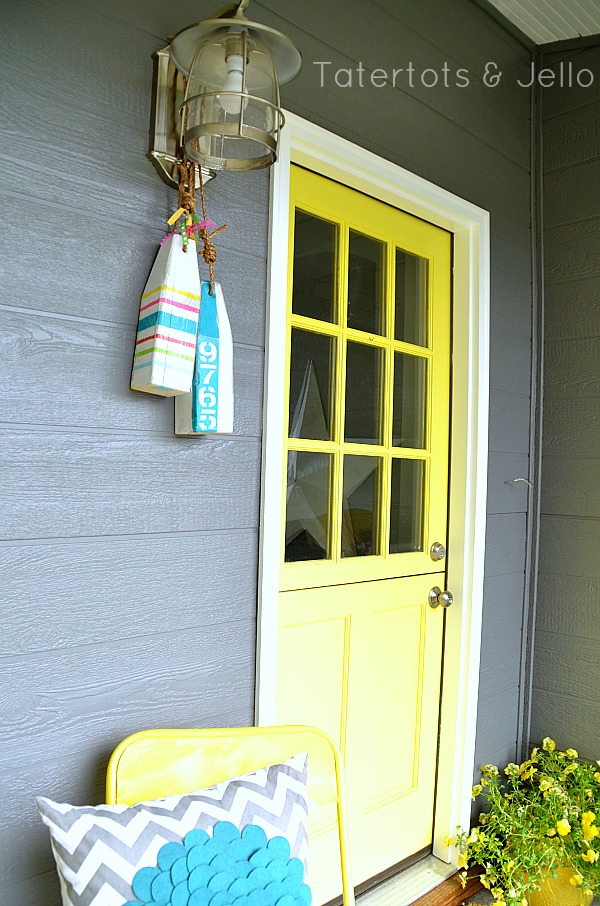
I have been a bit obsessed with ANYTHING nautical lately.
It’s so bright and cheerful-looking.
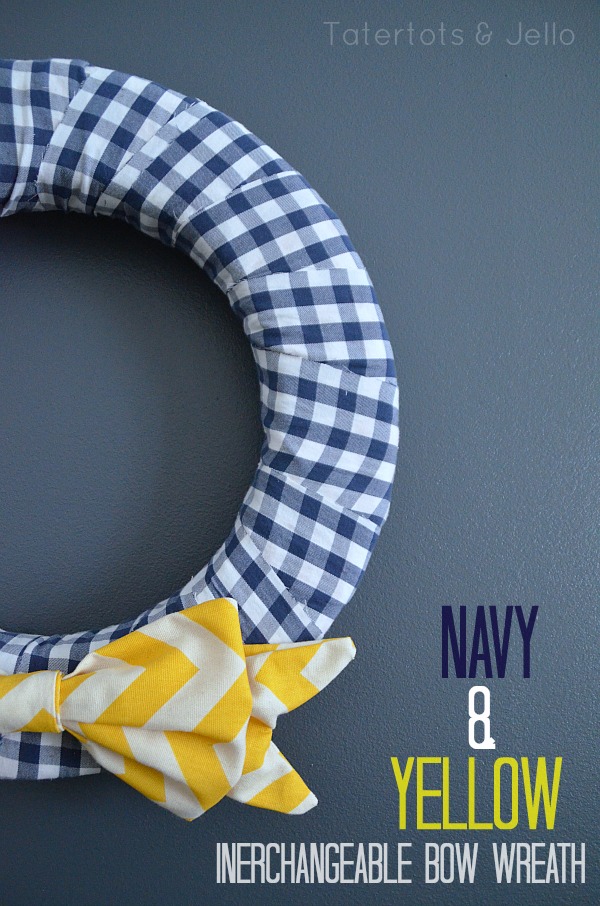
I made a Navy and Yellow Wreath.
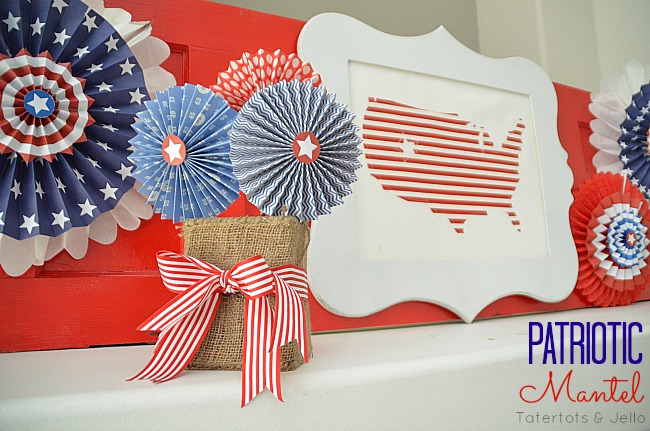
A Nautical Fourth of July Mantel.
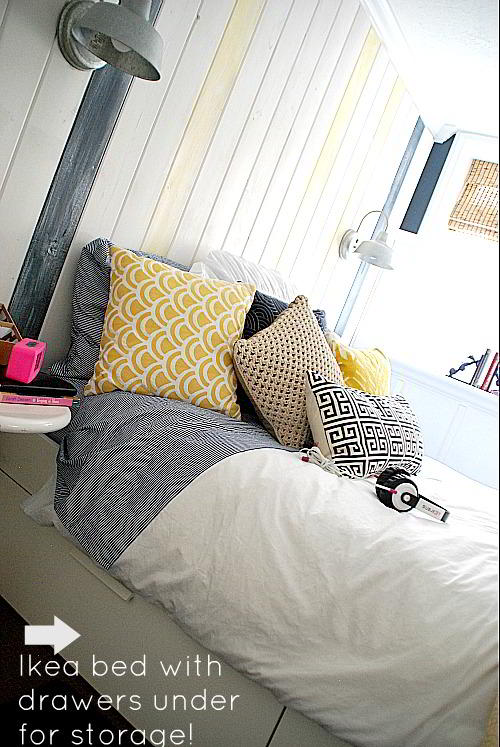
And recreated a dark basement bedroom into a Bright Nautical Teen Bedroom.
I thought it would be fun to make some decorative buoys – which seem SO nautical.

It also turns out – the buoys are easier to make than you’d think!
Here’s what I did:
- Run to the hardware store and pick up a length of 4×4 pine. DON’T get the pressure-treated stuff. You don’t need it and it’s kind of nasty unless you really need it — hard to cut and full of chemicals.
- I picked out an 8-foot length — look for straight boards with few splits. They should be about 10 dollars.
- I then had the helpful guy in the lumber department use his big table saw to cut me 4 one-foot pieces from the eight-foot length, leaving four feet for another project. Why four pieces? Well, that way I could have safely messed up and still had spares.
- (Remember that a 4×4 is actually closer to about 3 1/2 inches by 3 1/2 inches square. It’s a hardware thing. Weird.)
Once you get the one-foot lengths home, you’ll want to follow these directions to shape the rectangular pieces into a buoy shape.
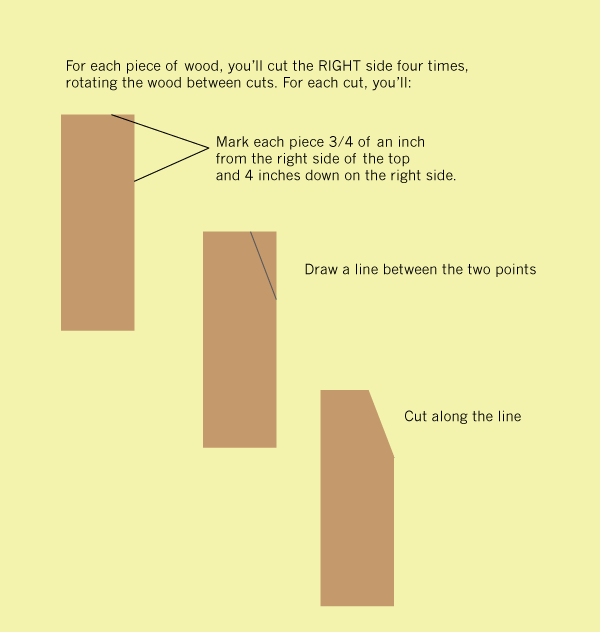
- Isn’t that a helpful diagram? We used our big sliding chop saw (compound miter saw) to cut these. The blade and saw were just barely big enough to cut the board. You could use a table saw as well.
- What we found worked best is in the diagram above. Mark and cut only the right side of the board. Then flip the board 180 degrees so you can mark and cut the side directly opposite.
- You’ll then have a buoy that tapers in only 2 of the 4 sides. Rotate the board 90 degrees and mark again, cutting the right side — then 180 degrees again. Mark and cut and you’re done.
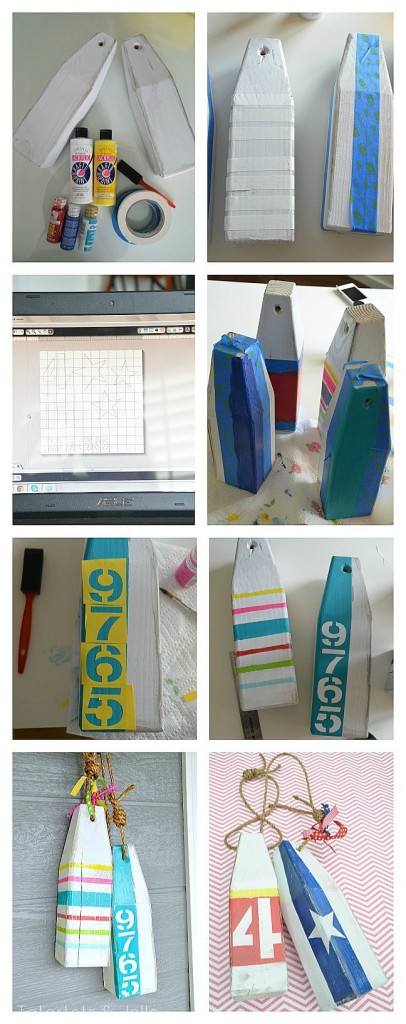
Now to finish the boards we just needed to drill holes for the ropes. My father-in-law drilled the holes with his handy-dandy drill press. You could use a power drill as well; it will just take more effort. We drilled the main hole at 3/8 inch to accommodate a 1/4 inch rope. We also chamfered, which means tapered, the holes on each side with a slightly larger hole to add some authenticity. (On a real buoy the chamfering would keep the rope from chafing and wearing along the edge of the hole.)
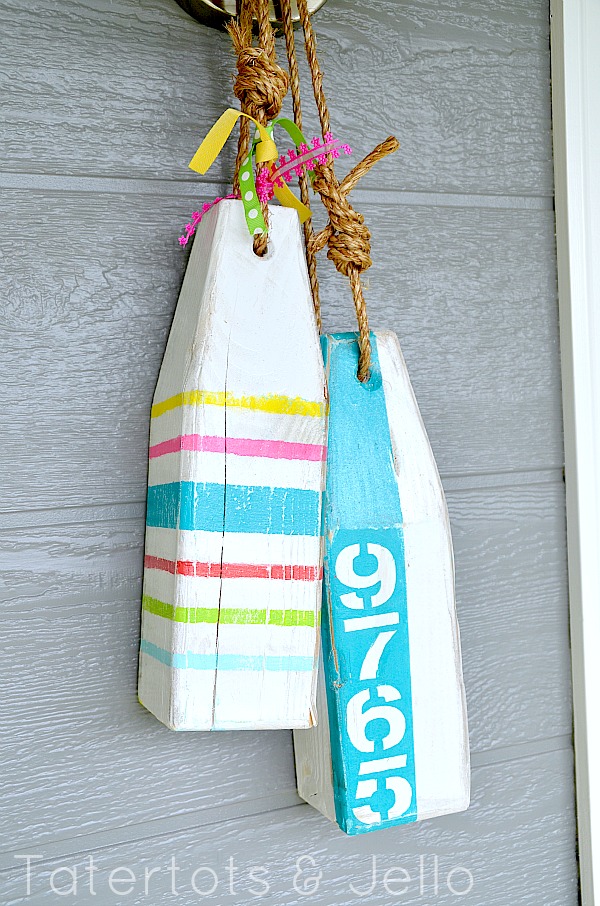
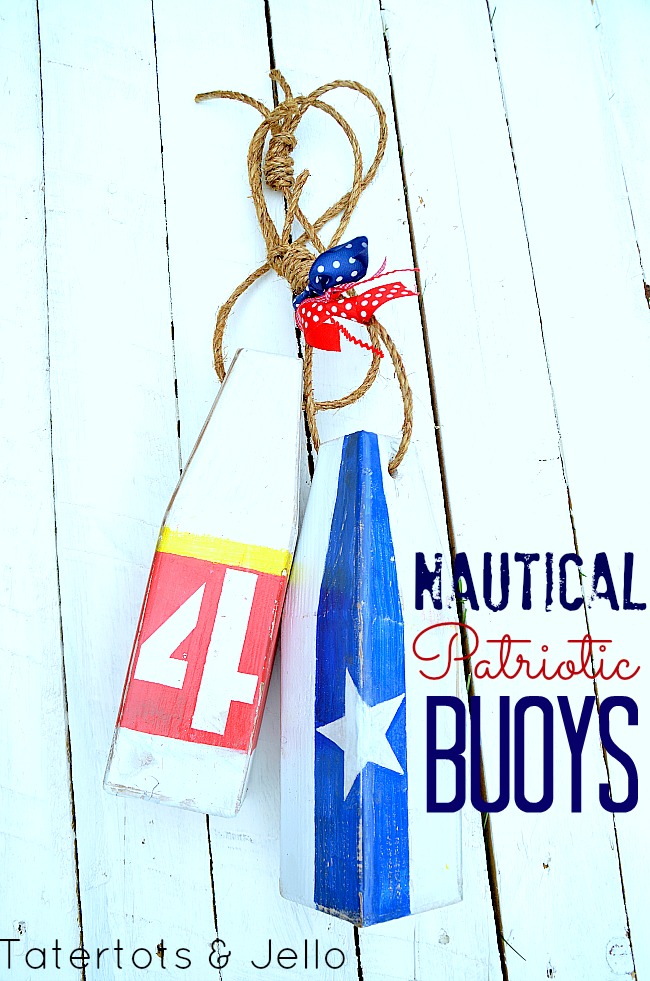
I used my Silhouette to cut out vinyl to use as a stencil for the numbers and stars. It was so easy. And I used painter’s taope to tape off the areas to paint. After painting the areas, I sanded them down, added some dye to make them look old and threw them around a little to give them character.

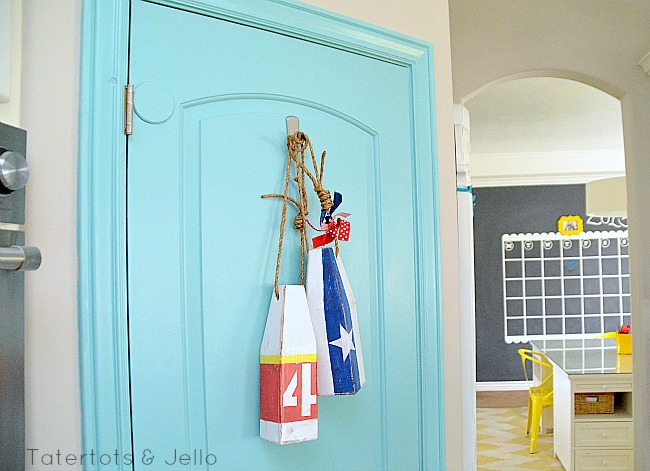
The last thing I did was added some rope from Home Depot and strung it through the holes of each buoy and tied the ends in a big knot. I added a few colorful ribbons too because I love color!!
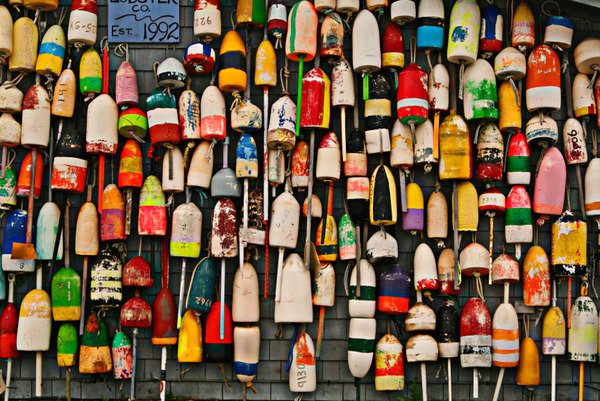
There are so many color possibilities — here’s a picture of some real buoys from FishTownCottage:

And Open Travel:
![]()
Have YOU gotten the Spring Decorating BUG?
Share YOUR projects in the comments!
xoxo


I do accept as true with all the ideas you have introduced to your post.
They’re really convincing and will definitely work. Nonetheless, the
posts are too short for beginners. May you please prolong them a bit from next time?
Thank you for the post.
If you want to take much from this piece of writing then you have to apply such
methods to your won blog.
I am going to read about this all day!! Hopefully you
own an RSS feed It’s possible to subscribe to. I had been checking throughout the web site relating to material focused on skin cream with lactic acid.
I have become obsessed with nautical diy’s lately! And these are super cute, Thanks for sharing!
Forgot to add THANK YOU for the great directions and the post!
These will be perfect for my lake house. I need some new house numbers! 🙂
Love these! Thanks for sharing the tutorial.
I love the buoys! There’s something about the nautical decor elements that I love— and they never go out of style.
Jen these are so awesome!! I absolutely love them and will definitely be making a BUNCH really soon!! Thanks for your fabulous tutorial 🙂
Krista
These DIY ideas are perfect for summer and Fourth of July! Love!
Jen – I LOVE these! We are getting ready to move to the lake and these would make perfect decorations! Thanks so much for sharing!!
Oh yay!! Let me know if you make some, I would love to feature them 🙂
xoxoxo
I can’t wait to make mine now! Thanks for sharing!!!
Yay!! Let me know if you do, I would love to feature them!
xox
Perfect for summer!
Thanks my friend!!! I miss you. I hope you are having a great summer so far!!
xoxo
I made some buoys this past winter for a nautical themed bathroom I re-did. And imagine that, this is exactly how I made them! I saw some on Pottery Barn (I think) and really wanted them, but the price was outrageous. So my brain instantly thought of a 4×4… and the rest is history.
Hi Kerry!!
Oh fun!! Do you have pictures of your buoys? I would love to see them 🙂
xoxo
Gorgeous Jen! Great job!
Thanks Katie!! I hope you are having a great summer so far!
xxoxo
Wow! I love how those turned out! Very neat!
Thanks Holly!!
xxo
Wow – these are great! I’ve never thought to cut my own buoys. I am also a bit obsessed with everything nautical =)
Thanks Natasha!!
Nautical is the best. Thanks for stopping by and leaving a comment – I appreciate it!
xox
These are so cute!! I love how cheerful they are!
Thanks Lisa!!
I love the colorful ones the most 🙂
xoxo
I love the buoys! I might try to make them using foam board to make them lighter! Thanks for the inspiration!
Thanks Barbara!!
Let me know if you figure out how to make them out of foamcore. I would love to share that idea!
xox
I got a reprieve from open-heart surgery till July provided that things don’t go south between now and then so I am hoping to be able to get to this once I recover from today’s surgery! Probably next week! I will post once I do it! PS. Thanks for your reply! The personal touch is wonderful!
OMG I love this idea!!! Thanks for sharing! I want to make some now right away to go in my bathroom, which I am (slowly) decorating with a nautical theme! 🙂
Hi Jess!!
Yor bathroom sounds so fun!! Good luck with everything!
xox
LOVE those buoys with your address! So creative and those ribbons are the icing on the cake 🙂
Hi Keri!!
Thanks so much. I love the colorful ribbons too!
xoxoxo