Tatertots and Jello

COLORFUL HAPPY HOME -- Daily DIY, Decor, Craft and Recipe Tutorial

  • My Home
    • 1905 Cottage
    • Daybreak House
  • DIY
    • DIY Projects and Ideas
    • Organizing
    • Tutorials
    • Printables
  • Decor
    • Spring Projects
    • Summer Projects
    • Fall Projects
  • Crafts
    • Kids Crafts
    • Painting Projects
    • Paper Projects
    • Sewing
    • Wreaths
  • Holidays
    • Valentines Day
    • Easter
    • Halloween
    • Thanksgiving
    • Christmas
    • HAPPY Holidays Series!
  • Recipes

Explore

  • my home
  • diy
  • decor
  • crafts
  • holiday
  • printables
  • recipes

Connect

Home » crafts » Make a DIY Stenciled Grocery Tote! (tutorial)

crafts, diy, refashion, sewing projects, tutorial · February 16, 2012

Make a DIY Stenciled Grocery Tote! (tutorial)

Tatertots & Jello is a participant in the Amazon Services LLC Associates Program, an affiliate advertising program designed to provide a means for sites to earn advertising fees by advertising and linking to amazon.com.

Hello Friends!

I’m so happy to be here another month sharing with you one of my latest little projects.

Lately I’ve been super busy working on my kitchen makeover and inspired by it I made this tote.

The best part about it is that you can purchase these totes at your local Wal-Mart for about $6.00 for 3 of them.

We are just going to give them a quick makeover using paint, ribbon and buttons.

In about 30 minutes you can have one of your own!

TUTORIAL

1

The first thing I did was to iron the tote.

2

After the fabric was smooth I applied the vinyl stencil that I had previously cut.

I always like to press against the edge of each letter to make sure no paint will bleed under it.

3

The third step involves paint.

I like to use fabric paint for my projects since it is softer than regular acrylic paint.

Before I started painting I placed a piece of paper inside of my tote to protect the other side of it.

It is a good idea to add some painter’s tape to those areas where the edge of the vinyl is too close to the fabric.

You don’t want to paint out of the lines.

Use a flat brush for this step and tap small amounts of paint against the fabric.

4

Peel the vinyl off.

I used a pin to peel off those hard to reach areas.
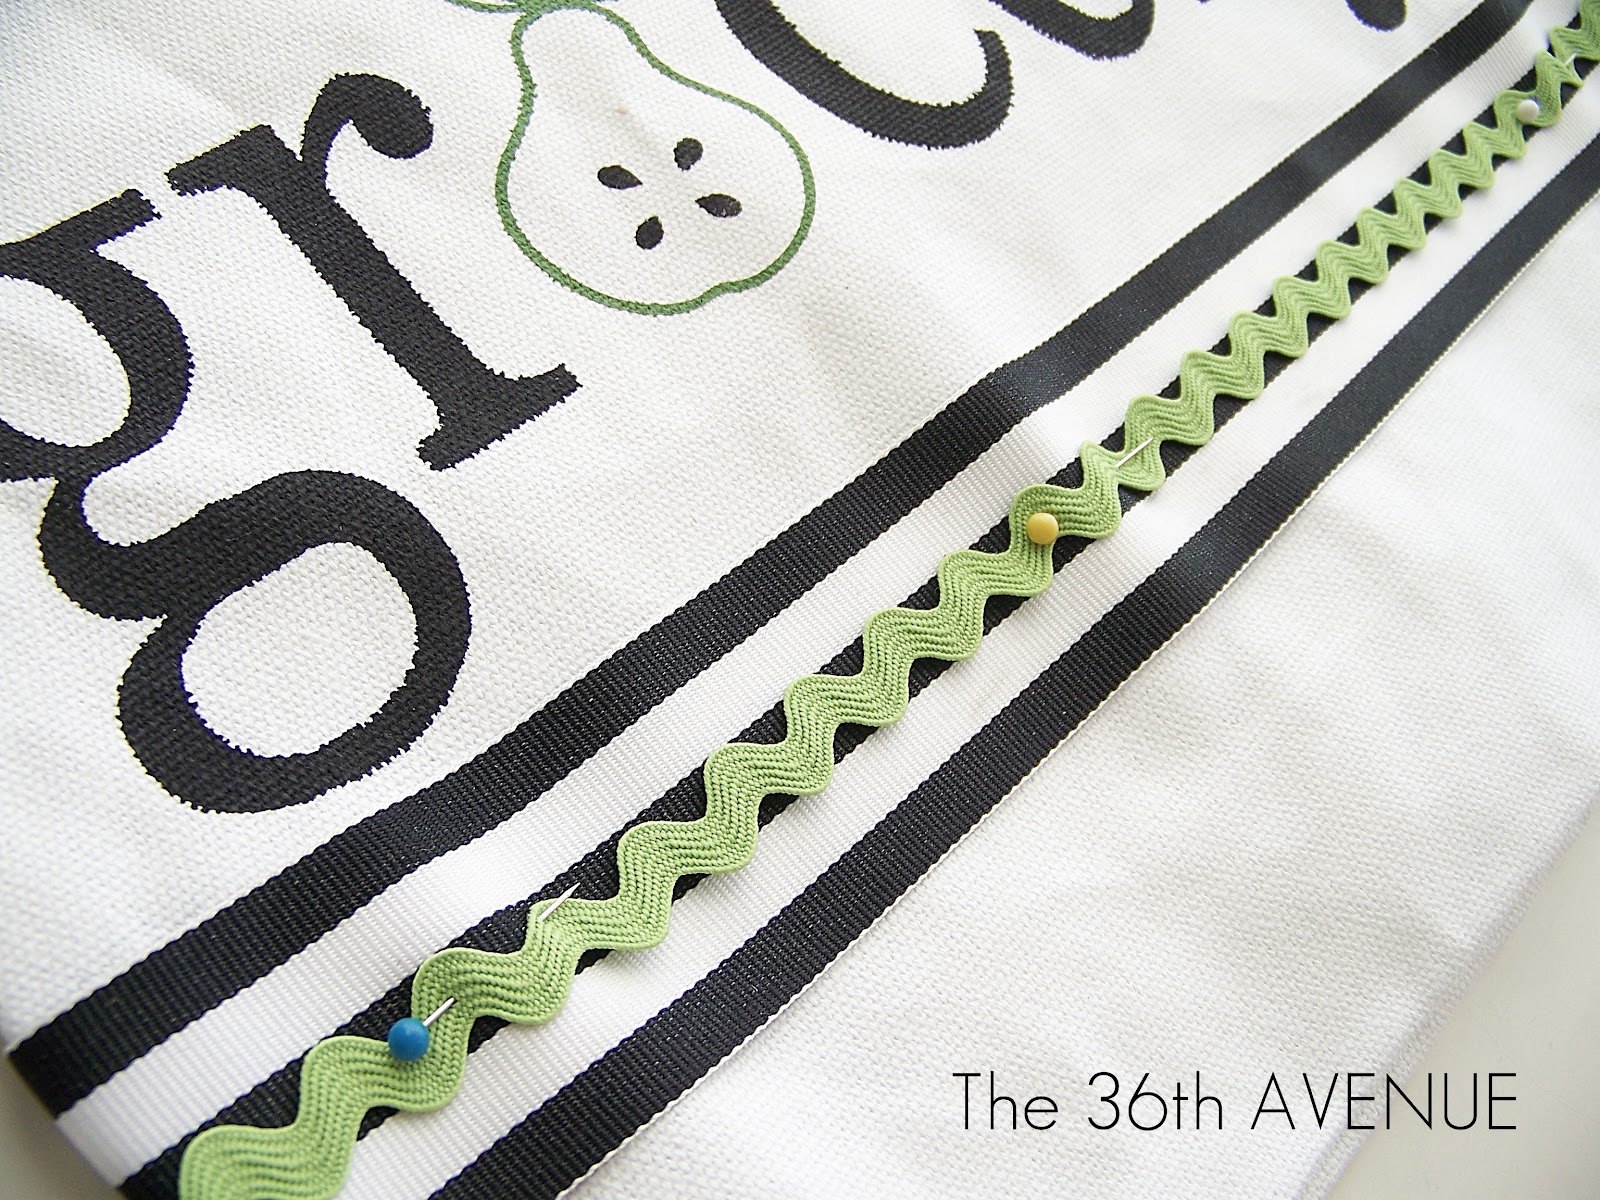
5

After the paint was dry it was time to have some fun and give some personality to the tote.

I used ribbons and buttons to do so.

With the help of some pins I placed the ribbon in place.

Then I opened a few stitches of the tote and I placed the end of the ribbons inside.

6

I turned it inside out and I sewed it again securing the ribbons in place.

7

To secure the rest of the ribbon I sewed some buttons on top of it and a little bow at the end.

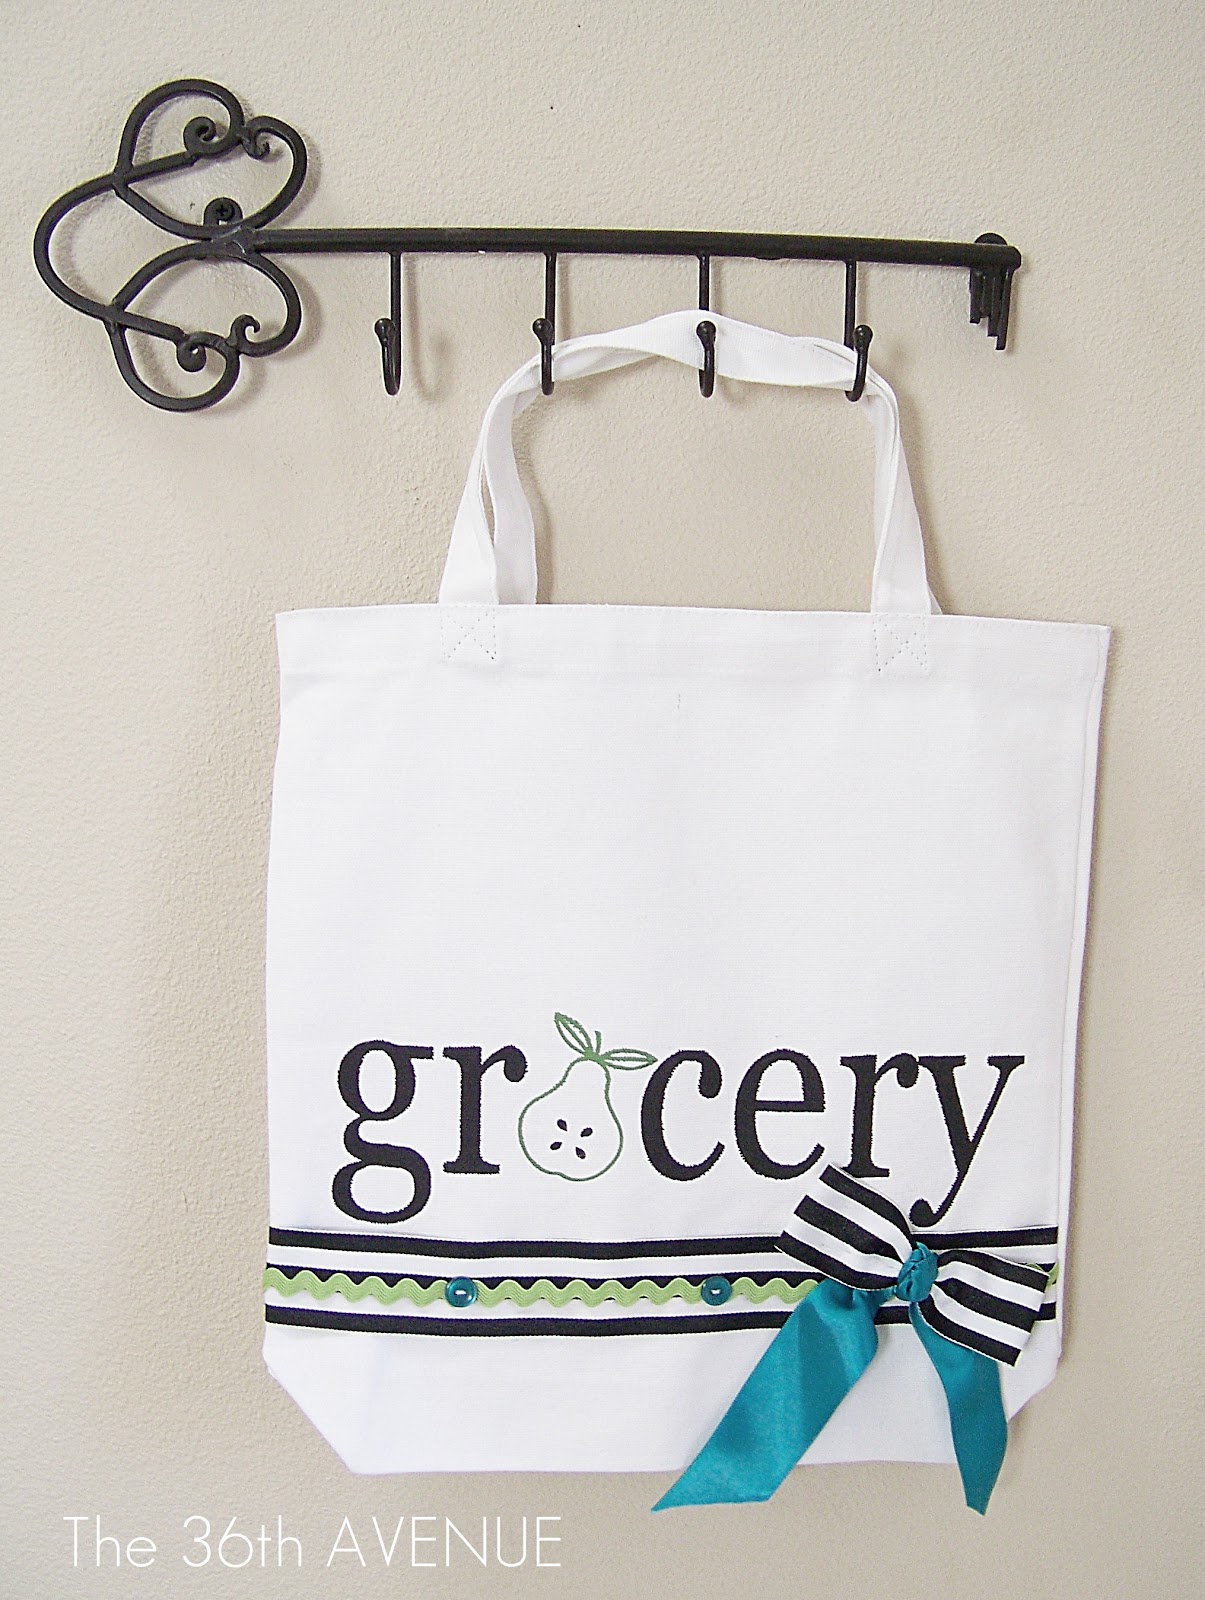
Before I knew it I was done.

My little tote will be part of my kitchen…

I am going to use it to store all of those plastic bags that come home with me from the grocery store.

I hope this simple tutorial inspires you to stencil some fabric of your own.

Pillows, curtains, totes and even rugs are some fun surfaces to work with.

If you have never stenciled before you can click here for a step by step tutorial of how to use vinyl stencils to paint fabric.

Jen, as always it is my pleasure to be here today.

I love you dearly and it is my honor to be a part of your blog every month.

What a treat!

Have a great day everyone!

Desirée

The 36th AVENUE

Desiree – what a fun project!!

I love seeing what you will come up with each month. You are amazing!!

If you don’t follow Desiree at The 36th AVENUE — you are missing out!

This Shoe Printable makes me happy — who doesn’t love a new pair of shoes??

And don’t miss Desiree’s Washable Stenciled Mugs – so cute!

And how adorable is this — Shrink Film Necklaces

Thanks again Desiree!!

I am so excited to see your kitchen makeover!!

xoxo

And be sure to head over to Desiree’s TODAY — she is having a giveaway for the vinyl for this project AND she’s made four different versions. You can make your own tote!!

PS — Coming up tomorrow – a little sneak peek of my secret project and what I have been working on this week!!

Posted By: Jen · In: crafts, diy, refashion, sewing projects, tutorial

Get Organized in 2012 — Update and Ideas!!
Make a Crepe Paper Ruffle Wreath & Party Vignette!! (tutorial)

You’ll Also Love

how to bleach dye clothesHow to Bleach Dye Clothes – a Great Teen or Tween Craft!
how to embellish shirtsHow to make DIY Embroidered Shirts!
Lost in Oz a smart original animated series based on the beloved Wizard of Oz classic.Painted Plaid Shoe Tutorial Based on the new Lost in Oz Animated Series!

Comments

  1. Jeanie says

    November 19, 2012 at 10:28 PM

    thanks for sharing .. such a lovely tutorial!!

  2. Kimberly Burgess says

    February 19, 2012 at 6:35 PM

    Where can I order one of the cute “grocery” vinyl stencils? I love this idea and can’t wait to make these for family gifts!

  3. Carmen says

    February 18, 2012 at 9:02 PM

    Gracias por todas las ideas , me son de mucha utilidad

  4. Missy (aka Badgeracat) says

    February 17, 2012 at 9:34 AM

    I love the grocery bag idea. This is a fantastic tutorial. Going to PIN IT so I don’t forget it!

  5. Brenda Kula-Pruitt says

    February 16, 2012 at 5:34 PM

    Oh, the pears are so lovely and sweet!
    Brenda

  6. Trace @cleverlyinspired says

    February 16, 2012 at 4:46 PM

    Super cute;)

  7. Caitlin says

    February 16, 2012 at 4:25 PM

    I am new here and i have have looked at practically every single post you have had!I was wondering where you get your crafting inspiration because you come up with so many thinngs i would have never thought of.Thanks,Caitlin.

  8. becky Mercado@reinventingtheordinary says

    February 16, 2012 at 2:28 PM

    Great project. I like your table of contents and was wondering where you found it. I have a blogger blog so I’m looking for one that works there and can sort by categories like yours.
    Thanks
    [email protected]

  9. Barbara says

    February 16, 2012 at 12:03 PM

    I love what you did, but I think I would use the heat transfer vinyl instead of painting. In fact, I just might!

  10. Nicole says

    February 16, 2012 at 11:55 AM

    I LOVE this tutorial! Thanks for sharing with us!

  11. Beth @ Design Your Dwelling says

    February 16, 2012 at 10:49 AM

    What a fun tutorial! Thanks for having Desiree stop by! She has a great blog! 🙂

  12. Tauni says

    February 16, 2012 at 10:14 AM

    What a cute tote Desiree! If I had something this adorable, maybe I would remember to actually pull it out of my trunk and take it into the store with me 🙂

  13. Sam Adams says

    February 16, 2012 at 10:13 AM

    I am a huge fan of both of your blogs! This tote is just too cute! WAY better than those yucky plastic ones you can buy at the store. I need to make like a million of these. I need to get my hands on that darling stencil!

  14. AJ says

    February 16, 2012 at 9:42 AM

    Super cute tote! Thanks for sharing and I’m a huge fan of Desiree@The 36th Avenue! AJ@queenofmynest

  15. Julie @White Lights on Wednesday says

    February 16, 2012 at 8:36 AM

    The stenciled mugs are really cute. I think I need to make them!

  16. Chessa says

    February 16, 2012 at 7:31 AM

    Love the bag. So cute! What a great tip about the ribbon on the seam-great idea!

  17. Kelli says

    February 16, 2012 at 7:23 AM

    What a cute tote! I love the tip about opening a few stitches on the side to stick the ribbon it. I always end up with a strange unfinished edge when I add ribbon to something like that!

  18. Amanda says

    February 16, 2012 at 6:54 AM

    This is SO cute! I am smitten.

  19. Karin says

    February 16, 2012 at 6:04 AM

    I LOVE IT!!!!

  20. cindy says

    February 16, 2012 at 3:37 AM

    Love it

  21. Pam says

    February 16, 2012 at 2:54 AM

    Looks fabulous, Desirée! Thanks for the tutorial. I’m pinning this to our Inspiration Board for a typography challenge I’m taking part in…

Hi! I'm Jen Hadfield. I'm a mom of 5 restoring an 1891 home in the heart of Salt Lake City. I love being creative and sharing simple ideas to make your life easier and more beautiful!

Receive the Latest Crafts, DIY, Recipes and More in your INBOX!

Follow us on Pinterest! It's awesome!

Top Posts & Pages

Spruce up Your Outdoor Space with a DIY Recirculating Fountain! (tutorial)
A New Deck in Under 30 Minutes!
DIY Secret: How to Print on Post-It Notes (and Free Printable Template)
12 Must-Have Items to Pack on an Alaskan Cruise!
Copycat Panera Spinach and Artichoke Egg Soufflés - SO good!
Mother's Day Cup Holder Gift Basket


Popular Posts

  • Spruce up Your Outdoor Space with a DIY Recirculating Fountain! (tutorial)
    Spruce up Your Outdoor Space with a DIY Recirculating Fountain! (tutorial)
  • A New Deck in Under 30 Minutes!
    A New Deck in Under 30 Minutes!
  • DIY Secret: How to Print on Post-It Notes (and Free Printable Template)
    DIY Secret: How to Print on Post-It Notes (and Free Printable Template)
  • 12 Must-Have Items to Pack on an Alaskan Cruise!
    12 Must-Have Items to Pack on an Alaskan Cruise!
  • Copycat Panera Spinach and Artichoke Egg Soufflés - SO good!
    Copycat Panera Spinach and Artichoke Egg Soufflés - SO good!
  • Mother's Day Cup Holder Gift Basket
    Mother's Day Cup Holder Gift Basket
  • How to Change a Recessed Can Light into a Pendant Light with No Remodeling!
    How to Change a Recessed Can Light into a Pendant Light with No Remodeling!

As seen in


Amazon Affiliate

Tatertots & Jello is a participant in the Amazon Services LLC Associates Program, an affiliate advertising program designed to provide a means for sites to earn advertising fees by advertising and linking to amazon.com.
  • About Me
  • Advertising
  • Get Featured

Copyright © 2025 Tatertots and Jello · Privacy
This site is a place for positive discussion and ideas. Negative talk, comments that disparage others, and similar are not welcome and may be removed.