I don’t know.
Maybe it’s because I always wanted a nickname…and no one would call me T-Bone. (oops…blatant Seinfeld reference. If you don’t get it…skip)Anyway, I have this little blog called Less Cake {more frosting}. I like to share snippets of life around my house. We have lots of great ideas, lots of Diet Coke, and lots of laughs!
Mostly, I’m trying not to need a change of underware….as I prepare to make a post on my very favorite blog of E-V-E-R! Jen has been so nice to me, and has helped me want to blog away in my own corner of the blogosphere. I’m so honored to be here!
DEEP BREATH.
Okay, enough Mount Gushmore….you want a new idea…don’t you?
Today I want to share a really cute, (I mean REALLY CUTE) and really easy idea for new mommies. (or old mommies…I think I need one…even though my youngest is 3 years old)
I wish it had a fancy name. I just call it “The Wipes Band”. You can call it whatever you want. Well…don’t call it tacky, or ugly. That’s not nice.

Start with your materials. You’ll need big elastic. I mean BIG. I’m using 3″ thick elastic. It would work with a little thinner. But it does need to be thick. I found this elastic at JoAnns. It’s not expensive.
Then you’ll need your material. If you’re planning on embellishing with material, you’ll need some coordinating colors as well. But we’ll get to that in a minute.
- get a box of wet wipes. Measure loosely around the perimeter. Then cut about 1.5″ – 2″ off that measurement to make sure the elastic will fit tightly. I always use Huggies wipes. That box measurement ends up being 22″.
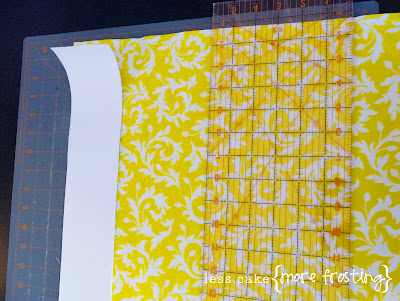
- You’ll need to cut your fabric double the width of your elastic plus 1.5″ (for seams and fit). So if you’re using the 3″ elastic, you’ll need 7.5″ inches. You want the length to be AT LEAST double your elastic.
- The fast answer is: I used 22″ elastic, and 7.5″ inches material x the entire width of my fabric (45″)

Take the long tube, and pin the sides together so that the “right sides” of the fabric are facing each other. (***do I have to pin it? Well, no, but if you can’t keep it straight, I’d suggest it. No unpicking when you pin to begin with.
Wow. I just turned into my mother!)
Sew along the length with a 1/4″ seam. (re-inforce both ends, just to be safe)

When it’s all done, turn the tube inside out.

Now you need to pull your elastic through your tube. There will be A LOT more fabric than there is elastic. But I’m not opposed to giving the tricks away….
- Put a large safety pin on the end of your elastic. The pin will help you guide your elastic through.
- Once you get the elastic in (just to the opposite end) twist your tube so that the seam is on the top edge of the elastic. Then, go to your sewing machine and sew right along the back edge. Close to the end. Raw edges aren’t a problem. So just sew across. Making sure you catch both sides of the material and the elastic, and that your seam is right at the top.
- Now that your back end is sewed, it can’t pull through. (subsequently making you swear. See how I’m looking our for you?)
- Push all the fabric down until your elastic comes out through the top of the tube. Remove your safety pin.
- Then tuck the raw edges of your tube inside (to finish the edges a little) then sew that side shut. (I like to pin the second end, just to make sure it’s all straight.)
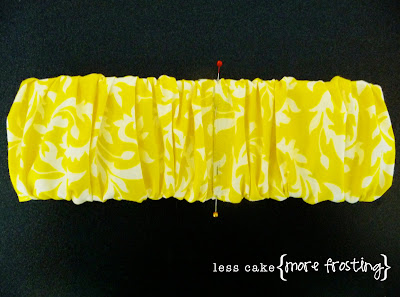
- Once both ends are sewed, you can distribute the gathers so that they’re even.

Pin the two ends together. Overlapping the ends by about a 1/2″. (make sure your “finished” one is on top.
Then sew right down the middle. I usually sew 2 or 3 times, just to make sure that it doesn’t pop when stretched.
Guess what? You’re done. Well, mostly. Now comes the fun part. To cover up the front seam, you can embellish.
Did that say EMBELLISH? Oh yay! (I love this part)
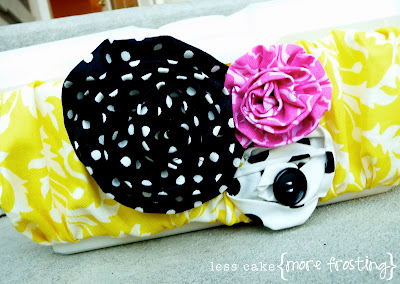
I’ve used ribbon, buttons, ric rac, bling…oh the possibilities are endless. Today I used the ruffled and rolled fabric flowers. Wanna see?
 These are just hand sewn on to the front. That seam is just a memory now!!

C’est Fini. (That’s French for…it’s finished. That’s right. I’m classy that way!)
I just love these for quick, and personal, baby gifts. And sometimes I’ll pair it with a personalized travel wipes case as well. But that’s a lesson for another day, isn’t it?
Thank you SOOO much for letting me come over today, Jen! AH-MAZING!
Come over and see us at Less Cake {more frosting}.
We love visitors.
(but bring your own frosting. I don’t share)


So cute and easy! Thanks for sharing. 🙂
[email protected]
I use baby wipes a lot! No baby in the house, though. Just hubby and me. =) This will be so cute to color coordinate with both bathrooms! =) I use baby wipes to take my make-up off with.
That is so pretty! What a great project, I'll be linking. Off to check out Ellie G's blog…
Waaay cute stuff, thanks for sharing!
Oooh, I love ellie g and her projects, plus she's a total hoot!! This is a darling project. And of course, I love Tatortots and Jello too. 🙂
Brooke @ craftingchicks.blogspot.com
I'm a big fan of Ellie G and all the fabulous things she creates along with her writing style. Oh those polka-dot pots….gotta make some now!
Adorable!! That's cute enough that you could stack a couple of them (empty) in a craft room and use them to store embellishments, buttons, etc.
Darling! I love her blog! And she is so much fuN!
Oh my gosh all her things are so cute! Love them all!
I simply adore this crafty project. Thx ellie for sharing! Ummm, Jen, I couldn't find a contact email – but I wanted to ask…how can I become a part of the the "weekend wrap up"? I have a craft I would like to share. I just didn't know if you choose the crafts or if it was like a "linky" deal that we submit some ideas. I am a huge follower of you blog (and now less cake, more frosting, too). Thx for the info.
How cute! I love this idea for a little girl!!
Ummmmmmm…..YAY!!!
I was hoping I'd catch this going up before I left town. My little vaycay is going to be so much happier now! Thanks again, Jen. (man I sound like a broken record. What if I say "gracias" at least that's different)
so stinking cute (no pun intended due to the 'wipe band')
I have a feeling I will become a total loiter at less cake more frosting 🙂