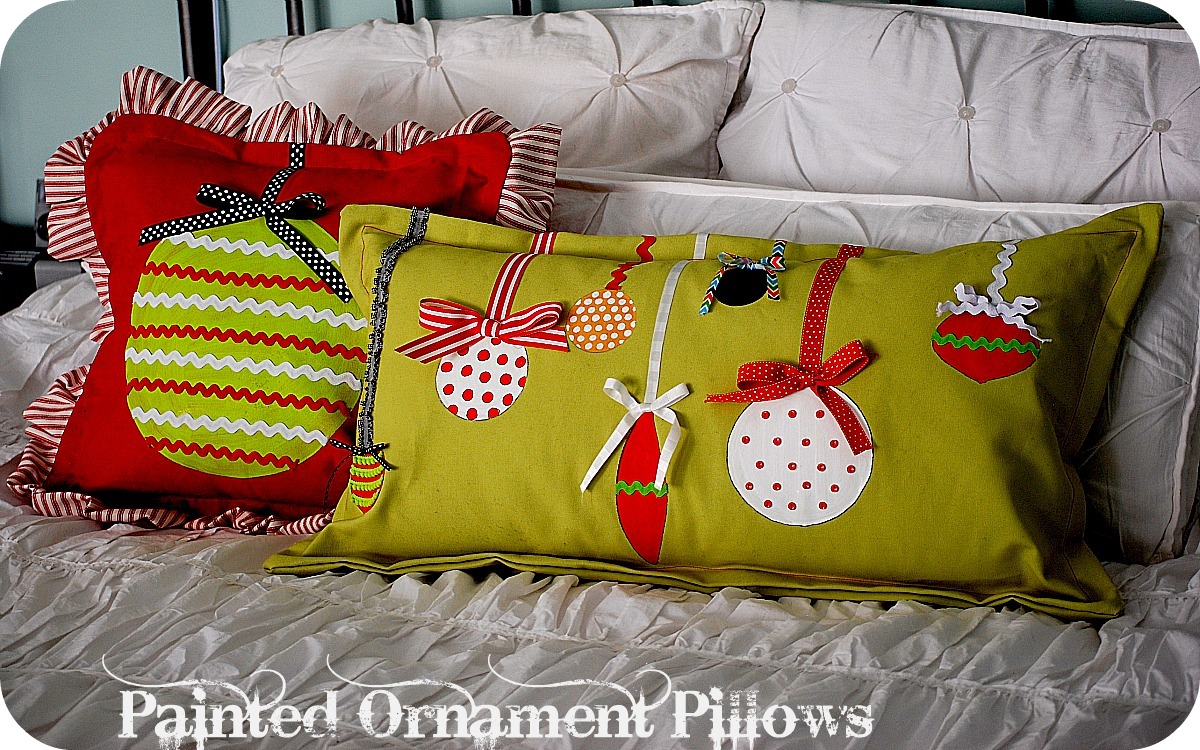
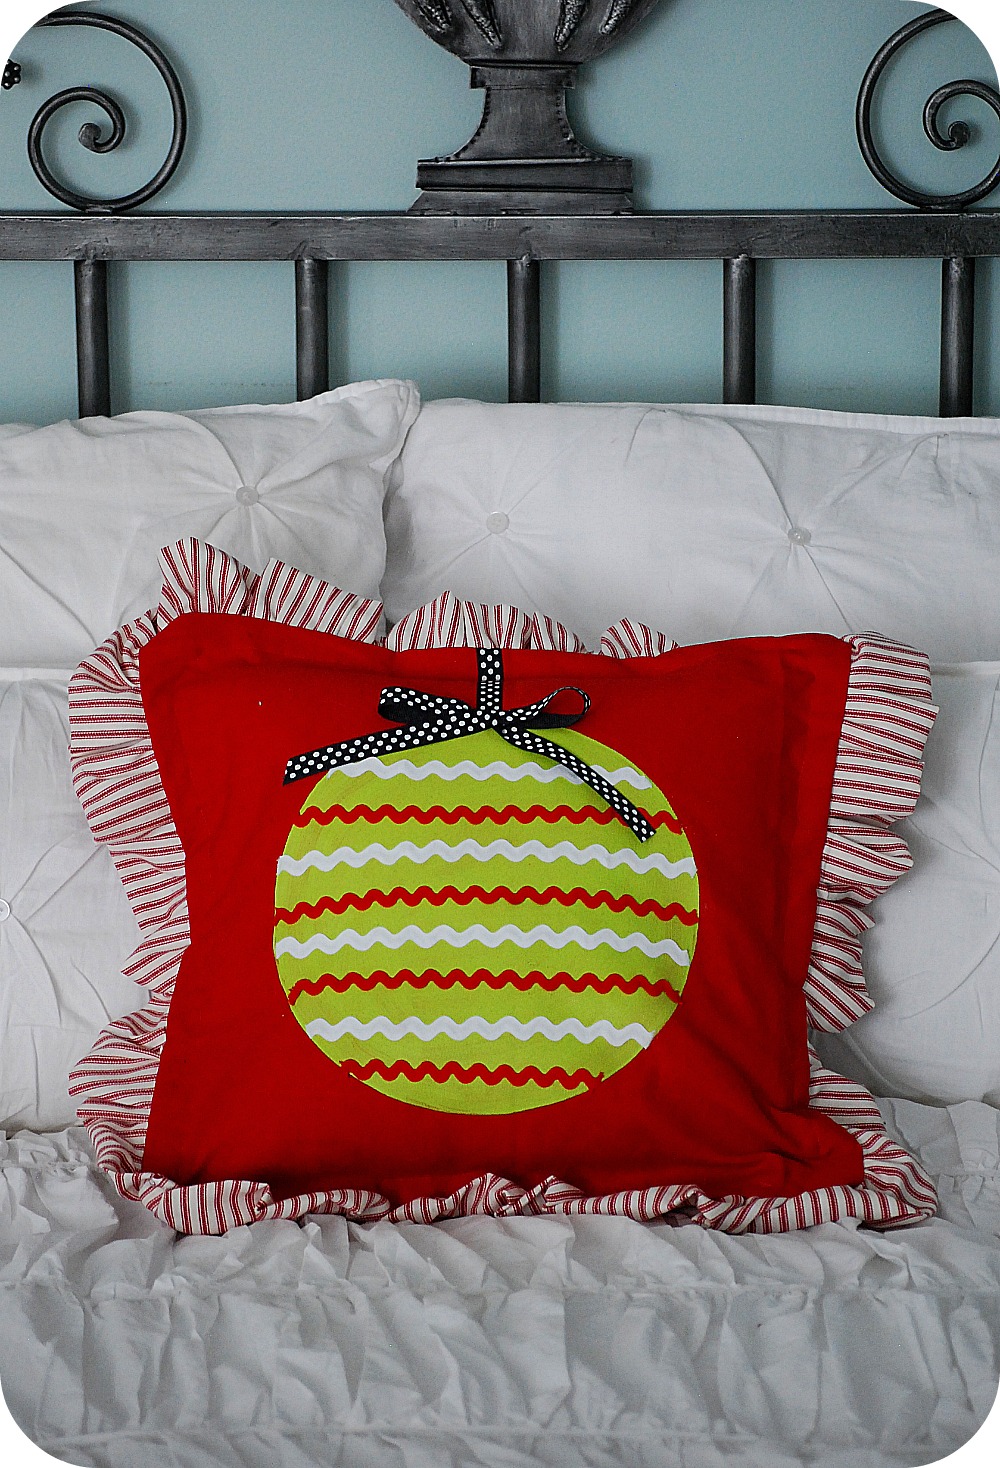
Here’s what I did:
1. Figure out what size pillow form you will use. Cut out a piece of material 2 inches wider and longer than the form in whatever material you want to use. I used canvas for my Halloween pillows, but used colored duckcloth for the Christmas ones. It is very similar to canvas.
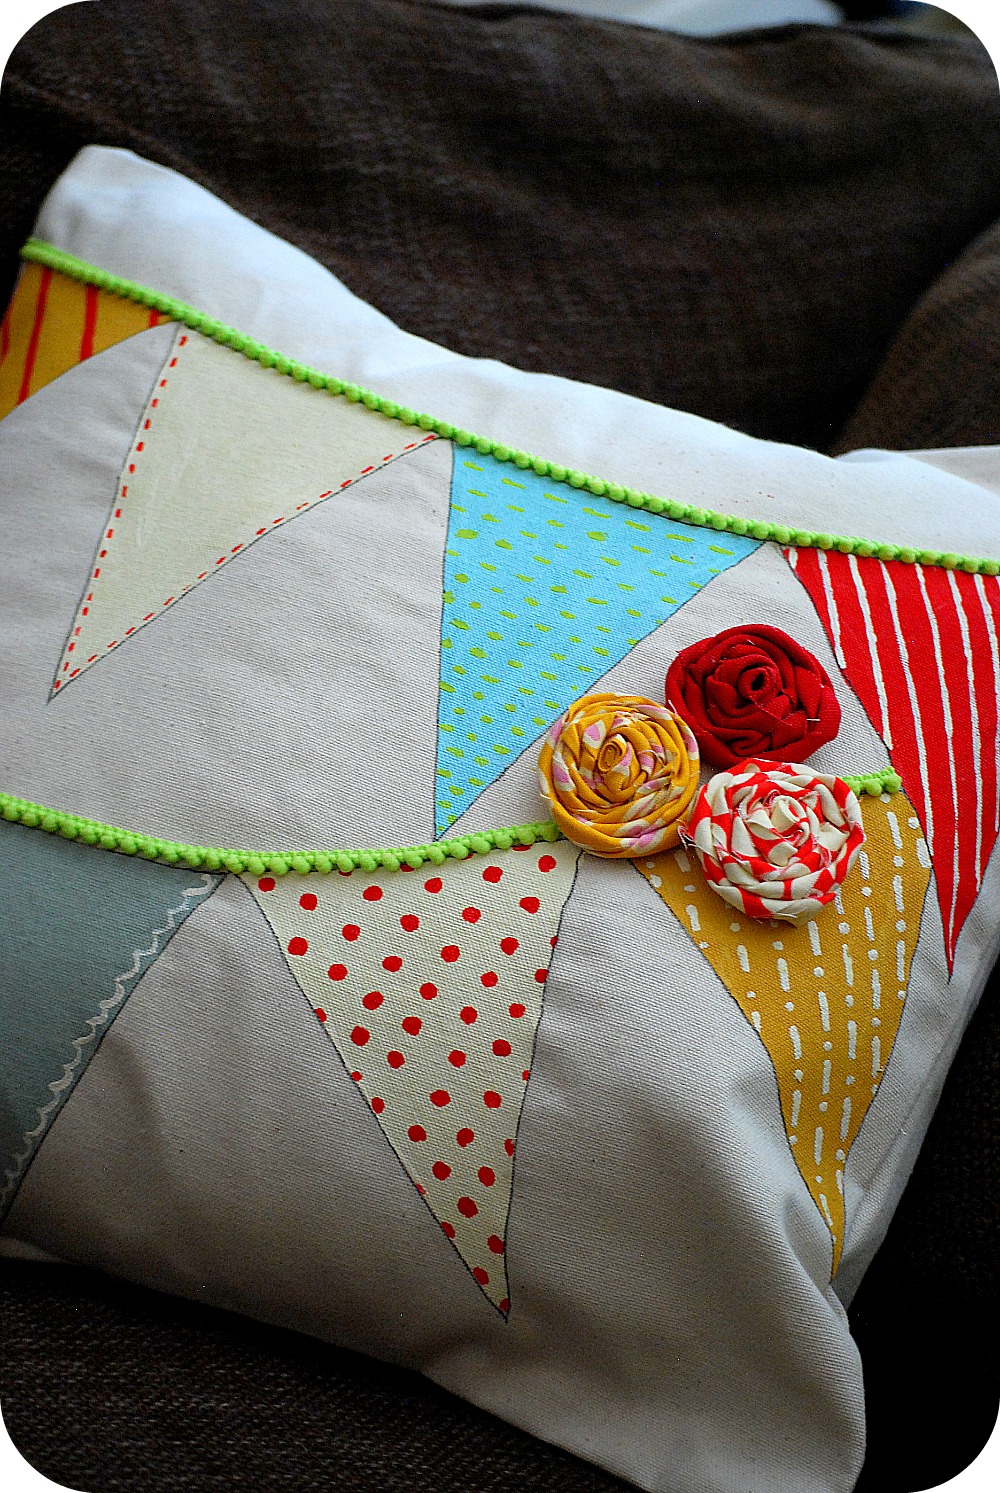
***Note — I made these pillows a little bigger than normal because I wanted to have a border around the entire pillow. So I made mine 4 inches larger on the width and the length than the pillow form. And then once I sewed the pillow together, I turned it right side out and then sewed a line around the outside of the pillow to create a border.
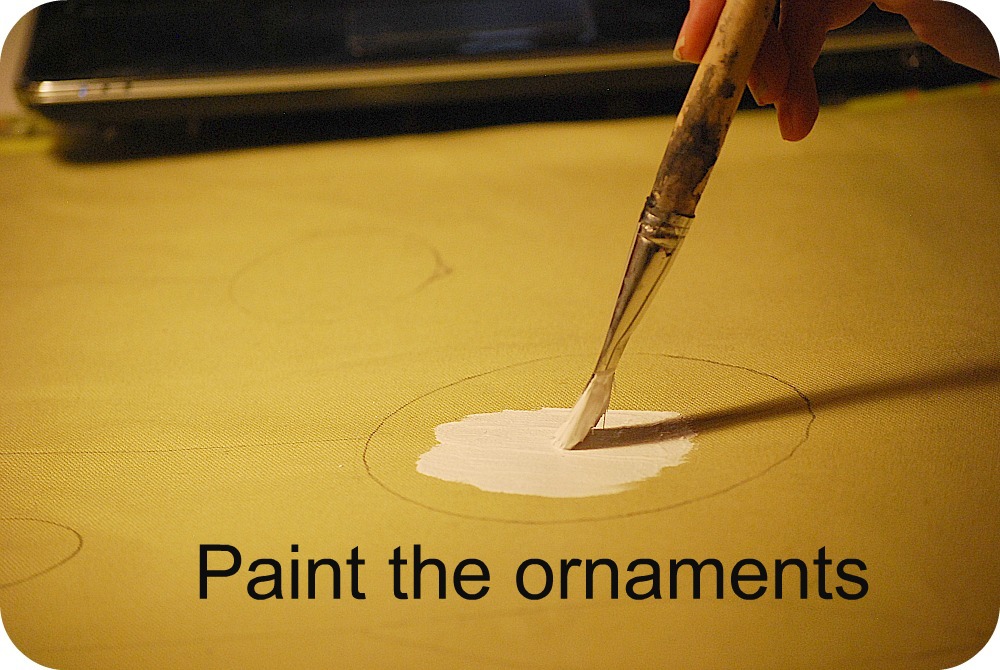
2. Now paint your ornaments. I found some different size glasses to use for the ornament shapes. I traced around the glasses using a pencil. I staggered the circles on the fabric. For the longer ornaments, I made a template out of cardboard and traced the ornament on the fabric.
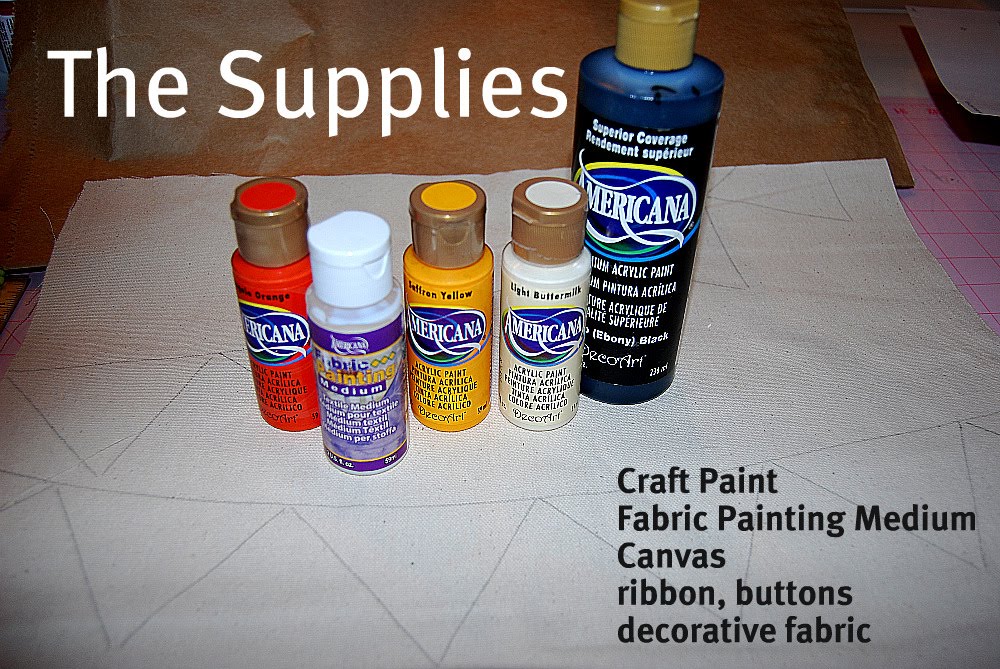
3. I used DecoArt’s Fabric Medium to make the regular paint into fabric paint. I added a few drops to each of the colors and then painted the fabric.
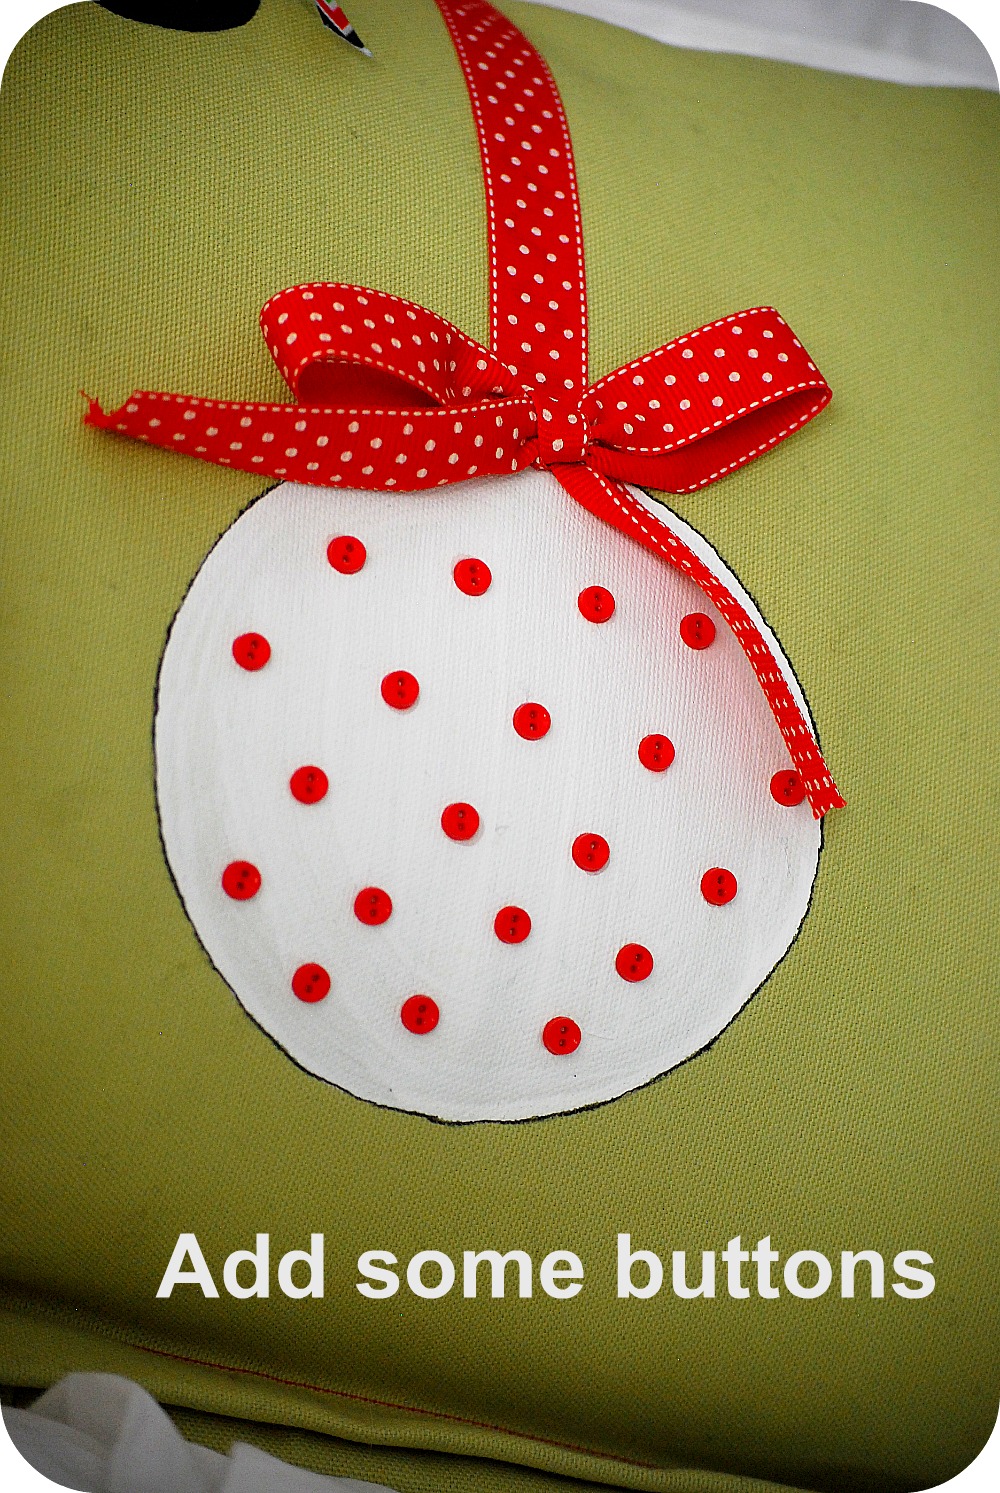
4. After the paint had dried, I outlined the ornaments with a fabric pen. I also added buttons to some of the ornaments.

5. Then I drew a line up from the ornament to the edge of the fabric. Then I cut a piece of ribbon and used Liquid Stitch to attach it to the fabric.

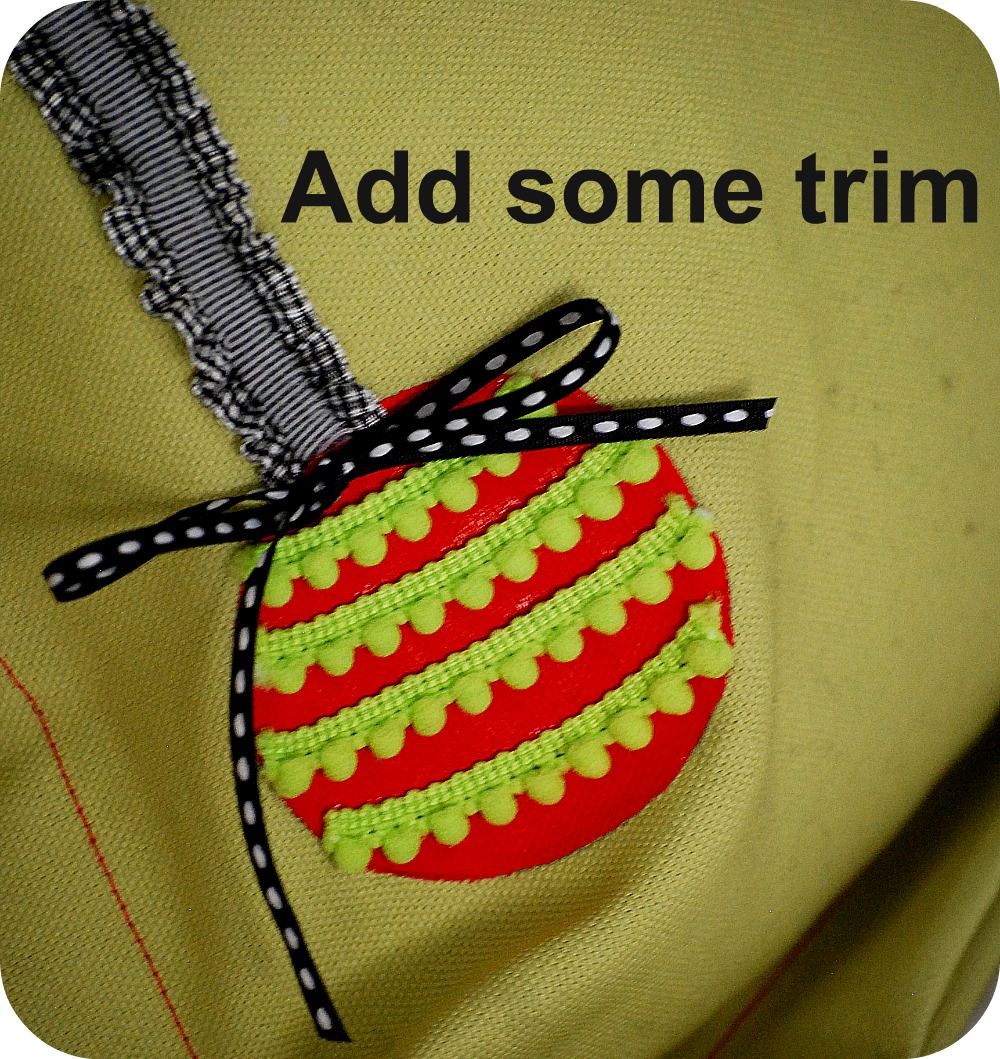
6. I also made a bow out of most of the ribbons and attached the bow on the top of the ornament. I put a glass on top of the bow until the glue dried.

7. Then iron the ornament pillows to set the paint.

8. The last thing I did was sew the back on the pillow. I used an envelope enclosure. So basically, I took the size of the front, added 8 inches to the length and then cut that in half — so each side would have an extra 4 inches of material that would overlap.


I love the pillows! I made a sewn version of the single ornament pillow. I have photos of my pillows and links to your tutorial and blog in my blog post . Thanks for sharing these!
Mary Ann
Thanks for great idea…linked to your post from my blog!
I love love love these pillows! I will be making some this weekend. Thanks for the inspiration!
This is so cute!! I linked to your tutorial over at Craft Gossip Sewing:
http://sewing.craftgossip.com/tutorial-painted-ornament-christmas-pillow/2010/11/30/
–Anne
I just got my Ballard Design in the mail and show this
http://www.ballarddesigns.com/holiday-patchwork-pillow/accessories/holiday-decor/162770
They just had the same idea on different fabric.
it's a toss up of which i LOVE the most. the christmas pillows are outstanding! so adorable. of course i LOVE the bunting as well.
i will go ahead & say this – i wont even be bashful about it…i am totally going to copy this & make some. they are wonderful!
kellie
These are so fabulous! You are such a talented lady!
I love this!!! I featured it on my blog I hope you can come by and take a look!!!
http://dragonflyfeathers.blogspot.com/2010/10/featuring-my-favorites-friday-no8.html
Of course it isn't too early for Christmas…we're crafters. I got up this morning searching for Christmas ideas, and…voila!
Thanks for the cute idea.
It's NEVER too early for Christmas ideas! You chose my favorite color combo for xmas decorating too! Dang you…between the laundry that I now want to make over and now the pillows and a few more subway signs- I'll probably miss xmas, because I'll be too busy crafting! :0
Jen
I love it! This was actually on my to do list for this afternoon….I was just about to kick myself off the computer because I had spent too much time browsing all these great ideas, then "bing" there was this adorable idea. Can't wait to get going. Thank you!
I love these pillows such a great idea. I am going to have to try this and when I do Ill share a picture with you from my blog. I am a new follower and love everything I have seen so far can't wait to check out more.
Jen – These are just too CUTE! I LOVE them.
Hi Jen! ADORABLE 🙂 Quick question, on your everyday pillows – the smaller pillow — what fabric is that you used for the base? I have been trying to find something similiar but haven't had any luck. THANK YOU!
Love the ornament with the poms on it, how fun! You make such great pillows, I need to remember to do more of that.
Taylor
I am so glad to see a non-halloween post! We don't decorate for halloween (we do trick-or-treat, just not that into the holiday). I have been waiting anxiously for October to end so I could engross myself in wonderful Thanksgiving and Christmas ideas! Thanks for the sneak peek!!!!
I love these, Jen! I would love to make some of these!
Those are BEYOND cute!!!
These are so stinkin' cute! I love them. They're really gorgeous.
Thank you for sharing the tutorial. I may have to try my hand at these this Christmas. I love them all.
I love these! I'm afraid to paint though! LOL
wow, great! thanks for the post! i always have such a hard time deciding whether to spend my time on crafts or baking during the holidays. but my problem has just been solved! i found this great place, Ruths Brownies and they're great! they are shipped fresh from the oven and baked to order AND right now they are having this awesome sale…everything is 15% off until Oct 31 and they have great sales monthly. just wanted to share with any fellow time-challenged readers. now i can focus my energies on these super cute pillows! thanks for the post!
Girl!!! I'm working on my own version of a painted pillow! I'll e-mail you the finished project, I can't put it on my blog yet cuz I am giving it to someone who reads me. LOL
It's not going to be as cute as yours though!
These pillows are amazing! I'm loving your blog…I'm your newest follower from lovecraftwritedream.blogspot.com
These are sooooo cute. I love them.
Is it every too early for Christmas?
Cheri
I love, love, love these pillows! I can't wait to try them.
Super cute as always, Jen! I can't wait to start on Christmas…thanks for getting me excited about it!
Do your girls craft with you?
Have a great day!
Jenn
Jen, These are adorable! Love them all!
Very pretty…I am thinking about Christmas already too! 🙂
Those ornament pillows are adorable! I love all the rick rack and ribbon that you used!
You are CRAZY talented, my dear! LOVE these!
{stumbled, too}
those look absolutely fabulous. I need to try that, a Christmas tree one would be adorable!
These are so cute!
Jen- SLOOOOOOWWWW down!! It's not even November yet! (j/k) I love these! Amazing job!
Jen that is just so cute!! You always make the cutest little pillows and I have loved every version of these painted pillows!
Ps-Also, glad to see something Christmasy! I am a little bit over Halloween already. 🙂 Geeze, what is the Halloween equivalent of Scrooge?
Take care!
Erin
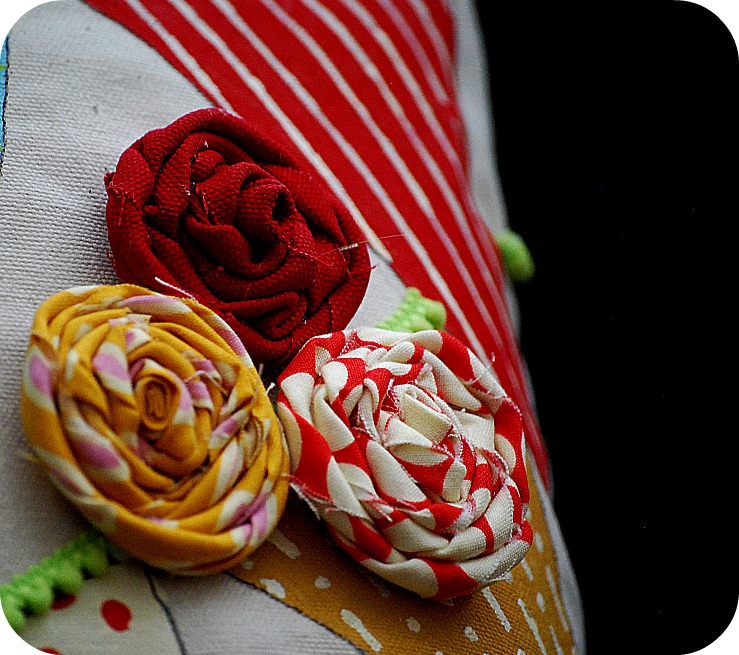
So stinkin cute I don't know where to start. LOVE them all. The ornaments are darling. The everyday ones with the rolled flowers remind me of anthropologie pillows. Darling
When I met the Halloween pillows….I thought I couldn't love anything more. And yet, here I am, cheating on them with the Christmas version. I'm sorry Halloween pillows….but I've been wooed by Christmas ornaments hanging on ric-rac strings. Let's go to the material store, pronto!! (and if we happen to hit an eating establishment on the way…oh well!) 🙂
Love these, Jen.
Jen, they're adorable. Great job.
What a great creation. I love the ornament pillow. I say it is never to early to start working on Christmas.
I was also going to ask for some help. I have agreed to decorate a table for a women's night out at church. I was trying to think of a party favor and wanted to see if you had any suggestions. The theme is Pearls of Wisdom.
Thanks for the help and have a great day!
I love these. Thanks for sharing 🙂
Can I stop you right now and say it is NEVER too early for Christmas! Was just listening to Christmas music yesterday, figures I have to get the two year old excited for the holidays!
Those are awesome! I love all your painted pillows and yes, my brain is starting to think about christmas… its scary.
I'm going to feature these in my feature post this weekend, so watch for it!
Thanks,
Krystal
sassysanctuary.blogspot.com
It's never too early to get ready for Christmas and these are so cute!
Oh, thanks for sharing those fabulous pillows! You're right about making pillows with kids-They personalize them so much! Great post!
so cute! I don't think I could make them without messing them up, but you did a great job! You always do.
Adorable!!!!! I love the colors.
Those are so cute! I'm going to have to make the one with the mutiple ornaments. I love it!
You've outdone yourself, Jen. These are wonderful. Thanks for the inspiration.
Cute. I think these would make wonderful teacher gifts and my girls could help make them. Must get these started…
Cute. I think these would make wonderful teacher gifts and my girls could help make them. Must get these started…
jen! this is so awesome! looks really advanced though-is it or is it just me having doubts in myself:)
smiles,
gina
Very, Very cute!
Im loving the Chartreuse Green & reds!They look awesome together!
Anyone getting this as a gift is one lucky receiver!!
So cute! I love that you are showing us cute ways to paint pillows rather than just sew on them (since I am NOT a sewer!). These turned out great!
Jen, those are precious!!!! LOVE the cute ribbons you added. I'd love to have something cute like that to set out when Christmas comes. 🙂
Very creative! I have never used the fabric medium but I think I need to get some. These pillows would make Wonderful christmas gifts! You have such great ideas – love your blog!!
Jennifer
love it, love it, love it!
These are so adorable! I love this idea!
I love this Jen! I will be trying this too 🙂
Love it, love it, love it!! I cant wait to try this out.
SO cute and festive–love them!
Oh my goodness Jen! I wish you sold these I would totally buy them!!!!! Yet another reason why I need to learn how to sew.
Yes I will be sharing this on facebook as wel1!
Kendra aka "Domestic Princess in Training"
I am overrun with sewing right now, so this seams soooooo easy.
Shared on our facebook!
ooh! simple and seems easy enough…another great project! tfs =0)
These are so cute, Jen! I love the lumbar pillow with the ornament assortment.
I love these SO much! You continue to amaze me with all of the fabulousness in your brain, i keep hoping some will rub off on me 😉
Just adorable Jen!!! I love them! Sooooo Sweet!! xxoo