This post sponsored by Lowe’s. 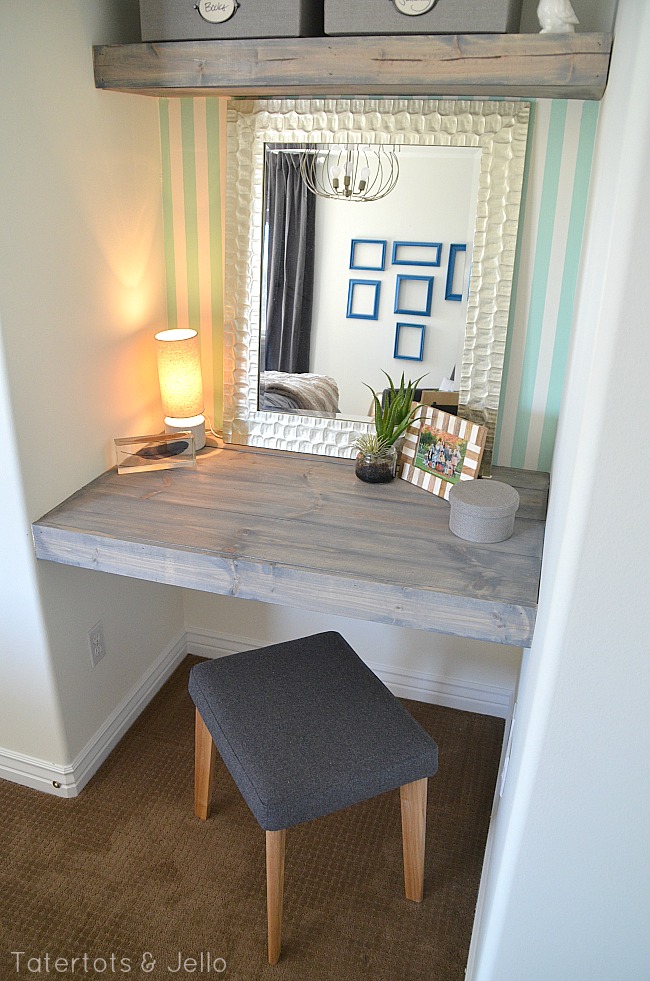 Inspired by the awesome floating bathroom shelf makeover at Shanty-2-Chic, I wanted to replace an old, underused nook space in the bedroom/guest room and turn it into a practical desk area. And thanks to that great tutorial, I was able to figure out my shelf measurements much more easily! If you’re going to tackle a project like this you should check out their excellent tutorial as well.
 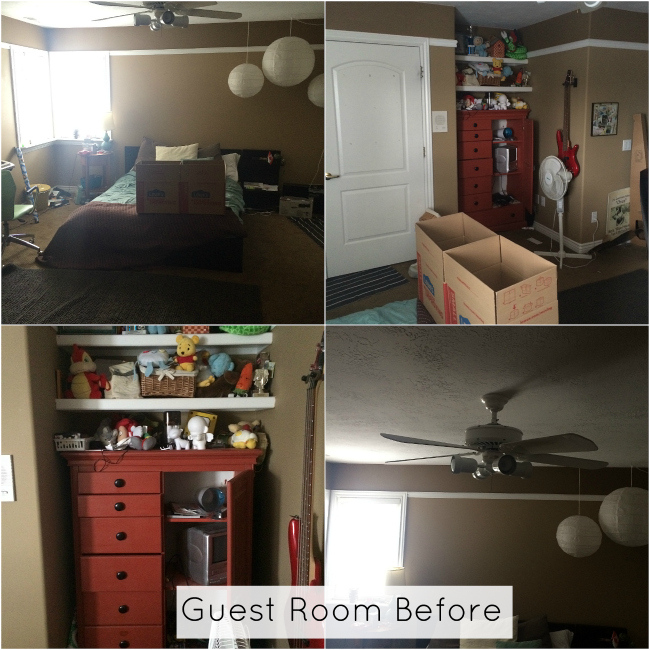 This month one of the topics we could choose was a bedroom makeover. Before, my son’s room was dark and dreary, now it’s a room that is so happy and fun!
 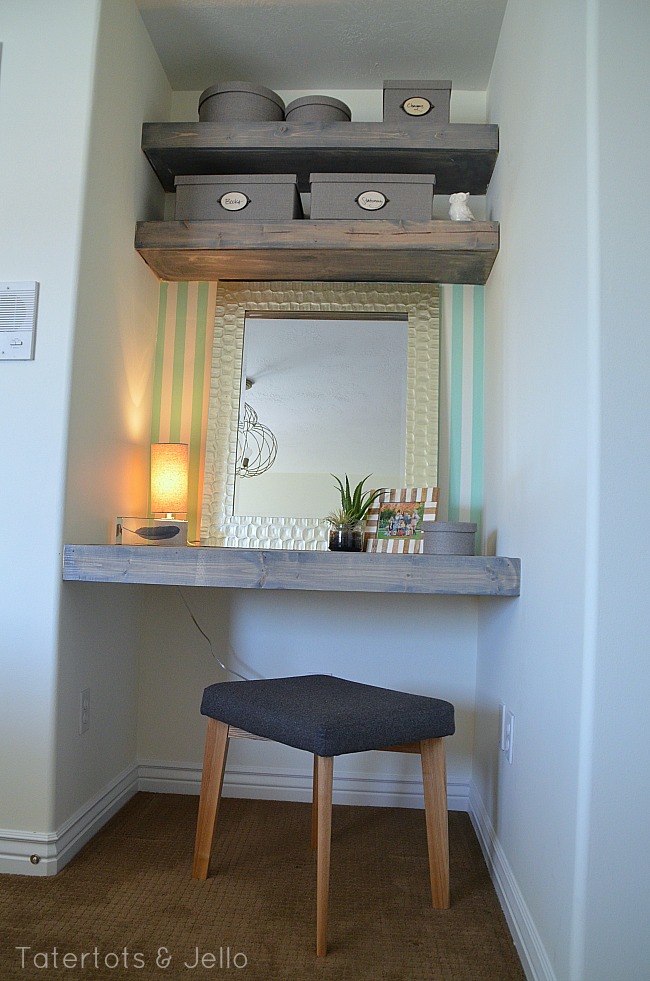 Here’s the basic idea: We want to build shelves that don’t have big, obvious supports — we want them to appear to float, even though they will be supported on three sides. We’re going to build them as if they were true floating shelves, but we’ll be able to attach them on the back and both sides. We’re going to use thicker boards on the top and front and a thinner piece on the bottom, hiding the structure inside with a frame shaped like a capital letter “E.”
Supplies
Your quantities will vary depending on the size of your nook, however, this is what I used:
- 1×10 and 1×12 whitewood boards – length and quantities will vary for you, but I used 4 1x10x6 boards and 2 1x12x6 boards
- 2 x 3 x 96 Kiln-Dried Whitewood Stud (x3) (about $2 each)
- 1 x 4 x 6 Kiln-Dried Whitewood Softwood Board (x3) (about $3.25 each)
- 2 x 2 x 8 Premium Furring Strip (x2) (about $2 each)
- 1/2 x 2 x 4 AC/BC Fir Plywood ($11.25)
- 1/4″ x 2′ x 4′ Fir Sanded Plywood ($9.50) (I had these cut to size at Lowe’s)
- Assorted wood screws – I used some 1/2″ and some 2 1/2″ screws
- Power drill
- Level, tape measure, pencil, wood glue, stud finder
- Whatever you want to finish the wood with — stain, polyurethane
- Electric saw, mouse sander
- Hammer and finishing nails or air nailer/brad nailer
- If you feel ambitious, a circle drill and a “desk grommet” like this one.
Instructions
It’s hard to give you exact measurements for your lumber cuts because your nook will be a different size than mine. However, the shelf and the desk will be constructed slightly differently.
Here’s the general idea: The shelves will have your 1x12s on top, then a frame of 2.3s in between, a 1×4 in the front, and the 1/4 plywood on the bottom. The desk won’t need such a complex structure because no-one will see the bottom. So you’re going to layer the 1x10s on top of the 1/2 plywood. You’ll put a 1×4 in the front as a trim piece, or lip. The desk will rest on a frame of 2x2s.
Here’s what to do:
1. Measure the space. You’ll need to figure out how wide and deep your nook is. It’s wise to measure before you head to Lowe’s so you can have them cut the 1/4″ plywood for you. You’ll want the 1/4″ plywood — the bottom of the shelves — cut to match the width and length of your shelf. (If you want a deeper shelf you can choose 1x12s, but if you try to go thicker you’ll have to choose a different kind of shelf. For the desk, once you’ve measured your nook you’ll know how many pieces of wood you’ll need. In my desk, I used 4 1x10s.
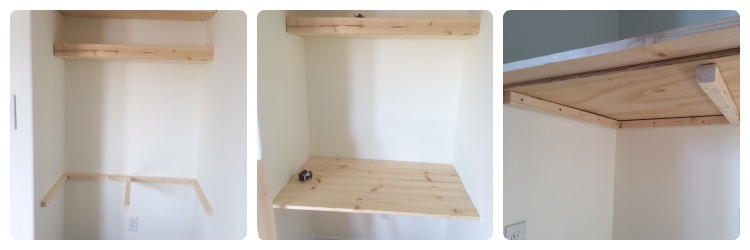
2. Sketch your project. If you make a sketch it will make the whole project much easier. You’ll be able to tell how long to make the “legs” on your support pieces, for example.  3. Cut your support pieces. You will basically be making a capital letter E to support each shelf. I used a Kreg Jig to make the fancy screw holes you can see in the left and center pictures above. You don’t have to do them this way, but they’re a bit more stable that way. You may also want to glue each junction for extra stability. Since no-one will ever see the supports, you can just screw them together from the back, too – you don’t need a Kreg Jig. Also cut the 2×2 supports for the desk — you can cut them a little bit shorter than the desk – easily an inch or two short on each side.
4. Cut your shelves and desk pieces. If you had Lowe’s cut your plywood, your life will be easier here. You’ll want to cut your 1x10s and 1x12s to the proper length. Try to be as accurate as possible: your shelves will look better. You can also assemble the desk surface – lay your 1x10s – in my case, 4 of them, on top of the 1/2 plywood. Assuming they’re a good fit, turn that whole assembly over and glue it in place. You may also want to use 1/2 screws, screwed in from the back of the plywood, which will be the bottom of the desk, to be extra sure. Remember, it is a good idea to pre-drill the holes in the plywood. Don’t forget to cut the 1/4″ front pieces. You may also want to sand the edges a bit, particularly on the desk, for convenience and comfort.
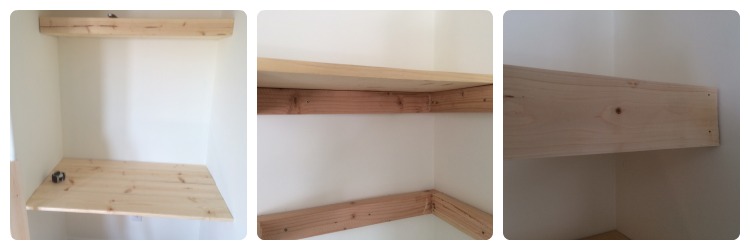
5. Mark the wall and attach your supports. Use your level to make sure your marks are level. I also made sure that I was choosing at least two spots on each support (sides and back) that would screw into studs. Use your stud finder to mark these. Put the supports against the wall and use long screws – 2 1/2″ or so – to attach them to the walls. (Picture above right). 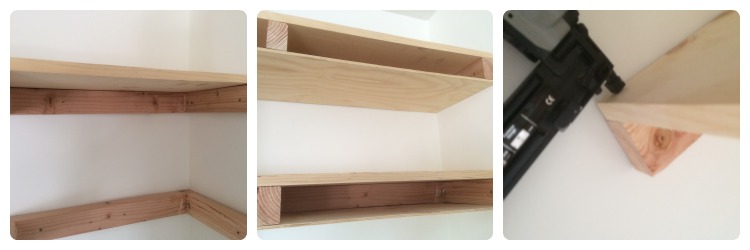
6. Place the shelves and desk. Now that your supports are attached, you can put the shelves and desk tops on (above, left). Discreetly nail them onto the supports with an air nailer (above, right) or hammer and finish nails.
7. Attach the shelf bottoms. Use your nails to attach the bottom, 1/4″ plywood pieces (above, center).
8. Attach the shelf and desk fronts. Use the 1/4″ pieces you cut; attach with the nails or air nailer. (below, left and right)
9. Cable hole. If you want, you can drill a hole in the rear corner of the desk for cables. I did this after it was assembled and it was more difficult. You will need a large hole drill bit and a desk grommet to finish it all off (like a plastic plug with a cap).
10. Stain and add a polyurethane topcoat if you want.

* * * * *
I am SO excited to show you the whole Guest Room next week. I love the way it turned out and can’t wait to show you the whole makeover!!!
You can also follow Lowe’s on Facebook for more great ideas and sign up for their FREE Creative Ideas Magazine with TONS of great DIY ideas and instructions!!

++++
How might you transform a nook? You can take these ideas and make them your own!
xoxo
 Thanks to Lowe’s for providing materials for this post; the opinions and content are mine. See my disclosures.
PS- I’ve linked this post up to these fabulous blogs this week!




Such a great makeover, the shelves and the table look perfect, not to mention the color that you made the wood turned magnificent. I also want to do this as a study table for my two kids. The tutorial is so easy to follow that a woman can also do this alone.
Wow! This is really impressive! I love the stain on the wood, too. So pretty!
Love love love!!! Perfection Jen!!!!
What a great idea for those awkward spaces you don’t know what to do with! I love how it turned out! Especially the stain you used! It’s so pretty! Which one did you use?
I absolutely love how it turned out! What a drastic difference from the before pics!! I would love to do some of these above my toilet!
Love this Jen! What stain did you use? So pretty!
I love these Jen- I especially like how the top shelves are completely boxed in so they look like a thick chunk of wood from the top and bottom. I wonder what width you could go with a floating shelf like this before you need a center support? I would love to do this in my son’s closet but think it may be to wide….
this will be perfect for my annoying cupboard in my room! and will give me SO much more space! thankyou thankyou for the idea! X
Love it! Where did you get that mirror? It’s gorgeous!
Love those shelves and the whole area in general! It would be a perfect little makeup spot too 🙂 I think I need to find a nook like this somewhere in our house, just so we can make those floating shelves!
What stain or finish did you use?
What a great little area! I love how it’s not only cute, but secure, too! A lot of ‘floating’ shelves aren’t too sturdy! Pinning.:)
This is so chic! And you’ve made the process so un-intimidating. I don’t have a nook like this to work in, but I think this could also work in a corner where I really need to add some small office space.
OH MY GOODNESS…I am so in love with that. I love the weathered look of the wood. Thank you for making my creative heart swoon this morning. You may have just given me the kick in the pants I need to start planning some changes around here!
I absolutely adore this!!!