Tatertots and Jello

COLORFUL HAPPY HOME -- Daily DIY, Decor, Craft and Recipe Tutorial

  • My Home
    • 1905 Cottage
    • Daybreak House
  • DIY
    • DIY Projects and Ideas
    • Organizing
    • Tutorials
    • Printables
  • Decor
    • Spring Projects
    • Summer Projects
    • Fall Projects
  • Crafts
    • Kids Crafts
    • Painting Projects
    • Paper Projects
    • Sewing
    • Wreaths
  • Holidays
    • Valentines Day
    • Easter
    • Halloween
    • Thanksgiving
    • Christmas
    • HAPPY Holidays Series!
  • Recipes

Explore

  • my home
  • diy
  • decor
  • crafts
  • holiday
  • printables
  • recipes

Connect

Home » diy » How to Make a Cardstock Gift Box

diy, gift ideas, guest tutorials, paper craft · September 23, 2015

How to Make a Cardstock Gift Box

Tatertots & Jello is a participant in the Amazon Services LLC Associates Program, an affiliate advertising program designed to provide a means for sites to earn advertising fees by advertising and linking to amazon.com.

Welcome to the Summer of Paper series – where we’ve invited fabulous guests to create projects using supplies from my Home + Made paper decor line.

unnamed

Hi! I’m Nikki and I’m the creative force behind Tikkido. I love public radio, archaeology, Irish dancing, crafting, DIY projects, and geekery of all sorts.


I especially love creative gift wrapping ideas. Love love love them. Actually, I love paper crafts of any kind, so when I received a box of beautiful paper crafting supplies from Jen Hadfield Home+Made, I knew exactly what I wanted to do with them: transform boring, plain, white gift wrap into something artistic and hip and amazing.

tatertots-jello-hex-gift-wrap-tikkido-27

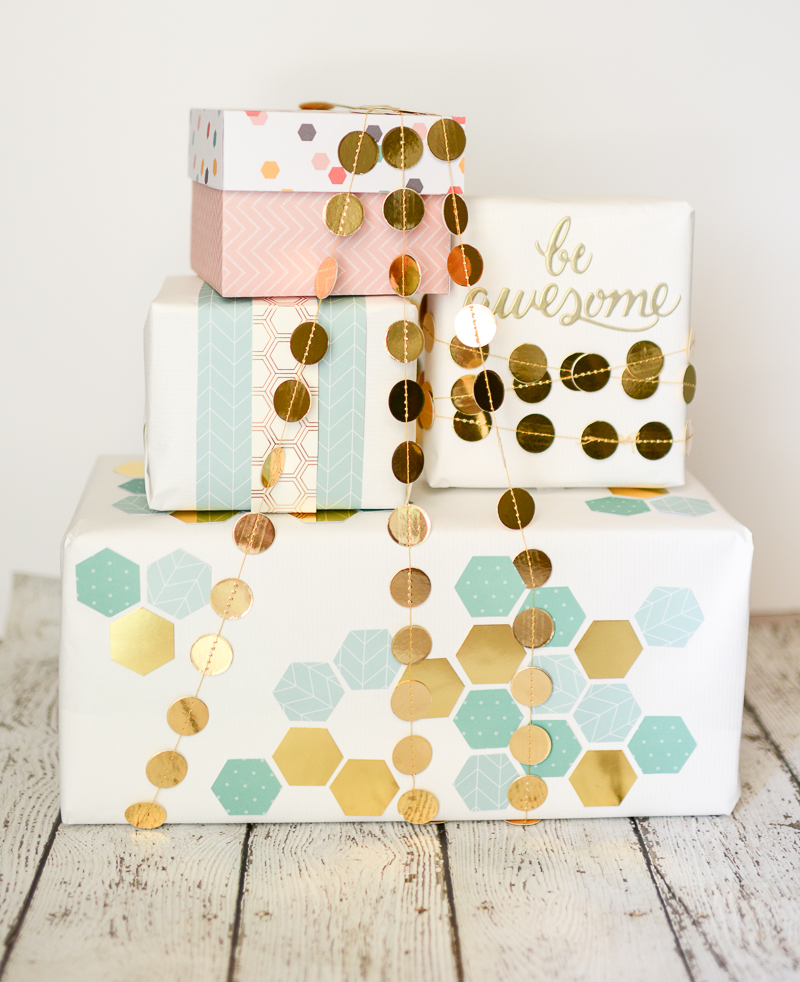
The theme for these coordinated, creatively wrapped gifts was inspired by the hexagon papers in the Jen Hadfield collection. Beautiful, geometric papers for scrapbooking and any kind of paper crafting. There were several different designs using hexagons, and I knew that was my unifying theme.

tatertots-jello-hex-gift-wrap-tikkido-2

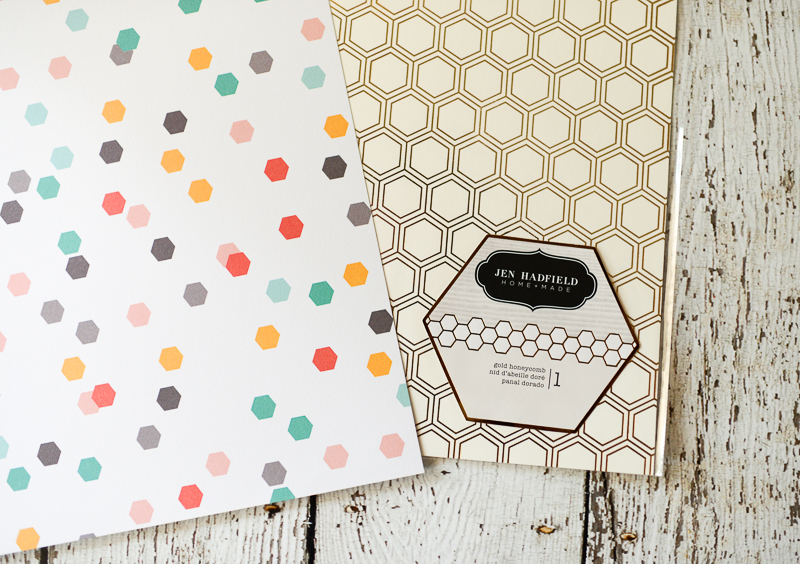
The cardstock was remarkably heavy and high quality, and I decided to make a custom gift box out of the scrapbook paper to stack in my collection of beautifully wrapped, coordinated gifts.

tatertots-jello-hex-gift-wrap-tikkido-8

Gift boxes can be made in any size you need, so I’m going to give you a formula, rather than exact measurements to make a custom cardstock box out of beautiful papers.

Materials For Making a Cardstock Gift Box

  • two sheets of complimentary, but contrasting cardstock
  • straight edge ruler
  • scissors
  • low temperature glue gun or double stick tape

Making the Bottom Portion of the Box: Decide how high the walls of the gift box will be. Decide how wide the box will be. Add the height of the box + the height of the box (for the other side) plus the width of the finished box. This measurement will be one dimension of the total piece of cardstock you’ll use to make the bottom portion of the box. Decide how deep the box will be (the other dimension of the square or rectangle). Add the depth + the height +the height. This measurement will be the other dimension of the total piece of cardstock you’ll use to make the bottom portion of the box.

tatertots-jello-hex-gift-wrap-tikkido-4

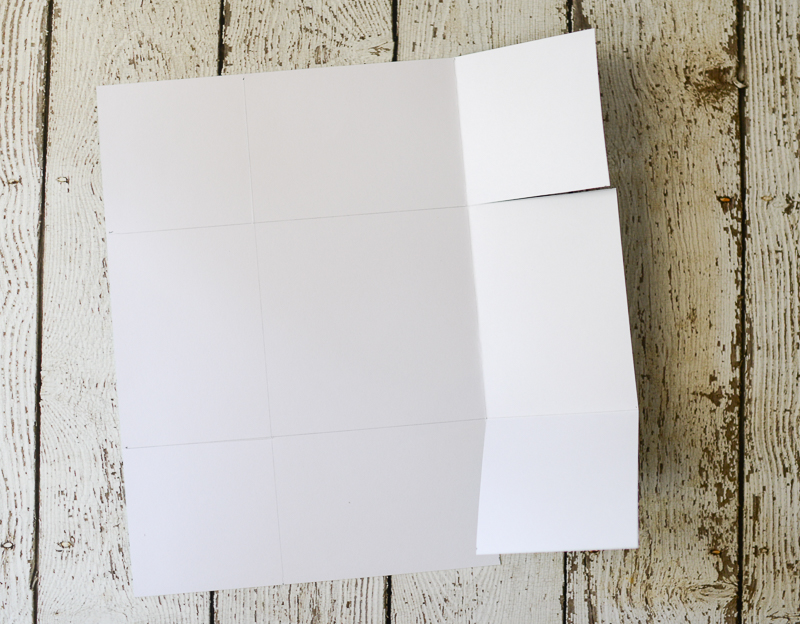
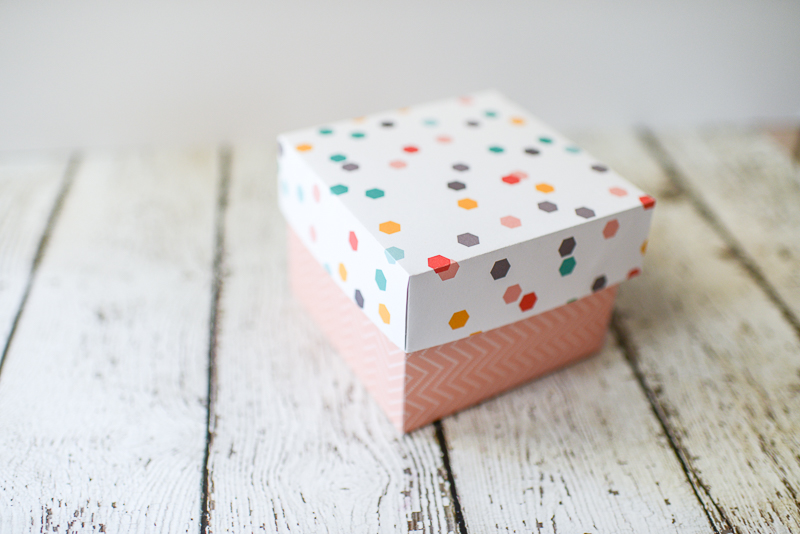
Cut the cardstock to the dimensions you found using the instructions above. (I wanted a square box, so I used the entire 12×12″ paper, which was terribly easy.)

Use the ruler to measure the height of the box walls in from each corner of the large piece of cardstock. Do this on every corner. Take a look at the photo above. Basically, we’re making a square at each corner that’s as tall as the wall will be. Draw pencil lines connecting the marks you’ve made, so you’ll see a square (or rectangle) in the center, and four perfect squares at the corners. Score along those lines, and fold the paper along those lines. See the four squares at the four corners? Use scissors to cut along ONE edge of each of those corners.

tatertots-jello-hex-gift-wrap-tikkido-5

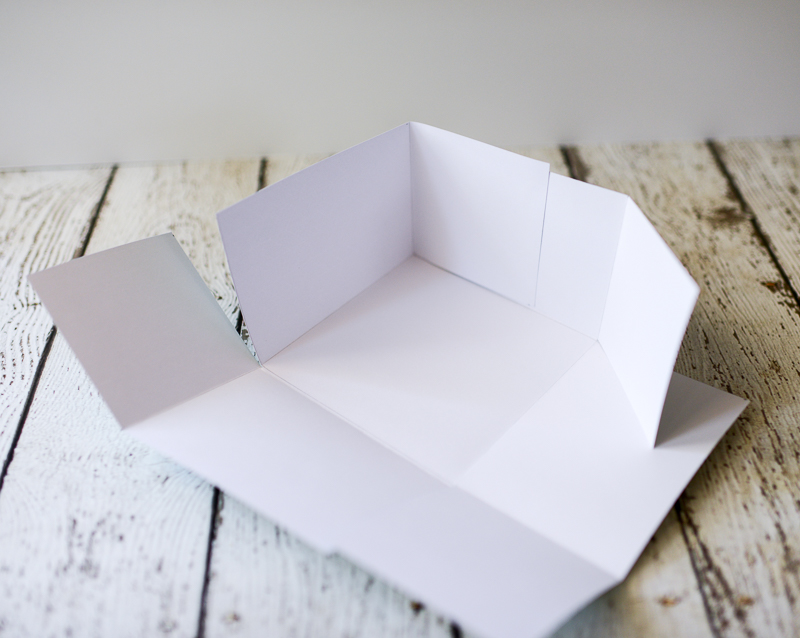
Fold the edges up along the scored lines. Use a low temperature glue gun or double stick tape to glue the corner square to the inside of the perpendicular side. Some of these descriptions might give you a headache eerily reminiscent of 9th grade Geometry class, but really, it’s easy, I promise! Just look at the pictures. Glue all four sides together, and voila, you have the bottom of your box complete!

tatertots-jello-hex-gift-wrap-tikkido-6

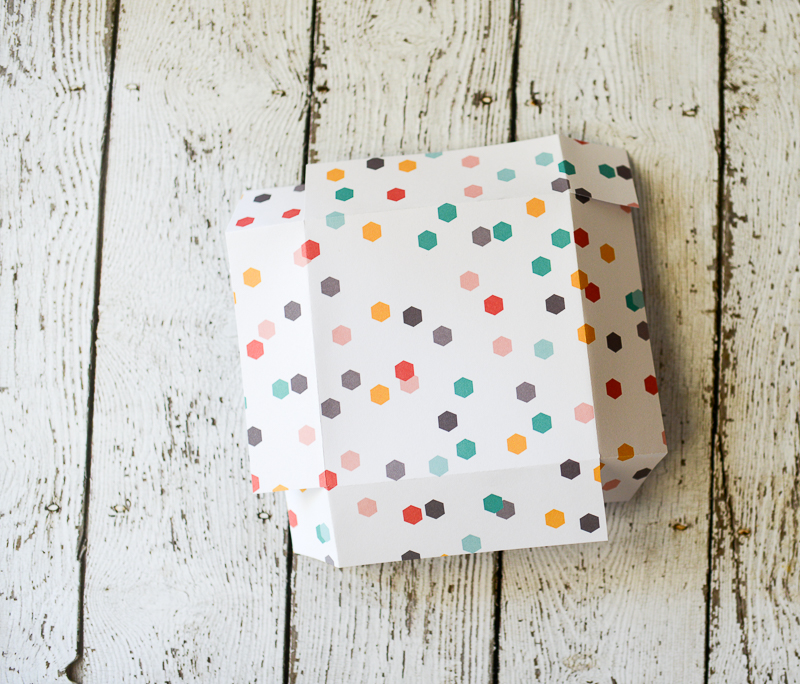
Do exactly the same thing to make the lid for the box, EXCEPT make the sides of the lid shorter (so you can see that pretty bottom box), AND make the center square just a *hair* larger. We’re talking 1/16″ larger, nothing dramatic. Just enough so that the lid will slip over the bottom box without bending the side walls.
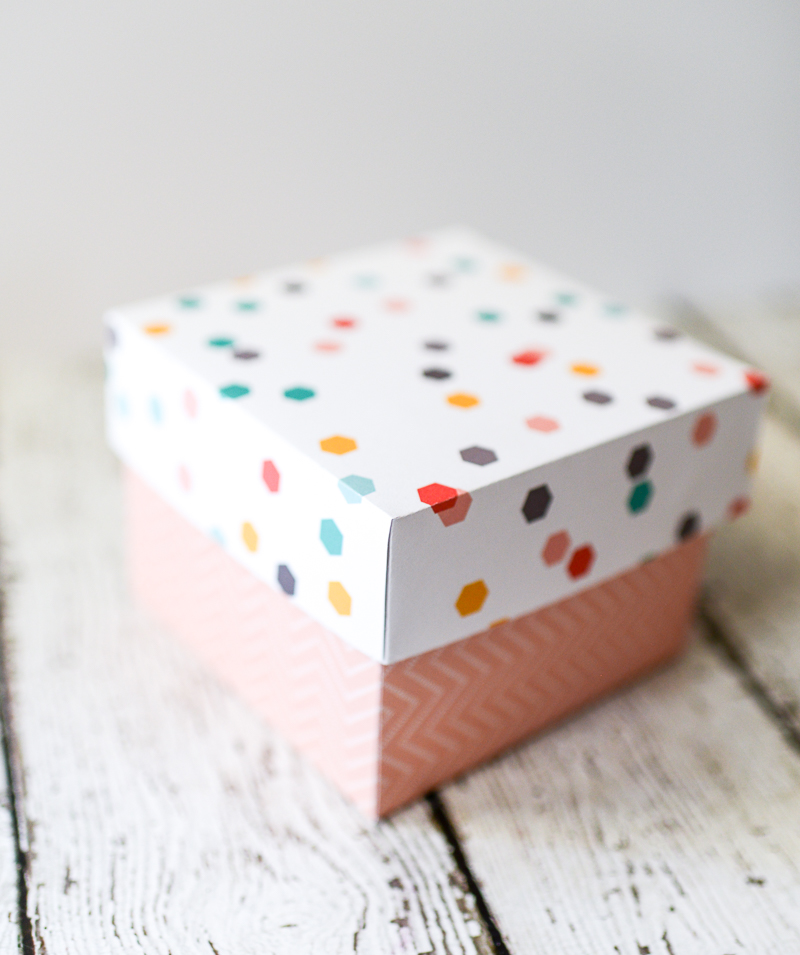
tatertots-jello-hex-gift-wrap-tikkido-7

So pretty, right?

tatertots-jello-hex-gift-wrap-tikkido-22

And the box works so well with the other coordinated presents. I also did a tutorial on my blog for each of the coordinating presents, like the  hexagon punch embellished present, the simple Be Awesome sticker present, and the scrapbook paper band embellished present. So easy, and so perfectly coordinated.

tatertots-jello-hex-gift-wrap-tikkido-18

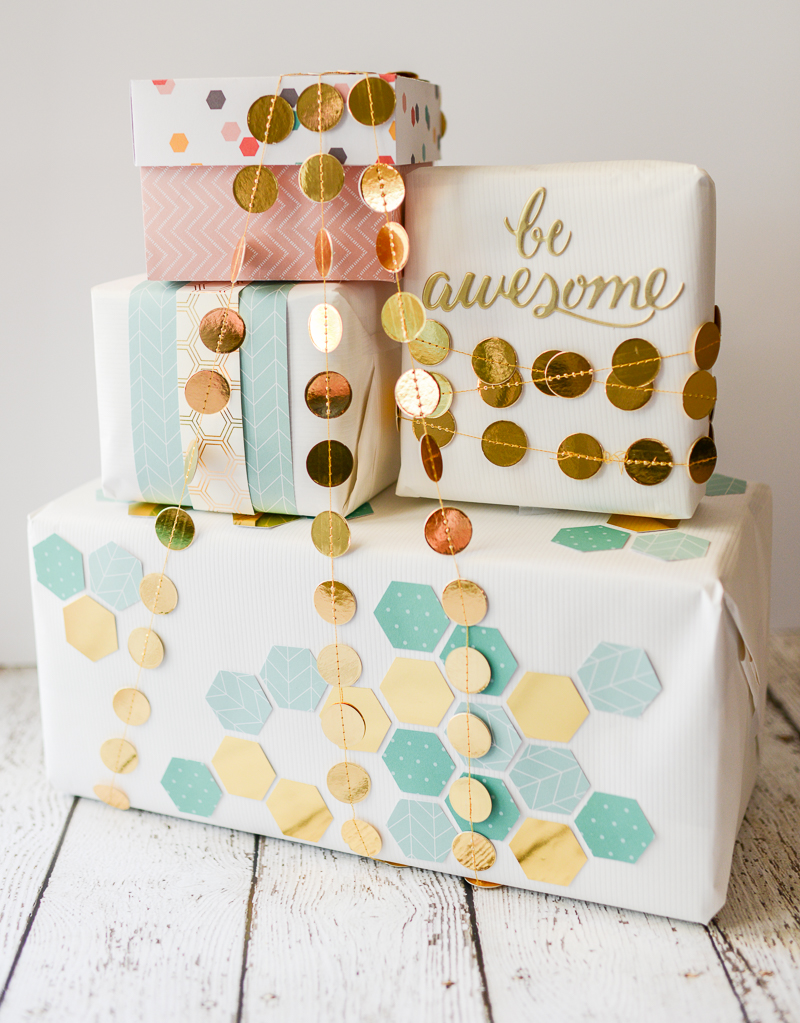
One present is great. But several? Gorgeously, thematically wrapped? Well, that’s a present in-and-of itself.

************

Thanks Nikki! Those presents are just amazing, and so inspiring! I know I would love to get a gift so gorgeously wrapped!

Nikki has amazing ideas on her blog, here are a few I know you’ll love:

firefly resized (25 of 48)

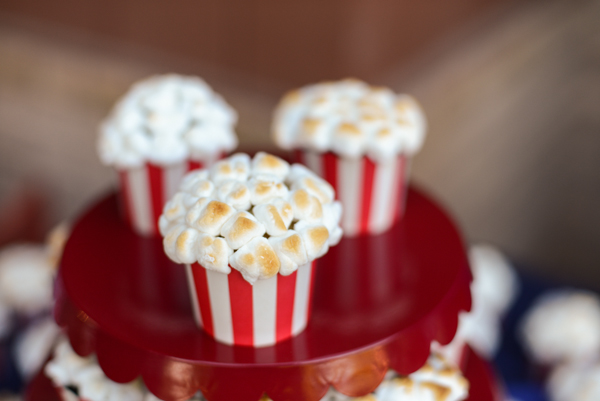
She has this fun tutorial for How to Make Adorable Popcorn Cupcakes!

mirrored cake stand

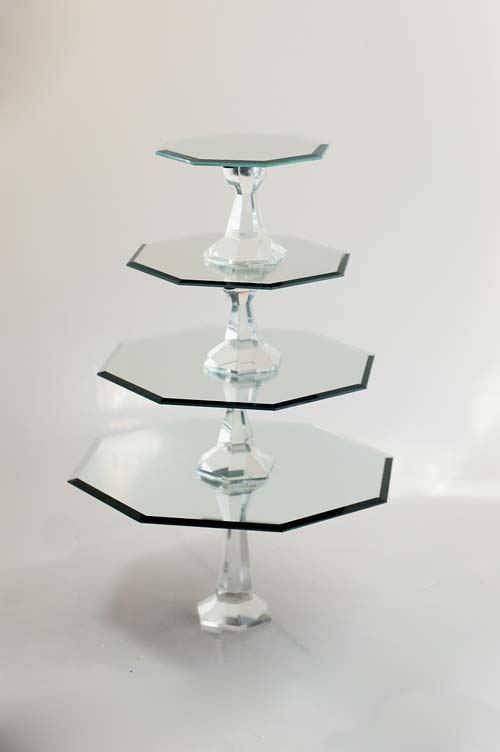
She also has a super cool tutorial for making these Mirrored Cake Stands! So pretty!

Spider Web Cupcakes Tikkido TEXT

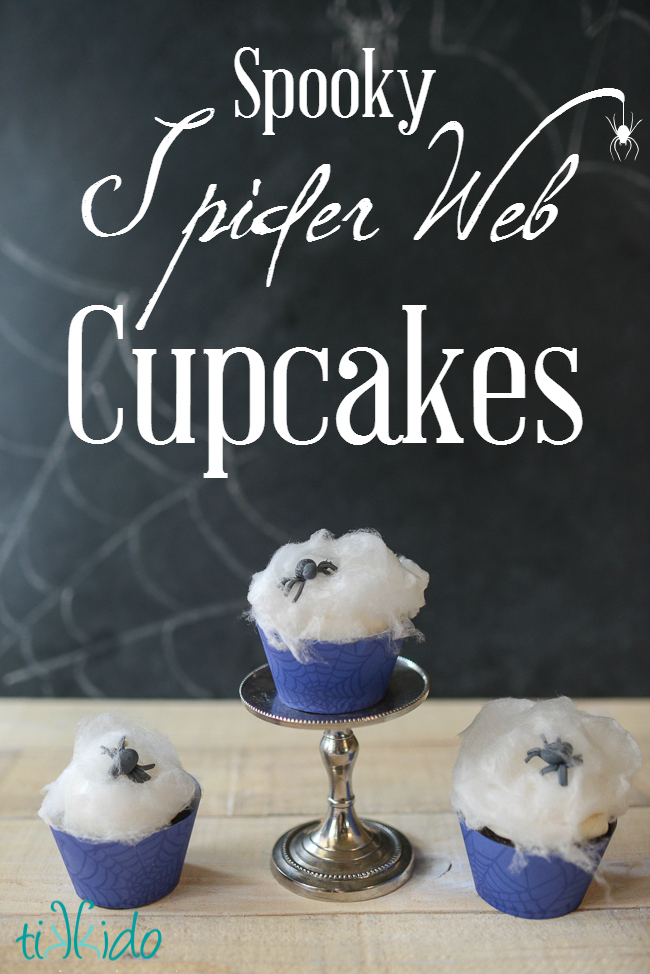
She also has these fun Spider Web Cupcakes with Edible Spiders! So cute!

Make sure to follow Tikkido and
pinterest.32x32.icon.circle
Follow Tikkido on Pinterest
instagram.32x32.icon.square
Follow Tikkido on Instagram
facebook.32x32.icon.circle
Follow Tikkido on Facebook
twitter.32x32.icon.circle
Follow Tikkido on Twitter
And if you’d like to try this project she shared today, you can find my Home + Made line at craft and hobby stores near you!
unnamed
xoxo
jen signature

Related Posts

  • DIY Dry Erase Memo BoardDIY Dry Erase Memo Board
  • DIY Handmade BookmarksDIY Handmade Bookmarks
  • 3-D Letter Art and Storage Jars3-D Letter Art and Storage Jars
  • Easy DIY Instagram DisplayEasy DIY Instagram Display
  • DIY Dry Erase Wall CalendarDIY Dry Erase Wall Calendar
  • Home+Made Scrapbook Pocket Pages and Handmade CardHome+Made Scrapbook Pocket Pages and Handmade Card

Posted By: Jen · In: diy, gift ideas, guest tutorials, paper craft

Gold, Glitter and Grout Pumpkins!
Cowboy Salsa Recipe!

You’ll Also Love

9 Bright Printable Holiday Gift Tags
Paper Bag Leaf Garland. Upcycle your old paper grocery store bags into a warm and vibrant paper leaf garland for a mantel or shelf for Fall!Paper Bag Leaf Garland
Pretty Summer and Father’s Day Ideas

Comments

  1. Alychidesigns says

    July 4, 2017 at 10:02 AM

    This month will be one of my best friend birthday.
    Maybe, I should try this! Looks awesome boxes.

  2. Crystal says

    September 25, 2015 at 3:50 PM

    I love any craft that deals with paper. Love these boxes!! They are beautiful and you can’t get them anywhere else. Love it!!

  3. Antonella | White House Crafts says

    September 25, 2015 at 5:53 AM

    Oh, I have that same paper! And this looks so easy. Thanks for sharing 🙂
    Antonella | White House Crafts recently posted…DAY OF THE DEAD FREE PRINTABLES

  4. Kim says

    September 23, 2015 at 8:33 AM

    I’m curious where you purchased the gold-dot garland for the cardstock boxes you created.
    Thank you!
    Kim

    • Nikki @ Tikkido says

      September 23, 2015 at 2:01 PM

      The garland is actually part of Jen’s line of craft and party supplies! Isn’t it gorgeous?
      Nikki @ Tikkido recently posted…Food Safe Fabric Treat Basket Tutorial

Hi! I'm Jen Hadfield. I'm a mom of 5 restoring an 1891 home in the heart of Salt Lake City. I love being creative and sharing simple ideas to make your life easier and more beautiful!

Receive the Latest Crafts, DIY, Recipes and More in your INBOX!

Follow us on Pinterest! It's awesome!

Top Posts & Pages

$2 Scallop Felt Heart Garland - Valentine's Day Project
Copycat Panera Spinach and Artichoke Egg Soufflés - SO good!
DIY Black Painted Window Frames
DIY Secret: How to Print on Post-It Notes (and Free Printable Template)
Easy DIY Valentine Porch
How to Change a Recessed Can Light into a Pendant Light with No Remodeling!


Popular Posts

  • $2 Scallop Felt Heart Garland - Valentine's Day Project
    $2 Scallop Felt Heart Garland - Valentine's Day Project
  • Copycat Panera Spinach and Artichoke Egg SoufflĂ©s - SO good!
    Copycat Panera Spinach and Artichoke Egg Soufflés - SO good!
  • DIY Black Painted Window Frames
    DIY Black Painted Window Frames
  • DIY Secret: How to Print on Post-It Notes (and Free Printable Template)
    DIY Secret: How to Print on Post-It Notes (and Free Printable Template)
  • Easy DIY Valentine Porch
    Easy DIY Valentine Porch
  • How to Change a Recessed Can Light into a Pendant Light with No Remodeling!
    How to Change a Recessed Can Light into a Pendant Light with No Remodeling!
  • 11 Warm and Delicious Fall Weight Watchers Soup Recipes!
    11 Warm and Delicious Fall Weight Watchers Soup Recipes!

As seen in


Amazon Affiliate

Tatertots & Jello is a participant in the Amazon Services LLC Associates Program, an affiliate advertising program designed to provide a means for sites to earn advertising fees by advertising and linking to amazon.com.
  • About Me
  • Advertising
  • Get Featured

Copyright © 2023 Tatertots and Jello · Privacy
This site is a place for positive discussion and ideas. Negative talk, comments that disparage others, and similar are not welcome and may be removed.