Tatertots and Jello

COLORFUL HAPPY HOME -- Daily DIY, Decor, Craft and Recipe Tutorial

  • My Home
    • 1905 Cottage
    • Daybreak House
  • DIY
    • DIY Projects and Ideas
    • Organizing
    • Tutorials
    • Printables
  • Decor
    • Spring Projects
    • Summer Projects
    • Fall Projects
  • Crafts
    • Kids Crafts
    • Painting Projects
    • Paper Projects
    • Sewing
    • Wreaths
  • Holidays
    • Valentines Day
    • Easter
    • Halloween
    • Thanksgiving
    • Christmas
    • HAPPY Holidays Series!
  • Recipes

Explore

  • my home
  • diy
  • decor
  • crafts
  • holiday
  • printables
  • recipes

Connect

Home » decorating » DIY Wooden Dessert Pedestals for Fall Entertaining!

decorating, diy, Fall Craft, family, party, Thanksgiving, tutorial · September 11, 2013

DIY Wooden Dessert Pedestals for Fall Entertaining!

Tatertots & Jello is a participant in the Amazon Services LLC Associates Program, an affiliate advertising program designed to provide a means for sites to earn advertising fees by advertising and linking to amazon.com.

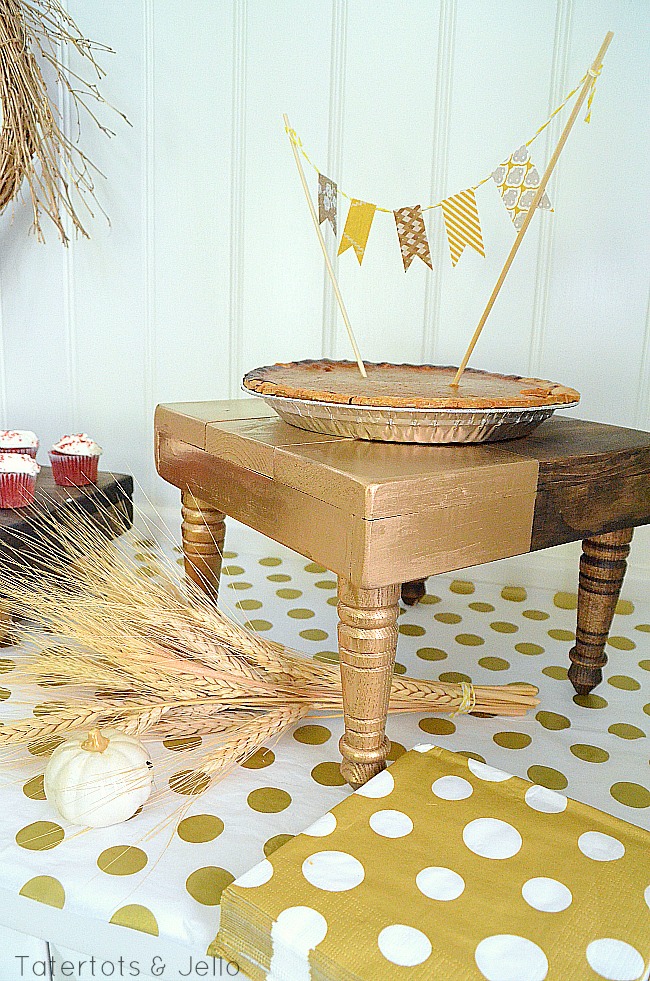
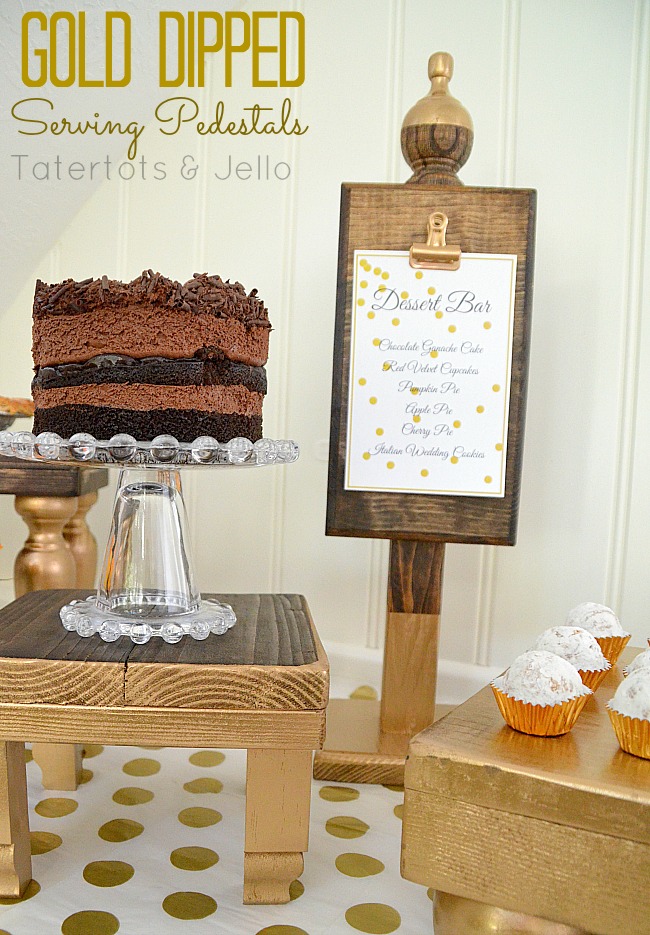
This month for our Lowes Challenge, one of the topics we could choose was a DIY project for fall entertaining. I love Fall — it’s the perfect time for a party!! So I wanted to make some tiered DIY wooden cake pedestals. It’s a easy project and I think it would be awesome on a Halloween or Thanksgiving table!!

gold dip dyed tiered serving pedestals

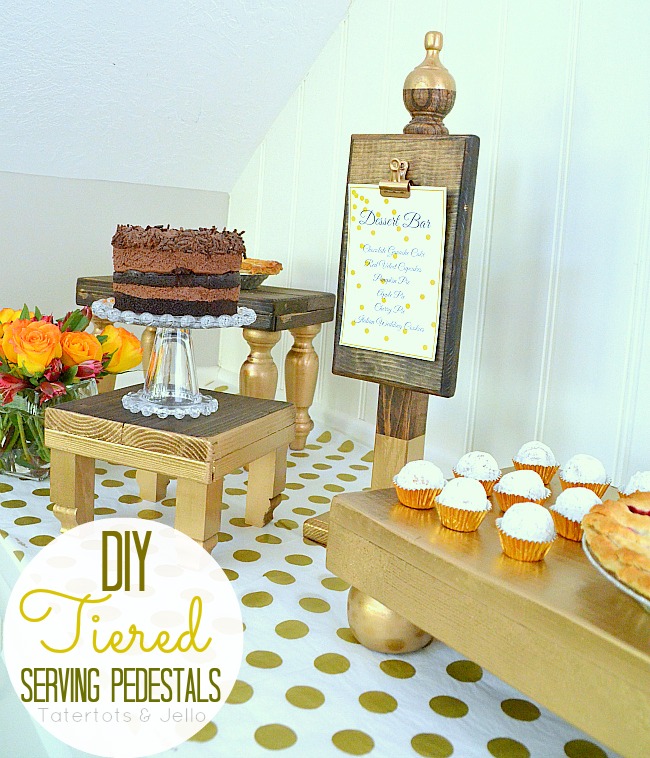
We dipped the pedestals in gold too – for an even more festive look!

long dip dyed serving tray with pie

Here’s how we made these easy DIY serving pedestals:

thanksgiving DIY pedestal tables

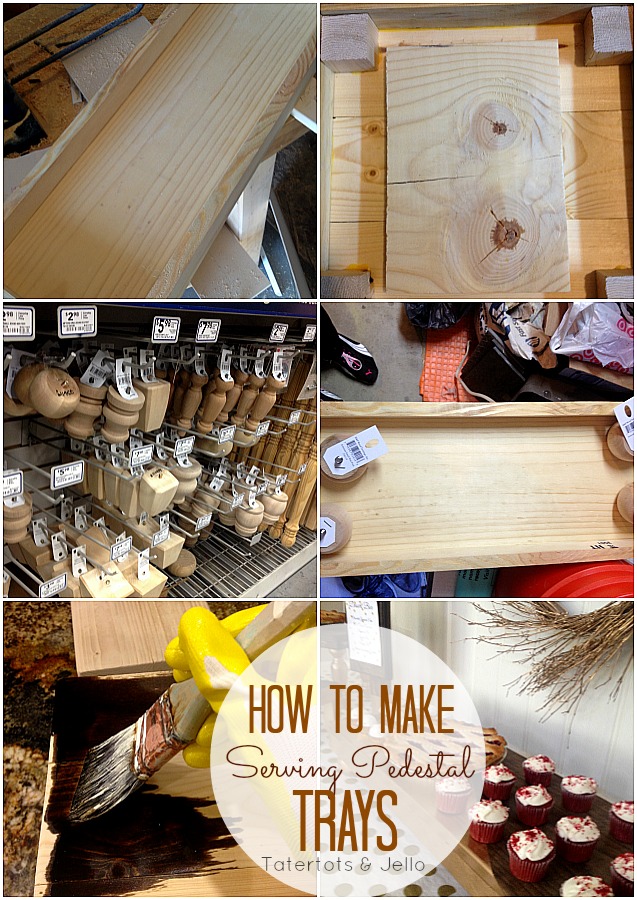
I looked through my pile of left-over boards from the #1905Cottage project and found some different width boards that we cut to different sizes. (We used mostly 1-inch thick, premium pine.) I also chose some leftover molding — like 1x2s and a few smaller  molding pieces — for the “skirts.”

Then we sanded the boards and stained them.

We cut the skirts — like a small frame around the bottom of each board — with 90-degree, straight cuts, instead of doing 45-degree corners. For this project, I wanted that look, but you could do your skirt with 45 degree cuts (like a picture frame) instead.

I attached the skirts with wood glue and small finish nails.

And then we attached different sized legs from Lowes to the bottom of the boards. I also took some smaller pieces of molding and cut those to make legs. Super easy! (On the shortest table, I had to cut some 2×2-inch boards to place between the legs and the top so that the legs weren’t covered by the “skirt.”)

The last thing I did was I taped off the little pedestals at different angles and spray painted them with Valspar Gold Spray Paint.

Once they were dry, I peeled off the tape and they were ready.

how to make wood serving pedestal trays

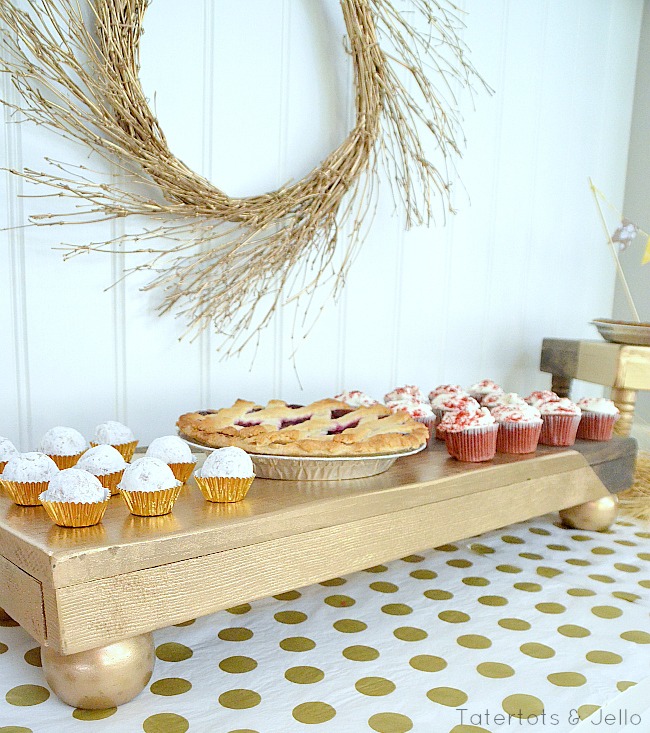
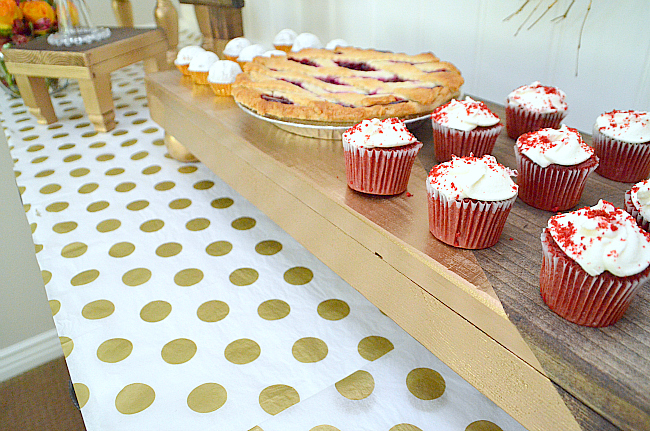
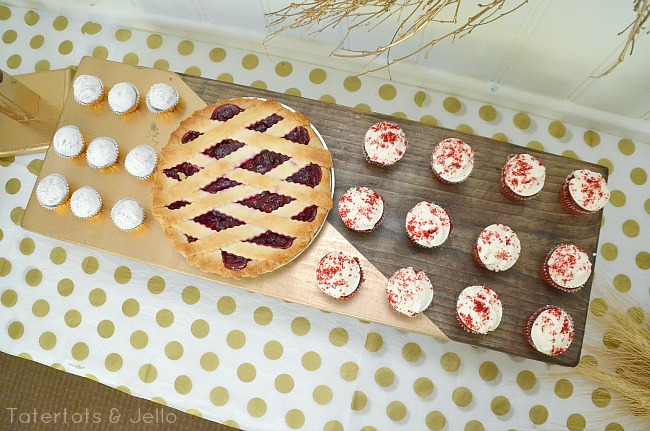
Note – you don’t want to put food directly on these surfaces: I don’t know how “food safe” they are, but you can put a pretty pie plate on them. Also cupcakes in wrappers would be awesome.

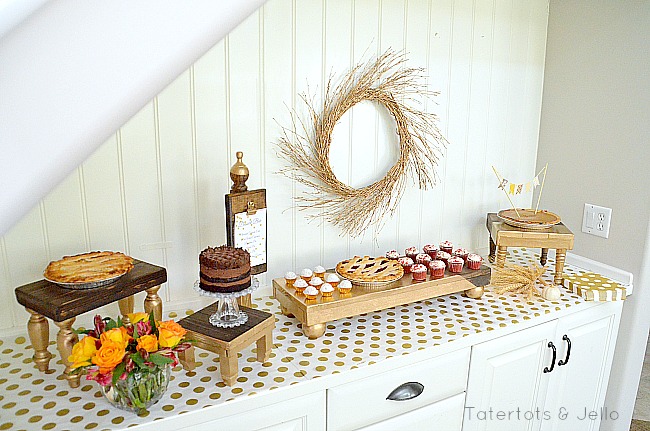
I think the different heights of the pedestals really adds some interest and drama to a Thanksgiving table. I also think you could make just one and use it as a centerpiece for a set of pretty candles. These would also be so pretty for a wedding. You could make a few and then put jars of candies or different treats on a buffet table!

gold dip dyed tiered serving pedestals

dip dyed mini table with pumpkin pie

dip dyed mini dessert tables

lnog dip dyed serving table tatertots and jello

gold dipped serving pedestals for holiday entertaining


You can follow along with Lowe’s on Facebook for more great ideas and sign up for their FREE Creative Ideas Magazine with TONS of great DIY  ideas and instructions!!

lowes creative

Have a CREATIVE Day! 

xox


Thanks to Lowes for gift cards I used to create this project. You can find out more about my disclosures here.

Posted By: Jen · In: decorating, diy, Fall Craft, family, party, Thanksgiving, tutorial

Back to School Project — Create an Organized Homework Station with Washi Tape! #ScotchBTS
Scrolly Fall FREE Cake Toppers and Party Printables – Plus 11 more Fall Printables!!

You’ll Also Love

Welcome Home Saturday – Cozy Thanksgiving Ideas!
10-minute wood pumpkin chalkboard place markersDIY Wood Chalkboard Pumpkin Place Markers
Things I Love This WeekWelcome Home Saturday – Things I Love This Week!

Comments

  1. Jen says

    December 29, 2013 at 4:52 PM

    Love!
    Any chance you can tell me where to get the gold polka dot tablecloth/fabric?
    Thx

    • Jane Rotton says

      April 29, 2014 at 9:30 AM

      I looked for the instruction for the menu stand but couldn’t find it. Did you make it ?

  2. Cindy Hopper says

    September 16, 2013 at 10:26 AM

    Pinned I love these! You have the best ideas.

  3. Krista @ the happy housie says

    September 14, 2013 at 11:54 PM

    These are so pretty Jen- the gold is the perfect complement to the stained wood colour and the perfect colour for the holiday season!! Thanks for the tutorial! Pinning:)
    ~Krista

  4. Angie@Echoes of Laughter says

    September 13, 2013 at 10:27 PM

    This is so gorgeous Jen! I especially love the gold paint…so glam and fabulous! Angie xo

  5. nest of posies says

    September 13, 2013 at 11:00 AM

    Jen, Jen, Jen, Jen!

    these are fantastic & so fun for a gathering! how beautiful will these be for your cookie exchange & the holidays. GORGEOUS!

    xoxox
    kellie

  6. Jim Thomas says

    September 12, 2013 at 10:28 AM

    That looks like something I could do in an afternoon and would add a nice touch to the season. Thank you for sharing.

  7. Sandy @ Reluctant Entertainer says

    September 12, 2013 at 10:09 AM

    LOVE these! Perfect and fun!

  8. Lisa@ Creative Raisins says

    September 12, 2013 at 9:36 AM

    These are fantastic so much better than a store bought stand. ~ Lisa

  9. Sydney says

    September 12, 2013 at 3:53 AM

    So cute! I’m loving the gold dots. I just purchased some gold dot burlap from Joann’s and plan to make some coasters as gifts and also a runner for my holiday table with it. These pedestals would look so good on the table!

    • Jen says

      September 12, 2013 at 7:51 AM

      That sounds so pretty Sydney!! I haven’t seen burlap with gold dots. I need some LOL!!

      Thanks for stopping by and commenting!!

      xoxo

    • Kaite says

      September 12, 2013 at 4:30 PM

      I just purchased that same burlap not knowing what to do with it but I couldn’t pass it up! I might borrow your table runner idea and have to make this stand as a centerpiece for gourds and a candle 🙂

      • Sydney says

        September 12, 2013 at 4:34 PM

        I like the way it’s casual and fancy all in one! 🙂

  10. Marie@InteriorFrugalista says

    September 11, 2013 at 11:55 PM

    These are great! I love the menu board too. I must remember this idea for the holidays.

    • Jen says

      September 12, 2013 at 7:52 AM

      Thanks Marie!!

      They were really fun to make. I am excited to use them this Fall!!

      xoxox

  11. Angie m says

    September 11, 2013 at 8:44 PM

    LOVE!!!!!!!!

    • Jen says

      September 12, 2013 at 7:52 AM

      Thanks Angie!!!

      xoxxo

  12. Tonya Staab says

    September 11, 2013 at 6:20 PM

    Ooh, I love the gold. I made a few of these recently and use them all the time. I think I need another set in gold though. Love the round legs.

    • Jen says

      September 12, 2013 at 7:53 AM

      Hi Tonya!!

      I want to see your pedestals! Have you blogged about them. So fun!!

      xoxoxo

      • Tonya Staab says

        September 12, 2013 at 9:48 AM

        I did, but they aren’t nearly as fancy as yours :). http://www.tonyastaab.com/2013/06/entertaining-tip-making-food-visible-on-diy-stands.html

Hi! I'm Jen Hadfield. I'm a mom of 5 restoring an 1891 home in the heart of Salt Lake City. I love being creative and sharing simple ideas to make your life easier and more beautiful!

Receive the Latest Crafts, DIY, Recipes and More in your INBOX!

Follow us on Pinterest! It's awesome!

Top Posts & Pages

Spruce up Your Outdoor Space with a DIY Recirculating Fountain! (tutorial)
A New Deck in Under 30 Minutes!
DIY Secret: How to Print on Post-It Notes (and Free Printable Template)
12 Must-Have Items to Pack on an Alaskan Cruise!
Copycat Panera Spinach and Artichoke Egg Soufflés - SO good!
Mother's Day Cup Holder Gift Basket


Popular Posts

  • Spruce up Your Outdoor Space with a DIY Recirculating Fountain! (tutorial)
    Spruce up Your Outdoor Space with a DIY Recirculating Fountain! (tutorial)
  • A New Deck in Under 30 Minutes!
    A New Deck in Under 30 Minutes!
  • DIY Secret: How to Print on Post-It Notes (and Free Printable Template)
    DIY Secret: How to Print on Post-It Notes (and Free Printable Template)
  • 12 Must-Have Items to Pack on an Alaskan Cruise!
    12 Must-Have Items to Pack on an Alaskan Cruise!
  • Copycat Panera Spinach and Artichoke Egg Soufflés - SO good!
    Copycat Panera Spinach and Artichoke Egg Soufflés - SO good!
  • Mother's Day Cup Holder Gift Basket
    Mother's Day Cup Holder Gift Basket
  • How to Change a Recessed Can Light into a Pendant Light with No Remodeling!
    How to Change a Recessed Can Light into a Pendant Light with No Remodeling!

As seen in


Amazon Affiliate

Tatertots & Jello is a participant in the Amazon Services LLC Associates Program, an affiliate advertising program designed to provide a means for sites to earn advertising fees by advertising and linking to amazon.com.
  • About Me
  • Advertising
  • Get Featured

Copyright © 2025 Tatertots and Jello · Privacy
This site is a place for positive discussion and ideas. Negative talk, comments that disparage others, and similar are not welcome and may be removed.