Hi all…I’m Jessica from Mom 4 Real, and I am beyond thrilled to be contributing here at Tatertots & Jello! It has been a dream of mine, so I am currently pinching myself.
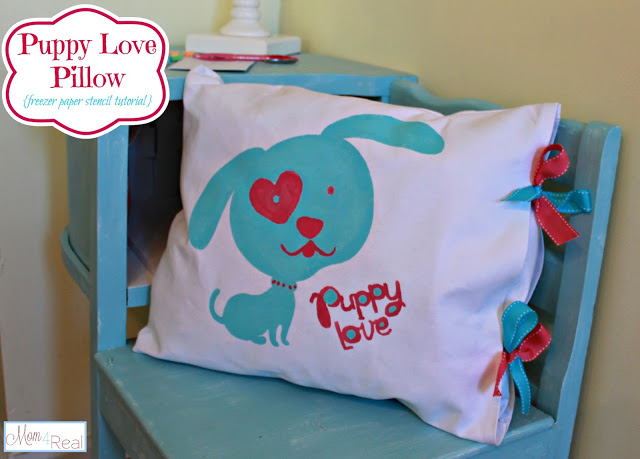
Today I want to show you how to make a pillow using a freezer paper stencil.
This is one of the easiest ways to make your own custom pillows for very little money.
Here’s how to make this pillow:
You’ll need a roll of freezer paper (you can find it at the grocery store near the foil and plastic wrap), some duck cotton fabric or dropcloth fabric, and paint. Cut two pieces of fabric the exact same size. I wanted my pillow to be rectangular, so I cut two pieces 16 X 20 inches.
I used my Cricut cutting machine to cut out my image, but you can cut out absolutely any shape, letter, or image you like. I decided to go with a puppy and this little puppy love saying for Valentine’s Day. The great thing about this pillow, is that my daughter can use it in her bedroom after Valentine’s Day as well.
If you are using a cutting machine, place the shiny side of your freezer paper down on the cutting mat. Smooth out the freezer paper really well before cutting.
Once your image has been cut out, take the outer part of the freezer paper and place it shiny side down on one your fabric panels. Run a hot iron over the stencil making sure that it sticks to your fabric. You want to make sure it is fully sealed.
Once your stencil is firmly in place, take your fabric panel to a table or flat surface. I put a board under my fabric to protect the table. Place your paint (I used acrylic) in a container, and grab your stenciling brush. Get a little paint on your brush and start dabbing paint starting at the edges and working your way in. Once you have painted the entire inside of the stenciled area, allow the paint to dry, then pull the freezer paper up.
I went back in and painted the white spots pink to match the pink Puppy Love saying.
Instead of going with the traditional throw pillow that is sewn all the way around, I decided to leave one end open. I sewed two pieces of ribbon to each panel so you can tie it shut. Make sure to space them the same width apart on each panel. Once you have sewn your ribbons to the side that is going to be left open, place the panels wrong sides together and sew the other three sides together. Turn your pillow case right side out, fill with a pillow form, and tie the ends together.
Trust me, once you have made one of these, you won’t be able to stop yourself…you’ll be making pillows for every room in your home!
Thank you so much for having me here at TT&J! I can’t wait to share more with you!








I love this! I will be featuring on my blog today!
seemesew.blogspot.com
I’ve been looking for that same aqua ribbon. Do you remember where you got it? Thanks
Such a cute puppy! Puppy Love <3 My daughter would love it! I might even be able to make this one for her for Valentines Day! Thanks for the great idea.
This is adorable! I am so going to try this project with my neice! Thanks for the post! : )
Kayla
http://www.lovelucygirl.com
Thank you so much for the opportunity, Jen! I so appreciate the opportunity and can’t wait to share more!
Thanks for the wonderful tutorial Jessica. I am SO excited to have you!!
xoxoxo
Beautiful project! The puppy is just so cute! LOVE! Angie xo
So adorable! I love doing freezer paper stenciling! I’m always surprised so many people have either never tried it or heard of it. Adorable!!
Jessica…you are so creative…the pillow is just adorable…congrats on being a new contributor…I am sure you are so over the moon about it…well deserved…
So adorable!
Love the pillow! How absolutely adorable!
I have never used freezer paper for anything! Not even the freezer, but now I will! There are so many possibilities! It’s fun seeing Jessica here~love her!
Debbie
Love it, Jess! It is so stinkin’ adorable! And congrats on your first post as a TT&J Contributor! You go, girl! 🙂
Love it!! Where did you find the cute puppy..was it part of your cricut stencils?
Hi, Amber! It is actually on the Spring Fever cartridge, and thank you!
Ok thank you. I don’t have a cricut so maybe I can find a cute dog coloring page and use that.
This little puppy pillow is adorable! Just about the cutest thing ever. The colors are fun and I love the side ties. So fun seeing Jess share her ideas here 🙂
Yay Jessica!!! Love seeing you over here! Your pillow is ADORABLE! I’ve been wanting to try freezer paper stencils. This is a perfect tutorial! Thank you!!!
This adorable Jessica! So excited to see you over here on TT&J and look forward to your upcoming projects!
OH Jess… this is so cute! And you are right..I want one is EVERY room.. so can you make them and just send me them? 😉 What a cute idea..and I agree with Cheryl..loving the open end with the ribbons! Nailed it!
Oh it’s so adorable!! I’ve been wanting to use freezer paper to do something like this.
So cute Jess! I love the open end with the ribbons! That part makes the pillow even cuter, if possible!
Super cute!
Super cute! Love it, Jessica!
Really cute Jess! Congrats on the contributor gig too!
How adorable!! That Jess is just too smart!! I’m seeing lots of freezer paper stencils in my future!
Love it Jess! The pillow is super cute and you have once again inspired me to buy some sort of cutting machine…it has been on my wish list for years – need to DO it!
How adorable! I have got to try using freezer paper in my silhouette instead of vinyl when making stencils for fabric… it’s so much cheaper! Thanks for the tip 🙂
What an awesome idea!! I’m in dire need of one of those Cricut cutting machines now. OH THE POSSIBILITIES!!! Thank you so much for sharing, LOVE Mom4Real!!
This pillow is so, so cute! And I really need to try freezer paper stenciling – thanks for all the tips! Great job, Jess!
Adorable, I love love love it. I have never used the freezer paper but you can bet I will. Congrats Jessica, I am so happy for you.
For some reason, freezer paper doesn’t seem to exist in Canada! Arg! I kick myself every time I go over the border and forget to pick some up. I love this idea! The possibilities are endless. Great first contribution, Jess!
I LOVE your Puppy Pillow, Jess! And A Zillion Congratulations for being a new contributor here at TT&J!!! You’re totally amazing and you will ROCK it!
Jess – that is adorable! I just love that little puppy! Great job, my friend! And congrats on being a TT&J Contributor!
OMG this is so stinking cute!!! I always forget about using freezer paper … So much cheaper than vinyl! Thanks so much for sharing this with us!