
I was recently contacted by Northridge Publishing, which hosts a really cool webshow, about being on their show in their Scrapbook Trends Magazine “Create” segment.
It was really fun! The show’s host, Kristine McKay sent me a picture of a beautiful scrapbook layout as inspiration. And she asked me to come up with my own project based on this layout:

There were many elements of the card that I loved: the bold black and white contrast, the polka dots (of course), the damask, the bird for Spring and the burlap.

I thought it would be exciting to take the card and transfer the concept into a home décor project. Plus, I wanted to change the color scheme up a little for Spring and for my home which is lighter and has more green/turquoise colors.
")
So I went out and found a very cheap drum lampshade at Target – $7. I also wanted to add a more modern element, with a larger damask element. I was chatting with my friend Lara from Less Cake {More Frosting} about what I wanted to do and she mentioned a really cool product that she had seen on Char’s blog from Crap I’ve Made. Char discovered this I Love to Create’s Velveteen craft paint. Which was PERFECT for what I wanted to create. You see, this craft paint actually puffs up when it comes in contact with heat, creating a fabric-like look!!
I was so excited!!
I headed over to Hobby Lobby to see this paint. I was a little disappointed to find out that it only comes in a few basic colors, but I bought the white paint and then a slightly darker turquoise than I wanted of regular paint and I thought I would try mixing the two to come up with the color that I wanted plus the fabric texture.
I love experiments!!!

Once I got home I fired up my Silhouette. I love that machine – truly. But you could do this with any craft cutter. I found a damask graphic in their company store and downloaded it (or is it uploading – I get so confused). Regardless – it was .99. Then I enlarged it and printed it out on Stencil transparency film, which you can pick up at your local craft store. I made sure to DOUBLE CUT the film so it went all the way through.

Then I mixed up my paint – 1/2 plain turquoise craft paint and 1/2 Velveteen white dimensional craft paint. I then put my stencil on the shade, securing it with blue painter’s tape. It worked perfectly. I applied the paint with a plain, cheap, foam brush and it worked out great.
The trick to stenciling (I think) is applying the paint at the same angle all the way across.

I had to wait a little bit between stencils to make sure the paint was dry before I rolled the lampshade to another area to stencil. But the paint dried really quickly. So I think the stenciling only took about an hour total.

When the paint was dry, I took my lampshade down to my ironing board and put my iron on the highest setting with steam and then held it about 4 inches away from the lampshade and let the magic happen. I was amazed at the texture that popped out once heat was applied.
Really cool stuff!!


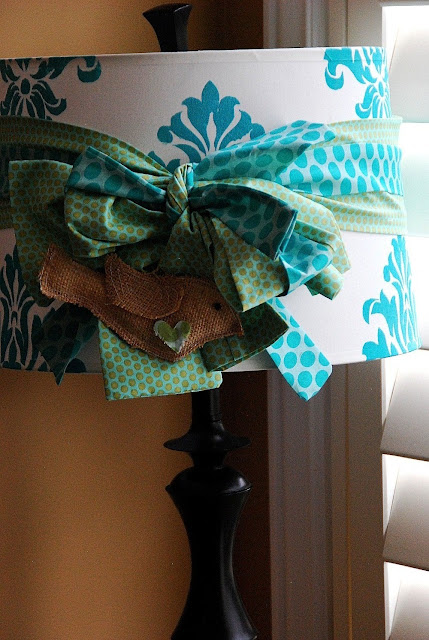
Once I finished stenciling, I put my lampshade aside and made some polka dot ribbon to tie around the lampshade. I folded the fabric over and created a sleeve so that there were no unfinished seams anywhere. The wider fabric was 12 inches in width (so about 6 inches when sewed up) and the smaller ribbon was 6 inches in width (so about 3 inches wide when sewed up).

I made the “ribbons” very long and after the taping I decided they were a little too long, so I shortened them a little.

The last element, and I think the most distinguishing one of the card was the burlap bird. So I made a three-dimensional bird out of burlap with a black bead for the eye. I stuffed it with quilting foam and added a appliqued wing. I also found some polka dot ric rack which I thought echoed the ric rack on the card. The bird is removeable. So I experimented with hanging it from the light switch too.


I made the ribbons removable so that I can leave the lampshade bare if I ever want a more modern look, OR I can also make different colored ribbons and change it out for different seasons. Like it might be fun to make a red and white polka dot one for Valentine’s Day or even Christmas. OR it might be nice to make a plain, linen ribbon for a more sedate look at some point. I mean – I love color. But maybe I’ll change my mind at some point – LOL!

For now – I love how the lamp coordinates with my RUFFLED PILLOWS. And, it also matches my Sweater Refashion #4. hahaha.

Thank you to Northridge Publishing for such a fun challenge.
You are welcome to check out the video too. And, feel free to sign up to their newlsletter and have their creative videos sent to you in email. I also love their “Simply Handmade” books — tons of great ideas. You can buy them at your local craft store or directly on the Northridge website.

xoxo
I am linking up to these fun parties – check them out!


![]()


And Amanda’s Craft Cutter Link Party. Come link up YOUR craft cutter projects!! Beth’s Tutorials and Tips Tuesdays. Check it out!

 This post sponsored by


Do you know what fabrics you used or where I can purchase them? Thanks
Hi there 🙂
I absolutely LOVE your website!! I am making a super list to try and follow the Tutorials you have up. I was wondering in this particular post, where you snagged your lamps???
I fell in love with this lamp when you first posted it. Would you, could you please link this to my VIP party? http://designergarden.blogspot.com/2011/03/vip-party-9.html
Wow! Gorgeous ~ I love the colours!
Wow, one of the nicest DIY tutes I have seen! Amazing job, I may have to try this one myself.
I love that lamp shade! That paint is so cool! I feel the need to do a lamp shade makeover coming on…
🙂
Great job!!!!
I really like this project. Thank you for introducing me to the velvet paint. I can't wait to try it.
Following you.
My mind is going bananas with ideas for this! Just darling, Jen. I am so inspired and impressed. Thanks for putting my on the path to my next project!
That is GENIUS. I want to make something similar for my craft room after we settle in to our new place!
How is it that I repeatedly end up on your site and am still not following you and your brilliance? Off to fix that…
Very nice post. I simply stumbled upon your blog and wished
to say that I have truly enjoyed surfing around your weblog posts.
In any case I will be subscribing on your feed and I’m hoping you
write again soon!
This is FANTASTIC!! I adore it!!
Hi, again, Jen! Just wanted to let you know I featured this post today. 🙂 I appreciate you taking the time to link up with me. 🙂
Was I ever suprised to see my card as the inspiration for your beautiful lamp! 🙂 I love the crafty translation! That paint is so cool amd the colors so frsh and springy! And dont even get me started with that burlap bird!
Hey!
I just featured this tutorial on my blog.
making life a Bliss
I LOVE this!!! That paint is so awesome! Now I want to do this in my house! Great job Jen!
goodness gracious jen.
you are using that machine like crazy! your lampshade looks so good! you've got me TOTALLY thinking of a painting project i could do with that stencil paper…involving chevron.
i think i'm going to attempt it next week. eek! i'm excited.
ok. i picked up that "medium" paint to mix in so i could paint on fabric, thanks for always introducing new fun products to us!
i love how all your home accessory colors flow through your house. so pretty.
love ya!
kellie
I NEED THAT STENCIL, I love damask! LOVE IT!
THAT LAMP IS SO DARN PRECIOUS JEN. I adore it and the bird is just adorable too. Great job. winks-jen
such a great idea! could you tell me what settings you used to cut your stencil film. thanks for sharing your creativity!!!
Absolutely love how this turned out. I want to try this on the little lamp I put in my daughter's room. Thanks for the inspiration!
LOVE this! You're so cool.
This is so seriously fantastic and fun. I love the color combo you used! So going to have to try this technique!
Megan
Oh my word – MUST get my hands on some of that paint! Jen, this is seriously to-die-for gorgeous!
Beautiful tutorial and just gorgeous all over, from the patterns to the colors to the textures! Gotta get some of that paint for my next pillow! Thanks for sharing your talent!
I am seriously DYING over this lamp!! I have to make one now!!! Thanks for sharing such an awesome porject.
So stickin cute! Love how you did it, I am going to get some of that paint and try it out. Anyone who knows me, knows I LOVE damask. Good choice.
Stephanie
Jen you are amazing!!!! Thanks for stopping by and doing this amazing project.
-Kristine
kmckaydesigns
So cute! I absolutely love the ribbon and little hanging birdie. Clever clever girl you are 🙂
So impressive and well thought out, Jen.
~ Sarah
I'm IN LOVE with this lamp. I want it!!
I love that! I am obsessed with Damask right now! And how cool is that technique…looks like velvet!
{Squealing} Jen, that is one gorgeous lampshade. You did a fabulous job of taking the inspiration from the card and using for something in your home. That burlap bird is too cute.
Love the play on color and texture…just lovely!
Thank you so much for taking the time to link up to my Crafty Cutter party. 🙂 You are a wonderful bloggy friend!
Holy crap – so stinkin cute! Thank you for the idea!
Jen, I LOVE your lamp shade!!! LOVE, LOVE, LOVE! That paint is so cool. I will have to buy some and use it on something for sure.
So much fun!
verynice! I just got a Silhouette and I look forward to trying this!
I *love* this!!!! You are so creative. 🙂 You should also tell us sometime how you do those bows. Mine always turn out weird.
you have the ability to come up with anything and that is an amazing gift that everyone cannot say that they were born with. awesome job as always doll.
What a beautifully amazing result.
Could I just borrow your brain for about a week? Never mind, could I just borrow you? I would never have dreamed of this and yet I love it! You are good, so good.
Great idea and beautiful lampshade. So many more things are possible for me thanks to the Silhouette. Thank you for sharng the tutorial.
As always, this is great!
What a stunning piece! It is just so gorgeous I can't stand it. WOW.
This is such a cool project! I never thought of using my silhouette to cute out stencils. SO MANY POSSIBILITIES!! hehe 🙂 definitely going to have to give that a try
I'm completely and totally IN LOVE with this! I want to buy a living room lamp JUST to do this! 🙂 I'd love you to link it up on my Tuesday Link Party!
Smiles,
Melanie
Reasons To Skip The Housework
Tuesday Time Out Link Up Party
Love damask and I love this tutorial! Thanks for sharing!
That is great…I have stenciled but not done any with texture paint..this looks so springy! I am going to have to try it…thanks!
THis is so cute, I love the colors and patterns you used. and the little bird just sets it off. Cute Cute!!
This is GORGEOUS!!!!! WOW, I love how you took the inspiration and totally took it to a whole other level! AWESOME! Thanks for sharing!!
OMGoodness, I am loving this, Jen! Love the stencil template idea. Where did you find the stencil film?? The velveteen looks like so much fun. And I'm dying over the ribbons. So shabby chic!! Great colors!
I used that same color velvet fabric paint for my quilted v-day art…I just love it! I love this lamp idea…so, so cute. I have been contemplating many different lamp makeovers for my blah lamps, this might make the cut!
You have got to be the most creative person I have ever met. I love that paint!!! Thanks for experimenting with adding color to it. I never would of thought of that. I love the whole project. Those litle birds would look cute hanging from a chandelier or made into a cute mobile too.
Very cute!
Oh wow! That is ADORABLE!!!
So cute! I love your style!
Wow! My mind is going over time about all the projects that could be done with this process. Thanks for sharing. -K
Wow! My mind is going over time about all the projects that could be done with this process. Thanks for sharing. -K
What a fun project, Jen! I love the stencil you made and applied ~ I'd have been thrilled to that point! The fabric ribbon you made though really helps "bring it home" and I like that you left it so it is removable. Lovely to see another option to dressing up a lampshade, although, I'll bet it is best to go with a drum shade for the stenciling.
FABULOUS project and tutorial. I am semi-obsessed with custom lamps and this is just perfect in your room!
I really want to buy that paint!
I really want to buy that paint!
Can. Not. Wait. to use that paint. I don't even know what I'd use it for yet.
Do you know if it is available anywhere other than HL? We don't have one in my little Wisconsin town.
I love this! LOVE LOVE LOVE. My mind is furiously working as to where I need a lamp like that, whether I could make something similar, what colors I need, do I have a lamp base….
Anyway, I wanted to let you know that I used your tutorial of your "whimsical Valentine wreath" to make an Easter version posted here:
http://holidaysnobs.blogspot.com/2011/03/easter-cupcake-wreath.html
with a link to your tutorial OF COURSE!
Thanks for sharing!
so so cute! I love how the paint puffs up. I did a double cut this weekend with my Silhouette and cut right through my mat – I need to take some lessons from you 😉
This turned out awesome! Love the colors and little sash!
Oooo! This just gave me an idea for some new curtains. Thanks for the tutorial! Your Lamp is {Darling}!!!
I'm pretty sure this is my favorite craft project I have seen this month!
I love, love it!! This lamp would look wonderful in my bedroom. 🙂
Jen, that is SOOOOO cute! I love the damask w/ the different patterns of the ribbon…such an adorable idea!
I'm still trying to get the feel of my new living room…and kitchen…and bedrooms. Maybe I could work this in somewhere?!
Hope you're having a great week!
The colors are wonderful. Terrific job.
I love the damask pattern in that blue color – beautiful! I'd love to see a picture of the shade without the bows if/when you take them off.
Wow- what a great idea! And I LOVE the color!! Thanks for sharing!
This is one of the BEST tutorials I've seen in a long time. Thanks for sharing.
SO cute, Jen!
That paint is seriously addicting…I dream about it.