Tatertots and Jello

COLORFUL HAPPY HOME -- Daily DIY, Decor, Craft and Recipe Tutorial

  • My Home
    • 1905 Cottage
    • Daybreak House
  • DIY
    • DIY Projects and Ideas
    • Organizing
    • Tutorials
    • Printables
  • Decor
    • Spring Projects
    • Summer Projects
    • Fall Projects
  • Crafts
    • Kids Crafts
    • Painting Projects
    • Paper Projects
    • Sewing
    • Wreaths
  • Holidays
    • Valentines Day
    • Easter
    • Halloween
    • Thanksgiving
    • Christmas
    • HAPPY Holidays Series!
  • Recipes

Explore

  • my home
  • diy
  • decor
  • crafts
  • holiday
  • printables
  • recipes

Connect

Home » Whimsical Spring Wreath

Uncategorized · March 2, 2010

Whimsical Spring Wreath

Tatertots & Jello is a participant in the Amazon Services LLC Associates Program, an affiliate advertising program designed to provide a means for sites to earn advertising fees by advertising and linking to amazon.com.
How’s your week going? If you are friends with my on Facebook, you might have noticed that I was trying to find plastic soda bottles last weekend.  

Here’s the reason. I needed bottles so I could cut them up to make flowers out of them for a Spring Wreath I had in my head.

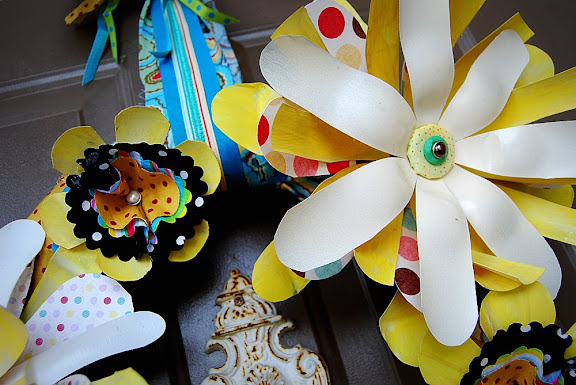
It’s kind of funny, because I ended up collecting about 30 bottles, but once I got the flowers cut out — they were HUGE! I could have made a ginormous wreath with all of those monster flowers. I think it would have been really cool. Instead, I tried to come up with a way to incorporate the flowers into a 16 inch wreath form without completely overwhelming it. After experimenting, I decided to layer the flowers together.
The result is a little unexpected, but completely fun. It reminds me of Disneyland. My husband says that it reminds him of the flowers on the Alice in Wonderland ride.
And, in the spirit of Keeping It Real, this project was quite a bit trickier than I had imagined. I originally wanted to make a wreath form out of chicken wire. That didn’t work out. So about midnight on Friday night I decided to make a wreath form out of clothes hangers and them cover the form in ruffled white duck cloth. Well, the form looked really cute, but by the time I hot glued the huge flowers to it, it was so heavy that the form would not hold its shape. So then I decided to go with a wire form and I wired the flowers onto the form. So if you want to make this project, I’ve done the trial and error work for you!
To make the flowers, I took the plastic bottle, and poked a hole in it with scissors, or with some of the bottles, a drill.

Then I cut around the circumference of the bottle until the bottom comes off. Then I cut petals in the bottle, with the opening of the bottle being the middle of the flower. I painted most of the flowers yellow, but a couple I painted white so they would contrast with the yellow flowers. I did about three coats of paint, alternating the shades a little to give the color a little more depth.

I used a variety of sizes of bottles. The 2 liter bottles make HUGE flowers. In order to layer the flowers together, it is helpful to have different sized opening of bottles. So the bottle with the biggest opening will be at the back of the flower. You can make the petals on this bottle the longest, then a middle layer with a opening that will fit inside the other bottle. And the first flower will have an opening that is the smallest and will fit inside the other two bottles. In the middle of the first flower and the second, I cut out a flower out of patterned card stock and cut a circle in the middle so it would nestle inside of the first and second flower. I thought that this added a little color to the flower.
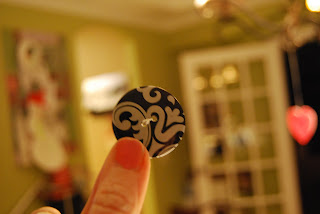
To fill up the mouth of the bottle, I took a large button and wrapped it in coordinating material.
Then I hot glued another button on top of that and added a scrapbooking brad onto the mouth of the bottle to make the center of the flower.
After I wired the flowers to the wreath form, I padded the form with a layer of batting, which I cut into strips and wrapped around the form.
Then I cut a 3 inch panel of bright material and wrapped the form with that. Then I cut another 3 inch panel of alternating material and wrapped that over the first, leaving room so that the underlying material would show through.
I thought it needed a little more color, so I added some ric rack and wrapped that around the edges of the second material.
To make the smaller flowers, I used the smallest flowers that I had left over. I cut out a 5 inch circle of material, followed by a 4 inch and 3 inch circle of contrasting material. Then I put a brad through the circles, attaching them together. After that I put a circle of  hot glue on the back of the circle and pressed it into the middle of the small plastic flower. Then I wrapped a strip of material around the base of the flower and hot glued that on top of the wrapped wreath form.
I attached some strips of material and ribbon together with hot glue to hang the wreath and I was done.
 
 
I am linking this up to:
 

Photobucket
 
Have a wonderful day!
XOXO

Tweet

Posted By: Jen · In: Uncategorized

My 15 Minutes of Fame… well, actually about 6 minutes – lol…
More Cute Subway Art & Being Happy

You’ll Also Love

One of my favorite things about Easter is setting a beautiful table! There are so many different colors and ways you can create a gorgeous Easter tablescape. And they aren't hard! Check out these 12 Beautiful Easter Tablescape Ideas!!12 Beautiful Easter Tablescape Ideas!
orange tulip carrot door hanging12 GORGEOUS Spring Wreath DIYs!
Favrotie things July 24thFavorite Things of the Week: Colorful Home Tour & More!

Comments

  1. Alison says

    April 29, 2010 at 4:47 AM

    What a fabulous idea!! I featured this tutorial and your burlap flower tutorial on my blog today, highlighting 3 dozen flower tutorials. Here is the link:

    http://oopsey-daisy.blogspot.com/2010/04/wednesdays-wowzers-3-dozen-flower.html

    Thanks for the inspiration!!

  2. Pam Ponder says

    March 17, 2010 at 6:53 PM

    I love it can I post this on my blog with a link back to yours I want to remember how to do this and show it off to allmy readers how fun!!! let me know

  3. Katie says

    March 12, 2010 at 3:19 PM

    What a precious wreath and a great way to recycle!!!

  4. ~Issy says

    March 8, 2010 at 8:21 PM

    Wow…that is beautiful! I LOVE the colors…they are so bright and cheery!

  5. [email protected] says

    March 7, 2010 at 10:23 PM

    REally cute! I featured this at somedaycrafts.blogspot.com

  6. Lorie says

    March 7, 2010 at 2:45 AM

    I love it! And I love all the colors!!

  7. The Whitings in Philly says

    March 4, 2010 at 9:22 PM

    I also love this wreath. I am so impressed. I am also wondering about cutting the bottles…it seems like that would be very difficult. Did you use any special scissors? Any tips or pictures about that part of it? Thanks!

  8. Tiffany says

    March 4, 2010 at 6:08 PM

    I will be linking this on my petite purse! Thanks for sharing this great idea!

  9. Tiffany says

    March 4, 2010 at 3:03 AM

    How awesome! This looks like fun.

  10. Rambling Girl says

    March 3, 2010 at 9:26 PM

    Mouth hanging open….awhh! Totally cool!

  11. Beth at Aunties says

    March 3, 2010 at 8:16 PM

    I too love these flowers! They are so fun and full of whimsy. I hope your finger heals so you can enjoy your surprise vacation.:)

  12. Sonia says

    March 3, 2010 at 7:59 PM

    Hi Jen, I love, LOVE, love those! I'm surely gonna try these..one question though, did you use normal shears for cutting the flowers? Or do you need some other tool?

  13. KRISTINA CIPOLLA PHOTOGRAPHY says

    March 3, 2010 at 3:09 PM

    I absolutely LOVE this! So creative and cute! Looks very Alice in Wonderland, which I love. Thanks for sharing! 🙂

  14. RedHeadedStepChild says

    March 3, 2010 at 3:03 PM

    I've been trying to come up with a spring wreath idea for weeks! I just knew you would come up with something, and it's fabulous! Thanks again, for a fabulous inspiration!

    I'll be featuring you soon!
    http://inallmyfreetime.blogspot.com

    ~Abby

  15. Brassy Apple says

    March 3, 2010 at 2:37 PM

    utterly fabulous Jen!

  16. [email protected] The Picket Fence says

    March 3, 2010 at 5:01 AM

    What a fun idea–I can't believe those were pop bottles. Wouldn't they make fun decorations in a girl's room!

  17. Room to Inspire says

    March 3, 2010 at 4:58 AM

    This is so super adorable! I love the flowers, love the colors and love that you re-used materials.

    Chelsea

  18. Miller Racing Family says

    March 3, 2010 at 4:24 AM

    What a fabulous wreath! I love those big bright flowers. This wreath screams Spring!

  19. [email protected] says

    March 3, 2010 at 4:20 AM

    Jen you know I love Whimsy! This is just that…so amazing!! Again, just so creative! Love it!

    Hugs,
    Victoria

  20. Jenn says

    March 3, 2010 at 4:05 AM

    I am absolutely freaking out…that is the most awesome wreath I have ever seen! I cannot believe that it is from pop bottles! Like I have said before–you are a genius!
    I wish I lived in Utah to see you on Studio 5, so I will have to watch it on the web!
    Have a splendid day!

  21. Jenny says

    March 3, 2010 at 2:54 AM

    Perfect for Spring!

  22. Fancy Pants says

    March 3, 2010 at 1:49 AM

    What a great wreath! It turned out so cute! Thanks for sharing 🙂

  23. Megan says

    March 3, 2010 at 1:40 AM

    For cryin' out loud… your wreath ROCKS!

  24. Alely L. says

    March 3, 2010 at 1:22 AM

    btw…now following your wonderful blog~

  25. Alely L. says

    March 3, 2010 at 1:21 AM

    found you through just a night owl who passed on an award to me. i'm glad i stopped by. this is a wonderful blog. looks like i will find a lot of great ideas here. hope you'll come visit me when you get a chance.

  26. Sarah says

    March 3, 2010 at 12:51 AM

    That's so funny!! I am totally working on a project similar to this… a knock-off Anthro window display of sorts. Cool. Your's are, as always, just beautiful. And the colors are so fresh. Yummy!

    Blessings-
    Sarah

  27. ~3 Sides of Crazy~ says

    March 3, 2010 at 12:43 AM

    Now this is just downright genius!! I love it! 🙂

  28. Tausha says

    March 3, 2010 at 12:34 AM

    super cute! I love it! Great idea to use the plastic bottles. I was wondering what you were needing those for. I already have my dvr set. Good luck tomorrw-I am sure that you are going to do great! Say Hi to Brooke for me!

  29. Sue (Someone's Mom) says

    March 3, 2010 at 12:25 AM

    As a child of the late 60's and
    70's…this is all about "flower power" to me. Peace, love and rock and roll!

  30. Connie Weiss says

    March 3, 2010 at 12:06 AM

    I love all of the colors! Did you have to dumpster dive for those bottles?

  31. Amy says

    March 2, 2010 at 11:02 PM

    I love seeing Spring colors..

  32. [email protected] says

    March 2, 2010 at 10:55 PM

    That's really cute and so cherry looking!

    Manuela

  33. Two Beautiful Girls Mommy says

    March 2, 2010 at 10:54 PM

    LOVE IT! I have been wanting to make some of those Anthro inspired plastic flowers but I had no idea where to put them. They look so adorable on the wreath and I can't wait to try it.

  34. Carmen says

    March 2, 2010 at 10:21 PM

    I can't believe the things you come up with. 🙂 This is cute and so colorful.

  35. TeamWatkins says

    March 2, 2010 at 10:20 PM

    I'm always impressed by your creativity but this wreath blows my mind. It's absolutely head-over-heels amazing!

  36. Jenglamgirl says

    March 2, 2010 at 10:11 PM

    talk about creative… plastic bottles.. WOW' way to recycle! LOVE IT, AND THE COLORS, VERY VERY CUTE! hugs, jgg

  37. too Blessed to Stress says

    March 2, 2010 at 10:11 PM

    oh my! so lovely… Love all the photos in the tutorial 🙂

    ~ Emily N. from "too Blessed to Stress"

  38. Andy Porter says

    March 2, 2010 at 10:03 PM

    Ooh!! So fun and Springy!! I love it!

    Andy
    http://www.poppiesatplay.blogspot.com

  39. michelle says

    March 2, 2010 at 9:51 PM

    aw; thats too cute and you are too creative! In a good way of course!

  40. southerninspiration says

    March 2, 2010 at 9:49 PM

    Love the bright colors!! You are quite a clever girl! ;D

    Suzanne

  41. LuckyStarErin says

    March 2, 2010 at 9:43 PM

    Awesome! Is it hard to cut the bottles? I just love everything you make…you are so talented.
    We now have a linky party on tuesdays so come join us!

  42. samantha says

    March 2, 2010 at 9:41 PM

    HOW CHEERFUL!

  43. Bobbi says

    March 2, 2010 at 9:35 PM

    No lie….I was just going to turn off the computer and go paint my soda bottle flowers! WEIRD! I'm attaching mine to a forsythia wreath with a fabric birdie I'm making. WEIRD!!!

  44. Laura says

    March 2, 2010 at 9:28 PM

    So bright and happy and springy! I love it!

  45. Jen says

    March 2, 2010 at 9:11 PM

    oH my ! Jen that is without question the cutest wreath I have seen! I am totally in love! LOVE! making that one for sure! You are the queen bee my dear! Good work – it was almost worth that hole in your finger – RIGHT? LOL!
    Smiles, JEN

  46. ~Bobbi~ says

    March 2, 2010 at 9:09 PM

    I just cannot believe this is made out of bottles. It is absolutely beautiful. My favorite colors and I love flowers. Gorgeous, gorgeous. One of my favorite things you have made!

  47. Amanda @ Serenity Now says

    March 2, 2010 at 9:06 PM

    The sunny yellow is so cheery! I love it. 🙂 You are so good at pairing different colors and patterns!

  48. Jeanette says

    March 2, 2010 at 9:03 PM

    Such a great idea. You lost me at glue gun! But you did an incredible job.

  49. MiMi says

    March 2, 2010 at 9:03 PM

    LOVE! I've been looking for something to do that is springy and not St. Patties.

  50. Kristen Andrews says

    March 2, 2010 at 8:55 PM

    love it Jen, very creative as usual! My poor door is plain at the moment!

  51. Ruby Red Slippers says

    March 2, 2010 at 8:50 PM

    Love it, Jen!!
    So sunny, and happy..It makes me feel like spring just may arrive after all…

  52. mama faith says

    March 2, 2010 at 8:46 PM

    So creative! I'm not sure if I have the patience to do this one. Nevertheless, I love it!

  53. ClassiclyAmber says

    March 2, 2010 at 8:45 PM

    Oooo – I LOVE the whimsy on this wreath! You did such a fab job, as always. And I agree with the previous poster here…it just makes ya so happy looking at it! *SMILE*

  54. Vivienne says

    March 2, 2010 at 8:44 PM

    This is adorable! Just in time for the Alice in Wonderland movie, no? I don't think I would have the patience to do this. Sure is cute though.

  55. Krissy says

    March 2, 2010 at 8:37 PM

    Very cute, I need to make sometihng whimsical for my door in the next few weeks. Its been bare since after xmas!

  56. Two Shades of Pink says

    March 2, 2010 at 8:31 PM

    This is amazing! I kept scrolling up and down through the pictures because these flowers just make me happy. So fabulous!

  57. Kelli @ RTSM says

    March 2, 2010 at 8:16 PM

    That is the most creative and springy wreath I have ever seen! I love it! I bet those flowers would make really cute stakes for your flower pots or garden areas too!

  58. the thrifty ba says

    March 2, 2010 at 8:08 PM

    oh my heck-that is beautiful! i have a huge front door (7 or 8' tall) and im always looking for things to match it in scale! this might be my ticket…

  59. [email protected] says

    March 2, 2010 at 8:08 PM

    That is so fun! I really don't think I have the skill to pull that one off but I love looking at all the fun stuff you come up with!

  60. Jen~ Lipstick and Laundry says

    March 2, 2010 at 8:07 PM

    I love it! So cheerful!

  61. Kimberly says

    March 2, 2010 at 8:00 PM

    How beautiful! I'll have to try my hand at making flowers that way.

Hi! I'm Jen Hadfield. I'm a mom of 5 restoring an 1891 home in the heart of Salt Lake City. I love being creative and sharing simple ideas to make your life easier and more beautiful!

Receive the Latest Crafts, DIY, Recipes and More in your INBOX!

Follow us on Pinterest! It's awesome!

Top Posts & Pages

Copycat Panera Spinach and Artichoke Egg Soufflés - SO good!
Healthier AirFryer Awesome Blossom Recipe!
Kids Outdoor Easter Scavenger Hunt - with printable clues!
DIY Secret: How to Print on Post-It Notes (and Free Printable Template)
Spruce up Your Outdoor Space with a DIY Recirculating Fountain! (tutorial)
DIY Black Painted Window Frames


Popular Posts

  • Copycat Panera Spinach and Artichoke Egg Soufflés - SO good!
    Copycat Panera Spinach and Artichoke Egg Soufflés - SO good!
  • Healthier AirFryer Awesome Blossom Recipe!
    Healthier AirFryer Awesome Blossom Recipe!
  • Kids Outdoor Easter Scavenger Hunt - with printable clues!
    Kids Outdoor Easter Scavenger Hunt - with printable clues!
  • DIY Secret: How to Print on Post-It Notes (and Free Printable Template)
    DIY Secret: How to Print on Post-It Notes (and Free Printable Template)
  • Spruce up Your Outdoor Space with a DIY Recirculating Fountain! (tutorial)
    Spruce up Your Outdoor Space with a DIY Recirculating Fountain! (tutorial)
  • DIY Black Painted Window Frames
    DIY Black Painted Window Frames
  • How to Make a Simple Garden Planter Box
    How to Make a Simple Garden Planter Box

As seen in


Amazon Affiliate

Tatertots & Jello is a participant in the Amazon Services LLC Associates Program, an affiliate advertising program designed to provide a means for sites to earn advertising fees by advertising and linking to amazon.com.
  • About Me
  • Advertising
  • Get Featured

Copyright © 2023 Tatertots and Jello · Privacy
This site is a place for positive discussion and ideas. Negative talk, comments that disparage others, and similar are not welcome and may be removed.