Tatertots and Jello

COLORFUL HAPPY HOME -- Daily DIY, Decor, Craft and Recipe Tutorial

  • My Home
    • 1905 Cottage
    • Daybreak House
  • DIY
    • DIY Projects and Ideas
    • Organizing
    • Tutorials
    • Printables
  • Decor
    • Spring Projects
    • Summer Projects
    • Fall Projects
  • Crafts
    • Kids Crafts
    • Painting Projects
    • Paper Projects
    • Sewing
    • Wreaths
  • Holidays
    • Valentines Day
    • Easter
    • Halloween
    • Thanksgiving
    • Christmas
    • HAPPY Holidays Series!
  • Recipes

Explore

  • my home
  • diy
  • decor
  • crafts
  • holiday
  • printables
  • recipes

Connect

Home » crafts » "Summer Social" Guest Project — Decorative Tile Message Board {tutorial}

crafts, guest tutorials · June 21, 2011

"Summer Social" Guest Project — Decorative Tile Message Board {tutorial}

Tatertots & Jello is a participant in the Amazon Services LLC Associates Program, an affiliate advertising program designed to provide a means for sites to earn advertising fees by advertising and linking to amazon.com.

Hello, Tatertots and Jello readers! My name is Amanda and I blog about crafts, thrifty decorating, recipes, and home life at Serenity Now. I love mochas, shoes, and Target.

As a stay-at-home mom of two little girls, I spend a lot of time at the kitchen sink washing dishes. 

Today’s project is a very simple, easy craft that will give you something cute to look at while you scrub those sippy cups!

Decorative Tile Message Board

Supplies:

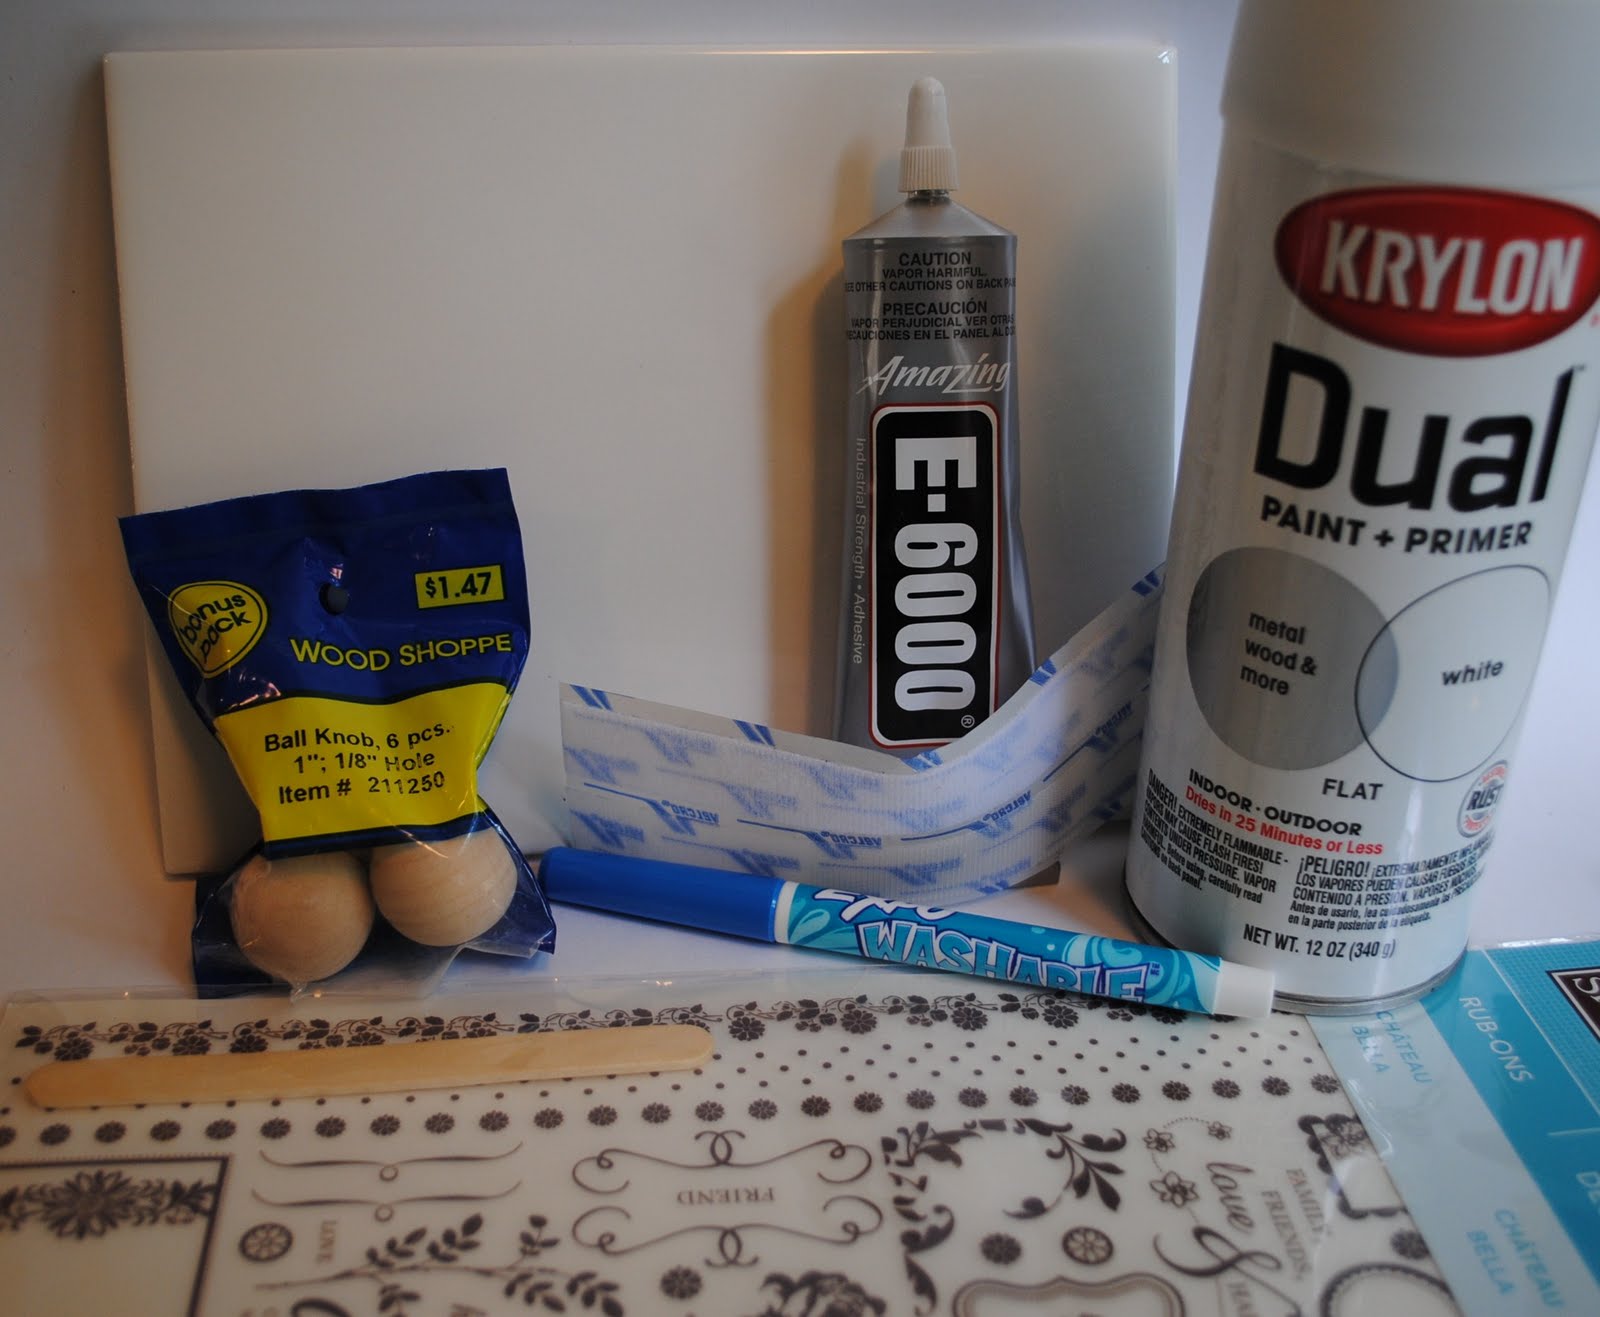
  • Large Ceramic Tile from a home improvement store (only $0.77 apiece at Lowe’s)
  • E-6000 glue
  • White Spray Paint
  • Ball Knobs (with one side flat) from craft store
  • Dry Erase Marker
  • Velcro
  • Rub-ons from craft store or Silhouette/Cricut and vinyl

Here’s how I did it!

1. Choose your rub-on (or vinyl design) and cut to fit your tile. 2. Lay your designs out and be sure they are spaced where you want them. 3. Follow the manufacturer’s directions and be sure your rub your design (or vinyl) down all the way. 4. Carefully peel away the rub-on backing or the Silhouette transfer tape

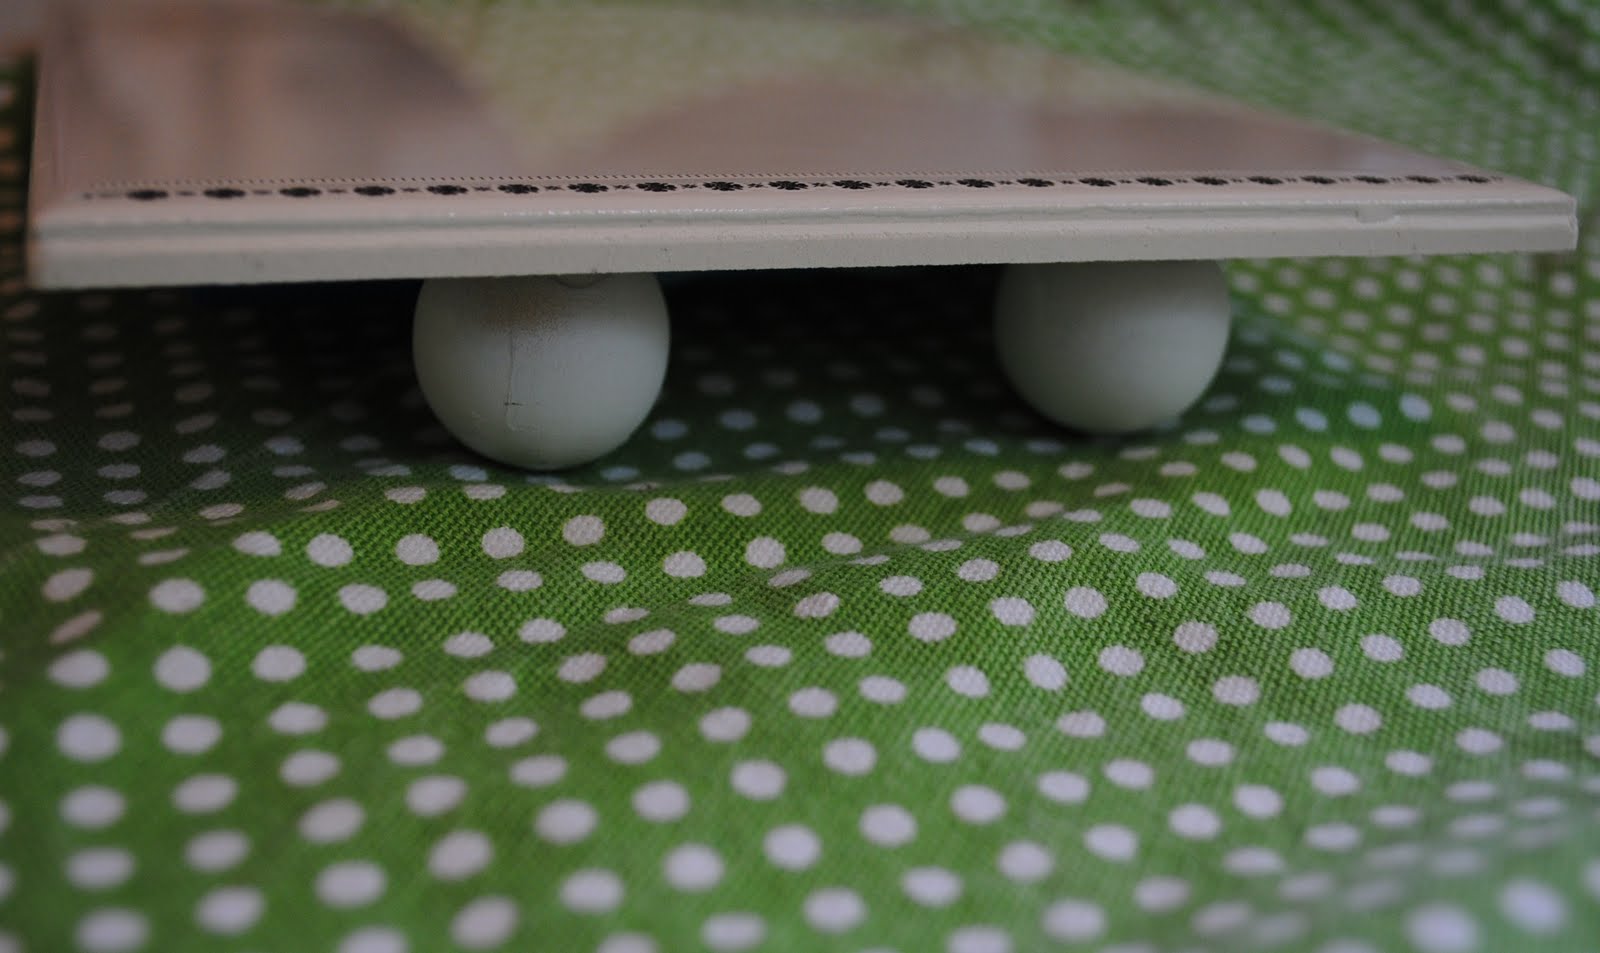
5. Apply E-6000 to the flat side of your knobs (after you’ve spray painted them white and they are dry) 6. Firmly press the knobs onto the back of the tile 7. Cut a small strip of velcro and apply to the back of the tile. 8. Apply the other side of the velcro to the pen and secure it to the back of the tile. Now your memo/message board is inclined to make writing easier!

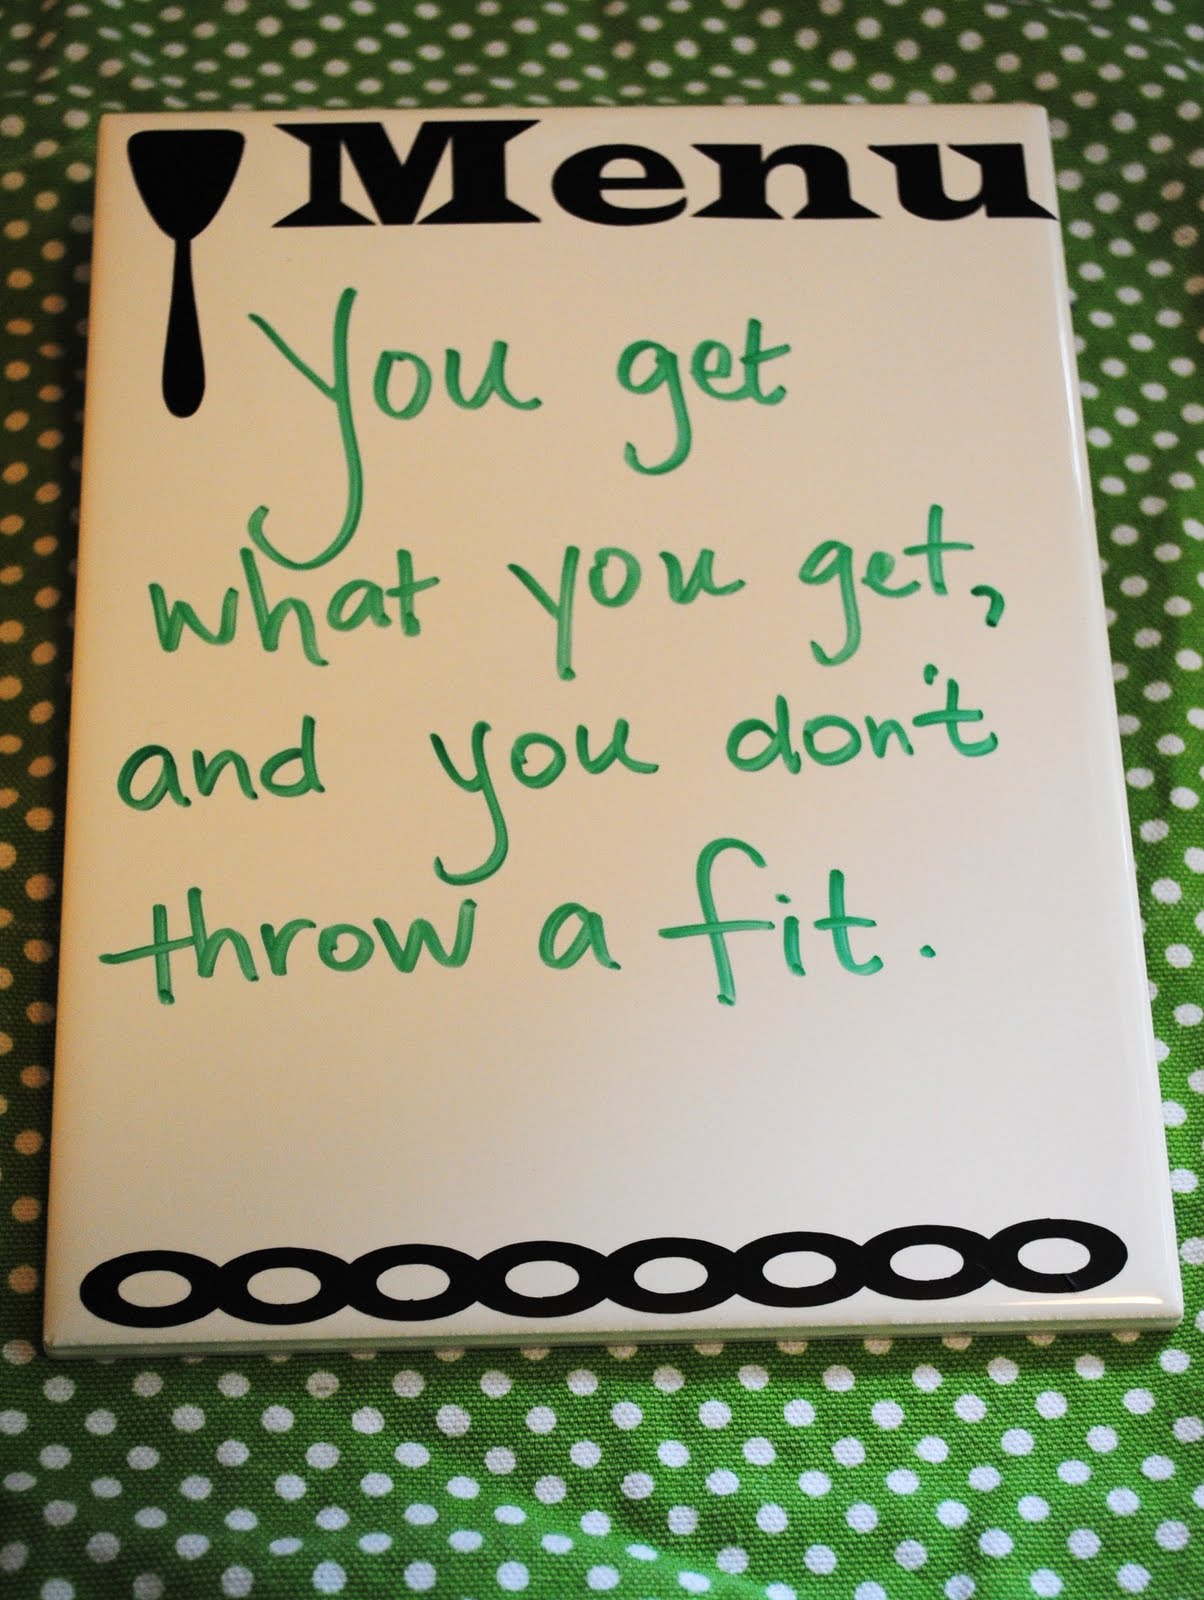
I wrote the most profound quote I could think of:

The dry erase marker should come right off with a paper towel. Wet it just a bit if the marker is older or stubborn. These make great gift ideas! I love words and quotes. It makes washing those dishes slightly less of a chore when I have something fun to look at. It’s also great for Bible memory verses, funny notes to your husband, to-do lists, and more. It would also be cute sitting on a small easel. You can pick up a pack of rub-ons at the craft store with a coupon for a couple of dollars if you don’t own a Silhouette. I used my Silhouette to cut some vinyl to make a separate Menu Board:

I’d love to know if you make one, and I hope you’ll come and visit me at Serenity Now soon! Jen, thank you so much for sharing your blog with me today. Your sweet spirit and generosity are inspiring. I appreciate you!

Thanks Amanda — what a great tutorial!!! 
Those tiles would make a great teacher, birthday or neighbor gift too! 
Amanda is one of the sweetest bloggers around. Plus, she has really fun ideas!! 
{I love Amanda’s thrifty Office space. She thrifted almost the whole space!}
{I Love Amanda’s Ruffled Bag and Headband tutorial}
And Amanda has a fun party where you can share your craft cutter projects — like Cricut, Silhouette, etc. It’s always full of great ideas!! 

Plus, she has her weekly “Weekend Bloggy Reading” Party where you link up your favorite projects from the week to share! 


Thank you Amanda!! 
I love those little round feet you put on the tiles!
xoxoxo
PS — We rode “The Tube” all over London yesterday – so fun!! And the weather was pretty nice until evening when it started to rain and we had to buy some umbrellas – lol! We also had the most delicious curry for dinner last night. Yum! I hope you are having a great week!!
PPS — I am loving the discussions that are happening over at BlogFrog’s International Delight Community. Come on over. It’s a great place to get to know people and get great Summertime ideas!


Posted By: Jen · In: crafts, guest tutorials

Giveaway Monday — $50 to Starfish Jewelry {custom jewelry made in sunny San Diego}
"Summer Social" Guest Project — Free {Chevron} Summer Party Printables!!

You’ll Also Love

DIY Gingerbread Christmas Wreath
make a dog playhouse out of a box. all the instructionsMake an Adorable DIY Dog Playhouse Out of a Box!
15 Best Kitchen Ideas for 2023!

Comments

  1. Kris says

    January 6, 2013 at 2:18 PM

    Thanks so much for the awesome idea! I just finished 10 of them for a craft swap with my friends. I cut my saying from my Silhouette. It says day to day stuff. Very fun!!! Thanks

  2. Addicted to Crafting says

    June 29, 2011 at 2:18 PM

    you have insired me to start a blog! Thank you!

  3. Leah says

    June 22, 2011 at 6:40 PM

    What a cute project – I didn't know you could use dry erase markers on tile – I'll be picking up a few on my next trip to the hardware store!

  4. james @ agirlcalledjames says

    June 22, 2011 at 12:31 PM

    Way Cute!

  5. Crystal @ Ordinary Days says

    June 21, 2011 at 8:41 PM

    Great post! This might be just what I need to push me over the "buy a silhouette" edge! lol

  6. Maggie says

    June 21, 2011 at 7:26 PM

    Love it, hoping to make a menu one and a school one 🙂 if not more 🙂

  7. FrouFrouBritches says

    June 21, 2011 at 6:26 PM

    Great idea Amanda! I love that it uses rub-on transfers. Even I can do that. Super cute!

  8. Stephanie says

    June 21, 2011 at 6:14 PM

    Such a cute idea! I really want to do a "menu" in my kitchen, and this would be perfect!

  9. Monica says

    June 21, 2011 at 4:58 PM

    This is really cute and I can't wait to see more pictures from your trip! Have a great time! :o)

  10. lauren@warmandfuzzy says

    June 21, 2011 at 4:38 PM

    This is a great twist on the glass frame message boards you always see, loving it especially the rub on sticker!

  11. Paula says

    June 21, 2011 at 4:25 PM

    What a great project! This would be fun to do and it would make a great gift. A school themed one would be a cute addition to my classroom!

  12. Kelli @ RTSM says

    June 21, 2011 at 3:00 PM

    What a fun and easy idea! I need a menu one at my house…maybe then I will actually plan a few meals:)

  13. The Answer Is Chocolate says

    June 21, 2011 at 2:41 PM

    Awesome project. I love rub-ons and using these kinds of tiles. Would make a great gift.

  14. Momma on the Run says

    June 21, 2011 at 2:27 PM

    cuuuute! This makes me want a Cricut even more!!

  15. Melissa says

    June 21, 2011 at 2:22 PM

    I love this idea! My mind is just spinning with things to design 🙂

  16. Bellenza Wedding Bistro says

    June 21, 2011 at 1:41 PM

    Have always wanted to do something with decorative tiles. Now, I see that I can be the one to decorate them! Thanks, Amanda and Jen!

  17. Louley's Belles says

    June 21, 2011 at 1:22 PM

    Message tile too cute!!!!

  18. Dixie Mom says

    June 21, 2011 at 1:15 PM

    Darling idea!

  19. Anthony from CharismaticKid says

    June 21, 2011 at 1:13 PM

    This is cool. But can guys do this too? (I'm a male nanny ;-P)

Hi! I'm Jen Hadfield. I'm a mom of 5 restoring an 1891 home in the heart of Salt Lake City. I love being creative and sharing simple ideas to make your life easier and more beautiful!

Receive the Latest Crafts, DIY, Recipes and More in your INBOX!

Follow us on Pinterest! It's awesome!

Top Posts & Pages

Spruce up Your Outdoor Space with a DIY Recirculating Fountain! (tutorial)
A New Deck in Under 30 Minutes!
12 Must-Have Items to Pack on an Alaskan Cruise!
DIY Secret: How to Print on Post-It Notes (and Free Printable Template)
Copycat Panera Spinach and Artichoke Egg Soufflés - SO good!
How to Make a T-Shirt Quilt!


Popular Posts

  • Spruce up Your Outdoor Space with a DIY Recirculating Fountain! (tutorial)
    Spruce up Your Outdoor Space with a DIY Recirculating Fountain! (tutorial)
  • A New Deck in Under 30 Minutes!
    A New Deck in Under 30 Minutes!
  • 12 Must-Have Items to Pack on an Alaskan Cruise!
    12 Must-Have Items to Pack on an Alaskan Cruise!
  • DIY Secret: How to Print on Post-It Notes (and Free Printable Template)
    DIY Secret: How to Print on Post-It Notes (and Free Printable Template)
  • Copycat Panera Spinach and Artichoke Egg Soufflés - SO good!
    Copycat Panera Spinach and Artichoke Egg Soufflés - SO good!
  • How to Make a T-Shirt Quilt!
    How to Make a T-Shirt Quilt!
  • 25 Quiet Time Activities for Kids
    25 Quiet Time Activities for Kids

As seen in


Amazon Affiliate

Tatertots & Jello is a participant in the Amazon Services LLC Associates Program, an affiliate advertising program designed to provide a means for sites to earn advertising fees by advertising and linking to amazon.com.
  • About Me
  • Advertising
  • Get Featured

Copyright © 2025 Tatertots and Jello · Privacy
This site is a place for positive discussion and ideas. Negative talk, comments that disparage others, and similar are not welcome and may be removed.