
I participated in Amanda @ Serenity Now‘s Decorating Dilemma party a couple of months ago. I shared a terrible eyesore in my kitchen.
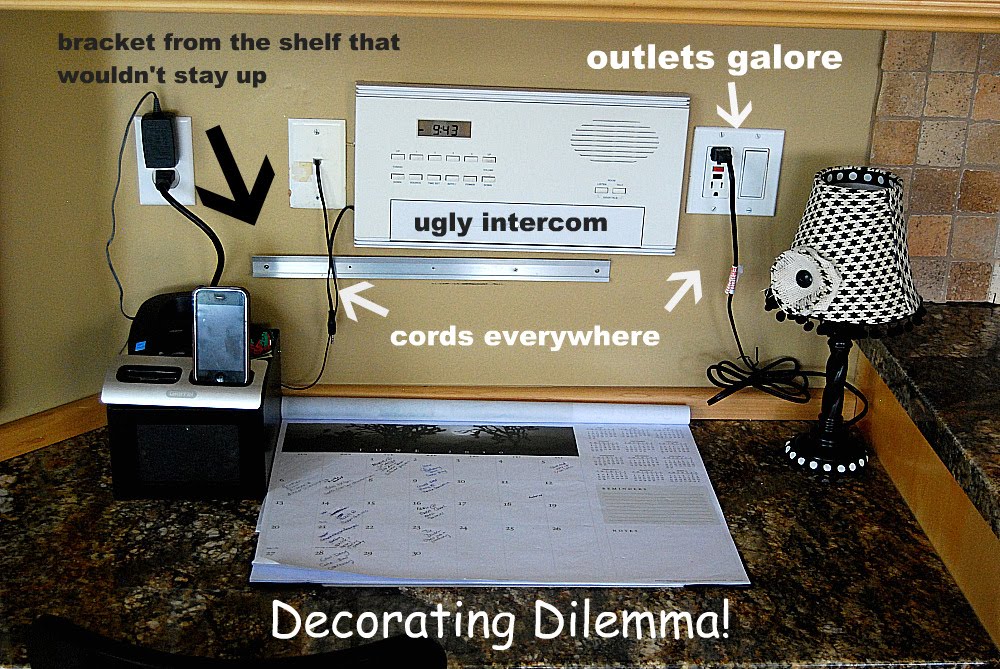
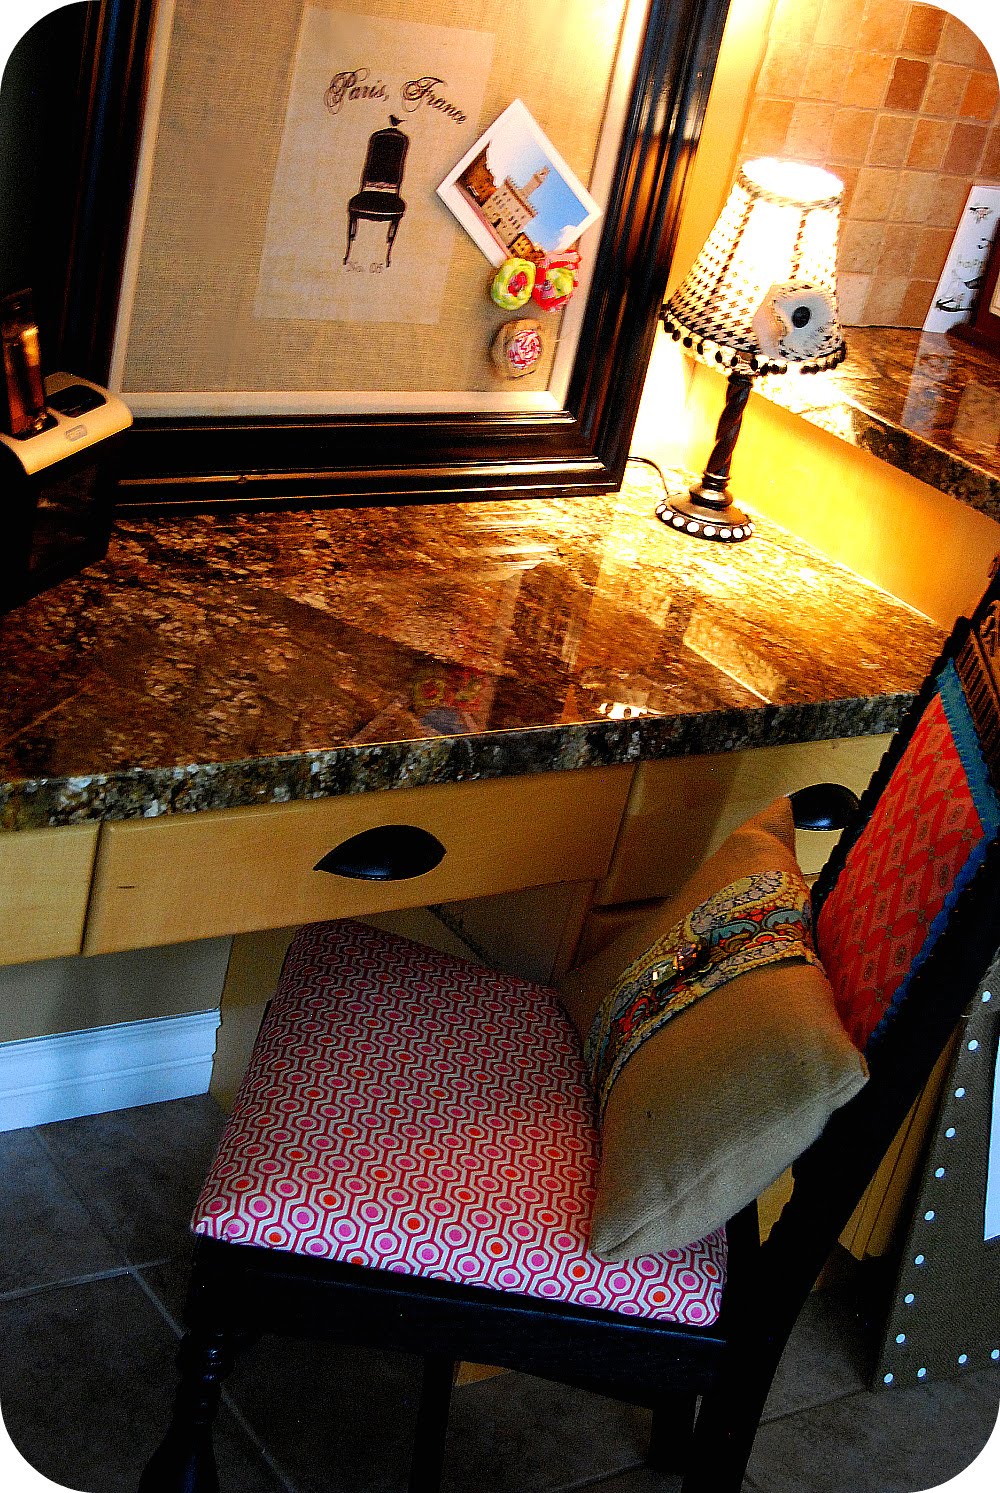
My kitchen desk which is a haven for everything that comes in the house. My kids love to dump their papers, food, shoes, and whatever else they can find on that space. It also is where the builders of the house built in a huge intercom gadget smack in the middle of the wall, plus a zillion wall outlets. Let’s just say — it’s not a pretty corner to do any work. I saw a post that Pam did a Bibbity Boppity Beautiful where she put a shelf on the wall to store her electronic gadgets and I thought it was such a great idea. Well, the shelf I bought started dropping immediately after I installed it and all of the gadgets slid off onto the desk. I pretty much gave up on the space after that and I even left the metal strip from the shelf.
Part 1: The Chair

About the same time as this was happening I was driving down the street in my neighborhood and came upon this beauty. She is pretty awful. Someone put her out to the curb in the rain! Well, I picked her up and thought I might be able to give her a new life for my desk.

This was the catalyst that started my desk transformation. {Bear with me — this post might be a tad long — this is actually three projects in one post.}
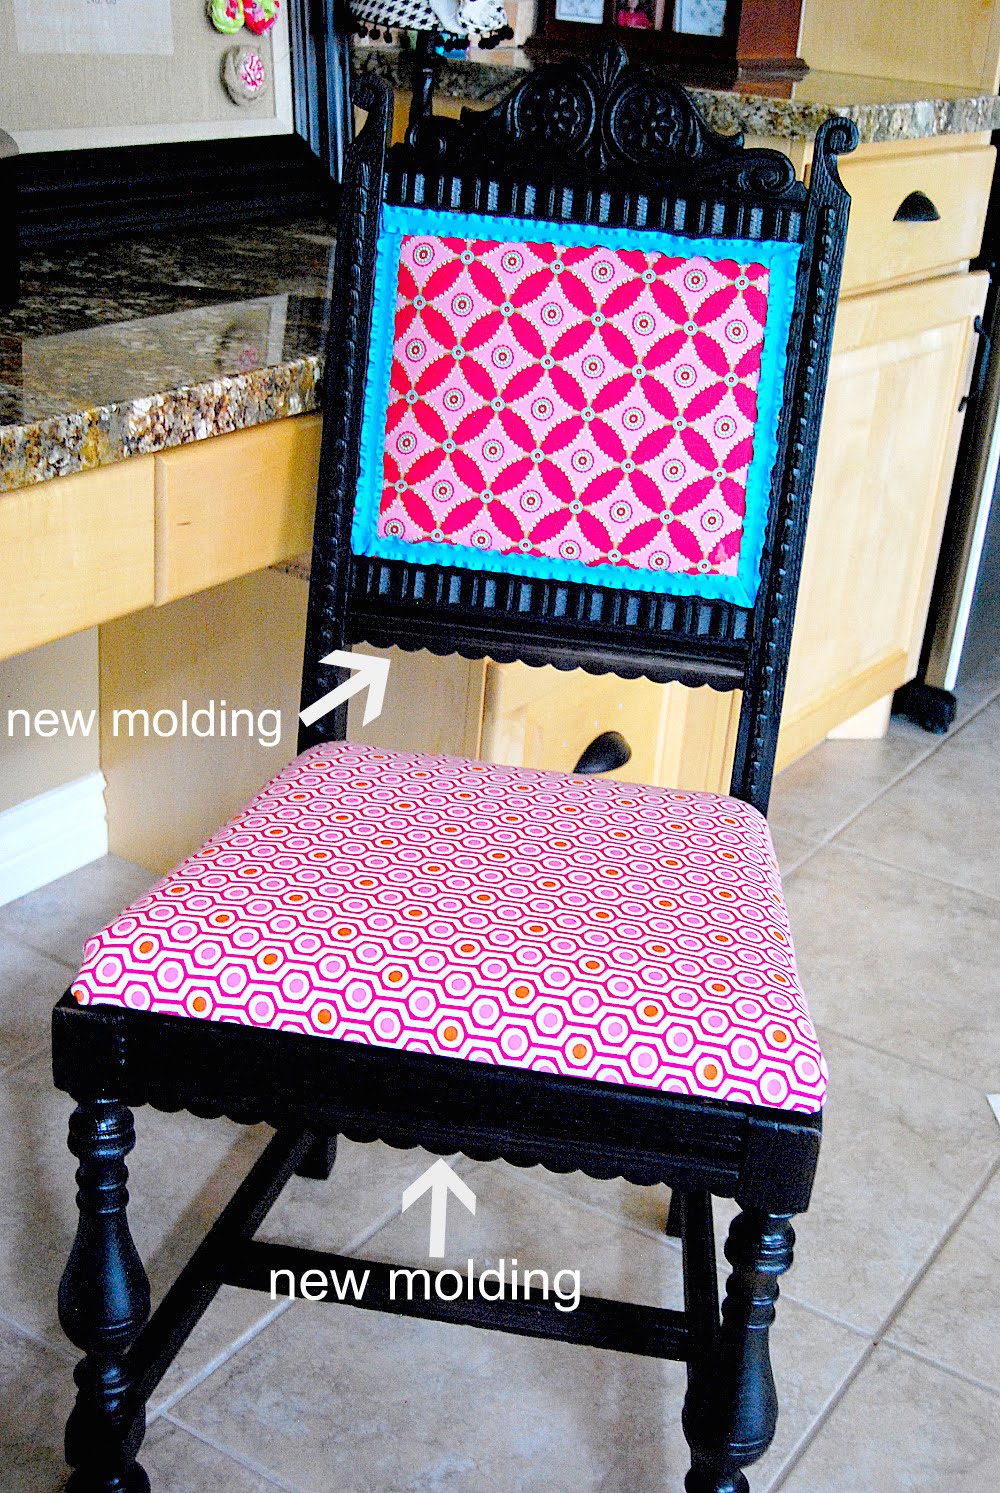
It started with the chair. I brought her home, sanded her off and took off the hideous Brady Bunch upholstery. Then I painted her using DecoArt’s Americana black paint.I used a bristle brush to get in all the nooks and crannies.


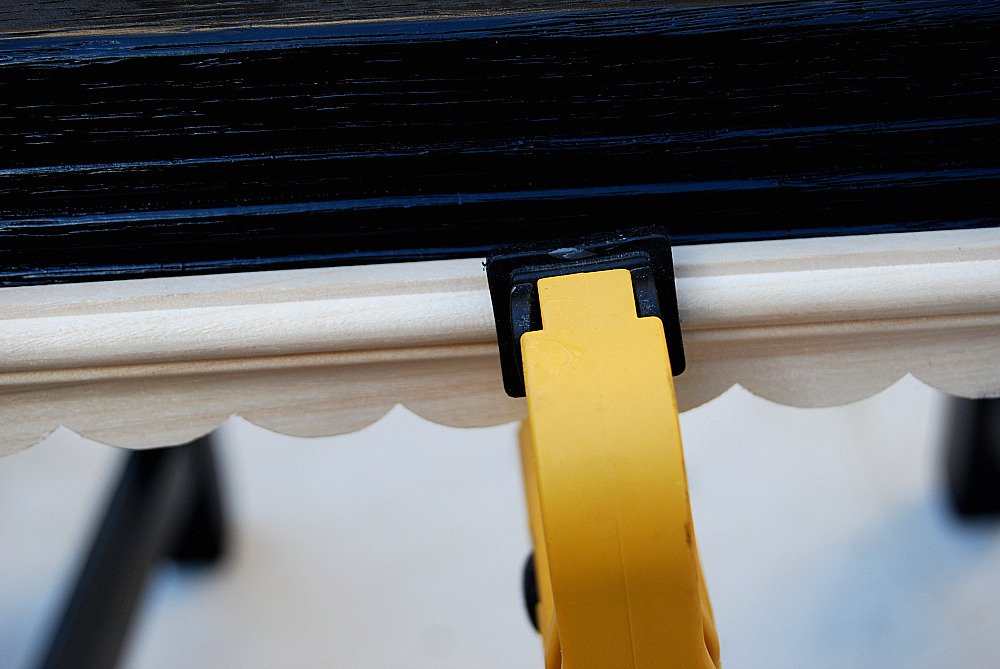
I also decided to add some scallop molding to take a little of the gothic element out of the chair and add a little more cottage-y feel. I used Gorilla’s Wood Glue and then clamped it until the glue dried.
And when I was done, I used Rockler’s Deft Finishing Spray to give it a slight sheen and to protect the surface.

I picked out three fabrics that I liked for the seat, the back and the other side of the chair. Then I recovered the seat.

I took off the old hideous material and added an extra layer of batting. I used my staple gun and stapled one side, then pulled the material taut and stapled the opposite side. And did the same with the other three sides. I folded the material down before I stapled it so that it was extra secure.
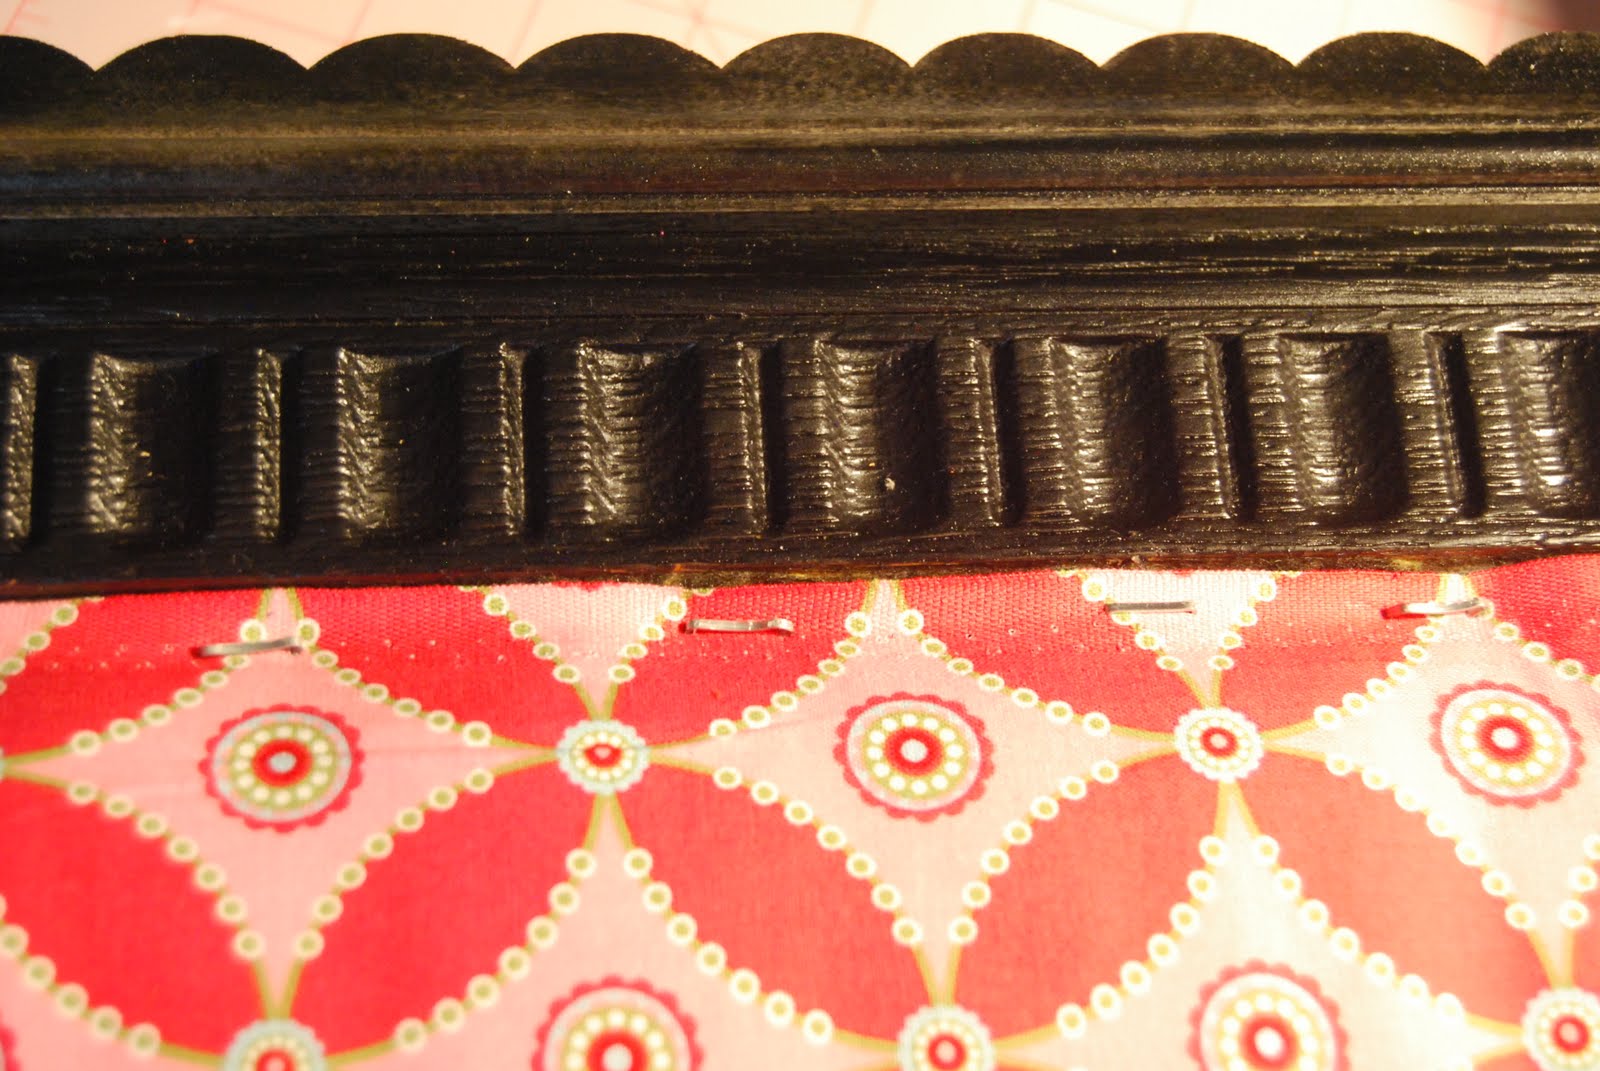
Then I upholstered the back of the seat. I measured the area and cut out a piece of material the same size. Then I got out my trusty staple gun and stapled the material onto the back. When I was done, I used a mallet and pounded the staples in so that none of them were sticking out. Then I covered the staples with coordinating ribbon. I hot glued the ribbon over the staples.

Part 2: The Bulletin Board
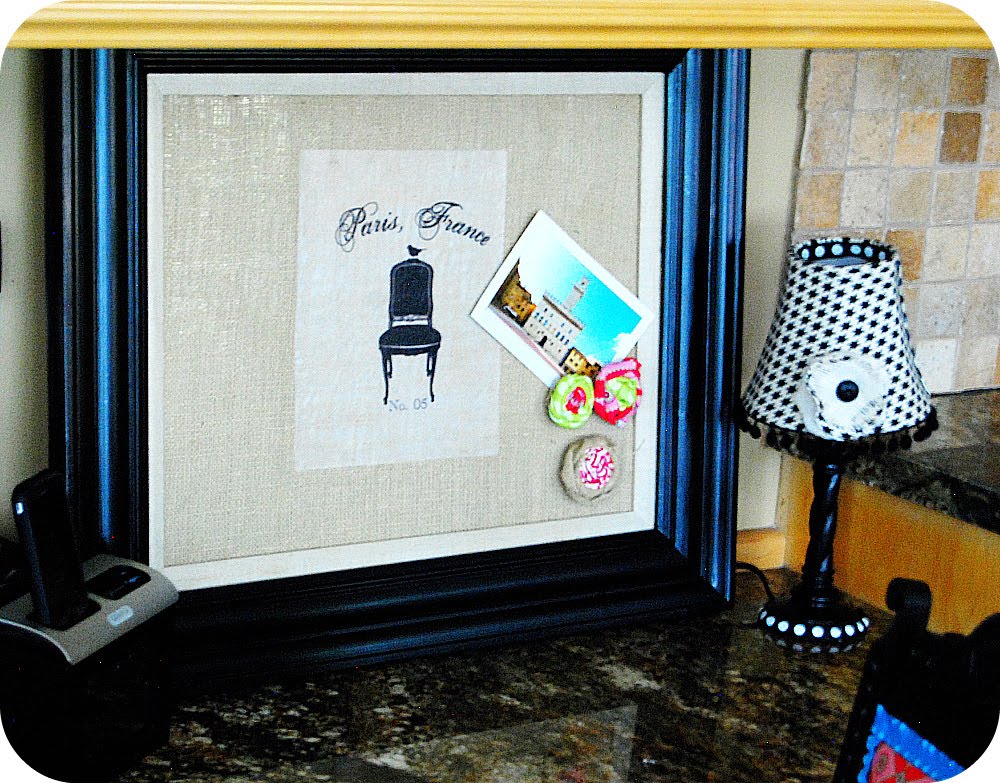
The second part of the project was making something to cover up the wall area over the desk. I measured the area and found a picture at a garage sale for $1 that was about the right size.

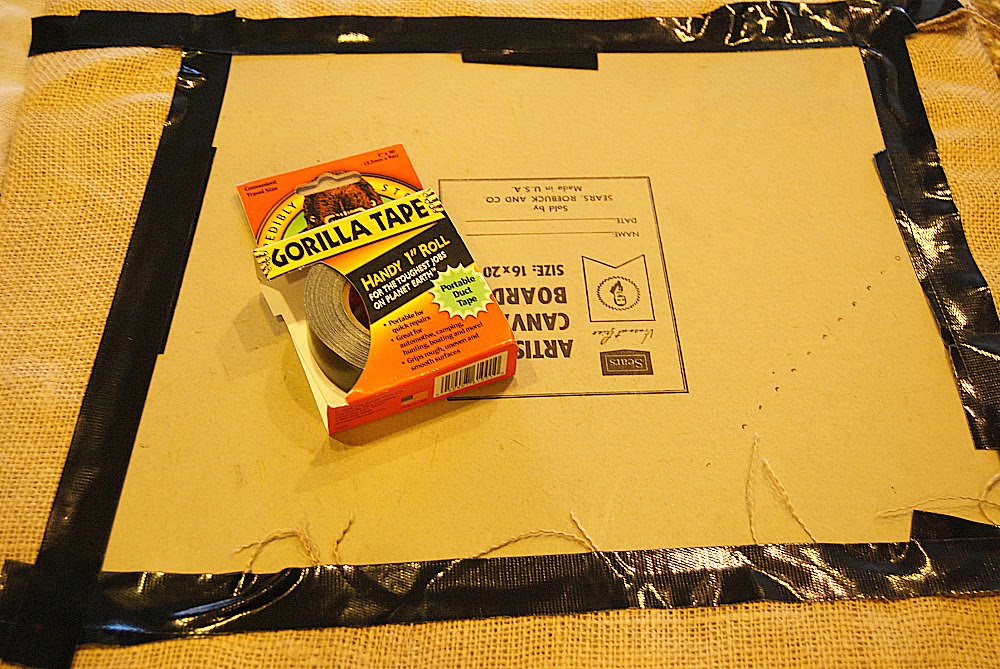
I took the picture out of the frame and hot glued a piece of metal sheeting from a roll that I found at Home Depot’s Roofing Department. Then I painted the frame using the same black DecoArt Americana Paint. Once it was dry, I sprayed it with the Rockler’s Deft Wood Spray to give it a sturdy finish and a bit of a sheen.

Then I took some burlap material and cut out a piece of material that was the same size as the picture plus 4 inches on each side.
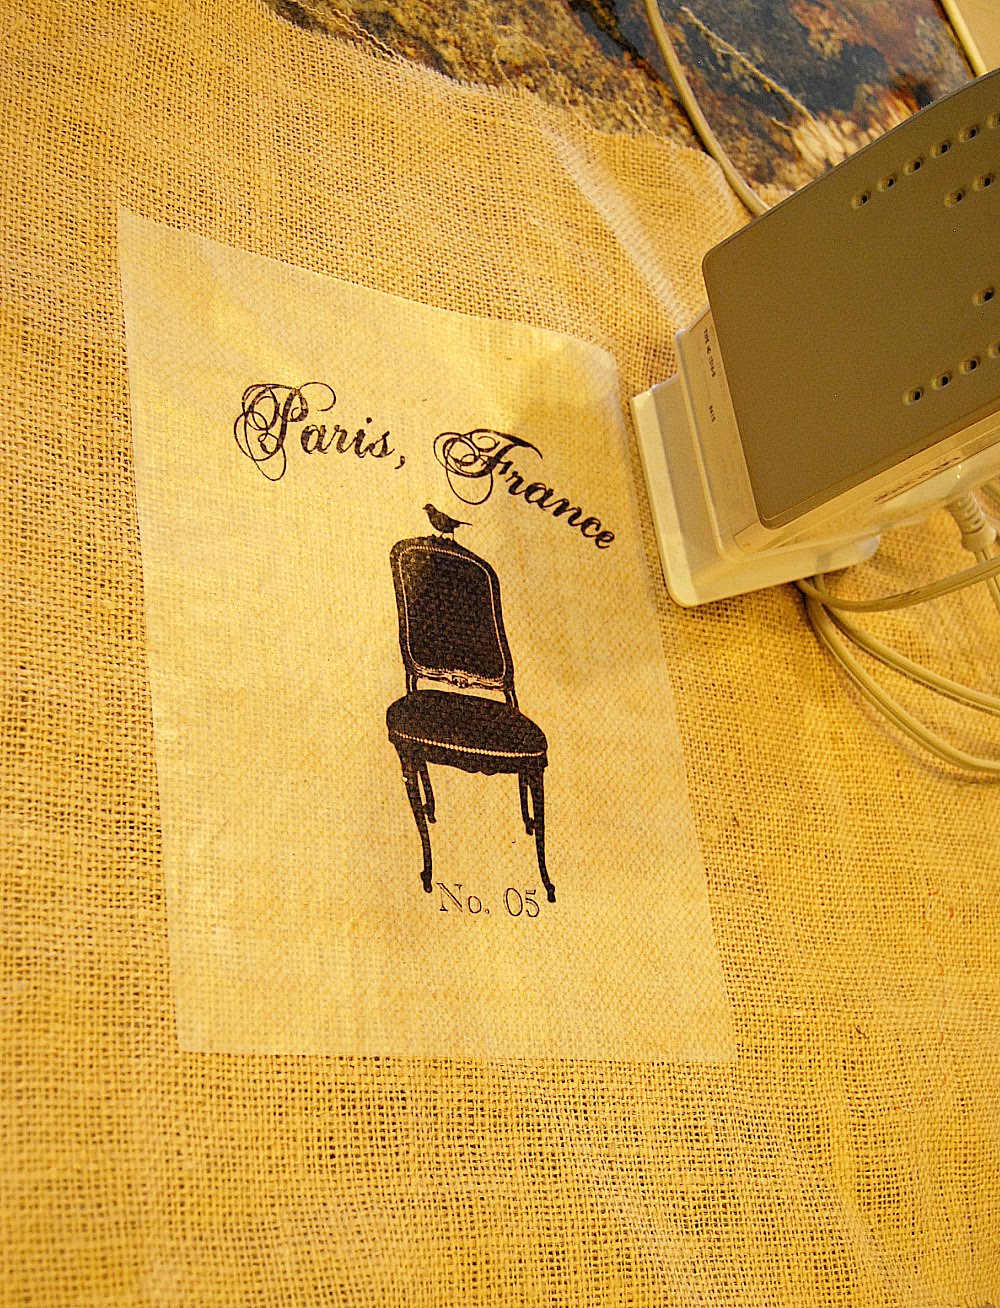
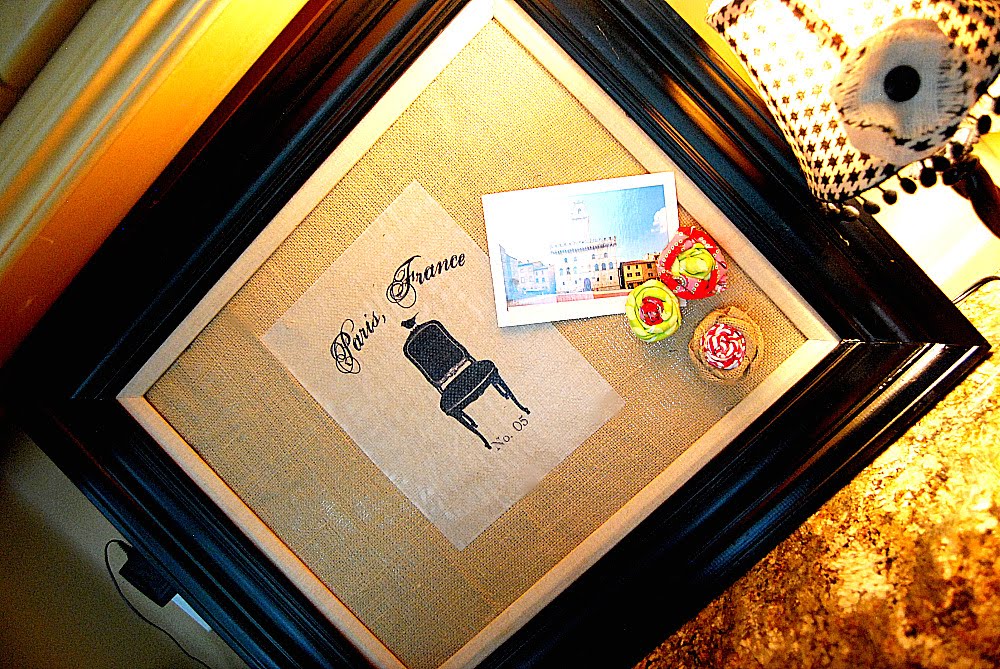
I wanted to make it cute, and one of the newest sponsor’s of the DIY Club is an adorable etsy shop called Olive Rue. I downloaded this image of a chair with a bird on it from Olive Rue and printed it on transfer paper {you must reverse out the image to do it on this type of paper}. Then I ironed it onto the burlap. I peeled off the backing and voila – an instanly cute focal point for my Burlap Magnet Board! I covered the metal sheeting with the burlap and flipped it over. I used Gorilla Glue Tape to secure the edges of the board. This tape is incredibly sturdy and sticky! Perfect for this project. Then I fit the magnet board inside of the frame and used my staple gun to attach it on the back.
Part 3: The Magnets

The Third Part of the Project — was making some cute magnets to tie the chair material with the magnet board. I took some scraps of material left over from the chair redo and cut them into 2 inch wide sections and folded the pieces in half.

I made a tie at one end of the material. Then I put a dab of hot glue on the knot and then wrapped the material around the knot, twisting it as I went.

I kept adding hot glue every half turn and did this until I got to the end of the material.

Then I added a second color of fabric and started it where the last fabric left off — also twisting it around until I got to the end.
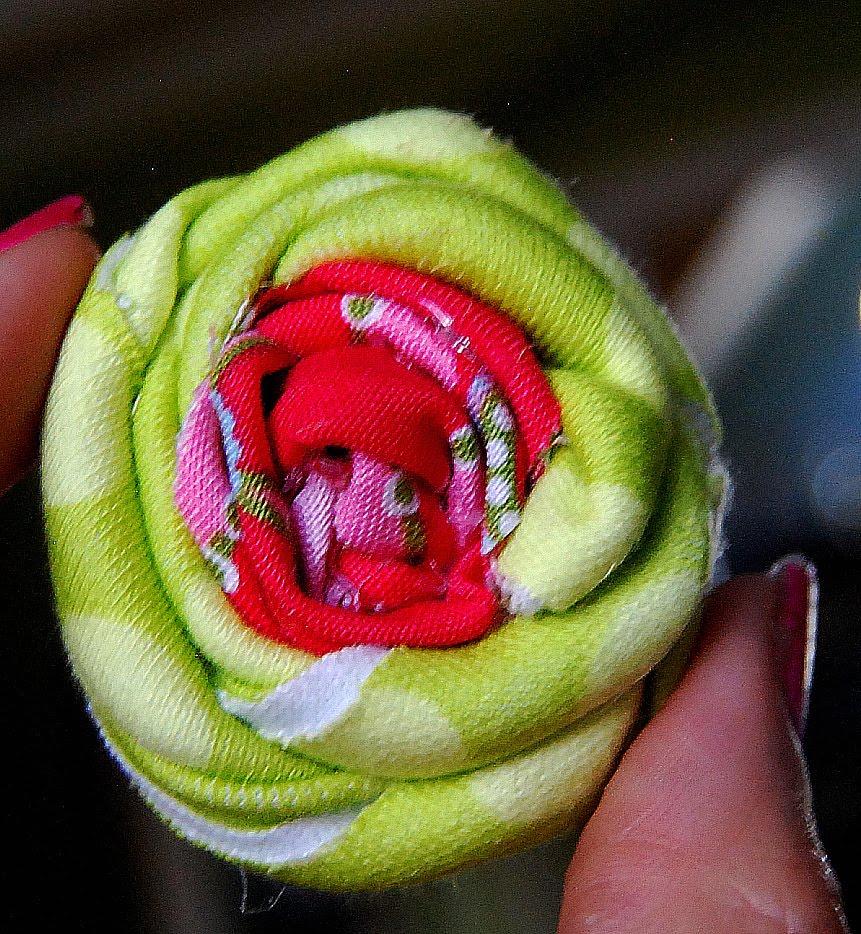
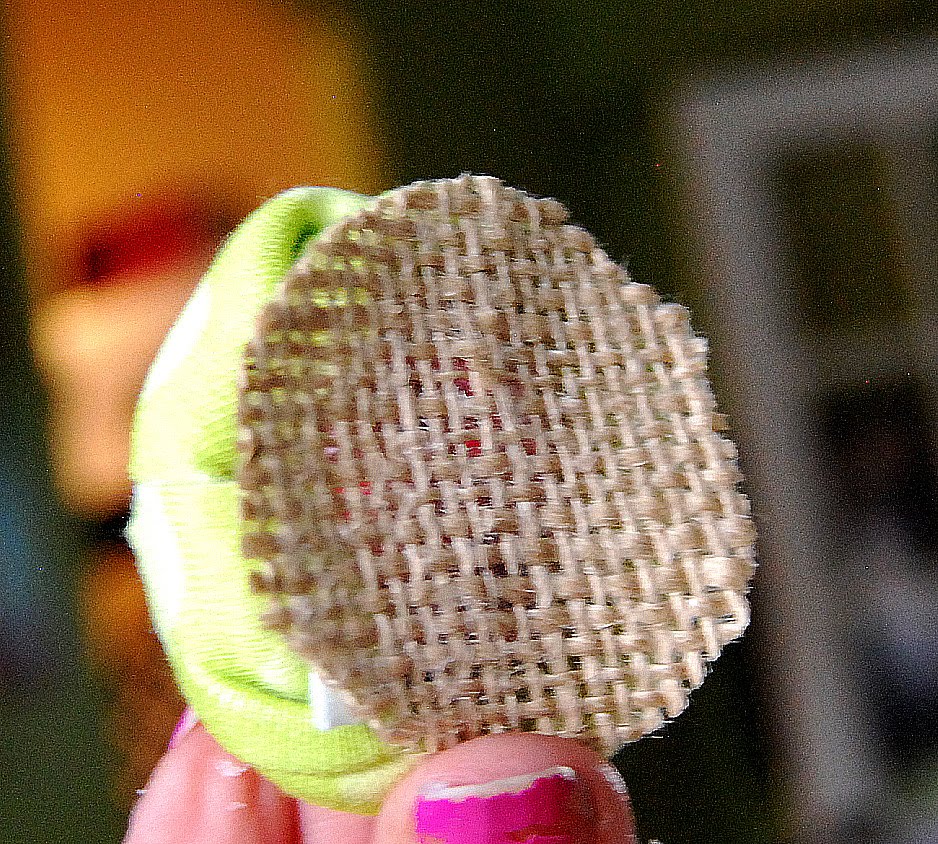
Then I cut out a burlap circle as big as the flower I just made and hot glued the circle onto the bottom of the flower. Once it cooled off, I added a magnet. And I had a cute magnet that coordinated with the chair! I made three for the board.
And that is my answer to my decorating dilemma! A nice, colorful place in my kitchen with a magnet board where I can keep important to-do items! And I can move the magnet board to the side when I need to get into the intercom or outlets.
Here are the DIY Club Sponsor’s products that I used:

Gorilla Glue — Wood Glue
Gorilla Glue — Tape
DecoArt — Americana Black Paint
Rockler — Deft clear Wood Finish
Olive Rue — Bird on a Chair Digital Download**
** Olive Rue is offering a special discount for DIY Club Readers — If you mention you are coming from the DIY Club, they will send you a free image.And, if you go over to Olive Rue’s blog www.oliverue.blogspot.com — there is a special there where you can download an image for free.

XOXO

www.tatertotsandjello.com


Loved your fabric bulletin board – I had bookmarked this forever ago and I was finally inspired to salvage a bulletin board I had on hand with some fabric I loved. Here's my post: http://mightycrafty.blogspot.com/2011/05/bulletin-board.html. Thanks for the inspiration! 🙂
Just lovely! What a great transformation! I miss crafting! Thanks for the inspiration~ Thanks for linking up to Topsy Turvy Tuesday's!
Great job, I especially love the chair!!
lifeofperks.blogspot.com
What an amazing transformation! I just love how it all turned out, job well done =)
Excellent space transformation. That chair has an amazing before and after…love that! But those buttons have my heart lol….TOO CUTE! 🙂
Great space! Love the chair!
Thanks for linking up to the Mad Skills party this week!
So inventive! I love how every part of your makeover solved an area problem and also was so chic and creative!
What a difference! I love the bulletin board…great idea and such a nice look for the space.
sooo awesome!!! I have a space like this too!
that chair makeover is pretty fabulous jen! and i love all the coordinating details. you are a girl after my own heart!!!
So clever!! I've never thought of adding molding to a chair! And I LOVE the magnetic board!! It turned out just gorgeous!!
Looks awesome Jen! The chair is fabulous and great idea for the magnets and board! I am sure you are so pleased to sit in that space now!
PIcking my jaw up off the floor right now. I love that chair transformation!
thanks for sharing.
Brittany
http://www.prettyhandygirl.com
I just love this project! Especially since you beautified old, used items and breathed new life into them. So gorgeous – and inexpensive too!
I did a soap project last week that took a little extra effort. If you're interested, you can see it here.
That chair is the prettiest thing ever !
It looks great..I especially love the fabric you choose to cover the chair and to make the pillow. Great job!
Thanks Shel!
Thanks so much!! Making the magnets was actually my favorite part of the project – lol. They are really easy to make! I just grabbed that burlap pillow to bring a little burlap to the chair — they were one of my very first sewing projects and so easy! Here's the post if you want to make some 🙂
http://tatertotsandjello.blogspot.com/2009/10/more-burlap-projects-15-minute-burlap.html
XOXO
Jen
Too pretty! I love it all. And I love the rolled flowers tutorial. I'm gonna have to get over my fear of fabric and try that sometime.
I love the pillow in the chair, too. Is there a tute coming up for that?
Hello? This stuff is AMAZING Jen. And thanks for the rolled flower tutorial. I haven't tried that kind yet! They're darling. And that chair? Seriously? I don't know what streets you're driving on, but they have gold in them. (of course I would have driven by, and made a comment about that ugly fabric, and how it probably was happy to be out in the rain! Leave it to you to find something awesome in it!)
Abolutely AWESOME Jen!!! I love it all 🙂 The chair is amazing, I know that I would've never seen the potential in the Brady Bunch chair! HA!!
You did an amazing job. I LOVE all of the color on that chair and the little touches to the board. I was wondering how you would cover up the intercom…great job!!!!
So stinking cute! I LOVE the chair. I have some projects that need to get started, too, so I'll have to start brainstorming on this…
FABULOUS Dahling as always! 😉
Great job with this area, Jen! I absolutely love that chair ~ I probably would have stopped for it, too. The detail alone is worth it! The magnetic board was a great solution to your issue over the desk. You'd never know there was something behind it.
adorable! the things you think of. you're far more handy than i am. i'd love to see where you store everything! 😉
I love all the ideas. I never would have thought to change the trim on the chair. I love the magnets and magnet board. Job well done!!!
Awesome transformation!
I LOVE how you solved your desk issues! You couldn't have made it any cuter!! Great ideas : )
Great interventions! Simple and cute!
Great solution to your decorating dilema. I love how you jazzed up that chair that most people would have laughed at on the curb. Your memo board will be functional and it is as cute as can be.
Oh my lord…
that chair is amazing!
The fabric is perfect!
KareyEllen
KareyEllenDesigns.blogspot.com
Jen, I am so impressed with what you have done with this space! I need your help with my craft room!! It has become a dumping ground for everything and Todd is not the only guilty party, I have done some dumping as well!
Love the fabric, the magnets, the chair, love everything!! Thanks for the fabulous tutorial, I have some similar projects coming up too:)
I love it! You did a fantastic job! I was wondering just the other day what amazing idea yu had come up with for that space. Truly impressive!
Jen~ the whole area and that darling chair you re-did with that cute chair pic on the bulletin board… simply darling all of it, totally love what you did. WELL DONE! jenn
Very cool!
And now I know how to make those fabric flower thingies too! LOL!
Brilliant – absolutely brilliant – having a – WHY DIDN'T I think of that moment over here! Definitely have a couple spots that will be getting covered up like this!
That is fabulous!! I love the way it all came out!