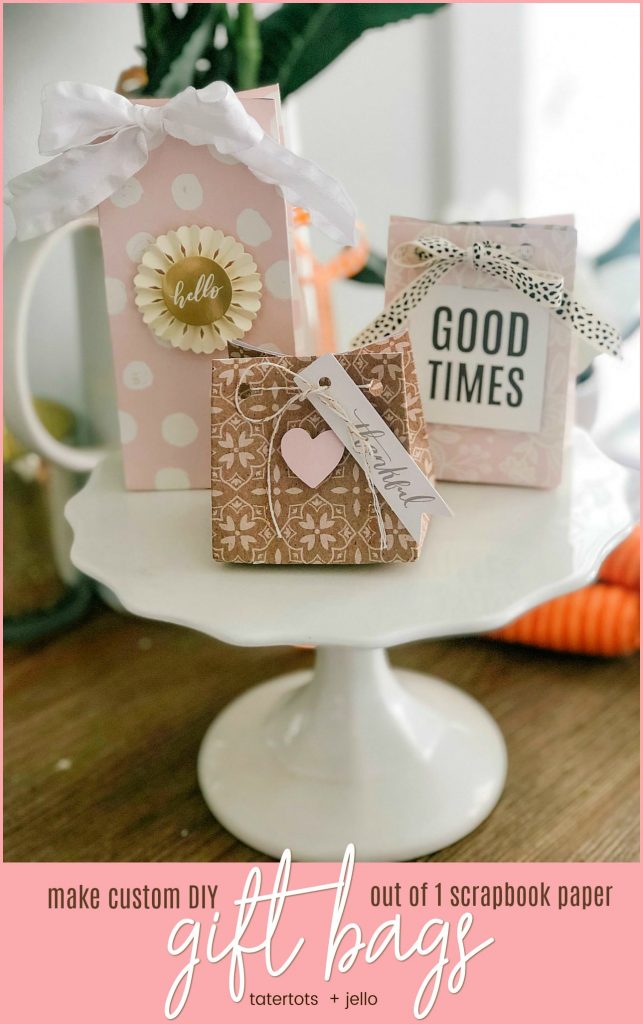
Make a custom gift bag out of a sheet of scrapbook paper! Gift bags are so easy to make and personalize for parties, special occasions and special gifts. I’ll show you how to do this with the We R Memory Keepers Gift Bag Punch Board.

Make a Custom Gift Bag in 5 Minutes!
Have you ever needed a gift bag quickly and didn’t have one on hand? You can make your own custom gift bags in 5 minutes!

Customize Your Gift Bags for Special Parties or Events
You can customize your gift bags for any type of party, occasion or special event by choosing a scrapbook paper that goes with your party color or theme and it’s so easy.

Another cool thing is that you can make your gift bag in different sizes. You choose the length and width of your gift bag. The gift bags I made above are small and you can make TWO gift bags out of ONE sheet of paper!
Gift Bags are Cute as Place Settings
Gift bags filled with goodies make a cute place setting on a plate for special occasions like Easter, Christmas and holiday dinners. Just add a tag and a name and you have a party favor AND a place card!

How to Use the We R Memory Keeper Gift Bag Punch Board
The trick to making these gift bags is a really fun tool that I recently tried out. It’s the Gift Bag Punch Board by Re R Memory Keepers. It’s a small board that has a little compartment for a scoring knife. It also has measurements built in to help you make all sizes of gift bags.

Small and Easy to Store
The gift card punch board also has two punches built into it. One makes notches that fold at the bottom of the gift bag, creating the bottom of the gift bag. On the other side of the punch board is a round hold punch which allows you to punch the top of the gift bag at the correct intervals so you can string twine or ribbon through the holes!!
The punch board is small and easy to store. I have a bin a the bottom of my Dream Box where I keep all of my tools like this one. I have a few of the different We R Memory Keeper tools and I love how well they are thought out. They really save you time.
How to Make a Custom Gift Bag Out of a Sheet of Scrapbook Paper

Heart of Home Collection at JoAnn Stores!
I used papers and embellishments from my Heart of Home collection which is NOW in JoAnn Stores!! I am so excited about this!!!
Make a gift bag. I looked online at some different YouTube tutorials and found them a little confusing. So hopefully this tutorial will be easier to understand. There are two different sides you are creating when making the gift bags. The front and back sides are wider and have no scoring in the middle. The sides are narrower and have a score in the center and a triangle at the top. This is so they can fold inward. So don’t score all sides of the box.

Decide how Big you Want your Gift Bag to be
The biggest size in length will be 12 inches. There are three sizes of widths you can choose from. Small = 10 inches ,medium = 11 inches, and large = 12 inches. Since 12″ is the biggest size that scrapbook paper is usually sold in, that makes sense. Cut your paper to the size you want.

Line Up Your Paper
Line up your paper with the longer length going horizontally. The edge of the longer horizontal side will line up against the yellow line. Push the paper all the way under the punch until it is flush against the back of the punchboard.
Punch the Paper
Then take the scoring knife and score the paper at the line that is the size you are making your gift bag. So if your paper is 10″ long, that is a size SMALL and you score at the “S” line. Also score at the top top of the punchboard. You will score the entire paper at that line.

Move the Paper to the Yellow Line
Line up the line you just scored and line it up at the yellow line. Punch at that line. This is the side of the gift bag. This side you score in the middle. You also score around the triangle shape at the top and at the top of the punchboard. The last thing on this side is you score on the line that says “SIDE” instead of the SMALL line. This is because this is the side of the bag and it is narrower than the front and back.

Slide the Paper
Move the paper to the last scored line (the one that said “SIDE”). Punch at the top. This is the back of your gift bag. Score along the top and then score again at the “SMALL” line.
Move the Paper to the Yellow Line
Slide the paper over to line up the last scored line, which was where you scored at the “SMALL” line with the yellow line. Punch it, score along the top and score the triangle and the middle. This is the other side and it is narrower. Score on the other side at the “SIDE” line.

Slide the Paper Over
Move the paper and line up the edge of the paper and punch. This is the tab that holds the back of the gift bag to the front. Once you you punch it, you can cut off the top and bottom and create the tab.

Hole Punch the Top of the Gift Bag
If you turn the Gift Bag Punch Board upside down, there is a round punch on that side. All you have to do is line up the score lines that you created and punch on those lines. DO NOT punch on the lines that are on the sides and go up to the triangle. If you con’t want to string your twine through all of the holes and want a different look, you can punch the front and back together in the middle and loop ribbon through those holes.
Glue the Gift Bag Together
Glue side tab to the back of the front panel. Then glue the bottom tabs together. Let sit for a few minutes.
Add Ribbon
Run your ribbon or twine through the holes in the gift bag and tie in a bow.
Enjoy your gift bags! You can grab the Heart of Home paper collection and the gift bag punch board at JoAnn Stores!

Have a Creative Day!
xoxo

Disclosure – I am a designer with Pebbles and American Crafts. I am so grateful for the opportunity!


It can be a good handmade present, thank you!
Slide the paper over to line up the last scored line, which was where you scored at the “SMALL” line with the yellow line. Punch it, score along the top and score the triangle and the middle. This is the other side and it is narrower. Score on the other side at the “SIDE” line.
I like giving hostess gifts but haven’t try to make such bags. Seems really easy to make, but I don’t know if I could do it as perfect as want. My daughter loves such things, I guess she would be happy to help 🙂
HI Kaylee!!
They are so easy to make!! I thnik you’ll love it!
xoxo
I just love this. I like giving small gifts especially hostess gifts and these little bags will be perfect. Besides, it looks like fun!
Thanks Cheryl!
They are fun to make and personalize!
xoxo
Phenomenal website.. You really deserve to get more reach…
These are awesome I love doing this for birthday parties!
Paige
http://thehappyflammily.com
Thanks Paige!! Yes! It’s such an easy thing to do and perfect for birthday parties!
xoxo