
Turn your lamp from dull to darling in 30 minutes flat!
Here’s my little Walmart lamp I bought to lighten up my desk area in my kitchen.
 It’s cute, if kind of boring.
 But I knew I could do something fun to brighten her up!

- First, I got three pieces of paper and taped them together lengthwise.
- Then I made an outline of the lampshade by tracing the outline with a pencil.
- I rolled the lampshade across the paper while tracing the outline.
- Then I cut out the outline to make a template — I added about an inch to the top and the bottom of the outline.
- Then I traced the outline on some fabric that matched my kitchen. I wrapped the fabric around the lampshade so it matched up with an extra inch on the top and an inch on the bottom.
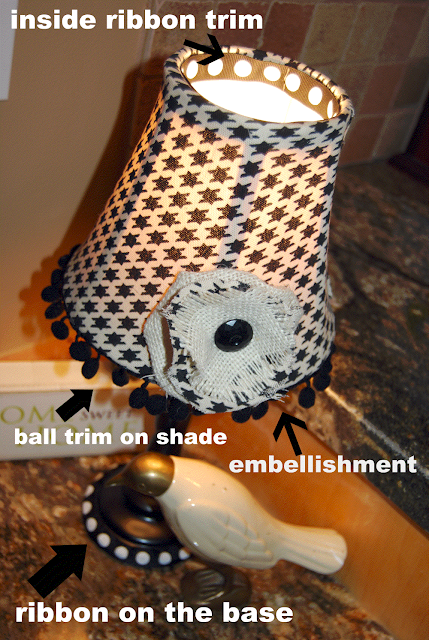
- Now, you can use spray adhesive, but I used a glue gun. I turned the seam down on the fabric that would show. Then I wrapped it tight around the lampshade and glued the two sides of the fabric together – pulling as tight as I could. I went down the seam pulling tightly as possible. There might still be a couple of ripples in the fabric, these will go away when you attach the fabrc to the top of the lampshade and the bottom of the lampshade. So do that now.
- Run a line of glue around the top inside of the lampshade and attach the material. It might be helpful for you to cut a few vertical lines in the fabric so it will lay flat. Do the same thing to the bottom.
- To cover up the glued edge on the top and bottom I covered it up with some cute ribbon. I turned the shade upside down and glued the ribbon down.
- Then I made the embellishemnt. I cut out a large burlap circle. Then I glued the edges under. Then I cut out a circle of the coordinating fabric that is a litle smaller than the puffy circle. Then I also cut out another circle of burlap.
- I glued it onto the lamp and added a vintage button to the middle.
- The last thing I did was add some ribbon to the base of the lamp. To get it to lay flat I made small cuts half way through the ribbon after each circle. Then I glued down the bottom of the ribbon first and put a dot on each part of the ribbon than was cut.
- And you are done! Now you have a one-of-a-kind lamp!


I made this project in honor of my friend Carrie’s 500th post last year. I had a few people that have emailed me trying to find it, so I thought it would be a good idea to post it over here in my archives.
Is it snowing where you are? It just started here.
XOXO


I just wanted to stop by and let you know that I linked to this post today from the new Home & Garden channel at Craft Gossip. 🙂 My hope is to share many of the fabulous projects I see everyday with the vast CG audience. I hope you will not only stop by and subscribe to CG, but will tell your friends about the new category! Hope you see some traffic from it!
Your feature will appear in the main Craft Gossip RSS feed, on the main home page and can be found directly here
http://homeandgarden.craftgossip.com/12-lamp-makeovers-and-redos/
If you would like a "featured by" button, you can grab one here!
http://homeandgarden.craftgossip.com/grab-a-craft-gossip-button/
This is fabulous!
Thanks for sharing!
Thanks for linking this up to my Round Robin..
Have a great night.
looks great I love pom-pom fringe!
I love it! Love the houndstooth, especially.
How very sweet Jen! You amaze me with your creativity!! xxoo
Love it! I think it would look fabulous in my new black and white bedroom. Oh, wait…I haven't even STARTED that makeover yet.
How do you do it all Jen? You are like super woman!
This makes me want to makeover a couple of my own lamps…yours looks fabulous! Great Work, and I love the 30 minute part 🙂
Hi Jen,
So Cute and creative. Thanks for sharing. You always have such great ideas. Thanks for stopping by for a visit too.
Very cute! I love houndstooth 🙂 I shipped your skirt out yesterday, hope your little girl loves it !
Super-cute! Thank you for sharing and including great instructions!
I love this lamp, so cute. Thank you for being so specific. I'm not really very crafty and I need a tutorial like that, lol!
I am going to have to try this. I have a couple of lamps that are looking a little boring!
~ Nan
I like it! I made some subway art inspired by you! It's on my blog if you'd like to see it-http://craftsbycourtney.blogspot.com/2010/02/subway-art.html Thanks for the great idea and tutorial!-Courtney
It is SO cute… I love it! Lovin' the ball trim! 🙂
Cute lamp – love the little makeovers you've been doing. I also have something fun for you to do. http://www.3sidesofcrazy.com/2010/02/creative-writer-awards-and-few-lies.html
absolutely adorable!!!
Have 2 little lamp in a box waiting to go to the goodwill, guess whats welcome back in the house?? BTW here in Northern Texas we are having record snow, not this much (4-6 inches LOL) since 1979! This is why I left beautiful Wyoming, 🙁
so cute, I just did some cute lamps for our nightstands, I made little pink rosette flowers and it is simple yet so cute now! Working on your necklace too, it is almost done!
Cute, cute, cute as always Jen!
It is very nice..
Way too cute! I just want to hang out with you…you are seriously so creative & have great style!
I love the stuff at the bottom the best! You so creative!!!
Another great design!
Wow! It looks great! I have a desk in my kitchen that could definitely use something like this! Thanks for the great idea!
Geeze – thats super cute!!
Love how just a little something can really make a differance.
great job!!
Super cute lamp. I will try something like this to go in my girls room. I love all you fun ideas. Thanks for posting them.
Extreme cuteness!!! Love the embellishment. 🙂 It's not snowing here right now, but we have close to 2 feet on the ground.
OH MY GOODNESS, FOR CUTE! LOVE EVERYTHING ABOUT IT. I need to get me some burlap projects going. I totally dig the houndstooth design. P.S. come see my tic tac toe v-day magnetic board on my craft blog, when you have time! JGG
So cute! Love it!
Very cute, Jen! I love it! I love the little trim you put around the bottom of the lamp shade.
My bedroom lamps are very much like your "before" picture. I can't believe the differnce this made. I'm saving this for a rainy day project.
That is just too cute!!! Walmart ought to see this! I just love it. Have a good valentines day and come say hi 😀
Jen…I'm not surprised…NOPE, not one single bit! You can do ANYTHING!!!
You lamp is too cute! Love the black and white! You did a beautiful job!
Thanks for the tutorial!
Cheers!
Tina
CUTE!
Awesome Job! Love your site!!!
love the lamp so much!!
we have about 10" of snow fall yesterday!…FUN!!!
LOVE it! I have the same exact lamp sitting right in front of me on my computer desk! Now I am flooded with ideas on ways to dress her up!
-Melissa
honestly jen you are too much…your eye for design and talent for making anything beautiful is enviable. I am always so very impressed.
Lovely!!
That B&W is soo Chanel!! 🙂
adorable! great job!
that is soooo cute!!! how are you doing???? have a great day!
I'm so glad Hannah likes it! I'm amazed at your creativity. I would have never thought to dress up a lamp!
certainly darling… you are sooo creative!
I need that lamp for my office makeover!!! So cute!
I love it.I found the cutest lamp at the di the other day. This would be the perfect little bit of sprucing that it needs. Thanks for all of your great ideas. I come and visit here often. Now, you know that your blog is famous here at utah because of studio 5-right? I used to email Brooke (the host) often and tell her of your fabulous ideas. Now, she just reads your blog herself. Maybe I can beat her to the punch on this one. I have a question for you, I will just shoot you an email.