Tatertots and Jello

COLORFUL HAPPY HOME -- Daily DIY, Decor, Craft and Recipe Tutorial

  • My Home
    • 1905 Cottage
    • Daybreak House
  • DIY
    • DIY Projects and Ideas
    • Organizing
    • Tutorials
    • Printables
  • Decor
    • Spring Projects
    • Summer Projects
    • Fall Projects
  • Crafts
    • Kids Crafts
    • Painting Projects
    • Paper Projects
    • Sewing
    • Wreaths
  • Holidays
    • Valentines Day
    • Easter
    • Halloween
    • Thanksgiving
    • Christmas
    • HAPPY Holidays Series!
  • Recipes

Explore

  • my home
  • diy
  • decor
  • crafts
  • holiday
  • printables
  • recipes

Connect

Home » christmas » HAPPY Holidays: DIY Antler Art

christmas, decorating, diy, guest tutorials, HAPPY Holidays, holiday · December 2, 2014

HAPPY Holidays: DIY Antler Art

Tatertots & Jello is a participant in the Amazon Services LLC Associates Program, an affiliate advertising program designed to provide a means for sites to earn advertising fees by advertising and linking to amazon.com.

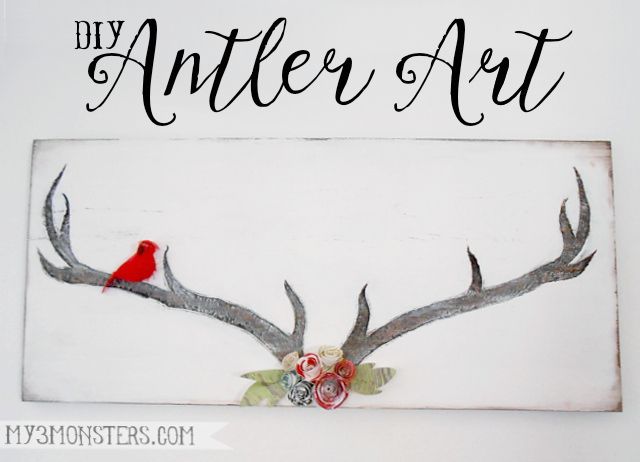
Hi guys!  I’m Amy from My 3 Monsters and I am thrilled that Jen invited me back for another year of Happy Holidays.   I recently got a Dremel tool and I have been having a blast carving everything I can get my hands on.  This carved antler idea has been knocking around in my brain for a while now, but it has seemed a little ambitious {ahem, intimidating} for a newbie like me. I figured Christmas was the perfect time to give it a go as part of our holiday decor. This DIY Antler Art was surprisingly easy and I absolutely love the result!

 photo AntlerArt-titled_zps2a7b2ac7.jpg
You will need:

a large piece of wood — I got mine in the wood shelving section of my home improvement store.  It is 16-inches tall by 36-inches long and cost about $6.
a carving tool — Dremel, chisel . . .whatever you like to use.
sand paper
wood stain
paint
scrapbook paper for embellishments

happy-holidays-2014-300-tatertotsandjello1


 photo AntlerArt-drawitinpencil_zps79502e61.jpg

Begin by sketching your antler design lightly onto the wood with a pencil.  I decided to freehand it, but I did find a picture online to use as a reference.

 photo AntlerArt-carvewithdremel_zps877bc09f.jpg

Use your carving tool to carve the design into the wood.  I found it easiest to first carve the outline and then go back and gradually remove the middle of the design.  Just be patient, go slow, and let the tool do the work for you.  Keep carving away until you get your design as deep as you want it.  Mine ended up being about 1/4-inch deep. I worked on it a little at a time over several days and bribed my son to help out.

If you happen to make a mistake, you can fill it in with wood filler, allow it to dry over night and try again.  I wouldn’t recommend this trick if you are going for a completely stained finish since the filler doesn’t take the stain exactly like real wood. Since I was going to paint it in the end, wood filler was my best friend!

Once you are finished carving, use the sand paper to smooth out any rough edges or gouges that my be left. I wasn’t too concerned about getting it perfectly smooth because the rustic look fit the style of the project.

 photo AntlerArt-stainthewood_zps31c591fb.jpg

Wipe your board down after sanding to remove all the dust, then apply a coat or two of stain to the entire board until you get the desired color.  I loved the way it looked at this point, but I wanted something a little lighter and slightly more feminine, so . . .

 photo AntlerArt-paintitwhite_zps78acd69b.jpg

I painted on a coat or two of white paint to all the flat surfaces. The white looked a little stark in contrast with the dark stain in the antlers, so I used a VERY dry paintbrush and put a VERY light coat of paint inside the carved area.

 photo AntlerArt-distressit_zps334a6c60.jpg

Once the paint is dry, sand the whole thing to give it a distressed finish.  If you accidentally sand through to bare wood anywhere, simply put a tiny bit of stain on the tip of a q-tip and fill in the bare area.

 photo AntlerArt-makepaperflowers_zps641dbb65.jpg

Now it’s time to add a few embellishments as a finishing touch.  I used several different patterned scrapbook papers to make some rolled rosettes and leaves.  Use hot glue to attach them right to the board.  I also picked up a little red bird at the dollar store and glued him onto one antler.

 photo AntlerArtfinished_zpsff7d7ac0.jpg

Attach it to the wall with Command Adhesive picture hanging strips so you can remove it after the holidays without damaging your wall.  Once Christmas has come and gone, I plan to change out the colors of the flowers and move this piece of art into the master bedroom.  It’s like a two-for-one!  It’s the perfect blend of masculine and feminine so my husband is totally {surprisingly!} on board.

Happy Holidays, friends!

If you want to see more fun projects like this one, follow My 3 Monsters on the blog, Facebook, Pinterest, Instagram, and Twitter!

**********

Thanks Amy! I just love it! And, I think it will look awesome in your master bedroom too! Definitely a two-for-one! Amy has awesome ideas on her blog. Here are a few I think you’ll love:
happy people black

Thanksgiving is over, but you really can never be too grateful! I love this Gratitude Chalk Art Free Printable! It’s so pretty to hang in your home year round!

Stocking and Antler Art - titled2

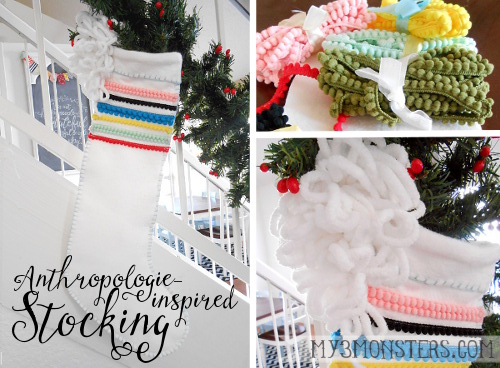
And, her Anthropologie Inspired Stocking is so adorable!

Christmas Pie titled

She also shares amazing recipes like this Cream Cheese “Christmas” Pie. YUM!

Visit My 3 Monsters and

pinterest.32x32.icon.circle
Follow My 3 Monsters on Pinterest
instagram.32x32.icon.square
Follow My 3 Monsters on Instagram
facebook.32x32.icon.circle
Follow My 3 Monsters on Facebook
twitter.32x32.icon.circle
Follow My 3 Monsters on Twitter

happy-holidays-2014-300-tatertotsandjello1

Follow the HAPPY Holidays Event at Tatertots & Jello
all through the holidays with awesome tutorials, recipes, decorating ideas and more from some amazing blogs!
xoxo
jen signature

Posted By: Jen · In: christmas, decorating, diy, guest tutorials, HAPPY Holidays, holiday

HAPPY Holidays: Photo Transfer Ornaments
Christmas Carol Typography Art – Free Printables! {And $200 Shutterfly Giveaway}

You’ll Also Love

The Best Christmas Tree Ideas!
Joy To The World Mantel – Colorful Christmas ideas!
DIY New Years Eve Photo Party BackdropDIY New Years Eve Photo Party Backdrop

Comments

  1. Theresa @DearCreatives says

    December 4, 2014 at 12:11 AM

    Hi Jen, Love this. I need to make one but, a dremel might be going on my xmas list. Pinning for later.

  2. Malinda Clay says

    December 3, 2014 at 12:48 PM

    I LOVE this….I just love it!!!! I must have one…Could you possible share where you find a picture online similar to this? I have no “free hand” ability. Thanks so much for sharing!!!

    Malinda in Mississsippi

Hi! I'm Jen Hadfield. I'm a mom of 5 restoring an 1891 home in the heart of Salt Lake City. I love being creative and sharing simple ideas to make your life easier and more beautiful!

Receive the Latest Crafts, DIY, Recipes and More in your INBOX!

Follow us on Pinterest! It's awesome!

Top Posts & Pages

Spruce up Your Outdoor Space with a DIY Recirculating Fountain! (tutorial)
A New Deck in Under 30 Minutes!
DIY Secret: How to Print on Post-It Notes (and Free Printable Template)
12 Must-Have Items to Pack on an Alaskan Cruise!
Copycat Panera Spinach and Artichoke Egg Soufflés - SO good!
Mother's Day Cup Holder Gift Basket


Popular Posts

  • Spruce up Your Outdoor Space with a DIY Recirculating Fountain! (tutorial)
    Spruce up Your Outdoor Space with a DIY Recirculating Fountain! (tutorial)
  • A New Deck in Under 30 Minutes!
    A New Deck in Under 30 Minutes!
  • DIY Secret: How to Print on Post-It Notes (and Free Printable Template)
    DIY Secret: How to Print on Post-It Notes (and Free Printable Template)
  • 12 Must-Have Items to Pack on an Alaskan Cruise!
    12 Must-Have Items to Pack on an Alaskan Cruise!
  • Copycat Panera Spinach and Artichoke Egg Soufflés - SO good!
    Copycat Panera Spinach and Artichoke Egg Soufflés - SO good!
  • Mother's Day Cup Holder Gift Basket
    Mother's Day Cup Holder Gift Basket
  • How to Change a Recessed Can Light into a Pendant Light with No Remodeling!
    How to Change a Recessed Can Light into a Pendant Light with No Remodeling!

As seen in


Amazon Affiliate

Tatertots & Jello is a participant in the Amazon Services LLC Associates Program, an affiliate advertising program designed to provide a means for sites to earn advertising fees by advertising and linking to amazon.com.
  • About Me
  • Advertising
  • Get Featured

Copyright © 2025 Tatertots and Jello · Privacy
This site is a place for positive discussion and ideas. Negative talk, comments that disparage others, and similar are not welcome and may be removed.