 Hello Tatertots and Jello Readers! First off, can you see me hyperventilating over here? Anyone have a paper sack I can borrow? This is my first guest post, and it’s at Jen’s place. Jen’s place! I talk about her so much that I now refer to her blog as T & J. Isn’t that some kind of lock jaw disorder? Oh wait, that’s TMJ. See how distracted I get? Okay, pullin’ it together. Let me take a quick sec to tell you a little bit about myself. My name is Erin, and I blog over at Frundy.

You’ll often find me rambling about my two adorable little boys, dreamy coastal inspired homes, my faith, and ongoing crafts and sewing projects.
Today I’ll be showing you how to make this fluffy ruffly tote.
Let’s get on to the tutorial, shall we?
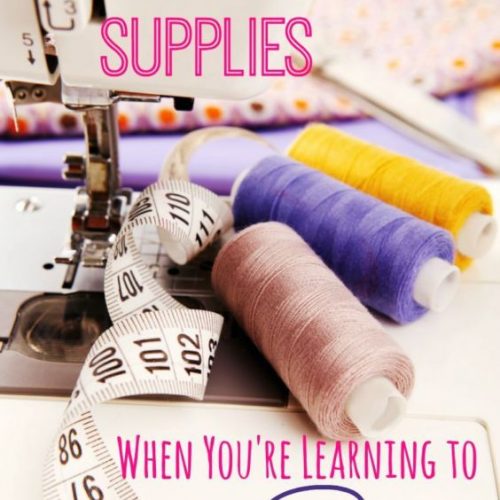
You will need:

and some cotton fabric of your choice, cut into strips. I made my strips extra long, just so I could ruffle as I pleased. I would hate to run out of fabric mid-ruffle. That would definitely throw me into an emotional chocolate devouring fit, and trust me, my kids don’t need to see me like that.

Hem the bottom of all strips. The top strip should be hemmed on the top and bottom. The top of the remaining ruffles are hidden under the ruffle above it, so I just left those raw, but you could definitely finish those off as well. In the future, I will probably finish the tops, because it does create loose threads to cut.

I chose to baste the top ruffle for a more uniform look. Once you pin and sew it onto the bag, remember to pull out those basted stitches.

The remaining ruffles were manually created. I tried to get a picture of this, but it didn’t really do it justice. Basically, you will just pleat your fabric as you sew. It’s sew simple. I know, bad joke. Can we still be friends?
Anyhoo, when you get around to where you started your ruffle, overlap your fabric, and sew up that side seam. I did fold and iron the piece that I knew would be overlapped before I started the ruffle. Does that make any sense? I didn’t think so.

Continue to layer up those ruffles. And, be prepared to swoon as you finish each ruffle.

As for the rosette, I took approximately a 3 foot strip of fabric, folded it in half, and rolled it up until I had the desired effect. I occasionally ran my needle and thread through it to secure it.
There you have it, ladies! If you make one of these bad boys, please stop on by and show me your take on it. And, if you don’t have the time to ruffle yourself crazy, I have one of these in my shop.
Later Taters! There, I’ve done it again. Honestly, I’m not always this cheesy. I think the pressure of being at Jen’s is causing me to act up. Ya know, it’s that insecurity thing.
For reals, please stop by Frundy and say hi or just tell me how corny I am. Whatevs, I’ll love ya forever!

Thanks you Erin for such a great tutorial. Here’s a button! I LOVE that tote. So cute! You really should stop by Frundy and see all of the cute things going on in Erin’s world.


Have a Terrific Thursday!
and check out the giveaways at the top of my sidebar 🙂
XOXO


Such a cute bag!
very cute Erin!!! So excited for you to be guesting. Can't wait to try and make one.
Girl…..i am loving those ruffles. Sadly, i cannot sew a straight line. Which means I absolutely must purchase one of your cute ruffly totes for myself!!! Headed over right now.
~Amanda
absolutely adorable!! I'm going to look at her blog now!
Thanks for posting this tutorial! I am still loving my bag that I won and have gotten many compliments on it.
I just love this tutorial to pieces! I may even need to teach myself how to use my sewing machine so that I can make one of my very own.
支持好的blog~繼續加油~~. . . . . . . . . . . . . . . . . . . . . . . . . . . . . . . . . . . . . . . . . . . . . . . . . . . . . . . . . . . . . . . . .
oh i love that bag!!! am about to go check out her site now- thanks for sharing.
Cute purse. I have been wanting to cover a reuseable shopping bag and this just might be the way to do it. Thanks!
OMG I am going to make all those ugly fabric grocery bags adorably chic now! TY for this really cute guest post, Im off to check out her blog as well.
Oh, I love it! I know the exact bag I'm going to do this to. 🙂 Thanks for the tutorial!
What a fun bag! I still haven't tried to do a ruffle yet. I am just now getting comfortable with a plain straight stitch and zig zag stitch:)
i totally thought this was a blouse..teehee!! i love it! thanks for the tuturial!
Ummmmm…Jen, don't you think she and I could be besties? (I mean, not to replace you and I…but to add a third? Okay, I'm a stalker) Anyway, that post was both hilarious and darling. I'm headed right this second. And I'm trying to think of an appropriate way to ask to be her BFF. How on earth do you track down such awesome talent? Oh, it's because you rule. I get it now.
Love that tote bag! I do my ruffles pretty much the same way!
Good guest post, Erin and Jen. 🙂
SUPER cute! She's so funny. Her blog is awesome too. Thanks for the guest post! Good one!
SO CUTE!!!!! love that bag, going to head to her blog now. Jenn