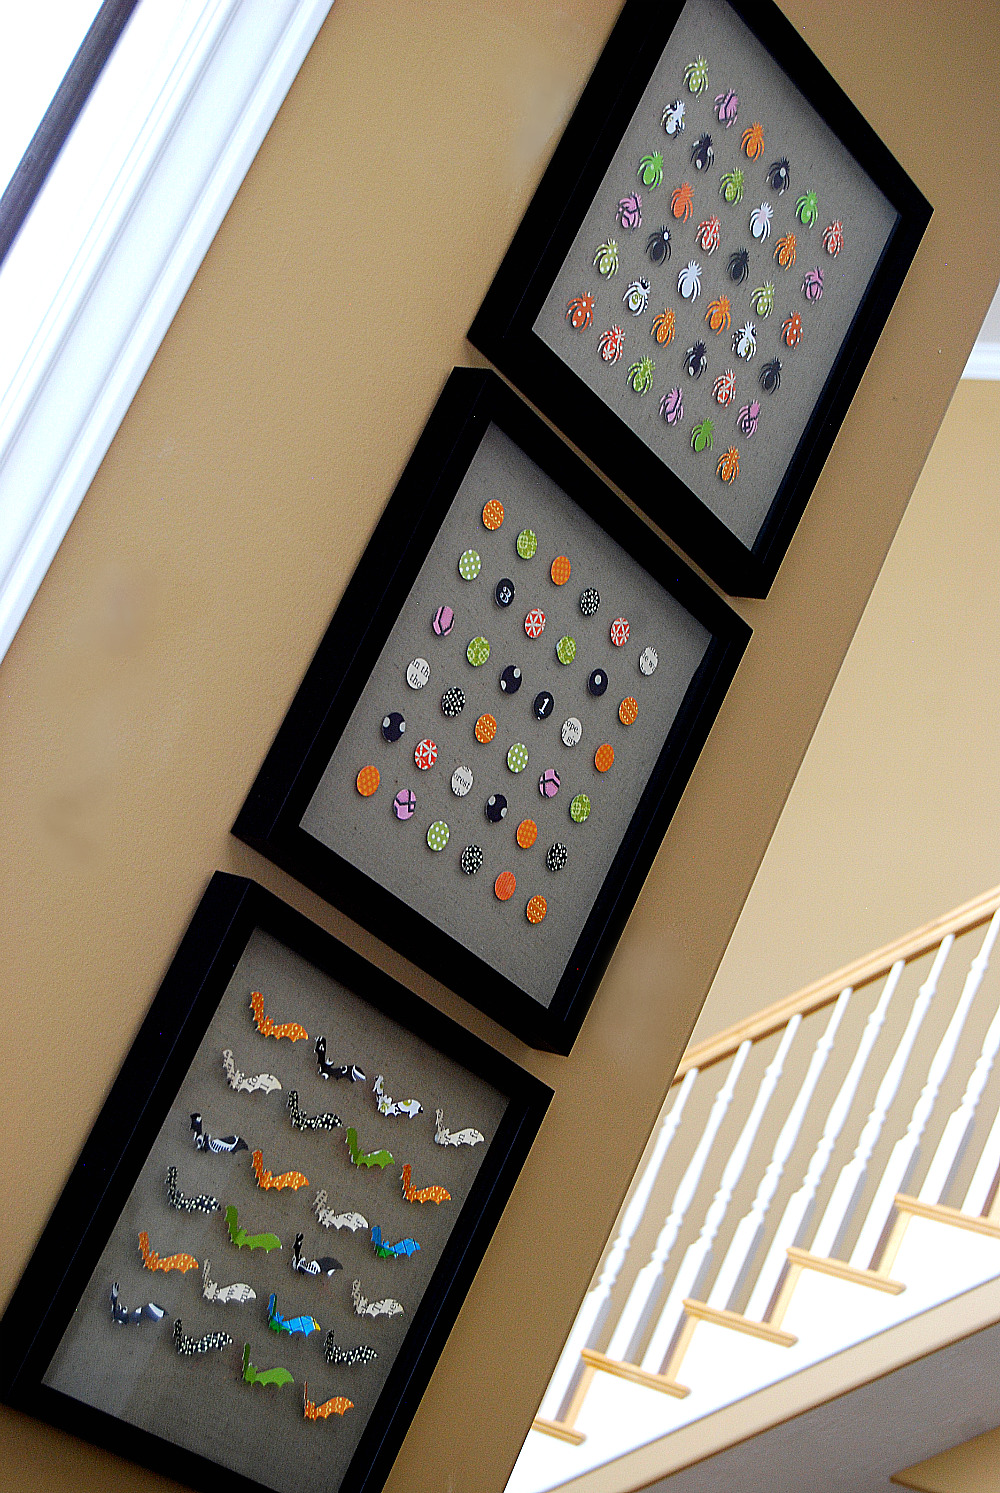
I loved my Halloween Specimen Art.
But I figured, it’s December — time to take down Halloween – LOL!
{I kept the inserts so I can pop them in next October though!!}
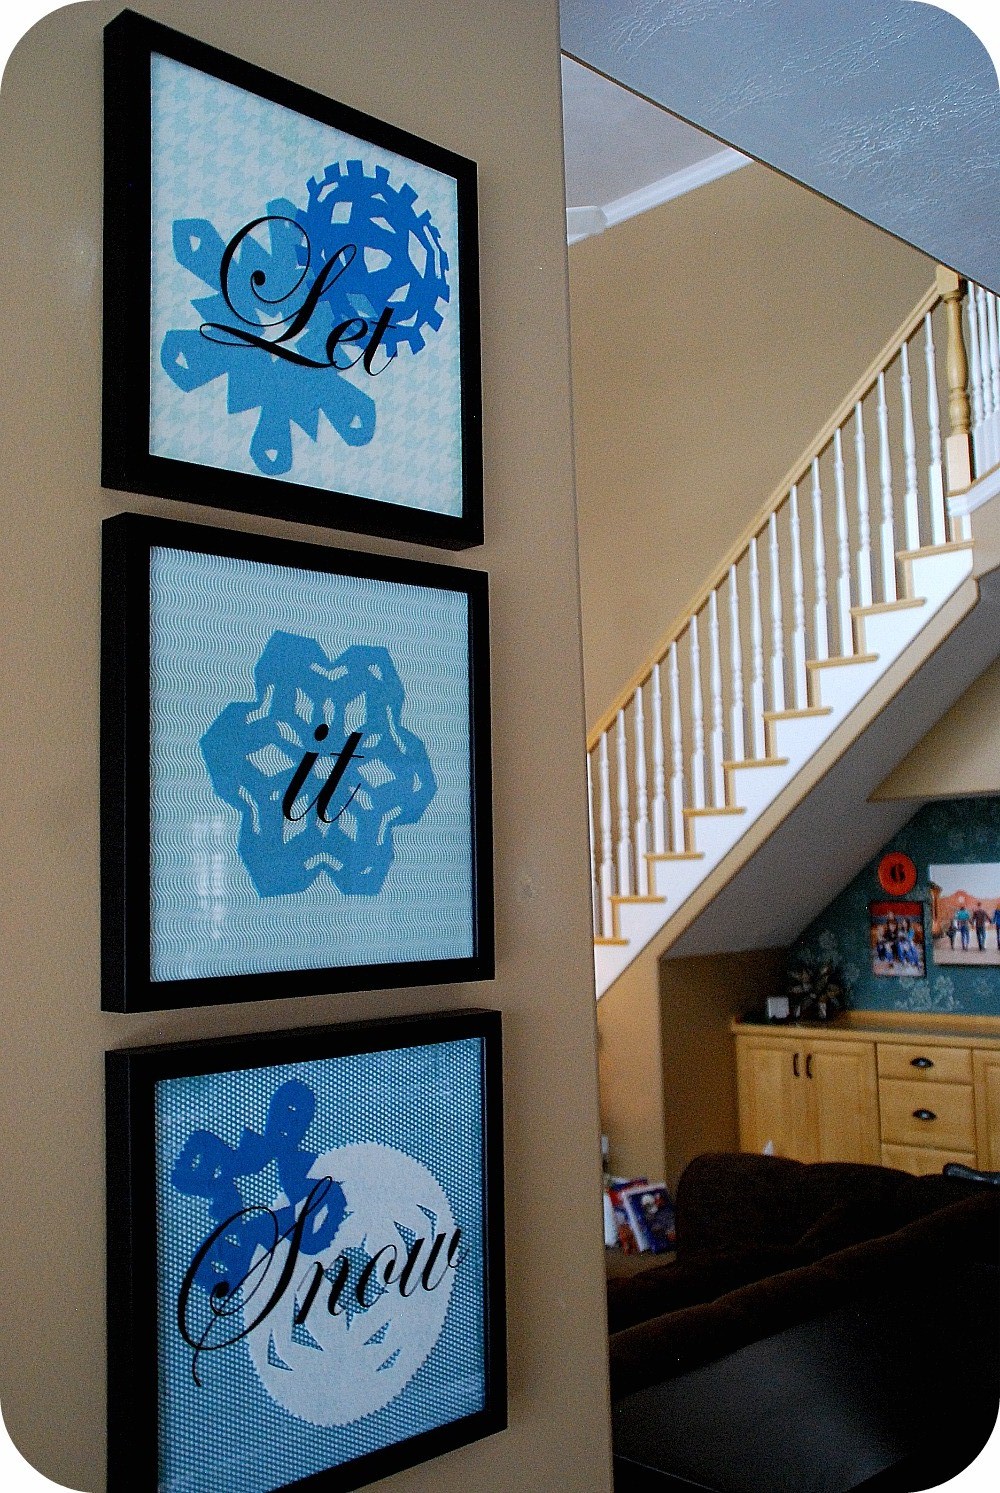
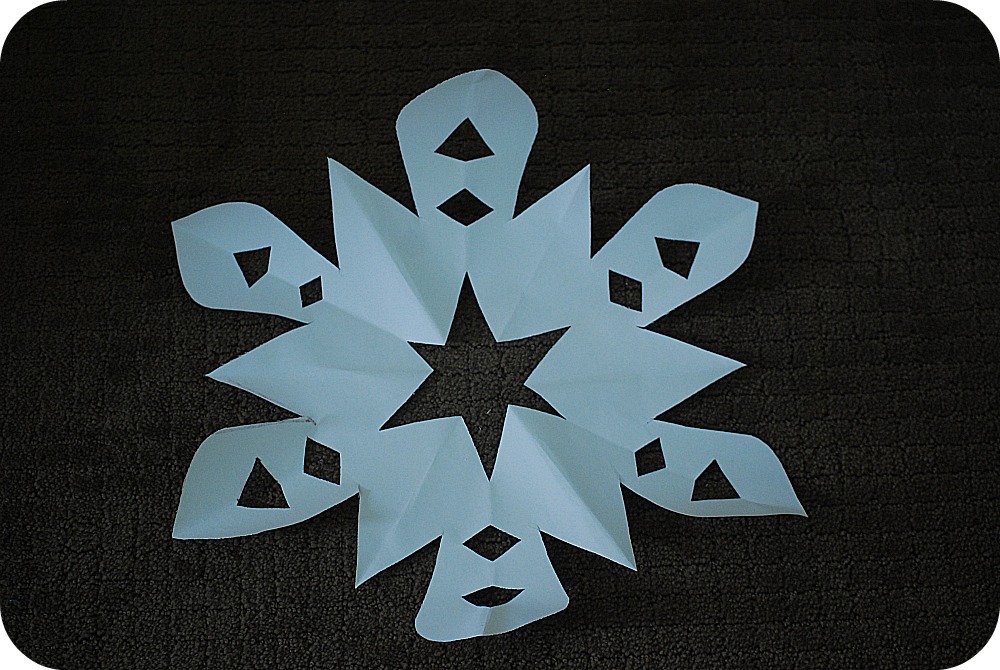
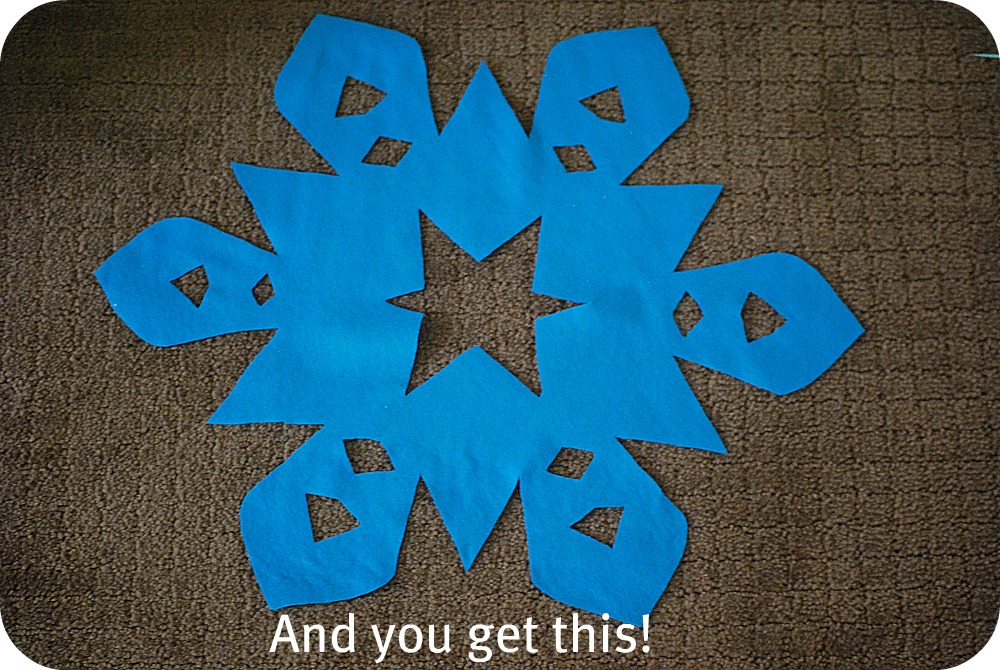
I was going to do another version only using a small snowflake punch. But in the end I decided that was a little boring and decided to try something new. It just happened that a couple weeks ago I had a huge desire to learn to make felt snowflakes. I wanted to make a felt runner but never got around to making it. And then the two projects came together!!


It was actually really fun experimenting and coming up with snowflakes of different sizes and designs. If you want to make some snowflakes, here’s what I did:
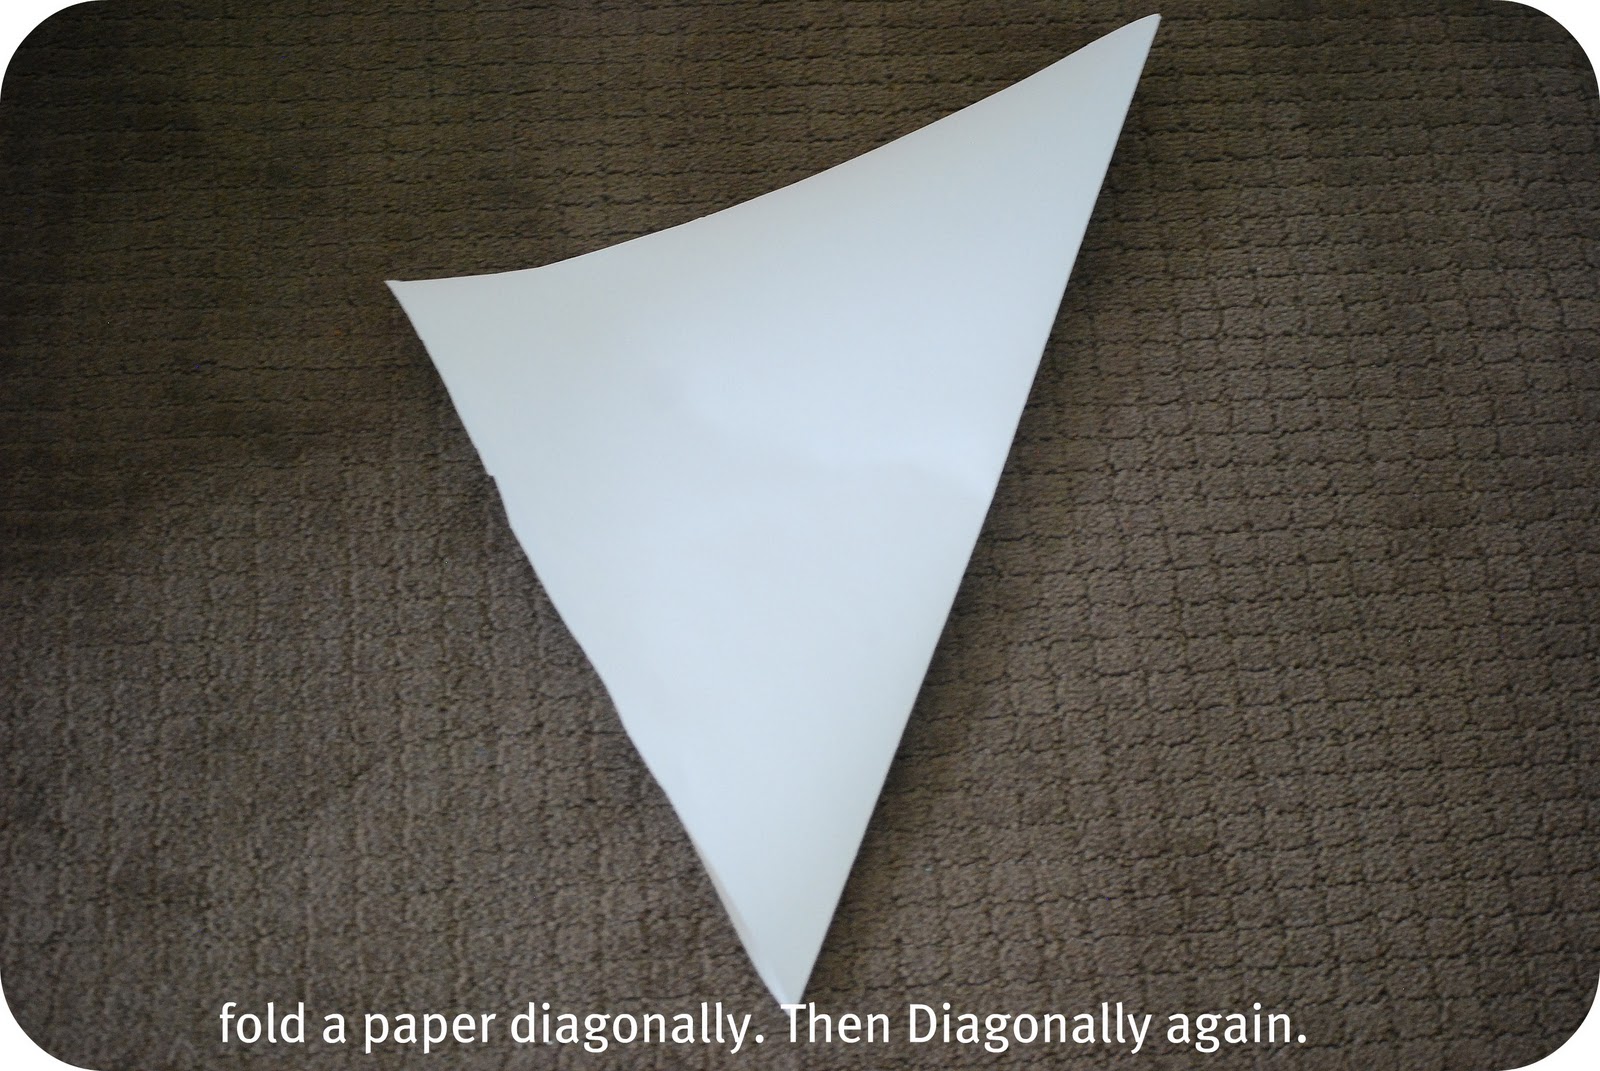
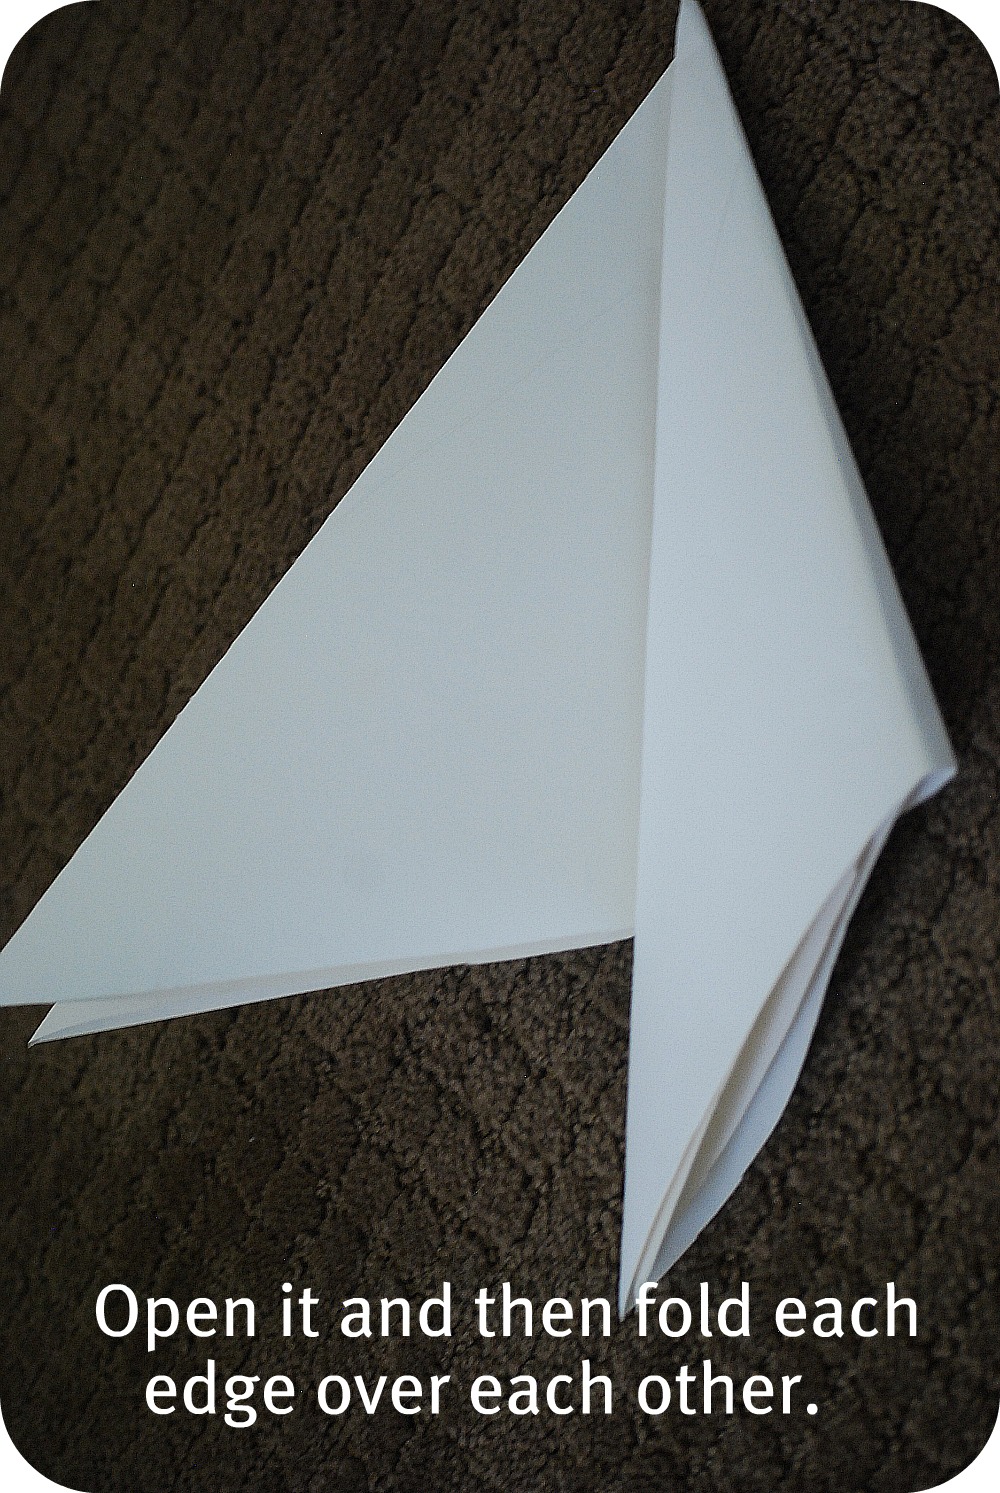
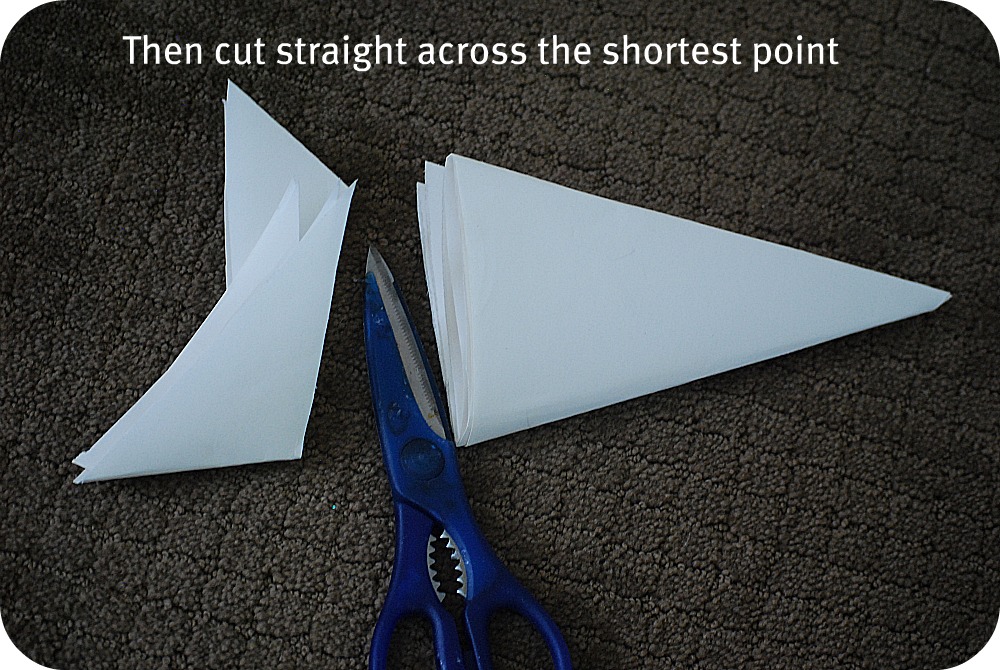
Start with a square piece of paper — any size. The smaller the original paper – the smaller the snowflake.


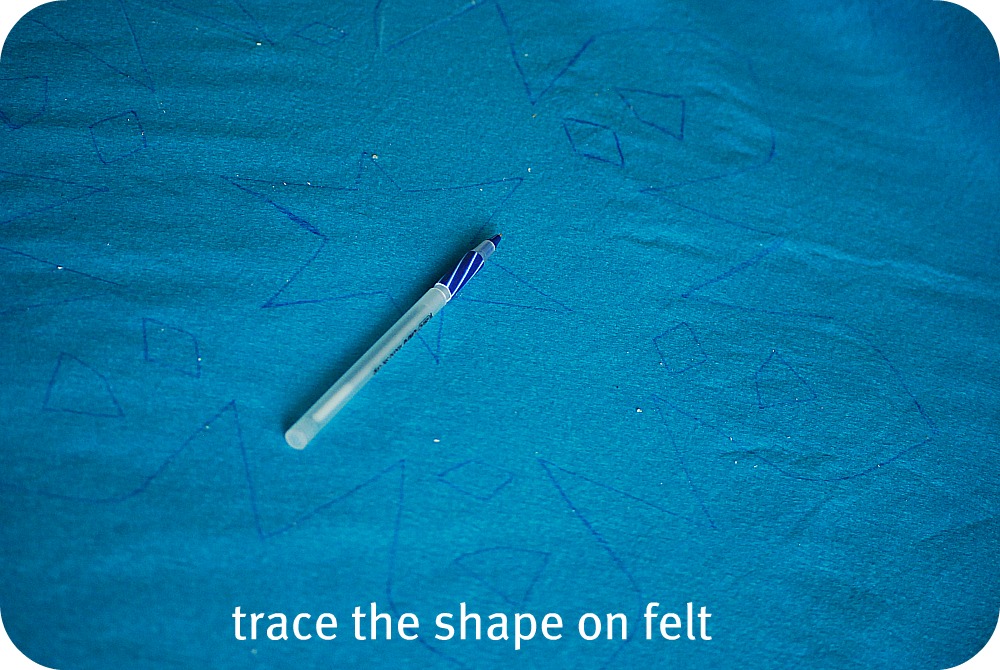
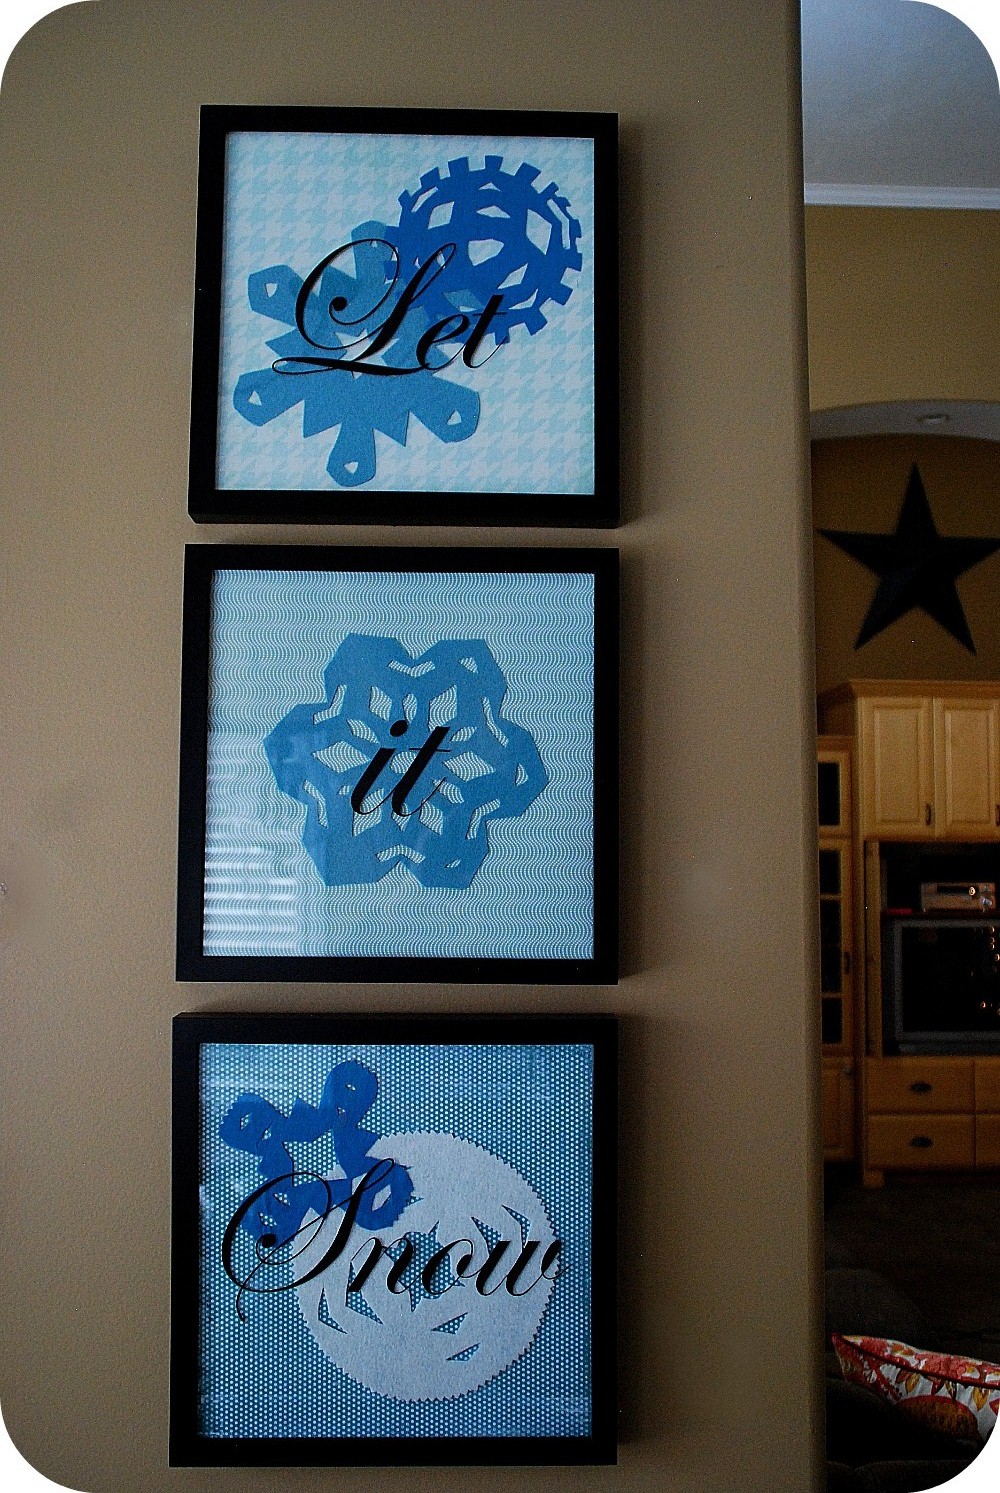
To make the Snowflake Specimen Art:
- I found three coordinating 12 x 12 scrapbook papers in my stash. They fit perfectly in those t-shirt frames. {you can get the frames from Michaels for $3 on sale}.

- Then I cut out some foam core. One of my readers suggested this when I made the Halloween version. In that version I used plywood, and foam core is — much easier to cut out, and much lighter!!
- I laid the snowflakes inside the frame and then paid the scrapbook paper on top, followed by the foam core. Then I secured the foam core with some Gorilla Glue Tape.
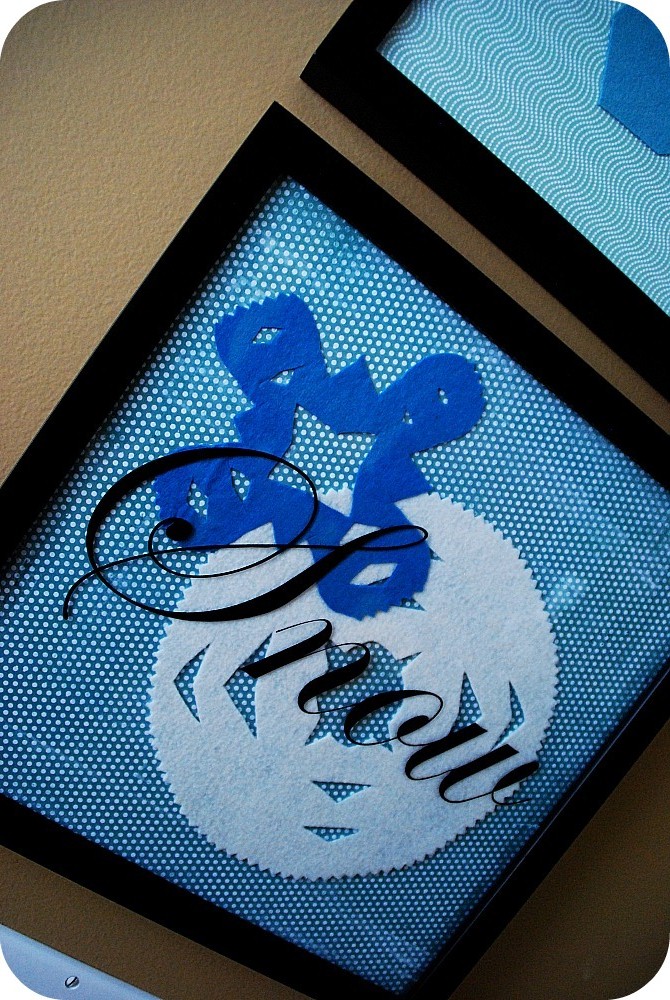
- I used my Silhouette machine to make some pretty words “Let It Snow”. I think the Edwardian Script is my favorite font!!

And Voila!! New Winter Snowflake Art.
And another great thing — I can keep it up all Winter!!
This project cost me less than $7 since I already had the frames 🙂
I think I might still try making that felt runner – I have quite a few snowflakes left!!
xoxo
What have YOU been working on? I’d love to see!!


That is so cute!!
I love working with felt!
What a great idea! We love decorations that can stay up for a whole season! Thanks for sharing! 🙂
Love this…but I'm with Kelli, I'm in New Orleans, we almost never get snow…maybe I could change it to "dreaming of snow"
This is too cute! I bet my boys would love to cut out snowflakes…though I don't know if "let it snow" would work very good down here in south Mississippi:)
It looks great, Jen!! I really love the snowflakes. They're great to decorate with, because they can be left up all winter! I framed some of Isaiah's artwork from last Christmas…a couple of little red birds. They're so cute.
Hope you're having a great week!!♥
Oh I just love those snowflakes! SO easy and so cute!
paula
You really come up with the best things. I love this look and it is one that I think I can do…I'd have to purchase the letters (or break down and eventually get a machine to cut them). I'm saving this one. Thanks!
Oh how I love your snowflakes. What an elegant way to bring that wintery feel into the home. You're just so darn creative. I love it.
I have my own version of snowflake art that I had so much fun with – I'd love to share with you:
http://firsthomemakeover.blogspot.com/2010/12/chalkboard-paint.html
As always, thanks for the inspiration!
So cute and my kids would have a blast helping!
Love this idea…so crafty and festive!
So cute! And the art as a whole looks really classy!
I love this!
I LOVE THOSE SNOWFLAKES!!!!!! So pretty!!! I picked up a Cricut on Thanksgiving weekend for a smoking deal & am just getting around to experimenting with it – I've seen you do such fabulous stuff, I'm excited to play around with it 🙂 Thank you for always posting such wonderful projects! I've missed stopping by 🙂 (And of course I should be cleaning now, but that will always wait, right?)
super cute! I love your snowflakes and I see LOTS of seasonal projects ahead for those frames in THAT spot!
🙂
gail
SOO Cute! and So Simply, I love quick simple projects!
Adorable! You should go for the table runner. I bet it would be great. 🙂
Jen,
So cute. I love the denim, burlap would be cute too.
Cheri
Love it. I'm going to have to bookmark this.
Fabulous as always!!
So so cute!! I love the shades of blue. And I love that you can keep it up through the winter!
LOVE this!!! The snowflakes are so cute! Great font choice too!
I am all about the snowflakes this year! What a cute idea, I wish I had some more wall space now!
These are fabulous! They look great and love that you went a different route this time! Gotta love how snowflakes work for Christmas and then roll over through the winter months. I just made a large wooden snowflake to use now and keep up later.
This is so cute Jenn! Love it! What a great idea…
PS – Heidi had a good idea about skipping the paper step and cutting the snowflakes out of felt without the template. I tried to do that, but the felt was too thick and I couldn't cut all the way through.
But maybe if you bought thin felt that would work. It would be much faster!
xox
Jen
Looks great! I have a very similar idea planned for 3 canvases. Thanks for the tips on the felt snowflakes!
I'm pretty sure you could skip a step and treat the felt just like paper. I did this when I made my snowflake pillow…although felt might be too thick…
Your snowflakes look super pretty though. 🙂
This is AWESOME. One of my favorite winter decorations I've seen this year. I really love the font too. I've been working on some winter projects too. Pom Pom snowballs and some framed mitten and hat art. Fun stuff. 😉
Wow! I love this.. very fun idea too.. I have a few frames in my garage, this gives me an idea.
Jen- this is a great idea! I love the idea of having seasonal shadowboxes/frames displayed in the house in the same exact place each season — it's just so much fun!
xoXOxo
Jenn @ Peas & Crayons
Love it! Your snowflakes are so pretty!