Make a simple circle burlap wreath with colorful fabric. You can add a string and hang a saying in the middle.
I retired the marshmallow wreath. It was a great wreath, but not one to keep for next year. I noticed a strange fact — although I live in a desert, the marshmallows never dried out. They were still squishy when I took the wreath apart — weird. On the plus side, the birds and other animals never ate any of it 🙂
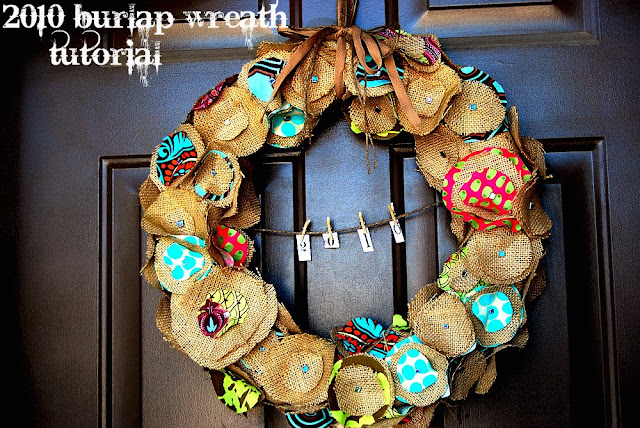
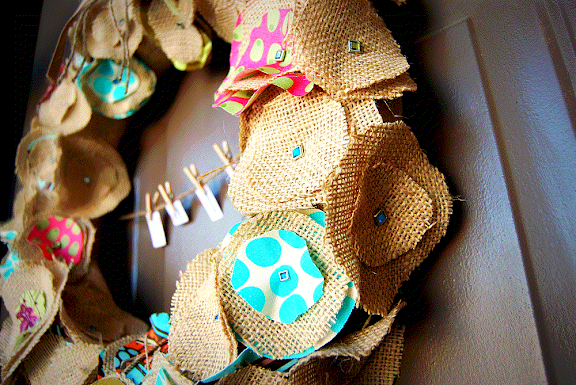
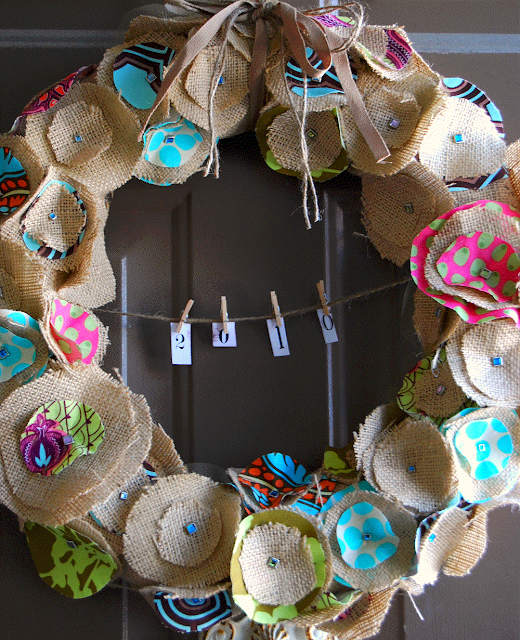
I wanted to make a wreath to welcome in the new year and decade. And I had a lot of burlap left over from draping around the base of my Christmas tree. I used materials that I already had, so this project ended up costing me nothing! I like the contrast of the coarse burlap paired with the pops of color from the Amy Butler fabric and the sparkle from the jeweled brads.
I thought it would be fun to attach letters to spell out different messages:
2010
Welcome 2010
happy
Some other ones that would be fun would be: hope, family, blessings, celebrate, Spring, Wish.…
Materials to Make a Farmhouse Burlap Wreath
wreath form
burlap — approximately a 3 foot section. (it is usually $2.99/yd. at most fabric stores)
some assorted fabric. I had some Amy Butler fat quarter squares
tulle – optional
tulle – optional
scrapbooking brads — but buttons would work too
hot glue and gun
twine
tiny clothespins
paper
stamp pad (brown or black)
If you would like to make one, this is what you do:
Cut Burlap Strips
- cut a 4 inch section down the length of your burlap.
Wrap Burlap Strip Around Wreath Form
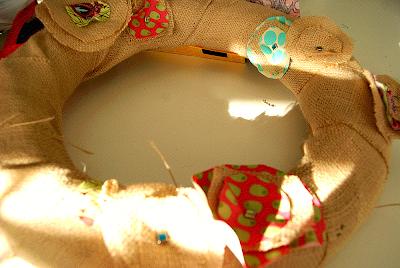
- secure the end of the burlap strip to your wreath form using your glue gun. Then wrap the fabric tightly around your wreath form until the entire form is covered. Overlap the edges slightly as you wrap/ Secure the other end to your wreath form.
Cut the Burlap Fabric
- Cut out two different sizes of burlap circles. I used a 14 inch wreath form and I cut out 50 3-inch circles and 50 2-inch circles. The circles do not need to be perfectly round. You can use a glass or cup that is about that size and trace around it if you would like. Also, you can double up the fabric by folding it up — I folded it twice to cut out 4 circles at a time. This is will save you a lot of time!
Cut Out Circles
- Cut out two different sizes of fabric circles using different fabrics. I cut out 25 3-inch circles and 25 2-inch circles total of assorted fabrics.I also cut out about 20 tulle circles to put under some of the flowers – this is optional.
Add Brads or Buttons
- You need about 50 jeweled brads or buttons to put in the center of your flowers. (remember you combine 2-3 circles together to make each flower so you need about between 120-150 total circles).
Assemble the Fabric
- Attach the flowers together with a brad in the center. If you are using buttons, hot glue the flowers together.
- Lay all of the flowers out on your work surface.
Hot Glue Flower to Wreath
- Hot glue your flowers on to the burlap wreath form. Start with the fabric flowers. Attach each of the designs at one time. So you are spacing out the different fabrics evenly on the form. For example, if you have three pink and green fabric flowers, attach one at the top, another at the bottom right and another opposite on the left. Then do the same thing with each of the other fabric prints.
Fill in the Form with Flowers
- Once you have your fabric flowers glued on, fill in the rest of the form with your plain burlap flowers. You may have to make a few more burlap flowers to fill in any bald spots.
Attach Twine
- After all of your form is filled and the glue is cooled, turn the wreath over and attach the twine across the center of the back. I attached the twine with hot glue.
Tie Ribbon to Hang Wreath Up
- Then tie the ribbon to the center of the top of the wreath to hang the wreath.
Add a Message
- You can attach any message that you want to the center of your wreath. I printed off letters on my computer using different fonts and various size letters. Then I cut out the letters/numbers. I used a brown ink pad to rub the sides of the letters to make them look old. Then I attached the letters to the twine using very small clothespins.
Fray Edges of the Burlap
- Then you can fray up the edges of the burlap and fabric as much as you want. I think I will fray mine up a little for some more texture. Enjoy your wreath!
Have a wonderful day!
XOXO
Update 3/10 — Because there are so many people who have made this wreath and put their own touches and spin on it, I thought it would be fun to have everyone link up their wreaths. That way if someone would like to make one, they can see all of the great ideas! So will you please link up your beautiful wreaths?? Thanks!!







Love this! Just wanted to let you know that I am featuring it on my “Top 10 Spring Wreaths” post today at http://www.cheapcraftymama.com! Feel free to stop by and grab a link or button! Thanks!
how do you keep the edges of the burlap from fraying?
I made my burlap wreath and then found your bright beautiful version! Love it! I added your wreath to my post and linked back here. Glad to see you added all these links. So many different ways to make these! So cute!
I linked my wreath! Love your blog! http://thriftyfindsandredesigns.blogspot.com/2011/03/diy-spring-yarn-wreath.html
I linked up my burlap wreath! 🙂
Sara
A friend and I had a blast whipping 3 of these babies right out!! Thanks for the awesome inspiration! I've been sitting on this for a few months and finally found the right time and season to do it!
I followed a link from twitter to this. When I saw the wreath, I literally said "holy crap thats the cutest thing EVER!" So unlady like of me, but true!
Loooove it!
KaraM @ http://www.karamoseby.com
I followed a link from twitter to this. When I saw the wreath, I literally thought "holy crap, thats the cutest thing EVER!!" So unlady like of me, but true!
Love it!
KaraM @ http://www.karamoseby.com
I have been dying to make this wreath since February, and today I am finally making it! It is so adorable. I love your site. Thanks for the inspiration!
I just found your blog by searching "marshmallow wreaths". 🙂 I have a new love, your blog. Great tutorial for this burlap wreath – and I will be making one.
This is sooo cute! I just made a smaller christmas version last night and put a pic on my blog. Thank you for all of you fabulous ideas and wonderful blog!!!
Emily@ http://www.senselesssophistication.blogspot.com
I linked up my Christmas wreath. Thanks for the cute idea!!!
Thanks for the cute idea!!! Totally enjoyed making my UNDER $5 version (gotta love scrap fabric):
http://thisdomesticateddiva.blogspot.com/2010/10/october-is-here-yay-fall.html
Hi! I found you last week via the nester and had to make this wreath for my fall door. I love it! Thank you:)
Hello! I am new to your blog by way of CSI Project. I gotta say I am loving this wreath! It's 10:30pm here right now but I feel like running to the crafty-craft room and starting on it! haha. I'm a follower now. 😀
thank you for the great tutorial!
I followed your directions and it turned out great.
I LOVE that wreath! I think I have some burlap laying around even… 🙂
My friend and I had so much fun making this wreath!! I am about to start another one!! THey are fabulous 🙂
Love this wreath! It makes me smile every time I see it. I linked up to a blog post I did on an ordinary day, with pics of my wreath!!
Thanks so much for the tutorial! I fell in love with your wreath–and made my own today!
Here's the link:
http://writerleeanne.wordpress.com/2010/03/28/thing-a-day-no-19/
Love the wreath…Had to make my own! Thanks for the inspiration
Lovely wreath, I had to make my own! I linked up… Thanks for the inspiration
I love your blog and I love this wreath!! I made a small one for myself and used it for a centerpiece on my Dinning room table! i linked up so you can see it and sent people your way for the details! Thank you for the brilliant ideas!
Just wanted to thank you for the tutorial! I just made this wreath and love it! I did one thing differently that might make it easier for some folks – I didn't hot glue on all the flowers. I found pretty pins and just stuck all the flowers into the wreath form. Cutting out the circles took the longest but once they were all cut out it was easy! You can see pictures at my blog: http://emcampblog.blogspot.com/2010/03/burlap-scrap-wreath.html.
Thanks again!
I love this, I had to have one! I just came across this post earlier this week and had to make it. Thank you for your inspiration!
http://kenziehand.blogspot.com/2010/03/knock-off-burlap-wreath.html
Loved it so much I had to make one too! Thanks for all of your inspirations!
http://kenziehand.blogspot.com/2010/03/knock-off-burlap-wreath.html
Such an awesome wreath!! I did a version today with denim instead of burlap! Thank You! http://prairiestormdesigns.blogspot.com/2010/03/tutorial-tuesday-scrap-wreath.html
We did it, Jen! 🙂 Love how it turned out. Thanks again for all the inspiration.
Blessings-
Sarah
http://harriganhowdy.blogspot.com/2010/03/crafting-spring-wreath.html
Hi Jen~
I LOVE the burlap wreath! I did a lil twist on the burlap wreath and did a burlap MONOGRAM for the front door! I'd love to share but can't figure out where to attach a picture!
I'm adding your wreath tutorial to my Friday Faves tonight. My friend & I are going to try to make one this coming week! 🙂 Can't wait to give it a try.
Blessings-
Sarah
Loved this and knew I had to make one for myself. I just posted about mine so you can check it out if you would like! Thanks for the inspiration!
http://pureoffaith.blogspot.com/2010/02/spring-burlap-wreath.html
I love this wreath and can't wait to make my own! I signed up for your blog feed and am looking forward to future posts!!