Tatertots and Jello

COLORFUL HAPPY HOME -- Daily DIY, Decor, Craft and Recipe Tutorial

  • My Home
    • 1905 Cottage
    • Daybreak House
  • DIY
    • DIY Projects and Ideas
    • Organizing
    • Tutorials
    • Printables
  • Decor
    • Spring Projects
    • Summer Projects
    • Fall Projects
  • Crafts
    • Kids Crafts
    • Painting Projects
    • Paper Projects
    • Sewing
    • Wreaths
  • Holidays
    • Valentines Day
    • Easter
    • Halloween
    • Thanksgiving
    • Christmas
    • HAPPY Holidays Series!
  • Recipes

Explore

  • my home
  • diy
  • decor
  • crafts
  • holiday
  • printables
  • recipes

Connect

Home » decorating » DIY Faux Watercolor Art for Valentine’s Day!

decorating, diy, guest tutorials, valentines day · February 5, 2015

DIY Faux Watercolor Art for Valentine’s Day!

Tatertots & Jello is a participant in the Amazon Services LLC Associates Program, an affiliate advertising program designed to provide a means for sites to earn advertising fees by advertising and linking to amazon.com.

Hi everyone! It’s Holly from My Sister’s Suitcase, back again to share an easy decor project that will make a big impact in your space — faux watercolor art. This is something that can be customized for a certain holiday, or kept up year-round. I decided to put a Valentine’s Day spin on my watercolor art, and I love how it turned out!

watercolor art tutorial

I always enjoy a room with a big focal point art piece… the problem is finding or creating something that size, inexpensively. I started out with one of my favorite resources for large print designs, the Caravan Shoppe. They have lots of black and white designs, perfect for printing at your local copy store as an Engineering Print. Make sure you upload a high resolution file, and then select your size of print. I use Staples, and usually get the 36″x48″ print ($7.29) or 24″x36″ ($3.49), this one is a 36″x48″, trimmed square to 36″. I downloaded this pack of Love designs from the Caravan Shoppe for FREE:

caravan shoppe chatbooks

Here’s what it looked like after I printed it and put it in the frame, plain black and white.

love us print_before

I wanted to add some color and simple Valentine’s decor to my mantel, that’s when I had the idea to turn this print into a watercolor!

My color palette was inspired by these festive felt balls:

paint colors & felt balls
Here are the materials you’ll need to do this yourself:

  • craft paint
  • bristled paint brush
  • water
  • paper towel for blotting excess water

watercolor paint supplies

Decide which color you want to start with, and work your way up from darkest to lightest pigment. I wanted an ombre effect, where it would just fade into white at the top of the print. I mixed two pink shades with the dry brush to create my first color, got some paint on the brush, then dipped the brush in the bowl of water and swirled it around. Then I just brushed the color on with big strokes across the bottom of the print.

applying first watercolor

For the next section, I wanted the same shade, just a lighter pink so I put my brush in a clean bowl of water so the color was more diluted. When I switched colors to the red shade, I washed out my brushes and got clean water. Then I just repeated the same technique. As I worked my way to the top, I watered down my paint water so the strokes were very light in color, then blended into the white at the top of the print. Here is the finished product:

completed watercolor sign

I let it dry almost completely and then placed it into my DIY copper-leaf frame. The paper my be a little wrinkled as it dries, so here is a tip. Once you have the print inside the frame, face down, spray the back of the paper with a light mist of water from a spray bottle. This seems to calm the paper down and make it lay flatter. Then add your backing piece and secure the back of the frame. That’s it! Step back and enjoy your watercolor art!

faux watercolor

I coordinated my copper frame with the glittery sign hanging above my loveseat…

love watercolor art

I was able to do this entire project during commercials of the Bachelor on hulu! So it really is simple and anyone can do it.

If you are thinking about trying it, make sure to pin for later!

watercolor tutorial

Signature-Holly

******************

Thanks Holly! So adorable, and such a fun idea for Valentine’s Day too. Holly is always sharing fun ideas with us. Make sure to check out these fun Valentine’s Day ideas on her blog, too:

glitter-love-letters

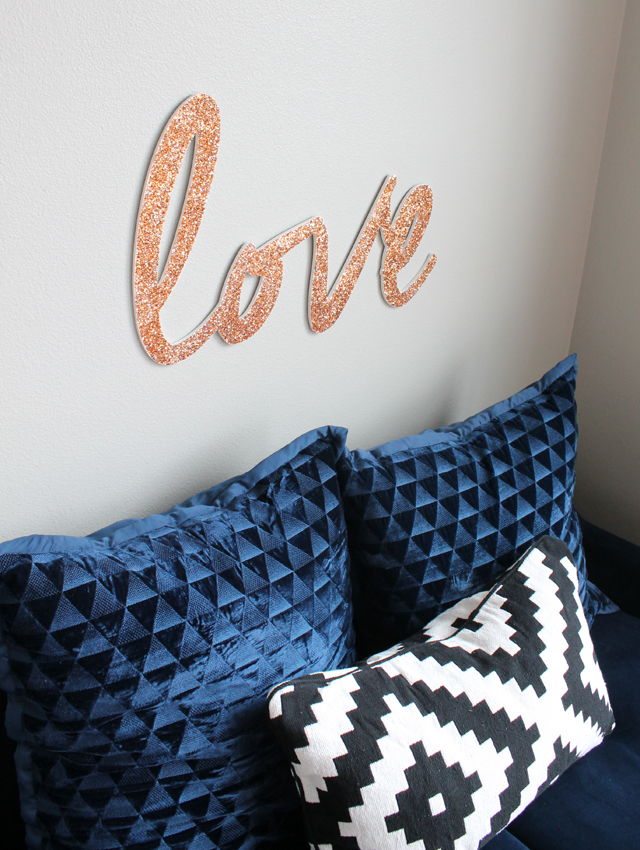
This DIY Glitter Love Sign is the perfect touch for adding a little glam to your Valentine’s Day Decor!

paper-straw-love-letters

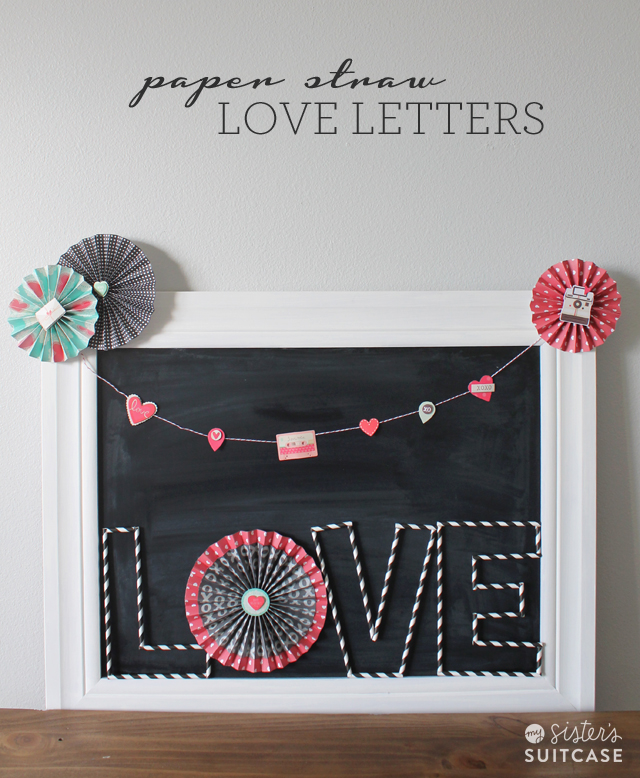
And, these Paper Straw Love Letters are just so sweet, too.

teacher-valentine-ideas

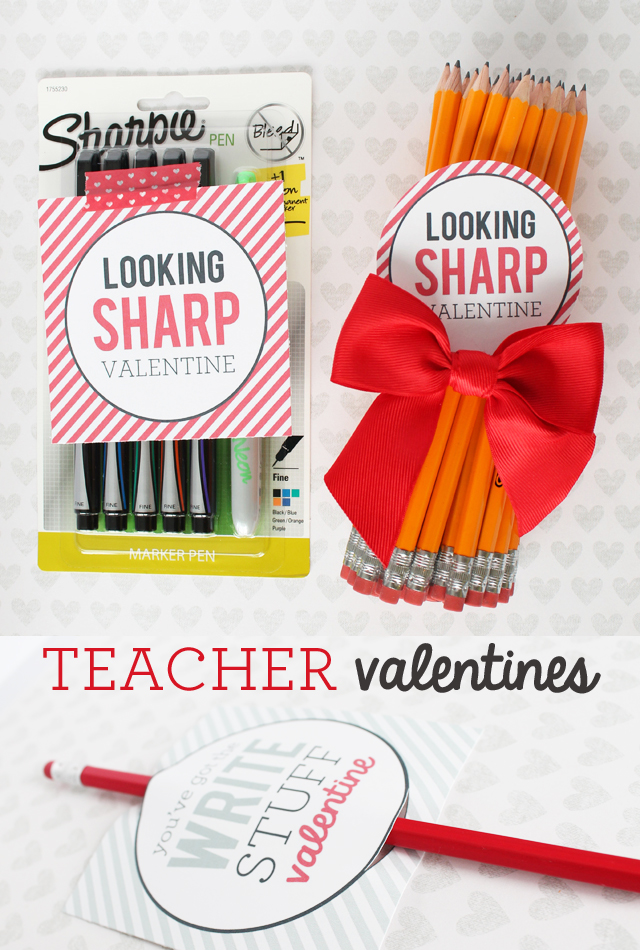
And, these Looking Sharp Teacher Valentine Printable Tags are perfect for that special teacher. Make sure to

Follow My Sister’s Suitcase on Pinterest
instagram.32x32.icon.square
Follow Nat from My Sister’s Suitcase on Instagram
instagram.32x32.icon.square
Follow Holly from My Sister’s Suitcase on Instagram
facebook.32x32.icon.circle
Follow My Sister’s Suitcase on Facebook
twitter.32x32.icon.circle
Follow My Sister’s Suitcase on Twitter
And here’s another fun idea — Embroidery Hoop Valentines Day Art from Mod Podge Rocks!
xoxo
jen signature

Posted By: Jen · In: decorating, diy, guest tutorials, valentines day

Date Basket Giveaway!
Link Party Palooza — and Date Basket Giveaway!

You’ll Also Love

Christmas garland to valentine's day wreathChristmas Garland to Valentine Wreath
Heartfelt DIY Valentine’s Day Ideas
Over The Door Garland: Valentine’s Day Edition

Comments

  1. Reelika says

    February 7, 2015 at 12:12 PM

    Another favorite of mine! Thank you for the post, I love it!

  2. Brie @ like-the-cheese.com says

    February 7, 2015 at 1:55 AM

    So cute! I love the painted ombre! P.S. Those ‘looking sharp’ Valentine’s are adorable!

  3. Chandra@The Plaid & Paisley Kitchen says

    February 6, 2015 at 8:39 PM

    I love this! I just made a I love us craft. It’s such a great phrase

Hi! I'm Jen Hadfield. I'm a mom of 5 restoring an 1891 home in the heart of Salt Lake City. I love being creative and sharing simple ideas to make your life easier and more beautiful!

Receive the Latest Crafts, DIY, Recipes and More in your INBOX!

Follow us on Pinterest! It's awesome!

Top Posts & Pages

Spruce up Your Outdoor Space with a DIY Recirculating Fountain! (tutorial)
A New Deck in Under 30 Minutes!
DIY Secret: How to Print on Post-It Notes (and Free Printable Template)
12 Must-Have Items to Pack on an Alaskan Cruise!
Copycat Panera Spinach and Artichoke Egg Soufflés - SO good!
How to Change a Recessed Can Light into a Pendant Light with No Remodeling!


Popular Posts

  • Spruce up Your Outdoor Space with a DIY Recirculating Fountain! (tutorial)
    Spruce up Your Outdoor Space with a DIY Recirculating Fountain! (tutorial)
  • A New Deck in Under 30 Minutes!
    A New Deck in Under 30 Minutes!
  • DIY Secret: How to Print on Post-It Notes (and Free Printable Template)
    DIY Secret: How to Print on Post-It Notes (and Free Printable Template)
  • 12 Must-Have Items to Pack on an Alaskan Cruise!
    12 Must-Have Items to Pack on an Alaskan Cruise!
  • Copycat Panera Spinach and Artichoke Egg Soufflés - SO good!
    Copycat Panera Spinach and Artichoke Egg Soufflés - SO good!
  • How to Change a Recessed Can Light into a Pendant Light with No Remodeling!
    How to Change a Recessed Can Light into a Pendant Light with No Remodeling!
  • Mother's Day Cup Holder Gift Basket
    Mother's Day Cup Holder Gift Basket

As seen in


Amazon Affiliate

Tatertots & Jello is a participant in the Amazon Services LLC Associates Program, an affiliate advertising program designed to provide a means for sites to earn advertising fees by advertising and linking to amazon.com.
  • About Me
  • Advertising
  • Get Featured

Copyright © 2025 Tatertots and Jello · Privacy
This site is a place for positive discussion and ideas. Negative talk, comments that disparage others, and similar are not welcome and may be removed.