
I have so many Valentine ideas I wanted to do — but I’m running out of time! Here’s one I made today. But, these napkin rings don’t have to be just for Valentines Day – you can use them all year.

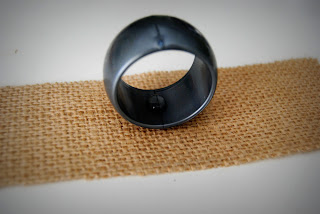
I bought the napkin rings at the Dollar Store. Yep, I have been wandering around in there again! Four napkin rings for a dollar — pretty sweet deal. I had wanted to make this for awhile and thought I would go to home depot and get some sprinkler PVC pipe and cut it into sections to make the rings, but then I saw them at the the Dollar Tree. Saved me some time and effort!
If you want to make these, here is what I did.

Supplies:
Burlap — eight inches wide by 13.5 inches long section to make 6 napkin rings
Hot glue gun and glue sticks (low temp is great or you might burn your fingers like I did)
Napkin rings (Dollar Tree)
Jewelry embellishments (I got mine from Michaels on sale — 2 for $1.99 plus 30% off)
Ribbon ( I used pale pink organiza, but you can use any color you like)
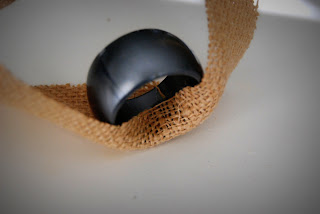
- Cut your burlap into strips 2 1/4 inches wide by 8 inches in length. Cut as many as napkin rings you want to make.
- Put your ring in the middle of the burlap strip. Put a dot of hot glue in the center at the bottom of the ring. Hold the material tight around the outside of the ring and bring the edges together where the glue dot is. Press down tightly. If using hot glue, not low temp, let the glue sit for a few seconds before bringing the material around on top of it. It is very easy to burn your fingers. It is good to let the glue cool off just a bit first. You can also use the end of a Popsicle stick or end of a pencil to hold the glue while it is hot and then smooth it down with your fingers once it is almost cool.
- Repeat step 2 all the way around the napkin ring until you are back at the beginning.
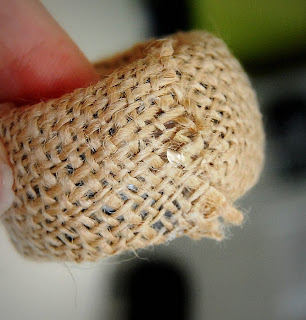
- When you are back to the seam again, overlap the burlap so that it goes over the first seam and cut off any excess. Run a line of glue under the outside seam of the burlap and press down to close.
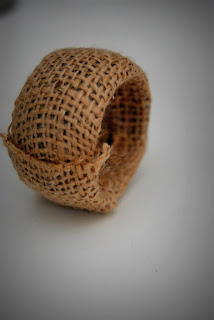
- Repeat with all of the napkin rings.
- Measure your ribbon. Cut the ribbon to the length of the circumference of the napkin ring.
- Once your burlap is attached, put a dot of hot glue on the seam of the napkin ring. Put the edge of the ribbon on the hot glue, run the ribbon around the napkin ring until you reach the hot glue again. Press the end of the ribbon into the hot glue. If the glue has cooled, put another dot of hot glue on top of the other end and press down.

- Once the ribbon is attached, attach your decorative jewelry pieces. Mine had loops on four sides that are used if you using them for jewelry. I cut the loops off using pliers. I used Gorilla Glue to attach the jewelry piece to the napkin ring. I put a small dot of glue at the top and bottom of the jewelry piece and put it on the top of the napkin ring – so the seam is opposite on the back. I held it down for a couple of minutes until it was tacky and then let it sit so the jewelry piece was facing up until it was completely dried – about 2 hours.


I’m excited to use them on Valentine’s Day, but I think I will use them throughout the year too!

XOXO


www.tatertotsandjello.com


My daughter is getting married in October. Should I start now??
Love this! Just wanted to let you know I included it in my 2011 Ultimate Gift Guide (101 tutorials/recipes)! Check it out: http://danimariedesigns.blogspot.com/2011/10/2011-ultimate-diy-gift-guide.html
Love these Jen! I've scheduled this post to be featured on Craft Gossip tomorrow morning so my readers can come and see! 🙂
Thanks for inspiration!
If you would like a "featured by" button, you can grab one here:
http://homeandgarden.craftgossip.com/grab-a-craft-gossip-button/
These wonderful .. I want to do it .. thanks
googbye
berra
these are perfect! I have a new obsession for burlap and LOOVE these!!
Great idea – can't believe I was looking at burlap in Joann Fabrics yesterday and didn't buy any! I am kicking myself!
glad you shared this one too for the Round Robin..
Happy Valentine's Day..
very pretty!
Brilliant!
These are just so darn cute. And you could customize them for just about any occasion–or leave them plain. What a great idea! Thank you for sharing it!
This could be my new favorite burlap project!
Girl, you have to stop! Your head is going to blow from all that creativity bouncing around in there! l LOVE these ;).
Jen, those are amazing! The things you come up with are wonderful! I am going to have to use this idea somehow! I'll let you know and link to your blog when I do! 🙂
Oh, and I wanted to ask you~ you mentioned a weekend wrap up party… Is this a new thing you are starting to do every week, and if so, what day are you doing it on? I am sure I could come up with something! 🙂
I hope your week has been a great one so far! Have a good night! 🙂
What a fantastic idea! These are gorgeous and what a fun gift they'd make for hostesses. Thanks for inspiring! (Stopped by from Amanda's party.)
I think after all the snow we've had here I am headed to the dollar store tomorrow ALONE to see what I can brew up in my head. Fabulous job, Jen 🙂 so pretty!
Those are gorgeous Jen, as usual!
Oh great. Now I have to go back to the dollar store for these! I was just there buying a tray to redo. First the burlap wreath, then the frames with marbles…I think I need to stay away from your blog for a while!! These are adorable.
Super Duper clever!! Now I just need to get some nice fabric napkins
This is So cute, are they up for sale! Adorable, have to try these!
Thanks for sharing!
Amanda
Very pretty. What you do with your those little purchased at the Dollar Store always amaze me.
I love love love love love all your awesome dollar store craft projects. Now I walk through my dollar store with different eyes, thanks to you!! I can't wait to come up with my own dollar store craft!
Oh so pretty!!
These are fabulous and you're right, they aren't just for Valentine's Day. I'd use them any chance I got!
Those are gorgeous, Jen!! What a wonderful gift to make. 🙂 I'm saving this idea in my file! Thank you so much for linking up. 🙂
These are really pretty. I have everything except the jewelry piece. I may have to try this! Thanks!
Sue
Love these, thought they were bracelets at first (would love it as a bracelet also).
THOSE are so L♥VELY!
Oh my word. These are amazing. Thanks for the simple tutorial!
Stunning! I {heart} burlap….
what a great idea!! they turned out lovely! i want to try this! maybe as soon as this snow storm passes and i can leave the house! hehe. thanks for the inspiration!
Hi Jen, these napkin rings turned out fabulous. They look so vintage and yet they are easy and cheap to make. This is my first visit, you are very creative. I will definitely be back as a follower.
Oh Jen, these are so cute!!! LOVE them!
Super cute! I want a matching bracelet!
Every time I go to the dollar store, I stare at the Napkin rings. I knew they could be turned into something beautiful! I just couldn't visualize it. Thank you for showing me how 🙂
If you'd like, I'm hosting my very first Link Party today. And you are welcome to link up this craft!
http://lanieree.blogspot.com/
How cute. Wouldn't these make a fabulous wedding gift.
Thanks for sharing!
Those are so pretty and elegant!
I just did a dollar store napkin ring too!! I found an 8 pack though for a dollar but they were thinner and I had to take the fabric that was on them off. I love yours! So cute!
wow, you have such inspiring ideas! Thanks so much for sharing!
These are beautiful! I love the contrast of the rough burlap and the sily organza and sparkly jewels. What a smart cookie you are!
Love them!
beautiful!
Love them! Very creative – and Yes, you could definitely use them year round. I will have to be heading to the Dollar Store…
Chelsea
Very cute! Would make a nice Wedding/Shower gift with the napkins! Thanks for sharing.
LOVE
These are great, I love them!
Hey friend! I think this has to be my favorite burlap project you have done! I LOVE them…so adorable. Thanks for your tutorial. When will I ever get some of the projects I want to do done????
How pretty, I just love them! WAY TO GO JEN! you impress me each and every time! 😉 😉
i LOVE these!!
Great Job!
Wow as always.. I got my mantel up Thanks for your help and ideas..
Everything you ever post is always so INSPIRING!!!!! Thanks again Jen!
LOVE them!
so pretty! You have such creative ideas…love them all. Thanks for sharing:) Also I made a coffee filter wreath I think you may like. You should check it out…Inspired by your cupcake liner wreath.
Undoubtedly, these are one of my favorite ideas you're shared recently. Two thumbs up from me!
These are so pretty, Jen! They would go so well with placemats I already have, too.
OH the possibilities!!!!
Gorgeous! I think I will have to check out the dollar store today.
This is such a great idea! Love it!
Really so pretty!
you are so creative!
whohoooooooooo another one I can do!!! tfs!!!!!
So cute! And the best part…Cheap! I just might have to try these!
jen, i love this. they look so romantic and vintage!
Wow! Those are just absolutely beautiful! How creative!
Mary Ellen
I am in awe of the creativity that comes from your head!
I love these!! Thanks so much for the detailed How-To!! Can't wait to get started! Great idea!
Just beautiful! Everything you make is always just gorgeous! Thanks for the tutorial!
These are really pretty! That last pic looks like it came out of a magazine! Gorgeous!
Another cute project! You could make a set of these for each season.
these are great, so pretty! great idea!
Oh! These are adorable….and they seem easy enough to recreate. How do you always seem to make it so easy?
Thank you!