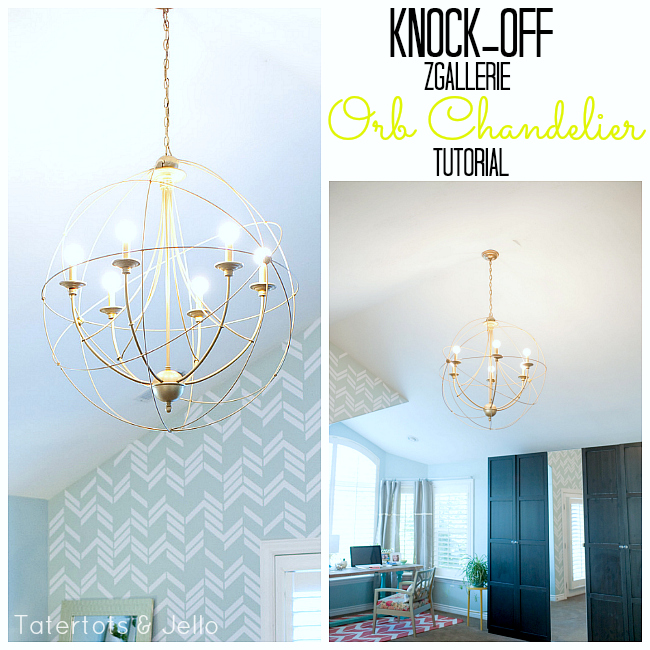
Have you seen those Orb Chandeliers at all of the high-end stores?? I love their shape and modern look. Shelley from House of Smiths and I went on a blogging trip a couple of months ago and we were chatting about all of the projects that we still want to accomplish in our homes. We both love the ZGallerie and Restoration orb chandeliers. But NOT the prices!!
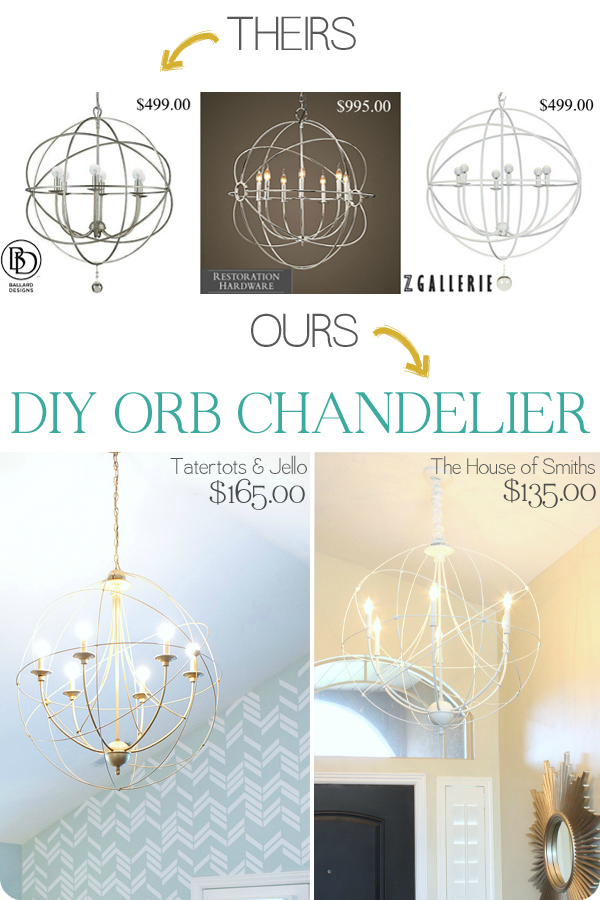
And we thought how fun would it be if we each made one and then shared our tutorials on the same day??
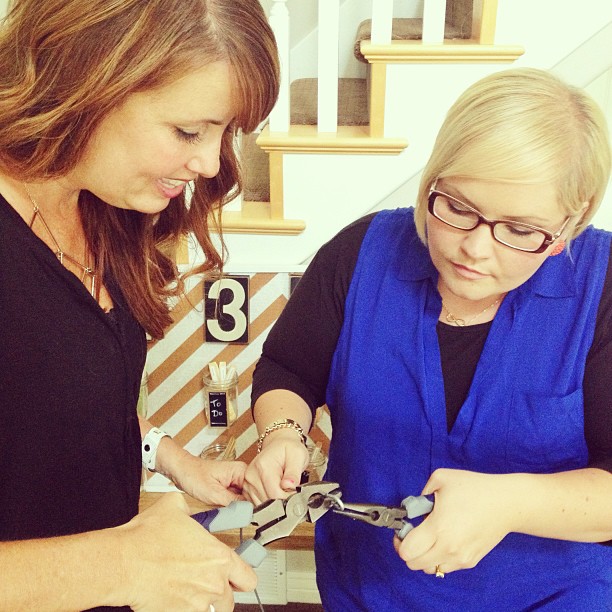
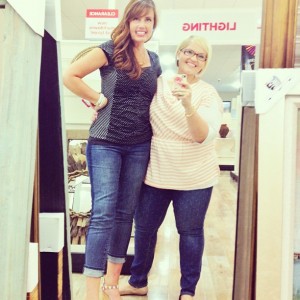
Projects are always so much more fun when you do them with a friend!
We’ve done a few other projects together in the past — our Chevron Rugs, she was so helpful when I made my Giant Valentine’s Subway Art and there’s another BIG project that she helped me with in my bedroom reveal. I can’t wait to show you!!

What a great friend!
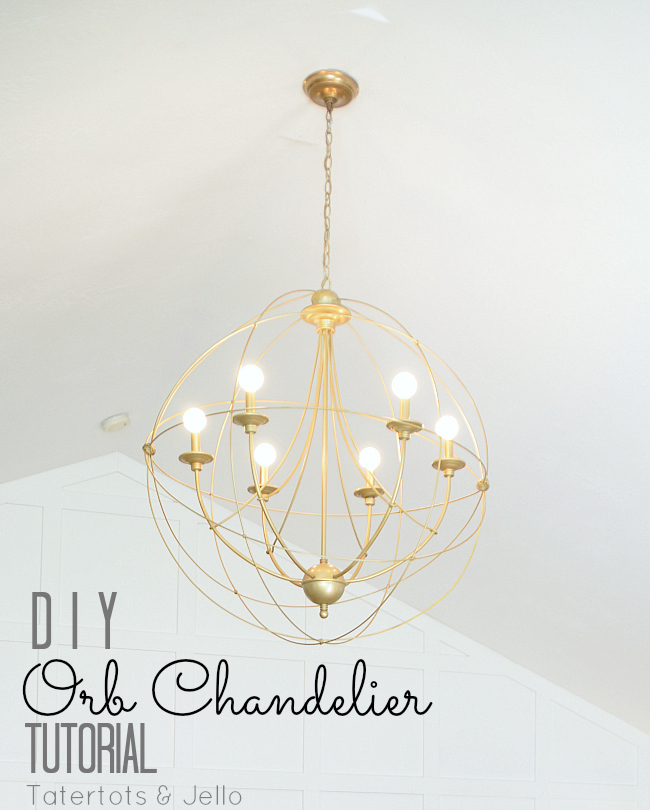
So Shelley came over one day and we worked on it. Then she took hers home and we both came up with our own tutorials! They both turned out so well!! I love the way they both look in our homes!!
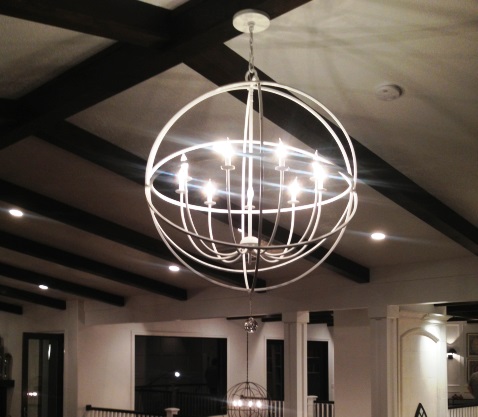
Here’s the look we liked from ZGallerie
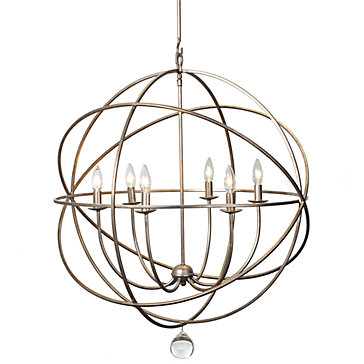
(or from Restoration Hardware), but we didn’t want to spend $500-$2000 to get it. This pic is from a Salt Lake Parade of Homes house:
Here’s the Tutorial:
Notes on design:
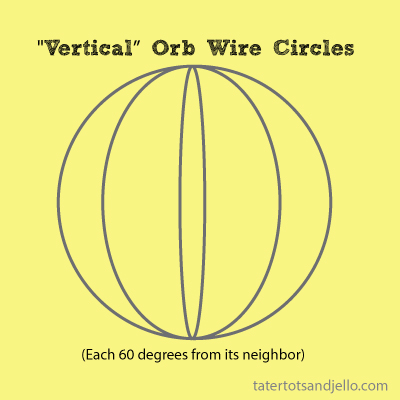
- The Restoration Hardware version differs from mine in a few ways. First, it has four complete circles — two on the vertical axis (top to bottom) and two on the horizontal axis (left to right). I felt like mine would look better with three on each axis.
- The crystal ball hanging on the bottom helps the orb hang straight. I experimented with a few different ideas for this — since I didn’t care for the crystal look — and didn’t find anything I loved. So my version omits that.
- Since I don’t have a welding torch or, really, any idea how to weld things, I had to come up with a different way to connect the wires. I experimented with some glues and epoxies, but none did the trick. So I experimented and decided to simply hook the two ends of the big wire together. I’ll tell you more about this below, but basically I bent each end so that it would hook around the wire it intersects. You may want to practice bending the wire on a piece of scrap wire — I got better at it the more I did!
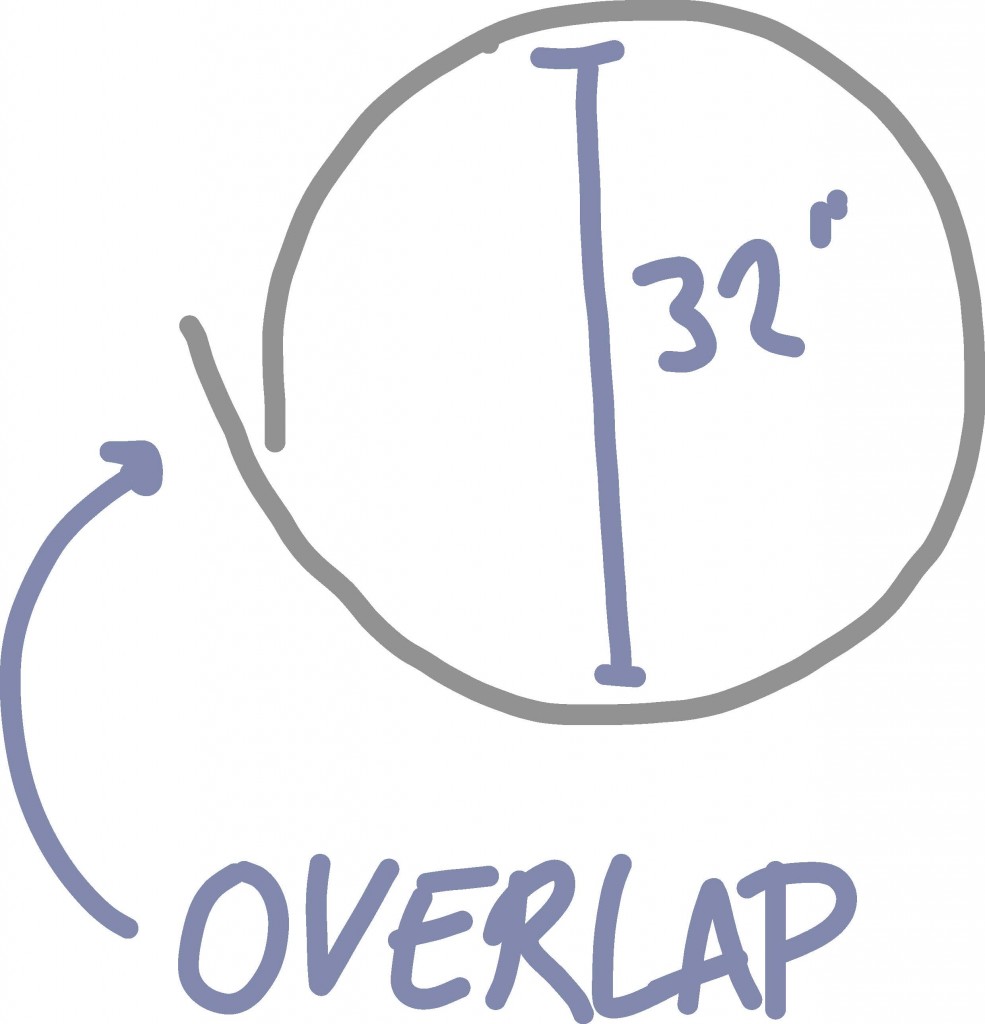
Here’s a sketch of the overall design:

Here’s what I used (supplies):
- Chandelier (I got mine at Home Depot — it was about $120). I liked the clean lines — and didn’t use the shades on the lights — I wanted it nice and bright! I chose a chandelier with a ring on the top — that certainly made things easier. When you choose a chandelier, if you find one that’s roughly square — meaning it’s as wide as it is tall, or even a little taller than it is wide AND has a ring at the top and the bottom, it will be even easier. If you can find a thrifted chandelier, this project will cost you even less!
![89bf4853-71b9-43ce-9731-dc701cb86a65_400[1]](https://tatertotsandjello.com/wp-content/uploads/2013/08/89bf4853-71b9-43ce-9731-dc701cb86a65_4001.jpg)
- High-tensile fencing wire for the “orbs.” I used a roll of heavy galvanized steel wire from the fencing section of the hardware store. It was in a large roll of about 170 feet, and cost about $20.
![f3444c42-d1cf-4456-85de-6784a3cb46c3_300[1]](https://tatertotsandjello.com/wp-content/uploads/2013/08/f3444c42-d1cf-4456-85de-6784a3cb46c3_3001.jpg)
- Smaller wire to use for the intersections of the larger wire. I used picture hanging wire from that section of the hardware store. I chose the thickest wire I that could easily be bent. I wanted it strong but easy to work with. (Like this kind.)
- Big pliers that can cut the biggest wire
- One or two pair of smaller pliers
- Spray paint for your final painting (mine is gold!), and primer!
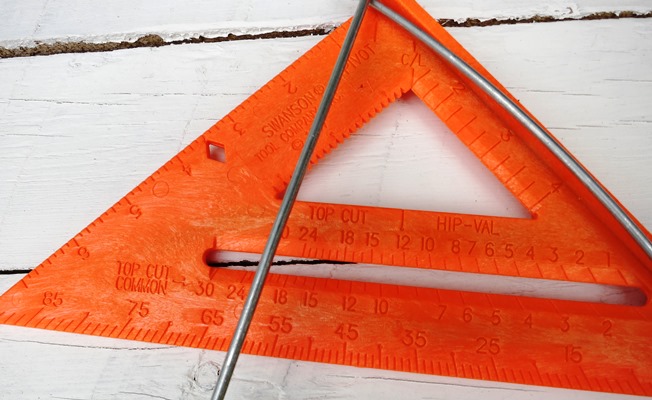
- Possibly a protractor or other angle-measuring device (I swear by the Swanson Speedlite Square ($4) for all kinds of things (Lowe’s; Home Depot carries a different brand I don’t like as well)
![038987001185[1]](https://tatertotsandjello.com/wp-content/uploads/2013/08/0389870011851-300x300.jpg)
How-to Steps:
1. Assemble your chandelier. Have it all put together before you start on anything else. If possible, hang it temporarily from something while you work. You’ll need to know its approximate size before you go further, so
2. Measure how big your orb will be. Grab some wire, or just wave your hands around, and estimate how much space you want between your chandelier and the orb that goes around it. I liked about 3 inches of space on each side. So for mine, the chandelier itself was around 26″ wide, so I figured my orbs need to be about 32″ across.
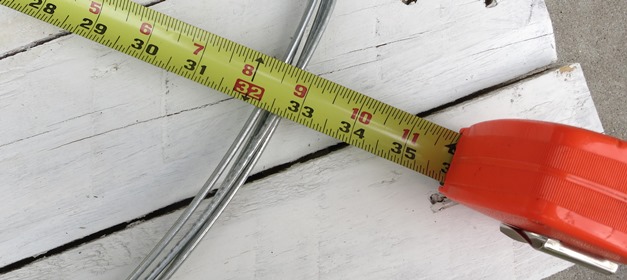
3. Cut your first circle. You’ll need to be a bit tricky with your measurements. I suggest you start with the three vertical circles — meaning, the ones that go from top to bottom and back again. If your chandelier is like mine, there’s a circle at the top you can use to attach your circles. Here’s the tricky part. You can lay a measuring tape (or two!) on the floor while you measure your wire to make sure it’s the right size.
(I know you are loving my diagrams.)
Tip: You will need to adjust the length of the overlap when you cut the wire while keeping the overall diameter (the space across the circle) the same. For the vertical circles you’ll need to allow for the top ring: for example, my top ring was about 2″ across, so I knew that I needed to have 2″ less overlap for the vertical circles. You will also want to overlap the wire enough to allow for your wire loops. This is trickier than it seems. practice making your wire loops on a few short pieces of your wire: then you’ll know how much to allow for the wire loop. In my case, it took me about 3/4″ to make a good wire loop, so I allowed for an extra 3/4 to 1 inch overlap.
Use your big wire cutters/pliers to cut this to size.
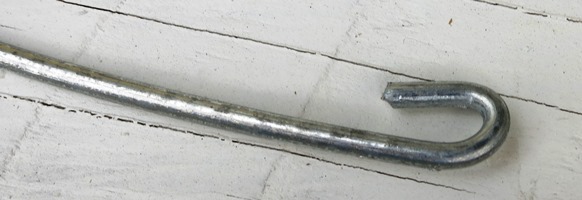
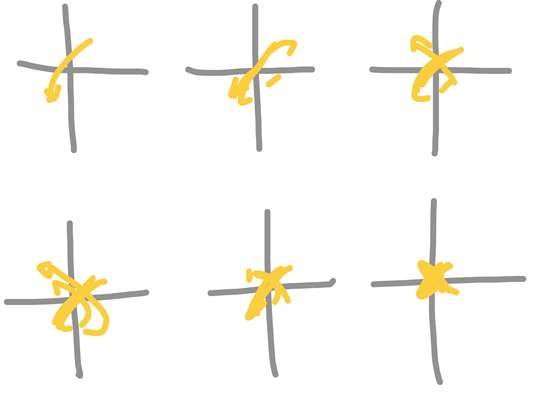
4. Make your first set of loops and test them. This takes a bit of thought. For example, for the first vertical circle I knew it would attach on both ends of the top chandelier circle, so I knew I needed to bend my wire loops to the left and right — so they would wrap around the chandelier top circle. I suggest for all of your wire loops that you bend them in opposite directions, like this:
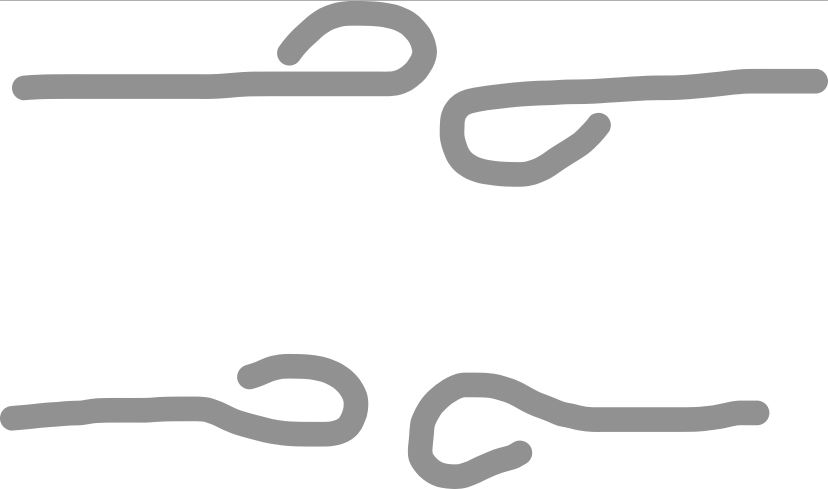
With a little practice, you can bend your loops more like the bottom than the top — that way the wire coming in is more likely to looks like it’s straight.
How do you bend the wire into hooks? Hold one end of the wire circle in one pair of pliers, and hold the wire about 1/2″ below that with another pair held in the opposite direction, like this:
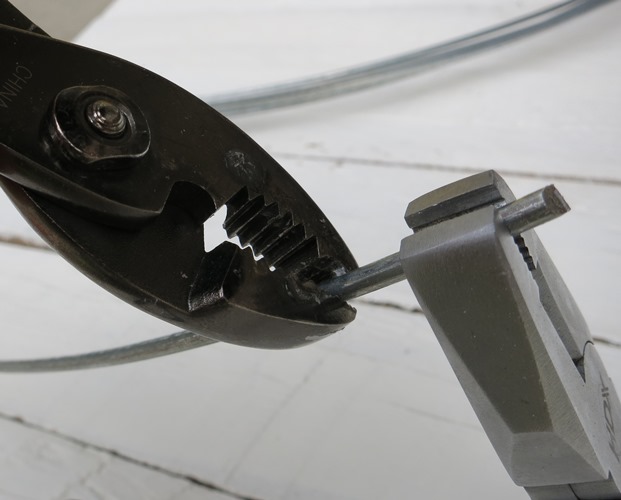
Bend the hook until it’s closed just enough to allow room to slip the hook around another wire.
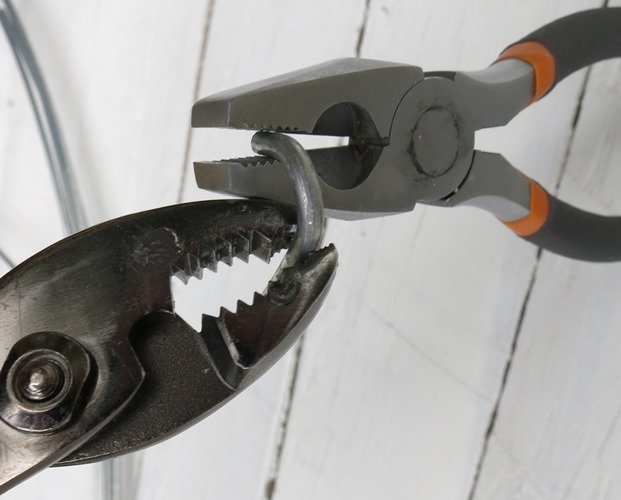
(My husband calls these photos “robot dinosaurs fight over robot snake.”)
You may even have to use a pair of giant pliers to push it just a bit farther closed:
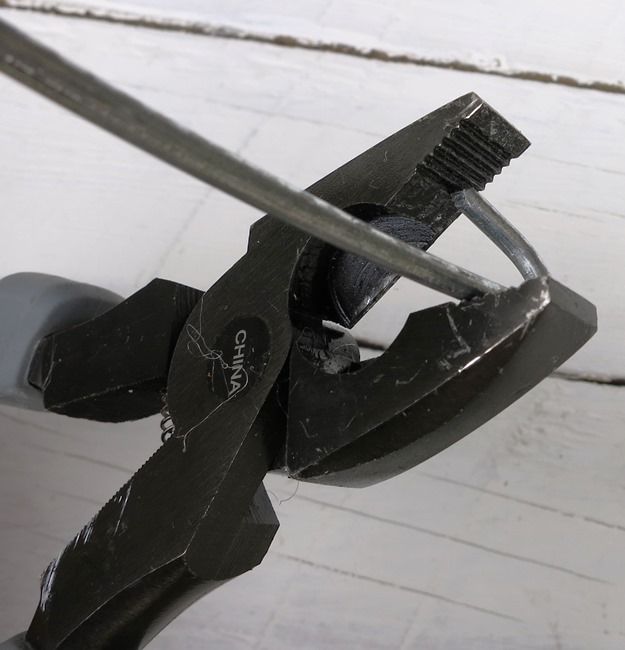
It just takes a few tries to get the hang of it.
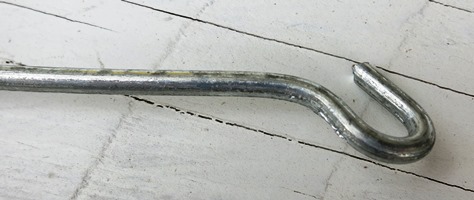
If you can, try to bend the finished hook a bit off center so that it will connect straighter, rather than going in at the side.
5. Hang your first circle. I suggest hanging them as you go for these first vertical circles. So hang the first circle. You may need to use a tiny bit of the smaller wire to hold the hooked ends in place (use your pliers to close the hook all the way after you attach them).
6. Cut and add hooks to the remaining two vertical wire circles and hang them from the top chandelier circle. Remember to plan your hooks for where they are going to attach at the top so they will fit nicely around the chandelier top circle (remember, they will wrap around sideways). Wrap a bit of the small wire around the bottom where the circles intersect below the center of the chandelier, adjusting them generally where you want them. This is just a temporary wrap so don’t get too worried about it.
Extra tip: In hopes of making my vertical circles hang straighter, I also added a “crossbar” across the top ring as tightly as I could with the thick wire, like this:
(Note that I have some temporary wire on the left side to hold things in place until they’re final. This way I could make adjustments before I did my final, “prettier” wrapping.)
You may want to try something similar.
7. Cut your first horizontal circle. Use the tips above to get it just right. Remember two things: pretty close is good enough — and you bought more than enough wire to be able to make another cut if one gets goofed up!
8. Attach your horizontal circle at the halfway point of one of your vertical circles. Hold it in place with some quick temporary wire wrap (you’ll be doing a final wrap later.
7. Adjust the angles of your three vertical wire circles and wrap them to the first horizontal circle. This is kind of tricky, too…and it involves math! But it’s easy math. Think about your orb from the top — envision it like a Trivial Pursuit game piece. A circle is 360 degrees, and we will be cutting our circle into six sections (three circles, both sides). So 360 degrees divided by 6 = 60 degrees. Each wire should be at about a 60 degree angle from its neighbor.
Wire wrapping tips: You will find a wrapping look that you like the best. I usually took about 4 or 5 inches of the thinner wire so I would have plenty to hold on to.
(You can follow along from the top left corner of my beautiful diagram.) I started from one corner and went diagonally across, pulled that tight, and went behind and across again in the same place. Then, as you can see in the upper right, I then went under the adjacent wire and then went across again at 90 degrees (perpendicular) to the previous wrap. I wrapped that again (lower left diagram) and then trimmed and tucked the end underneath (middle bottom). Each wrap looked about like the sketch in the bottom right, with two wrapped wires going each direction.
Tip: An easy way to measure your angles when you are adjusting these vertical circles is to use a compass or a tool like the$4 Simpson Speedlite Square: just hold the compass or Speedlite Square at the top of the orb, then look for the part labeled “DEG” (for degrees), at the bottom of the square, like this:
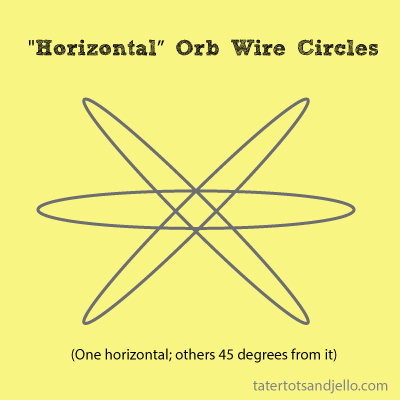
8. Cut and attach the remaining two “horizontal” circles. I attached one of the circles in the same place I had attached the first horizontal one, then attached the other on the opposite side. Use your same degree-measuring skills and wrapping skills to put these in place. Remember, these will be like an “X” across the orb:
9. Over-wrap the two “horizontal” ends where the hooks are. I wrapped more wire around the hook connectors to help keep them in place and hide them.
10. Adjust your wire circles into their final positions. I moved them around until they looked right, and tried to adjust the circles so they were as round as possible.
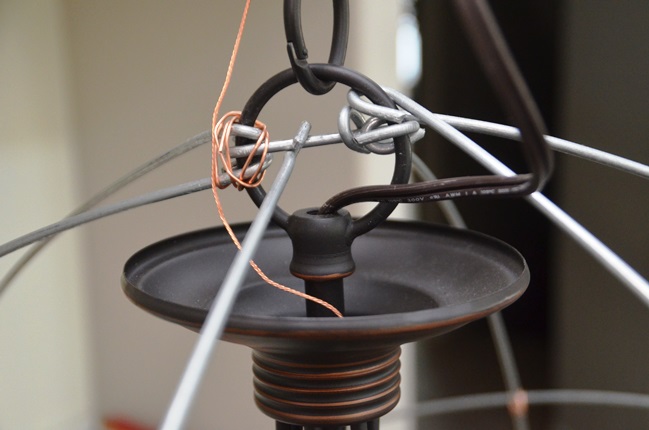
11. Cover the top connections and hooks. I tried a few different things and didn’t like any of them. The challenge: many wires going in many different directions. So I used some paintable Sculpt-It air-dry clay to create a ball at the top (available at your local craft/hobby store).
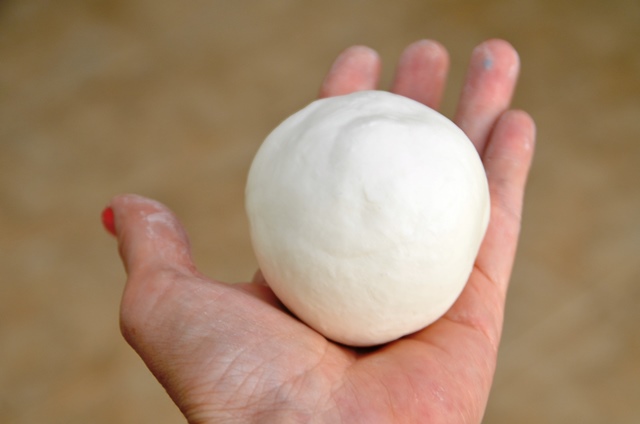
I cut the ball into slices, fit them on, and then smoothed them together with a bit of water to make it round again. The picture below is when I put the pieces onto the top and then I joined them together and smoothed it out into a ball shape.
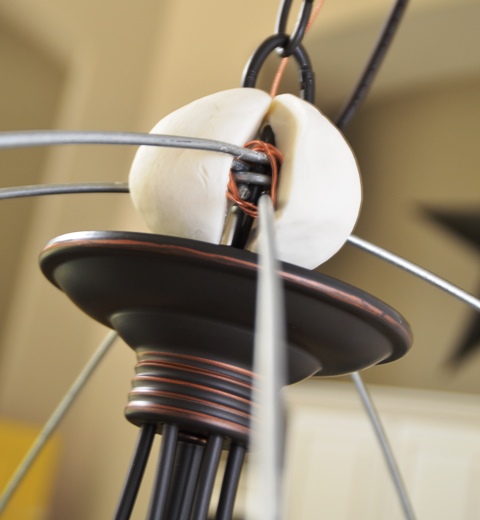

If your ceiling is tall enough, you may not even need this step. I just wanted to make sure it looked extra finished at the top!
For the connections on the side, I took the smaller size wire and wrapped it neatly around the connections, forming a ball on each side.
12. Prime and Paint. To help the paint adhere, I used a metal primer first, then my gold metallic paint. Let it dry!
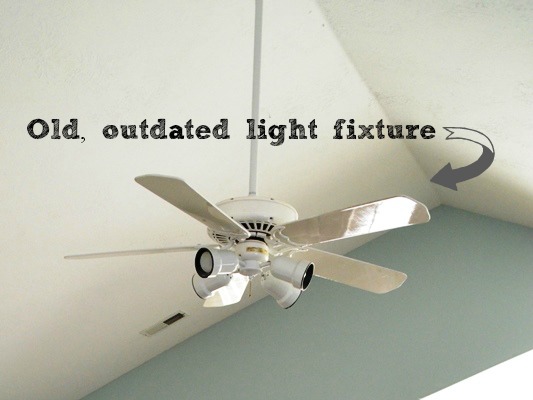
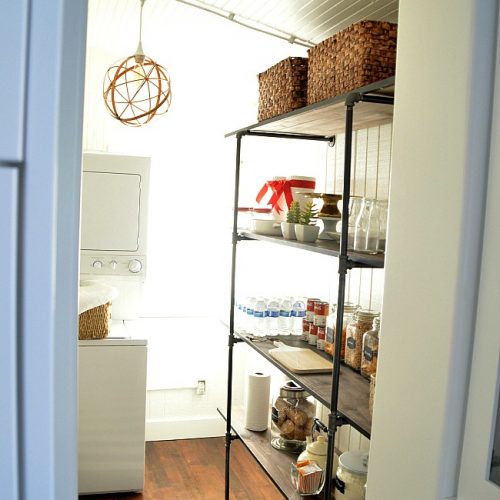
13. Hang! We replaced a ceiling fan with an unattractive light kit.
We had to adjust it a few times to get the height right, but we love it!
I have some more pictures of the light in the room, but I can’t show the whole room until the reveal at the Pinterest Party on August 22nd. But I just love it in the room!! I can’t wait to show you how the room turned out!
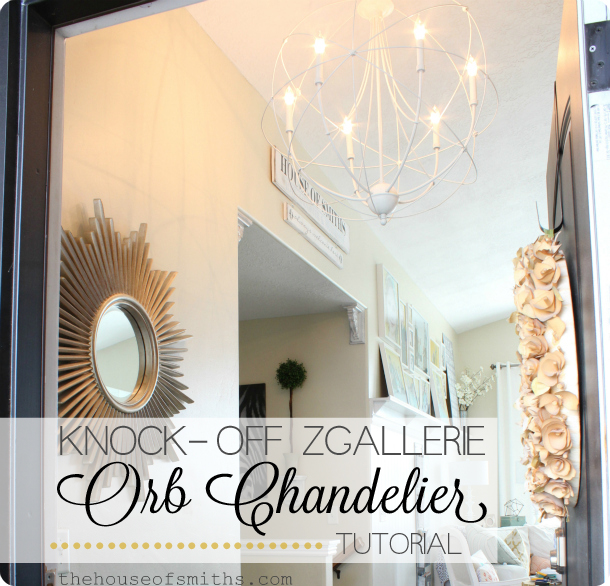
Be sure to go over to see Shelley’s tutorial too!!
She used a smaller size chandelier for her entryway and she discovered a genius way to camouflage her wires. Her tutorial is awesome!!
Have a Creative Day!!
xoxo


Is there anyway you would be willing to make one for me and sell it to me? I would pay a great price! Please email me.
I can’t figure out how you joined the cut ends of the 2 horizontal pieces? Did you use tape? Sorry if it is in your post, I read it over & over but still don’t understand .
Darcy » They’re looped/hooked together, like two “U”s — does that help?
LOVE this!!! What is the name and size of the original chandelier you used? Thanks!
Super amazing chandelier. I love DIY projects
So I started this tonight by myself. I’m norm very crafty dryer but man this was challenging.. I still feel like mine isn’t perfect please tell me you felt the same lol.. Going to spray it tomorrow.. Thanks for the tutorial
Awesome — glad to hear you tried it! I never think any of my projects are perfect, but I do them anyway :)! Send me a picture when you’re done!
Hi! I love, love, love your chandelier! I’ve had my eye on the originals for a year or so, but just couldn’t stand the idea of paying that much. To be honest, I like your design much better than the originals 🙂 I do have a couple of questions, though. I noticed in Shelley’s tutorial that she secured the bottom of the orb to the bottom tip of the chandelier itself, to prevent sagging, but you didn’t. Have you had any problems with the wires sagging? I am also trying to figure out how you hid the hooks on the horizontal and diagonal wires. I guess its a good thing that I can’t see them, but not sure how you accomplished that. Finally, I found 12 gauge aluminum floral wire in multiple colors that I was looking at to eventually make garden orbs. Do you think that might work for this project, or would it be too soft? I would appreciate any info you could give me. Thanks! 😀
HI Jan!
First, for the sagging, we tried connecting the center “intersection” of the orb wires to the bottom of the chandelier but we didn’t like the way it looked. The orb sags slightly (I measured it; it’s about 1/2″) but the look without the bottom wires was cleaner. If you’re more talented with the picture wire than I am I bet you could make it look fantastic!
We hid the hooks — the connections — by wrapping the thinner wire around each intersection of the larger wires. If you look closely you can tell some of those connections are a bit larger than others.
I have no idea if the floral wire would work, but it’s worth a try!
I absolutely love it!! I want to make one so bad. I’m hosting a candle giveaway on my blog that you should enter! http://homecomingmn.blogspot.com/2013/09/fremont-candles-givewaway-20-for.html
Turned out great. I really like how well it goes it your room, much better than the ceiling fan (although I’d miss the fan!).
This is so cool! I love the look of these lights, but not the price tag … what a great DIY option you’ve made!!
Love it! Both of you made these look fantastic. This would have taken me a month to make. HA!
Amazing job! I just included this tutorial in a post I did on my new blog. Thanks for the inspiration!
http://socialhall.wordpress.com/2013/08/26/diy-inspiration-gorgeous-chandeliers/
I absolutely love this! Great job!
Oh My Gosh, Jen! Can we be best friends!? I need you to come over and help me create cool stuff like this! You’re so talented!
hugs & kisses
Wow!! Beautiful chandelier! I’m seriously impressed!! This is a great project, just wish I knew how to even use a cordless drill. LOL
It looks so good Jen!
LOVE! LOVE! LOVE!
WOW!!! This is Seriously Amazing. My hands hurt just looking at all the Bending of the wires (LOL!!) I LOVE the sculpted Clay ball, what a Fantastic idea. I am looking forward to seeing the ENTIRE room, because I am sure it’s going to be GORGEOUS!!! 🙂
xoxo
Jen- your DIY brain kills me. How I wish I had your go for it attitude to tackle any project. This is amaaaaazing!!
AH-MA-ZING!!!! I am just beyond impressed. Blown away really. But….um…..you aren’t a crystal person?? Here I thought we were kindred spirits. 😉
I love this orb so much it makes me want to stick one right in my front hall even though it totally doesn’t work with my house! Or does it?? I don’t even know but I want to sick my husband on this STAT. So wish I could offer you and Shelly a starbucks to come over and chit chat about my entryway! 🙂
I love how you collaborated together on this project and ended up with similar, but still totally unique looks. Looks like a lot of effort but the pay-off is an awesome statement lighting fixture. Well done!
LOVED working on this fun project with you friend! You’re so inspiring and creative, thanks for letting me in on some of the awesomeness that is YOU!
xoxo
Wow! What an amazing project! And I think I like the looks of yours better than the expensive ones. 🙂
absolutely speechless! you & shelley are amazing together!!!!
both are gorgeous!
xo
kellie
Wow! I’d say “amaze balls” but “amaze orbs” seems more appropriate! So great! I love your gold version! Can’t wait to see your entire room. I’d love to do this in my new entryway- just moved from OK to Draper! How did you manage to be able to keep your wire perfectly round? Is it that it’s so thick or was it difficult to keep it from bending and getting wonky? Inspired to make things my own!
haha… amaze orbs 🙂 you could start something there.
you girls are so determined! Love you how make it work!
Jen this is amazing! I may try and alter this to do as a bedside light!! I would love it if you would come link this up to my linky party from monday! http://gracelangdon.blogspot.com/2013/08/making-monday-link-party.html
this is beautiful thanks for sharing!!
AMAZING!!! These look awesome ladies – great job!
I completely agree- projects are so much more fun when you have a friend with you. I would never get my hubs on board with something that took this many steps. He’s a bit impatient with these things. However- if I had a friend there working with me- it would certainly happen. Love how it turned out. Can’t wait to see the whole room reveal.
Wow…those are both amazing! I love your addition of the ball to the top, so cool Jen. I’m adding it to my pinterest board of dreams…LOL
SWOON!! I have a thing for gold shiny things and this is just perfect!
Great post! Loved reading it!
They turned out great! xo Kristin
This would be perfect for my new house! I looked at one that was $900!
Now THAT’S amazing!!
Very cool, Jen! Thanks for sharing that great tutorial with us! Your orb chandy looks fabulous!