
My family Room/Kitchen Redo is almost done and I’m so excited!! One of the last projects I had to do was find a rug that went in the new space. My new kitchen and family room is a really pretty shade of grey {Sharkey Grey by Martha Stewart}.

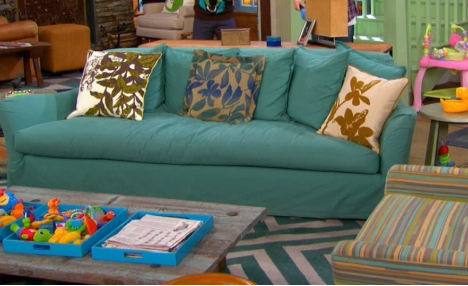
So I decided to make a slightly nautical striped rug to go with my turquoise couch. I used the same paint color as the walls to paint the rug.

This was definitely the easiest painted rug that I have done so far, and also my favorite!! I found this rug on Pinterest that I loved, but it was $800 —
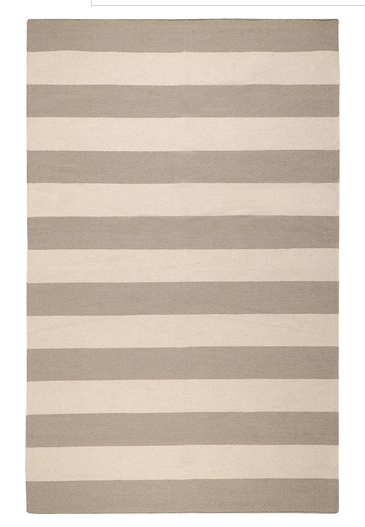
So I went over to Ikea and picked up this ERSLEV Rug for $59.00 —

Here’s what I did to make the rug:

- I measured the rug and then divided the sections up so that they were even. How many stripes and how thick they are will depend on how wide your rug is. I ended up having 5 thick stripes. I thought thicker looked a little more nautical.
- Once I figured out how wide to make the stripes, I measured it out on my rug. The rug I used, from Ikea, had natural stripes and so it was super easy to measure out the stripes.
- I used Frog Tape to tape off the stripes. It worked great. So great, in fact, that I didn’t have to make ANY touch ups! yay!!
- Then I rolled the paint on the rug. I actually started off with a darker color, and decided that the stripes were too dark and re-rolled them with the lighter {Sharkey Grey} color.
- I applied two coats of paint with a foam roller for best coverage.
- Then once it was dry, I peeled off the tape.
- And to make sure the rug stays looking clean, I sprayed on some Fabric Protection Spray.


And coming up later this afternoon – information on my turquoise slipcover, inspired by Disney’s Good Luck Charlie and a slipcover giveaway!!
xoxo

PS — Check out the Master Bedroom Mood Boards over at Remodelaholic. I love seeing all of the great ideas from these awesome bloggers!!
And the winner’s of the Krylon Glitter Blast 6 pack of spray paint AND $50 gift card are —
The winners of the Krylon Glitter Blast linky party are:

#46 Halloween Pillows — Chapman Place
Email me your address if you won, and I will get our prize to you 🙂 [email protected]
I’m linking this up to Kellie’s Fall Festival.
Be sure to check it out!!!
 “
“


I was wondering if you’ve tried washing the rug? Can you wash it with that particular paint? Thanks!
Great job! I love it. Did you mix textile medium wiht your paint to keep it soft? If not, was it hard and crunchy? Love your blog.
I love this tutorial so much! I am getting ready to make my own rug, and also a tutorial. It’s so inspiring, thanks for sharing. Great blog, check out mine and hopefully we can be friends. Thank you.
-claudia
deliciousspaces.blogspot.com
The tutorial was great and gives me hope that I, too, can accomplish such a high end look for a more reasonable price. My big hesitation is that I have two munchkins and a dog running through the living room all day. Did scotch-gard really protect the color so it would continue to look reasonably clean? Thanks!
Thanks for the tutorial! I have always wanted to paint my rug (I have the same Ikea rug) but have been afraid to because a lot of other bloggers say that the paint bleeds through and makes a mess! Did your paint bleed through? If not, what kind of paint did you use?
Lindsey » Hi Lindsey!! Thanks for your comment!!
No – my paint didn’t bleed through much. I pained it on my kitchen floor which is tile just in case. And some of the paint came through enough that if you flip if over you can see it in a few spots starting to bleed through, but it didnt make it all the way through. If you are worried, I would put a drop cloth underneath and paint it on tile or outside on a patio or garage. But I love it. And it was really fast to do and the lines turned out super crisp. That rug has lines in it the way it was made, so that also made it really easy to tape off 🙂
xxoxoxo
Oh I forgot to mention, I used left over paint from my walls for the rug. So it’s the same color. the paint is Martha Stewart Sharkey Grey from Home Depot.
xoxox
Thanks for the info! I need to do this real soon to cover up all the stains my rug has aquired! lol
Love your ideas!!! Looking forward to seeing more of them!
Hi Jen! I saw some rugs at Walmart for 20.00….and was wondering what type of rug you used. Is it the burber looking ones? Or the ones thinner than that?
Thanks!
Robyn
Hello there,
You inspire me on your projects! Great job! I have a question about the rug that you re-painted. Does’nt it feel hard after you painted it? How do you stay awaynfrom that? Does the rug that I buy have to be a certain kind of material to paint on it? Any way, I would appreciate it if you could answer my questions. I really think I want to f this.
Thank you
Amanda
[email protected]
Love this tutorial and how yours came out – those are some of my favorite colors! Can I ask whether the rug stays put? I went to buy one of them after seeing another tutorial online, but when I got there, it seemed like it would always be moving around on me.
love love your rug!! i’m actually doing this project today and trying to pump myself up for it 🙂 you’re the first one i’ve read that didn’t say it was horrible to do! thanks!!
You were featured. Please come by and grab a button.
http://decoratingcents.blogspot.com/2011/12/trends-painted-rugs.html
Thanks for sharing…the rug turned out great and I love the color with the turq slip cover! I have the hardest time finding rugs I like, so now I’m just gonna get busy painting my old ones to refresh them using paint I already have! you’re blog is awesome…happy holidays!
It came out lovely. Will be adding it to pinterest! Everytime I’m forced to watch Good Luck Charlie I am in awe with that sofa and rug! I just stare at it longing to create it myself :). Great job again.
Wow- that looks fantastic. What a beautiful addition to your living room!
Natasha
I NEED to do this! I just rearranged my living room and it really needs a cute rug! Thanks for sharing. I can’t wait to see the big kitchen reveal!
Erin{LavenderandLemonDrops} » Thanks Erin!!! I really love it. I am almost done with the kitchen. I am excited for the big reveal too!!
xxox
LOVE IT! I have been searching for a rug for my nursery, as I refuse to spend a fortune for a rug that will certainly be spit-up on! I’m off to IKEA…!!
Thanks!
Julie » It will be so cute in your nursery!! Send me a link when you finish, I would love to feature it!!
xoxoxo
Jen
Love this!! i would have never thought of painting a rug!! great idea
would love it if you could share this on my link party at http://www.serenityyou.blogspot.com
Natasha xx
Did you use the same paint from the walls on the rug? Or did you get special fabric paint?
Your rug is awesome! The whole room looks great – I LOVE the color combination!
I just discovered your blog and I’m so excited to see more!
Jacki
I’ve been looking for a rug to make for my living room and I LOVE yours! Can you tell me is it real stiff and/or scratchy? Baby will be crawling soon and can’t do something to hurt soft, little knees.
Thanks so much,
Robyn