
I had such a fun time talking about doilies today on Channel 5, here’s a clip if you want to check it out.
Do you have any of those doilies that your grandma or great-aunt made by hand? Instead of putting them on the back of a chair or a side table to gather dust, turn them into pieces of art that can be displayed forever.

This is what you need to make these:
- Doily
- a canvas or MDF board (I found mine at Robert’s Crafts for $5)
- Scrapbook paper
- Decoupage Medium like Mod Podge
- Foam brush
Here’s what you do:
Measure your canvas or board, then cut your scrapbook paper so it fits. Depending on the size of your board, you will probably have to use a few different sheets of paper.

Put a layer of mod podge on the back of your scrapbook paper. Then put a layer directly on the canvas or board. Place the paper on the board and smooth it until all of the air bubbles are out. I use the lid from the mod podge to smooth the paper, but you can also use an old credit card or a spatula.
Apply the rest of the paper, doing the same thing. Once the paper is on, put a layer of mod podge over the entire board/canvas and let dry. I put a layer of paper over the edges of the canvas too.

One the mod podge is dry, lay the doily on top and center it. Then I drizzled the mod podge over the doily. It takes quite a bit of mod podge. Once I had a good amount on the doily, I smoothed it gently over the doily with my foam brush, until the entire doily was wet. I

f you are using a colored doily, your doily will change color when it gets saturated with the mod podge. So you want to make sure it is all wet so it is all the same color. Let dry.
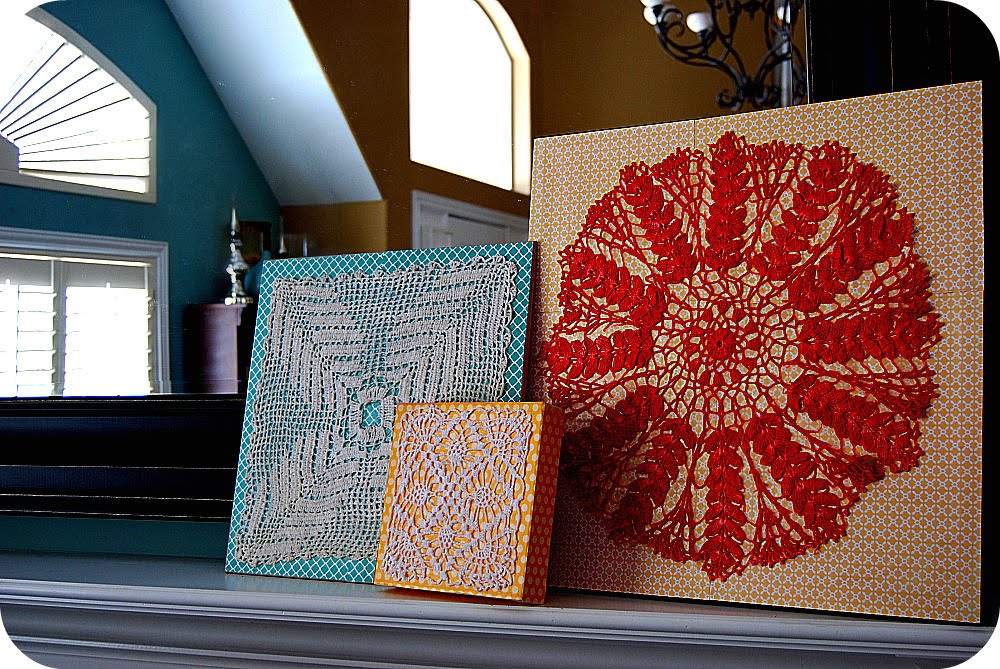
And now you have those precious doilies preserved forever.


I’ll be sharing more doily projects this week!
I am linking up to:


XOXO


beautiful!!! Love these!!!
This really awesome. I have some of my Moms and Grandmas doilies. I am gonna do this. to preserve and cherish Thank you for sharing with us.
http://michelesscrappyworld.blogspot.com
These rock Jen! But not as much as you. 😀
that is such a good idea… I have so many doilies (but I can't seem to sacrifice them). I might just make one just for this
Found this while looking through some "Anthro" inspiration… and thought of you & this post. 🙂
http://www.etsy.com/listing/43805052/vintage-doily-clutch
Isn't it pretty?!
Blessings!
-Sarah
Oh, what fun! Congratulations on the segment!
: )
Julie M.
Very creative craft project! I've run a doily through my Xyron sticker maker before to put on the front of a fabric-covered scrapbook album. Worked like a dream!
Very fun!! They turned out really great!
Wow how clever is this? They are gorgeous!
I an so happy you came by and linked this up for the Round Robin..
Have a great weekend..
That is a really sweet idea! What a great modern use for them!
Super cute! These certainly aren't yer Gramma's doilies!
love, love, love this!!
Ooh, I really love this idea BECAUSE I have many of these kind of wonderful doilies my grandma crocheted! What a fantastic idea, Jen!
Also, I am not sure I sent my email to the right address when I emailed you! I wanted to let you know I am doing a giveaway over at my blog, if you'd like to enter! 🙂
I hope you have a beautiful weekend! 🙂
Beautiful! I linked you on my blog. Thank you!
deliacreates.blogspot.com
What a way to keep such a treasure.
leave it to you to bring dollies into the modern day! great job on Studio 5! 🙂
How fun – I love finding old doilies. Here is a necklace I did with one…
http://babygotcraft.blogspot.com/2010/03/necklace.html
You did a fabulous job both on Chanel 5 and with this project.
Great idea! I have some that I can do this with. Thanks for stopping by my blog for a visit!
Funny that you've posted this! I was just going through back issues of my Martha Stewart Living mags the other day, and there was a big piece on doilies and creating with them and using them in new ways.
Thanks for sharing!
Jen, you are a real natural! You did such an amazing job and I was so inspired!
Way to go, Jen! Your doily projects look great and you look fabulous as always!
Congrats on being on Studio 5! How exciting for you! I love these ideas….I received some doilies from my husband's Grandma when she passed. Now I can proudly display them and he can have something of hers to remember out always! COOL! Thank you!!!!
I am seriously too obsessed with this!! You are AMAZING!!!!!
~Morgan
Meet Virginia!
Meet Virginia!
Meet Virginia!
that's a really great idea! maybe that's what I will do with the next doily I find of my grandma's
That's a great idea! I love making doilies, so I'll have to try this.
You did great today! You must really be getting more comfortable because you don't look nervous at all.
I am sooooo glad that you shared this today! I have two doilies from my Grandma that I just haven't been able to figure out where they should be displayed. This is perfect. I think I even have some canvas, already. Thank you!
so, so cute! what a fun project.
I love doilies, they are my favorite! I'm so glad they are "cool" again! And this title made me giggle because I did a doily cardigan once and titled it "not your grandmother's cardigan". There's something about doilies and grannies that just go hand-in-hand! :o)
This is so cute! I actually have 1 or 2 doilies that my hubs grandma made that I dont really know what to do with because while they are pretty they are just not my taste to have on a table or something. This would be perfect!
Those are so bright and fun! I have a ton of doilies that my Grandma made, and I might just have to do something like that with them. 🙂
what a neat idea…
Round Robin is tomorrow if you want to stop by..
That is such a great idea. I may have to be on the look out for some cute doilies. Thanks for the great tutorial!
What a FABULOUS idea!! I love the idea of taking something "old" and turning it into something new. Just perfect!
What a great way to display those beautiful doilies!! You always think of the most creative uses for simple everyday things. Awesomeness!! 🙂
Blessings!
-Sarah
These look SO pretty! My mom always had a doily with pink in it and I thought it was so pretty. Love the colors and love how it looks "framed". Better than lying flat on a table anyday! 🙂 Glad you had a great time on tv!
oOoo those are super pretty i need to get my doily on hehe
♥CMonster
http://www.bythemonsterandme.com
I have a few old doilies that I had no idea what to do with…that's a great use for them though. Thanks!
Une super idée, surtout lorsqu'ils sont un peu endommagé, je retiens.
Good have a nice day.
Josée
I have several of these framed that my grandmother made and also some other thing she made it makes beautiful meaningful art. Love that you like them also.
Cha Cha
great job, jen!! can't wait to try some of these ideas 🙂
I admit it…I love my doilies. I have them in a couple places. I can't help it, darn it. I like doilies, and I'm not afraid to show it!
This project is really, really cute. It's a great way for those doilies to be used, other than, you know, on a table or something totally geeky like that…
i watched and was so proud of what a greaqt job you do!
I'm amazed to see doilies on your blog. I never thought they could make a comeback! LOL
OOHoo I am in the presence of someone famous!!
Nice feature!!
I love these so pretty ♥