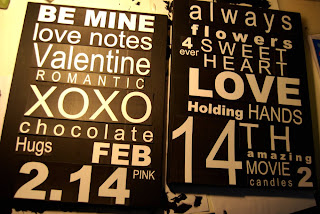
I have been obsessed with this Subway Art for a while now. I was going to make one to go in my kitchen, but got sidetracked by Lindsey’s Family Rules Canvas.
Here’s what I did:
I had a couple of canvases left over from my daughter’s room that I redid last year. So I used reused those — they are 12 x 16 inches. But you could also use a couple boards, or even foam board from the craft store.
I researched what typeface the original subway signs used and found out it was Helvetica. I used Mircrosoft Word to make my lettering, and it did not have that font, so after a little more research I found out that Ariel is an offshoot of Helvitica. So that is what I used.
I used three different types of Ariel — Ariel narrow, Ariel bold and regular Ariel. Then I thought of words associated with Valentine’s Day and made up different sizes of those words. If you would like to use these fonts, I have uploaded them — HERE. There are more terms that I didn’t use, and I have included those in the upload in case you want to use them.
I printed out the fonts and arranged them on top of the canvases to see how things would fit. Then I took a picture so I could remember where I was going to put all of the phrases.
To make this project easier, I printed out the fonts using the highlight option – using black highlight so the font inside is white. Note: For best results, take this file to Kinko’s and have them print it out on their color copy machine. It will cost a few dollars, but the black will be a true black.
Then I sanded down my old canvases and painted them. I used a mixture of black and graphite grey — because my ink was not a true black. I chose those paints because I wanted them to match the black that was printed out on the printer.
Now there are a few ways you can attach the letters to the canvas.
- I just cut out each word with straight lines and very sharp scissors. I knew that up close you can see the lines from the paper edges, but I fit he edges together as best I could and you can’t see the lines unless you are right up next to the canvas.
- If you want a more exact look, on the smaller canvas I made, I cut out each letter and number individually using small scissors. It took longer but is cleaner.
- Another thing you can do is to print the words/numbers out on heavy cardstock and cut each letter out using an exacto knife and then stencil the letters on the canvas.
And, if you have a Cricut, you can whip this project out in a snap. I got one for Christmas, but didn’t have the right font cartridge.
After the paint was dry, I cut out the words and numbers and arranged them on the canvases. Then I used Mod Podge and attached them to the canvases. I smoothed the bubbles out using a credit card. Note: the thicker paper you use, the less bubbling you will get using Mod Podge.
I then put another layer of Mod Podge over the top of the canvas, using smooth, even strokes. I didn’t distress the edges, like the Pottery Barn one, but maybe I will on the next one…


What a creative idea. I have seen subway art all over the place. Thanks for posting step by step on how to create your own subway art.
I have made a couple of wedding subway art for my family. http://deesdailynews.com/products-page/#ecwid:category=713151&mode=category&offset=0&sort=nameAsc
I'm fairly obsessed with Subway Art too, since I've starting blogging Ive seen a ton and I love it!! I kept thinking that since I didnt have a Cricut or Silhouette I couldnt do it, but today I snapped outta that and made one on powerpoint! I did mine with NYC spots, since our dining area is decorating in NYC stuff…what do ya think!?
http://www.teebliterary.blogspot.com
Thanks for the inspiration! I made my own version and linked back to you.
http://lifecraftsandwhatever.blogspot.com/2011/01/my-easy-version-of-subway-art.html
So Cute…Ill be posting on my Blog… Fabulesslycrafty.blogspot.com
Oh and I loved it so much I Had to make my own take on Vday Subway art too!!!
I can't wait to try!!!!!!
Jen, I bookmarked this months ago. Love your tutorial!
I included it in my Lettering Projects post today. Thanks for the inspiration!
I absolutely love your blog! I was fired from my job a little over a month ago now and I've been pretty depressed. I *want* to get bak into arts and crafts but I had been a little lost and didn't know where I wanted to start or what to do. I just wasn't very inspired but I must say, YOU are now my inspiration! THANK YOU! 😀 I WILL be doing this project this week! 😀
I didn't see this until recently.. but I HAD to do one.. mine is a little different. I did a link to yours of course 😉 Hope you can come check out my cowboy version of it!
http://cupcakeskissesncrumbs.blogspot.com/2010/04/done-with-finnleys-room-for-now-anyway.html
I love subway art and want to do some in my kitchen as well. Thanks for sharing your ideas. I linked this post to my blog. I also used that subway art photo that you used. I didn't know where it was from so I couldn't give credit. Maybe you could leave a comment and let me know, if you have time.
ohmyheckthisissocute.blogspot.com
Thanks Again.
Wow once again I can't believe how amazing you are! I love how you show ways to make cool things that you don't have to have a Cricut for. I do have one, but it's still in the box from Christmas. Haven't had the time to look at the manual. These are really fabulous, I can't rave about them enough. I love the graphic look, sorry if I am gushing a bit too much☺
What an awesome idea!! I'll be posting this on my blog – simplystunningideas.blogspot.com. Thanks for sharing with us!