


- You can have everyone write something they are Thankful for on Thanksgiving Day and then share those things at your dinner. Then when everyone is done sharing their leaves, you can put them on the banner.
- Or, you could put the banner up November 1st and have a family time where everyone writes their blessings on the leaves and then clip them on the banner and keep it up all month.
- Or, you could have each of your kids put a blessing on the garland each day, or once a week – depending on how many leaves you want on your garland. Then the blessings are up where everyone can see them all month and that helps everyone keep the spirit of thankfulness all month.

If you would like to make one, here’s what I used:
- A Grapevine Garland
- Package of Clothespins
- Glitter (I used three different colors)
- Mod Podge
- Scrapbook Paper (I used 5 different patterns)
- A few Fall Floral Picks from the Craft Store
- Ribbon (I used three different kinds)
- Gorilla Glue Tape (to hold the garland in place)
- Fabric Scraps (I used 6 different fabric patterns)
Here’s what I did:
1. I unrolled my grapevine garland. I cut the garland a little bit longer than my mantle.

2. I taped the garland on the wall of my craft room while I put the project together, using Gorilla Tape.
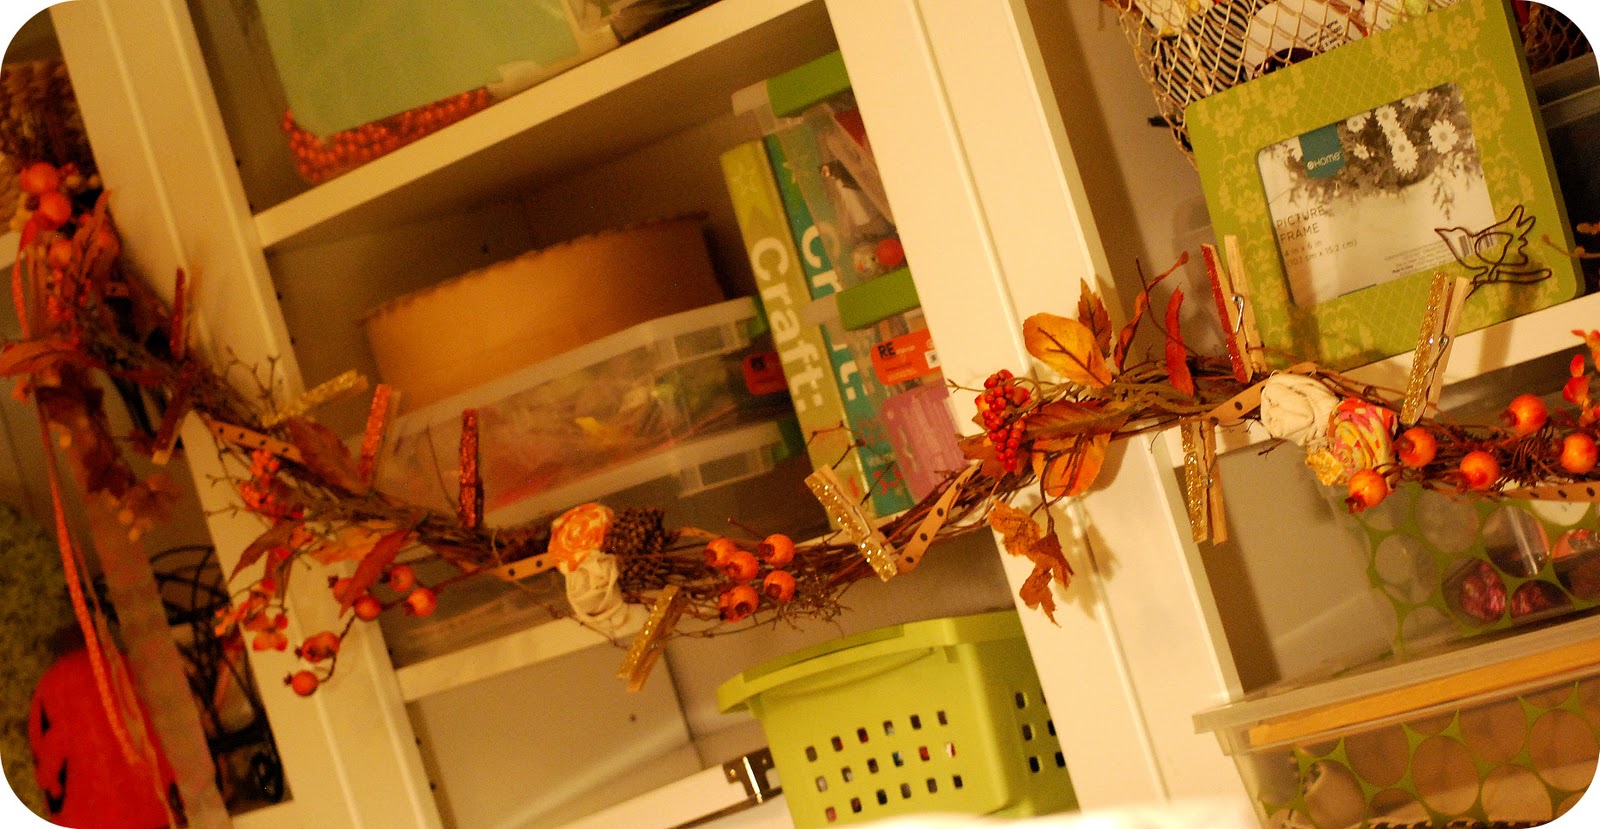
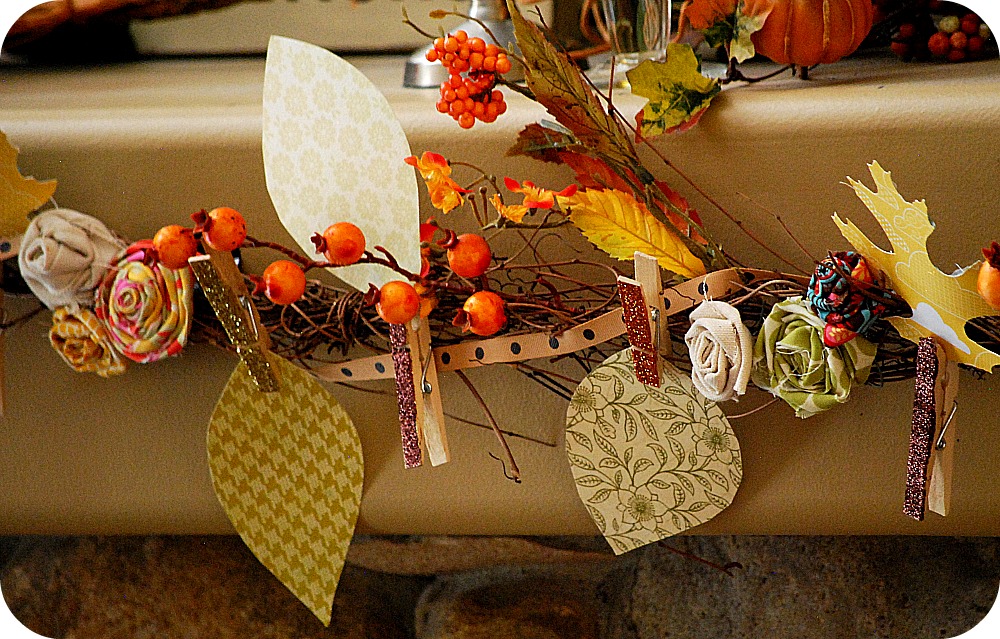
3. Take the Fall Floral Picks, cut the pieces apart and put the randomly throughout the grapevine garland. Hot glue them in place.

4. Take a piece of ribbon, wrap it around the garland. Hot glue in place on each end.
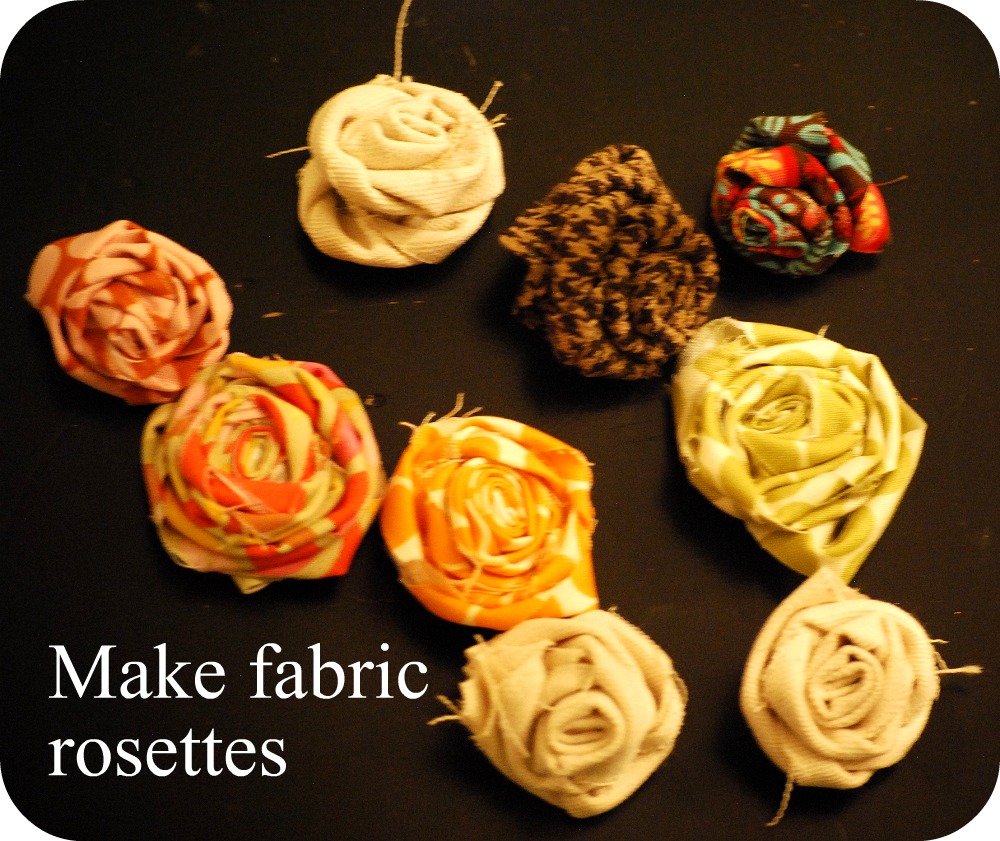

5. Make Fabric Rosettes. (Here is a tutorial on how to make Fabric Rosettes.) I made 12 rosettes using 6 different fabrics. Arrange the rosettes in groups. I used 4 groups of 3 rosettes and hot glued them onto the grapevine garland. You will need to press them in place until the glue cools.

6. Brush a layer of Mod Podge over one side of a clothespin. Then sprinkle the clothespin with glitter. Press down on the glitter to make sure it adheres. I had a special assistant help me with this! This is a project that is really fun to do with your kids!! And if they help make it, they will be more excited to make the Blessing Leaves with you later!!

7. Mod Podge and glitter all of your clothespins. I made 20, but you can make as many as you like.

8. Cut out your leaves. I created some leaves and cut them out with my Silhouette. If you don’y have a Silhouette, I created a template you can use. Just print it out and cut out the shapes with scissors. OR, go simpler and cut out a plain, oval leaf shape.
Maple Leaf. Oak Leaf.

9. Clip the leaves on the garland with the sparkly clothespins.

10. Cut out two sets of three different ribbons. Tie the ribbon together on each end of your garland. You can use the ribbon to secure the garland to whatever surface you are putting the garland on.


11. OR, you can use something like Gorilla Tape to secure the ends of the garland to your mantle, door frame or wall. Then cover up the tape with your ribbon on the ends. I also secured the garland to the mantle in a few different places on the mantle so the garland would lay flat. I put the tape underneath the rosettes or under something else that would camouflage the tape.


Mindy Lockard Getting your stationery wardrobe ready for the holidays + a giveaway
The Entertaining House Cocktails to Kick off Your Holiday Season
Lucky Life Parties Setting Up Bar and Food Stations
The Daily Basics Creating Fun Holiday Traditions – Memories You’ll Love


![]()


![]()


![]()


![]()
![]()


I like this garland. I don’t have a mantle, so I am always looking for ideas to decorate a doorway or the top of a cabinet. Thanks.
I know this is an old post… but… I’m hosting a Thanksgiving ideas week and am going to feature you in a garland/bunting roundup. I hope you will come over and check it out. Please grab a featured button too! This link will go live first this Saturday morning. http://www.nap-timecreations.com/2012/10/thanksgiving-week-garlandsbuntings.html
Your mantle is just gorgeous! Can you tell me where you got your mirror? I just love it!!
70 comments! Wow, you are going to help make the world look more amazing with your ideas. Popped over from Somewhat Simple and had to tell you I love the garland idea. I've seen others that weren't as cute, or were too complicated for me at this harried stage of life. I already hung garland, I will modify your ideas. Thanks!
I did it! I made one for my own mantle! Thank you for the inspiration! http://www.squibsandcrackers.com/2010/11/thanksgiving-garland.html
I loved this idea so much that I made one of my own! Thanks so much for the inspiration!!
http://itsthelittlethingsthatmakeahouseahome.blogspot.com/2010/11/our-give-thanks-mantel-thankful-garland.html
~Karla @ It's The Little Things…
I love this!!!
I am a big fan of this idea! It is pretty, festive, and perfect for kids to help with grateful hearts. <3
Lovely post, thanksgiving is a wonderful time of year to remind ourselves of all that is good in our world, my favorite holiday having lived in Plymouth for many years.
This is beautiful! What a nice addition to the mantle.
Corinna
Beautiful! I love the leaves and am thinking about incorporating some finger paint leaves into a pumpkin banner my kids made–maybe we'll make them "thankful" leaves! Thanks for the inspiration!
Just beautiful. As always another great idea from you. You are the greatest. Thanks for sharing.
beautiful!
love the grapevine as a garland. that photo with the thankful note for "MOM" is priceless.
such a great idea!
This is absolutely gorgeous.
This is simply gorgeous! I am hosting Thanksgiving at my home this year and would love to give a leaf to all my guests and have them add to the garland. Thank you so much for sharing!
We are a homeschooling family and each year do a "Thankfulness Tree" using foam leaves. I will be making the garland and reusing it each year. It is not only a great tradition but it's attractive. Beats the "tree" on the sliding door. …and the Barn Owl Primitive artwork is adorable. I will be asking for one or two for Christmas….but if I win, even better 🙂
Such a pretty garland and looks like a fun family craft. A great way to teach your kids to learn to think about things they are grateful for too.
I've never heard of the gorilla tape. When you remove the garland, will that leave your mantel okay? I know some tapes and adhesives are hard to remove or leave a gummy residue so I was just curious.
What a beautiful garland and idea! I love it! Great job!
Jen – you are amazing! Another home run for you! I posted about this on Positively Splendid this morning. 😉
Oh how Thanksgiving gets cheated every year…I love the idea of this wonderful decoration.
I simply love advent calendars and I am thinking the leaves could be used as dates. Love it!
Love it!
Blogged about it here 🙂
http://lubirdbaby.blogspot.com/2010/10/thankful-garland.html
It's so pretty! I love the idea of writing on the leaves.
Jen, I really think they should fire Martha and hire you! You seriously make the most adorable and creative things!
Excellent post!!
What a great idea! I am not too handy in the craft department but I will definitely give this the old college try, looks like so much fun to try with the kids! And I love the idea of involving the whole family!!
I love the simplicity of Thanksgiving. It's all about spending time with family and counting your blessings. So i love that little holiday squeezed in between the 2 Big holidays. 🙂 I'm loving your thankful garland! Your whole mantel looks awesome! Such a fun project!!
jen
This is such a wonderful idea! You're right — Thanksgiving gets lost. This is a great way to count our blessings — kids and adults.
beautiful! i love it;0)
smiles,
gina
This is great… I can't wait to get started! Thanks for all of your wonderful ideas!
This is a fabulous project! I think it would be fun to do andfun to open the garland next year and see how thingxs have changed and what each person is newly thankful for.
What a great idea Jen!! It is absolutely adorable and sweet, with the perfect message. Your mantel is stunning!!!
Lovely, really lovely! It looks fabulous. Your mantle as a whole is just gorgeous!
I not only love the look, I love the idea of kids participating. How fun for the entire family.
Oh my, Jen!! This is SOOOO cute! Look at that mantel. I love the idea, and I love the finished product. And I am loving those rosettes. Of course.
You're just so busy! And I forgot to say….you freakin' rocked it with your partner on Crafting with the Stars. She is a GENIUS. You're gonna be UNBEATABLE! So excited!!
I wish I had a mantel to put this on…and look how nice your BPO sign looks there.
What a great idea. I just finished this felt garland that says "thankful" and I think your garland would be the perfect addition to it. I found the pattern for the felt one for free at http://www.holiday-crafts-and-creations.com/thanksgiving-crafts-to-make-thankful.html.
I love this idea! O.K., to do list for Karen….help children be more Grateful…make a Grateful Garland! What a fantastic idea. Love, love, love this blog. Putting on my Grateful Garland, "Tatertots and Jello, and Jen". Thank you!
WOW Jen!! You are amazing!!!!!! I love it!!!!
This is so cute and a great way to involve the kids and helping them to get their brains around what it means to be thankful! Great idea I may do this and have leaves ready for when I have the whole family over for thanksgiving dinner. I'm getting teary eyed thinking about the many many things I am thankful for.
Jen, you are absolutely the best! I love this garland idea and even though my three kids are way older to care (23,21,18) I still think it is for us. I never want my kids to think they are too old to be a kid at heart! LOVE IT! Thanks darlin'!
SUCH a good idea!
we have a Thankful tree every year… but this is so much more imaginative!
Such a perfect way to share what it means to be truly THANKFUL for all your blessings! Big hugs, Jen!
Wow. Definitely a fave project. I love the mix of textures, nature, ribbon, paper, fabric….its just great. Thanks for the tutorial.
You know I love this, because it's darling and it has paper!
so fun, jen!
I'm off to Stumble it!
ps. I loved being with you last night, so fun!
Well, this is just darling! And thanks for the tutorial….I NEED it!
You did such a beautiful job! I love that you write what you are thankful for on the leaves.
Love it Jen!!! And I love you!!! Your thoughts are so simple but the impact is so WOW!!!!
Hey, I wanted you to know that I am now working on the Subway Art for my sister (the one that went to EUROPE) and it is a huge project, but I hear you beside me with my questions and doubts) You are wonderful!
I'll post it once it is finished! I just had to remember, do not do the letters small, think BIG! It is on a 4×2 board, nothing small about that!
I LOVE this Thanksgiving garland!!! I work at a retirement home and do the activities, and this is a great new way for us to display what all the residents are thankful for this year 🙂 Thanks for sharing!!
I love fall decor…LOVE. It's gawgeous girl! 🙂 <— i'm a new yorker now.
Beautiful! I will be doing this!
Jen… I love it, so wonderful and FULL of beauty!
What a gorgeous and meaningful garland!
What a wonderful idea to decorate with meaning. How do you keep coming up with all these wonderful ideas?! Another home run.
LOVE it! I agree that Thanksgiving gets overlooked. This is much better then the traditional Thankful tree. If you laminate the leaves and write in dry erase you could reuse it the next year, too, without cutting out new leaves
Love how your mantel looks!
Such a great idea! I love that you can reuse the garland each year and come up with new things to be thankful for. Love it!!
Beautiful. I really appreciate this simple, do-able idea! We're definitely doing this one in our home.
A.dor.a.ble! I have a mantle, but not the time… And the dogs would pull it off in no time!
I have a lot of "someday" projects!
Hi! I've been reading your blog for some time now and I love it. This garland is so cute, I think I'm going to have to give this a try.
Really fabulous!
adorable!
makes me want to host Thanksgiving this year! 🙂 unfortunately, our families live out of town & we're always traveling on turkey day, so I carry a journal with me and make all of our friends & family write what they're thankful for… but my journal is not quite as pretty & dramatic as your cute cute garland!
Great idea!!! I love this idea!
i love the garland and that subway art is awesome! I love everything!! I really need some subway art in my life!
This is so beautiful. I particularly love the addition of fabric rosettes. I've never thought of that before. Time to hit the craft store!
Gorgeous Jen! We did thankful tree last year, I love this spin on that idea!!!
Holy moly I LOVE this!!!! I have no kids as of yet, but I am a kid myself so…I'm totally making this just for me! LOVE it! (and shared the project link on my blog!)
I am making on of these this weekend! Thank you!
gorgeous!!! What a great project to do with the kids..and a great one to pass along.
I LOVE this! Thanksgiving is my favorite holiday, and you're right – it's so often overlooked. This is such a great, festive, easy idea – I'm so glad you shared it!
That is just adorable! I love it!! What a fantastic way to remember what we a thankful for!
This is darling and personal! What a great way to remember the season. Just lovely, Jen.
This is a beautiful project with so much meaning. I love it!
Krista
Craftinginthecloset.blogspot.com
Jen This is simply adorable. I love the idea of writing little thankfuls down everyday. Super cute. It's gorgeous on your mantle too! Stephanielynn