Hello! I’m so excited to be here at Tatertots and Jello! Jen is one of my favorite blog friends, and I absolutely adore her!
My name is Traci, and I blog at Beneath My Heart and Organize & Inspire.
I have been blogging at Beneath My Heart for 5 years, but decided to start an organizing feature blog this past year called Organize and Inspire. I am the mother of four boys, and it is my desire to live a more organized life. Is that even possible in a house full of boys?!

I figured if I was blogging about organization every day, that would certainly help me, right? ![]()
So today, I would like to share with you one way that I have tried to be more organized in my sons’ room.
I recently just built a set of industrial shelves for my oldest two boys who share a room.
I knew that I wanted to build some storage crates to go on the bottom of the shelves to provide extra storage for each of them.
Here are the ones I made for Jonathan’s wall…
The first thing I had to do was figure out how big I wanted to make my crates. Once I came up with my measurements, I went to Lowe’s to purchase a large sheet of 3/4 inch oak plywood. I gave the measurements to the employee at Lowe’s in the wood cutting section, and they cut the board to the sizes I needed.
Then I took them home and started putting them together. You can see in the picture below how I nailed the sides to the bottom of the crates.

I always add wood glue to each piece of wood before I nail it to another board to add extra strength…

After I nailed the sides on, I added the back piece of wood to the crate…

For the front of the crates, I used 1×4’s. I cut each 1×4 to the size that I needed and then nailed it to the front of the crate.

Adding wood glue, of course, before I nailed each board.

I also left a little space between each board before I nailed it.

Next, I added some wheels to the bottom of the crate. This will make the crates super easy to get in to and will keep the crates from scraping the wood floor.

I added a coat paint to the crate that was the same color as the walls. I didn’t sand the wood before I painted because I like the “worn” look, but if you like things to have more of a clean look, you may want to sand your crate before painting. I also didn’t use wood filler to fill in the nail holes because I like being able to see the nails in the wood, but that is just a personal preference. ![]()

For the front of the crates, I added these cute little handles that I found at Target. They come in packages of two.

That’s it! Super easy, but super cute!
Jonathan loves his new shelves and the extra storage! The crates under his guitars hold his guitar cords and music sheets. The other two crates hold his socks and shirts.

I will be sharing a tutorial on my blog soon about how I made the industrial shelves. So I hope you follow along. ![]()

I also have a tutorial about how I made the storage crates for Luke’s wall on my blog as well. I went with a different look on his wall because I wanted each of their spaces to be unique, just like them! ![]()

You can see that tutorial HERE.
Both of these projects will also be featured on my organizing blog, Organize and Inspire.

O & I is FULL of great organizing projects for every room of the house from talented bloggers from all over blogland!
You can visit O & I by clicking HERE.
If you have an organizing project that you would like to be featured on Organize and Inspire, you can submit it HERE.
Thank you for letting me share my project with you! And thank you, Jen, for letting me hang out on your blog today!
Have a blessed day!

*************
Thanks Traci!!
I am so excited to get organized this year. And I am so excited to get new ideas from Traci’s new site Organize and Inspire!!

It’s an amazing resource for making our lives more organized!!!
Be sure to put it on your “Must Read” list!!
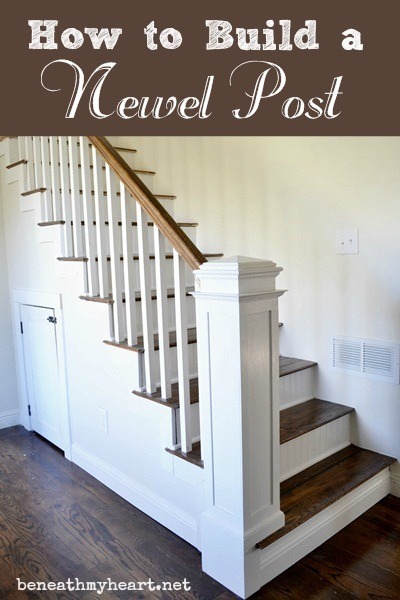
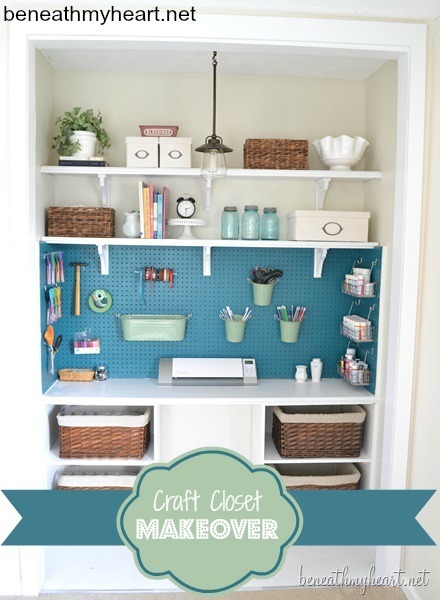
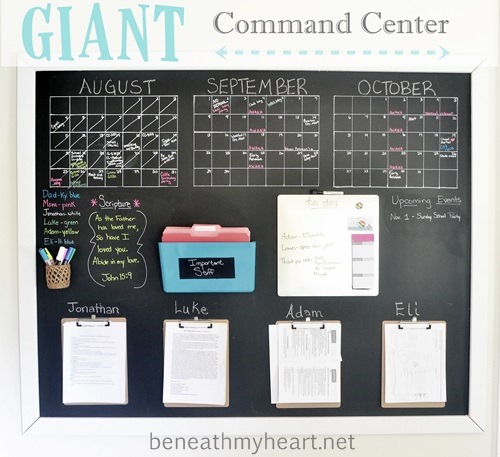
And check out these amazing ideas from Beneath My Heart:
Have a beautiful day!
xoxo


I have been looking for the cute target handles, could you give any more detail in brand? Thanks!
Very cute! Can’t wait to see the tutorial on the shelves!!
I love the way she put it all together in the end, her decorating is on point! 🙂
Nice crates and love the industrial shelves……but the article says that 2x4s were used for the fronts of the crates. Those are definitely 1x4s, not 2x4s. 😉
Oh my gosh, Jeff! You are correct! I’m sorry, that was my mistake. I will see if Jen can change it for me.
Thanks for catching that!
Traci