Hello everyone! I’m so excited to be posting for the super fabulous Jen today! I just love Jen! Is she the most productive blogger in bloggyland, or what? I think she must have Hiro Nakamura’s ability, but I digress.
My name is Pam and I love sewing and crafting cute decor and helpful solutions for my home at my blog Bibbidi Bobbidi Beautiful.
Anyone who has read my blog before is going to be surprised that this project doesn’t involve a slipcover, a monogram or a single pleat, but I think it turned out pretty cute just the same!
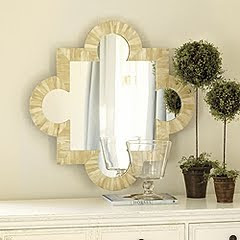
I’m in love with this shape which seems to be everywhere lately:
It’s called a quatrefoile. I’ve had this idea in my head for a while that I wanted to do some artwork in my little girls’ shared room incorporating the bedtime prayer we say at night. I wanted the project to be inexpensive, kid friendly (I intend this to hang over my nearly 2-year-old’s bed, so nothing too heavy and no glass!) and super cute.
After this project I decided to use my diy stretched canvas idea again to save money, and I knew I wanted to incorporate the quatrefoile shape, so here’s what I came up with:
It was really cloudy outside when I took these photos, and I just couldn’t capture the colors acurately. The greens all look way to dark and olivey and the pink isn’t showing up very well. You’ll just have to take my word for it that the colors are really cute in person!
Materials:
3 sheets of 20″ x 30″ foam board from dollar tree, (this was exactly enough to make 9 finished 10″squares)
18 sheets of Scrapbook Paper
Glue stick
Matte Spray Sealer
Here’s how I did it:
First I made the “stretched canvas” forms just like I detailed here. The only change I made was that this time I used two layers of “spacers” to make the finished canvases a little thicker. Making the canvases myself saved so much money! I made all 9 for $3. I couldn’t buy one plain canvas in craft store for that much!
Then I wrapped each “canvas” in one sheet of 12×12 scrapbook paper. To make it a little smoother and easier I used the pointy end of a letter opener to score the paper along the folds as I wrapped.
Then I made a quatrefoile template. It’s essentially a square with a semi-circle centered on each side. I started by figuring out how big I wanted the square part, then I traced half of my coffee cup along each side and cut it out.
Then I used my template to trace and cut out one SBP quatrefoile shape for each canvas.
Since I don’t own a cricut, it was a little tricky to figure out how to handle the lettering without having to cut each letter out by hand. My hubby helped me figure out that reverse printing in white on a colored circle looked nice and crisp. I believe the font I used was Clarendon Bold.
Once all my pieces were cut out, I assembled the canvases with a glue stick and used two coats of spray sealer on top.
Then I hung them with some command adhesive strips ( I stocked up on these a while ago when they were BOGO at my drug store). This way when my 2-year-old inevitably gets into shenanigans during naptime and tries to pull them off the wall, there aren’t any nails to contend with and I can stick them right back up!
The prayer reads:
Father in heaven
Hear my prayer.
Keep me in
thy loving care.
Be my guide
in all I do
and bless all those
who love me too.
Amen.
The “now I lay me down to sleep” prayer would also work on 9 canvases!
I hope you liked my project and I would just love it if you would stop by my blog to say hello sometime!the
Love,


Love this project too and I featured it in my roundup of crafty quatrefoil projects here. Feel free to check it out and hope you like it!
-Mel the Crafty Scientist
I love this idea! I will have to try it out. Thanks for sharing
Love it! That is such an adorable project!
I'm going to try this today. My daughters bedroom needs a mini makeover. What better way to do it than DIY art work. Thanks for the tutorial!
Jen, thank you so much for giving me this opportunity! You have such awesome readers! Safe travels!
Those are so, so cute! Thanks so much for this, I'll be linking. Off to check out your blog!
That is super duper adorable!!
That turned out fantastic!! I think I may try something similar in my room with photos in the centers. Thank you so much for the inspiration. =D
I love the wall decor! I wish I knew how to make them.
Love it. That is so sweet and pretty! Such a nice prayer too!
So cute! I love this and think I want to try something similar for my daughter's room. What kind of spray sealer do you use for this project? I was looking for a sealer for a collage project I did with my daughter and couldn't find anything that worked well.
Yay, Pam!! 🙂 This turned out beautifully. 🙂
I love the project! How did you do the painting above the artwork? Please let me know. I would like to do something like that in my son's room, but of probably with dark blue. Thanks – Karen Giddings
[email protected]
I love the project! How did you do the painting above the artwork? Please let me know. I would like to do something like that in my son's room, but of probably with dark blue. Thanks – Karen Giddings
[email protected]
I love the project! How did you do the painting above the artwork? Please let me know. I would like to do something like that in my son's room, but of probably with dark blue. Thanks – Karen Giddings
[email protected]
I love the project! How did you do the painting above the artwork? Please let me know. I would like to do something like that in my son's room, but of probably with dark blue. Thanks – Karen Giddings
[email protected]
That really turned out cute and what a treasure for your children. I love the color combination.
Sue
Looks so cute!! Great work and great post!
I also wanted to let you all know about the Appleseed St. Patty's 20% off sale! Check it out! Talk to you soon!
Ginger
http://appleseed-gifts.blogspot.com
(click on the clover for details)
These are so super cute…love the color combination and the pattern!
Those are absolutely gorgeous! Love em!
such an endearing project. I have done the foam board "fake" canvas thing too! 🙂 such a great option!
I absolutely LOVE this project. I've been racking my brain for ideas to decorate my girls room. I am so going to borrow this. Very very creative!!!!
That is so fun! What a great project!
Um….im pretty sure im going to love you forever for teaching me this…..and im going to be trying this all DAy…and im so happy to say i have 2 sheets of that from the dollar store. SaWeet!!
Love it!
Awwwe, I love everything about this project !
Hi Pam!
To say that I liked your project is an understatement…I LOVED IT!!! So very cute. I love the saying and the springy colors!
This is really cute, Pam! I love the colors! Your daughter's room looks adorable, too. I hope to get some time to visit your blog today!
So cute! And I love that it was so inexpensive!
How cute! I hope you're having fun!
Super cute! Thanks for sharing such an adorable project! Might have to try it out!
Hana
MomTog Diaries
It's adorable. The shape and prayer words are so lovely. I Love the paint job in that room. Too cute!