Tatertots and Jello

COLORFUL HAPPY HOME -- Daily DIY, Decor, Craft and Recipe Tutorial

  • My Home
    • 1905 Cottage
    • Daybreak House
  • DIY
    • DIY Projects and Ideas
    • Organizing
    • Tutorials
    • Printables
  • Decor
    • Spring Projects
    • Summer Projects
    • Fall Projects
  • Crafts
    • Kids Crafts
    • Painting Projects
    • Paper Projects
    • Sewing
    • Wreaths
  • Holidays
    • Valentines Day
    • Easter
    • Halloween
    • Thanksgiving
    • Christmas
    • HAPPY Holidays Series!
  • Recipes

Explore

  • my home
  • diy
  • decor
  • crafts
  • holiday
  • printables
  • recipes

Connect

Home » christmas » Make DIY Wood Votives — great neighbor gifts for under $1.50/each!!

christmas, decorating, diy, holiday, tutorial · December 13, 2011

Make DIY Wood Votives — great neighbor gifts for under $1.50/each!!

Tatertots & Jello is a participant in the Amazon Services LLC Associates Program, an affiliate advertising program designed to provide a means for sites to earn advertising fees by advertising and linking to amazon.com.
144
144Shares

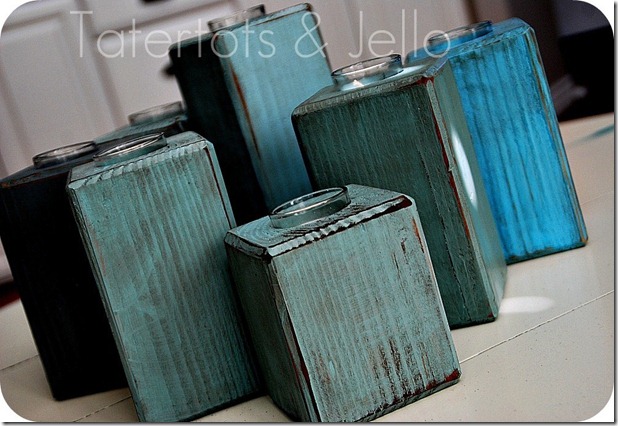
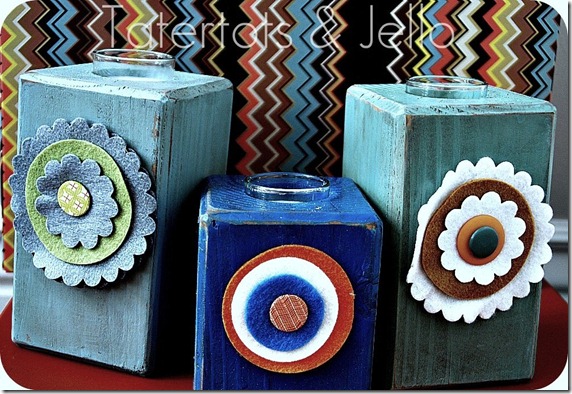
three block votive candles

It’s almost time to start handing out your neighbor gifts.

Here’s a little gift idea I came up with – DIY Votive Pillar Candles.

Who couldn’t use a cute candle holder in the cold winter months, right? And, this project is super inexpensive. Each pillar candle ends up being about $1.50. Yes, $1.50 for a neighbor gift isn’t too bad! And if you really like someone, you can give them a set of three candles in different heights. Yes!!!

diy votive block candle holders

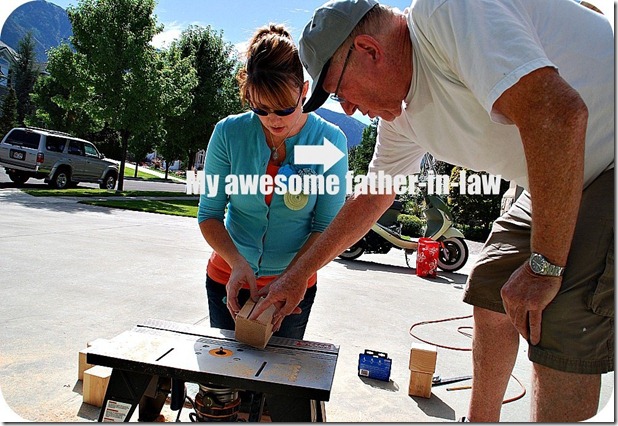
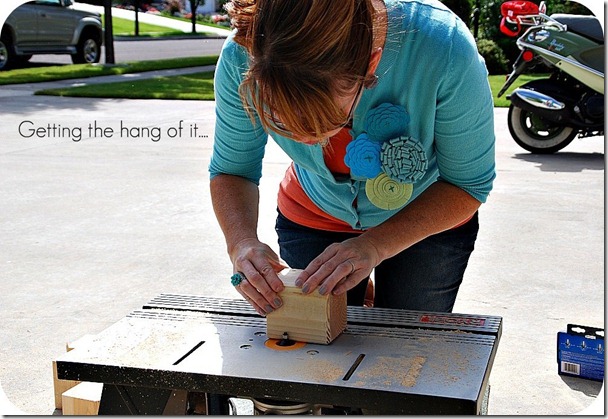
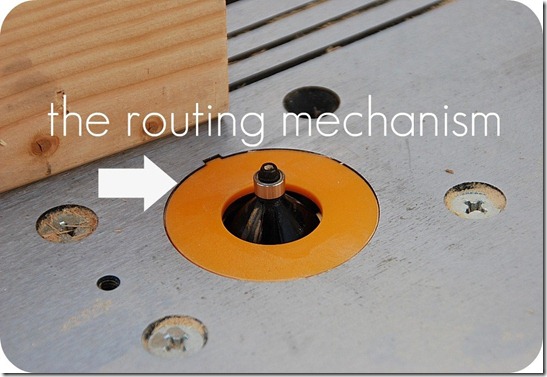
I got a router for my birthday, so I was so excited to learn how to use it to make this project!

my awesome father in law

getting the hang of it

routing mechanism

This is what I did to make this project:

  • 1 6x6x8 board from your local lumber store. {one board = 10-15 blocks $8}
  • A pack of glass votive candles. I bought mine at Hobby Lobby.
  • Paint.
  • Felt for embellishments {optional}
  • Hot glue sticks and gun
  • A Big Shot cutter {optional}
  • A router, saw and drill press {optional}

Directions:


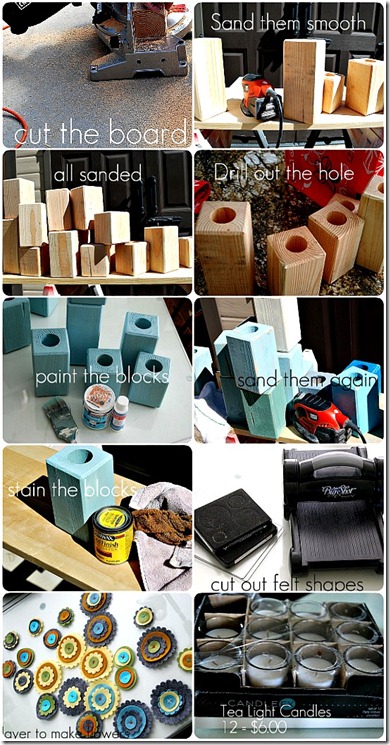
tea light blocks collage

    1. Cut your boards. I cut mine 4 inches, 6 inches and 8 inches. If you don’t have a saw, you can ask Home Depot to cut your board.
    2. Route the boards {optional}
    3. Sand the boards.
    4. Drill out the hole for the votive. I borrowed my neighbors drill press.
    5. Paint the blocks.
    6. Stain the blocks.
    7. Cut out felt shapes for embellishments.
    8. Layer the shapes.
    9. Insert the tea lights.

diy block candle holders

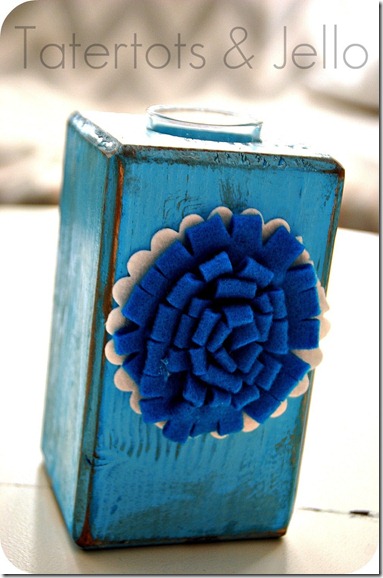
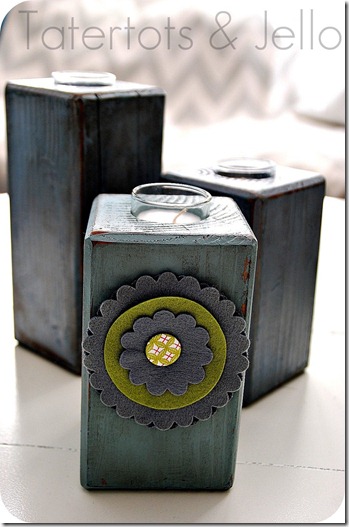
I borrowed my neighbor’s drill press to make the holes for the votives, but if you don’t have access to a drill press, you can make the blocks flat and add candles to the top. I also used my Big Shot die cut machine to cut out the felt shapes, but you can freehand the shapes by tracing circles onto felt and cutting them out. I used assorted brads and buttons to embellish the shapes.

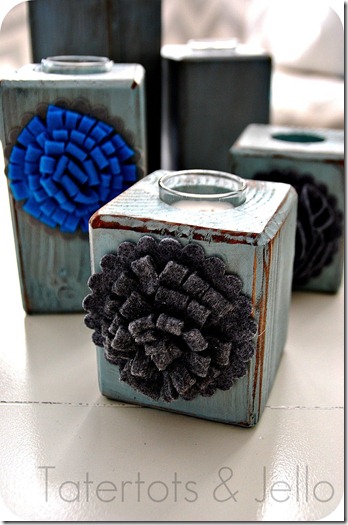
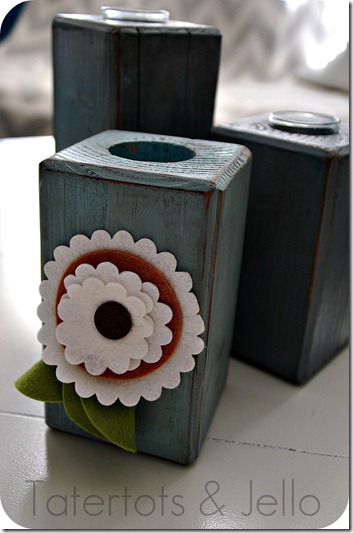
felt flower block votive candles

three pillar candles

one pillar candle

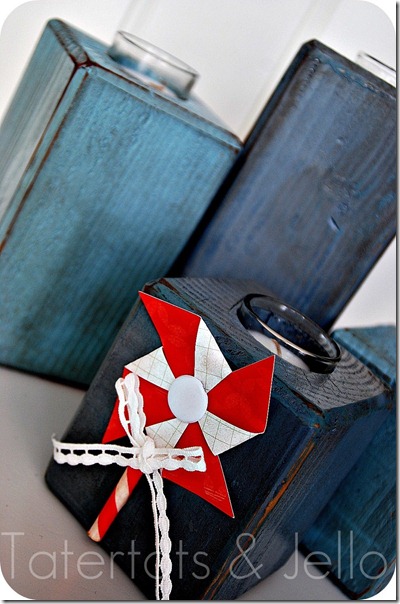
I also experimented and made a paper pinwheel on one of the blocks.

pinwheel candle holder

So use your imagination. There are so many things you could do to personalize your candles. Another idea would be to make vinyl letters with the family’s initial for neighbor gifts!


Happy Holidays!!

xoxo
144
144Shares

Posted By: Jen · In: christmas, decorating, diy, holiday, tutorial

PJs & Pancakes Birthday Party!!
Spreading Holiday Cheer through Decorating – my Holiday home!

You’ll Also Love

The Ultimate Kids Holiday Gift Guide!
Embrace the Cozy Charm: Hygge Holiday Cards and Simmer Pot Potpourri Tags. Free printables to use this holiday season.Hygge Holiday Cards and Simmer Pot Potpourri Tags
Warm and Cozy Hygge Christmas Gift Boxes

Comments

  1. Vickie says

    December 20, 2011 at 10:51 AM

    what a great idea! thank you for your inspiring tutorial.

  2. Make and Do Girl says

    December 16, 2011 at 5:27 PM

    Great idea! Lucky neighbors you have 🙂

  3. Katie from Sew Woodsy says

    December 15, 2011 at 7:26 PM

    Love these votives! I make (well mr. woodsy) makes these for me! And then I jazz them up! Great job!

  4. Angela B says

    December 15, 2011 at 1:39 AM

    Love it… although I might forego the felt and stencil letters and write a message for my mantle… such as hope, love, family, home, or my last name

  5. nest of posies says

    December 14, 2011 at 10:57 PM

    you are taking the posie cluster to new heights! you look adorable!

    these candle holders are an awesome idea. love all the details you made for them!

    xo
    kellie

    • Jen says

      December 15, 2011 at 12:12 AM

      I wear your Nest of Posies like every single day. I am in love with them.

      xoxoxo
      Jen

  6. Kara says

    December 14, 2011 at 10:36 PM

    I love these Jen! I’m gonna have to track down a neighbor with a drill press too! 🙂

  7. Jamie says

    December 14, 2011 at 8:05 PM

    Love these! What great gifts!

    jamie @ sewrockin.com

  8. Janet says

    December 14, 2011 at 5:40 PM

    These are great! I don’t have all your fancy tools, but I could get around that, I’ve watched enough DIY tc, LOL. Tight times, I’ll bet these gifts will be so much appreciated. Especially around here if we get more storms that knock power out for a week. 2 thumbs up, while I’ve still got 2 thumbs, haven’t used power tools yet. 🙂

  9. MiMi says

    December 14, 2011 at 1:28 PM

    I need a router!

  10. vicki says

    December 14, 2011 at 12:07 PM

    what is the thing that you used to cut out the felt shapes? What is it called??
    [email protected]
    vicki

  11. Heather@The Black's Best says

    December 14, 2011 at 10:04 AM

    I love how these look and even though these are inexpensive they take quite a bit of effort which I’m sure your neighbors will appreciate!

  12. Megan says

    December 14, 2011 at 7:11 AM

    Lets just talk about how cute your cardigan is!

  13. Megan says

    December 14, 2011 at 7:10 AM

    We did something like this for our wedding. Our aisle decor was hanging test tube vases that I made and then the main decoration for the alter table was this (http://a8.sphotos.ak.fbcdn.net/hphotos-ak-snc7/318333_2148350626533_1179330129_32158378_963821706_n.jpg) (http://a7.sphotos.ak.fbcdn.net/hphotos-ak-ash4/293259_2148350306525_1179330129_32158377_538242917_n.jpg) with one flower honoring our grandparents and my husband’s father who have died with candles in between. (word of warning, make sure to use candles that nearly fill the glass so that they can get enough oxygen to keep burning).

  14. Susie says

    December 14, 2011 at 6:46 AM

    I can’t believe how adorable these are! Lucky lucky neighbors!!

  15. Candee Gumm says

    December 14, 2011 at 6:43 AM

    Hello! Im new to your wedsite! And its adorable! Any way….. question for you… When you paint and then stain… could you explain that step by step for me? What kind of stain? And did you stain and then wipe off right away?

    Thanks!

  16. Amber says

    December 14, 2011 at 6:31 AM

    Very cute I love how you put your felt embellishments on these also, hopefully my hubby will want to try this project out with me!

  17. Paula Parrish says

    December 14, 2011 at 4:54 AM

    Hello Jen,
    Dag, your candles holders are super cute. Thanks for the tutorial.
    Smiles, Paula

  18. Sarah says

    December 14, 2011 at 4:33 AM

    Oh my these are so cute! I’m totally going to make some of these, but for me…. not as gifts 🙂

  19. Mrs BC says

    December 14, 2011 at 4:01 AM

    These look great, what a fabulous idea! I think I will make some with sea shells on the front..I too received a router for my birthday & I love it. I’ve been making coat racks out of offcuts.
    xx

  20. greatflowerlady says

    December 14, 2011 at 3:09 AM

    sooo in love gotta try this

  21. marissa says

    December 14, 2011 at 1:48 AM

    oh to have fun wood tools so I could make cool this like this, I love how these turned out!

  22. Christa Lysager says

    December 13, 2011 at 11:38 PM

    How do you like your router? I am wanting to get me one soon too. What kind is yours, and where did you get it?

  23. April says

    December 13, 2011 at 11:16 PM

    Those are really cute! I wish I’m your neighbor. =P

  24. Anna says

    December 13, 2011 at 11:15 PM

    That’s awesome Jen! I’m happy to know that I’m not the only one that still gives neighbor gifts. This year I’m making my neighbors Chocolate covered salted caramels. 🙂

    Anna
    http://www.askannamoseley.com

    • Jen says

      December 13, 2011 at 11:18 PM

      Yummy!! Those sound so good Anna!!!

      xoxo

  25. Jenni says

    December 13, 2011 at 11:14 PM

    Awesome! Sooooo gonna do this for our mantel! Thanks Jen!

  26. Leanne says

    December 13, 2011 at 11:02 PM

    Those are darling! Can I be your neighbor?

    • Jen says

      December 13, 2011 at 11:10 PM

      I wish you were Leanne 🙂

      xoxoxo

  27. Mindy says

    December 13, 2011 at 11:01 PM

    well aren’t you dressed up to use power tools! 🙂

    • Jen says

      December 13, 2011 at 11:11 PM

      I know – I’m a weirdo 🙂

      xoxo

  28. Vivienne @ The V Spot says

    December 13, 2011 at 10:52 PM

    I love these! (Did you do a similar version before?) btw You just kill me that you are so pretty and put together when crafting! (I haven’t haven’t gotten in a shower yet today!) ha! 🙂

    • Jen says

      December 13, 2011 at 10:59 PM

      LOL – that picture was taken on my actual birthday so I did make an effort to get dressed. Usually I am running around in my paint-stained sweats. hahaha!!

      Love ya Viv! Will you send me your address? I want to send you a card 🙂

      xoxoxox
      Jen

Hi! I'm Jen Hadfield. I'm a mom of 5 restoring an 1891 home in the heart of Salt Lake City. I love being creative and sharing simple ideas to make your life easier and more beautiful!

Receive the Latest Crafts, DIY, Recipes and More in your INBOX!

Follow us on Pinterest! It's awesome!

Top Posts & Pages

DIY Secret: How to Print on Post-It Notes (and Free Printable Template)
Spruce up Your Outdoor Space with a DIY Recirculating Fountain! (tutorial)
A New Deck in Under 30 Minutes!
Copycat Panera Spinach and Artichoke Egg Soufflés - SO good!
12 Must-Have Items to Pack on an Alaskan Cruise!
How to Change a Recessed Can Light into a Pendant Light with No Remodeling!


Popular Posts

  • DIY Secret: How to Print on Post-It Notes (and Free Printable Template)
    DIY Secret: How to Print on Post-It Notes (and Free Printable Template)
  • Spruce up Your Outdoor Space with a DIY Recirculating Fountain! (tutorial)
    Spruce up Your Outdoor Space with a DIY Recirculating Fountain! (tutorial)
  • A New Deck in Under 30 Minutes!
    A New Deck in Under 30 Minutes!
  • Copycat Panera Spinach and Artichoke Egg Soufflés - SO good!
    Copycat Panera Spinach and Artichoke Egg Soufflés - SO good!
  • 12 Must-Have Items to Pack on an Alaskan Cruise!
    12 Must-Have Items to Pack on an Alaskan Cruise!
  • How to Change a Recessed Can Light into a Pendant Light with No Remodeling!
    How to Change a Recessed Can Light into a Pendant Light with No Remodeling!
  • 3-Ingredient SAFE Puffy Slime Recipe
    3-Ingredient SAFE Puffy Slime Recipe

As seen in


Amazon Affiliate

Tatertots & Jello is a participant in the Amazon Services LLC Associates Program, an affiliate advertising program designed to provide a means for sites to earn advertising fees by advertising and linking to amazon.com.
  • About Me
  • Advertising
  • Get Featured

Copyright © 2025 Tatertots and Jello · Privacy
This site is a place for positive discussion and ideas. Negative talk, comments that disparage others, and similar are not welcome and may be removed.

144