Tatertots and Jello

COLORFUL HAPPY HOME -- Daily DIY, Decor, Craft and Recipe Tutorial

  • My Home
    • 1905 Cottage
    • Daybreak House
  • DIY
    • DIY Projects and Ideas
    • Organizing
    • Tutorials
    • Printables
  • Decor
    • Spring Projects
    • Summer Projects
    • Fall Projects
  • Crafts
    • Kids Crafts
    • Painting Projects
    • Paper Projects
    • Sewing
    • Wreaths
  • Holidays
    • Valentines Day
    • Easter
    • Halloween
    • Thanksgiving
    • Christmas
    • HAPPY Holidays Series!
  • Recipes

Explore

  • my home
  • diy
  • decor
  • crafts
  • holiday
  • printables
  • recipes

Connect

Home » decorating » Make a DIY Beadboard Decorative Centerpiece Tray!! {tutorial}

decorating, diy, Thanksgiving · November 8, 2011

Make a DIY Beadboard Decorative Centerpiece Tray!! {tutorial}

Tatertots & Jello is a participant in the Amazon Services LLC Associates Program, an affiliate advertising program designed to provide a means for sites to earn advertising fees by advertising and linking to amazon.com.
Hello, TT&J readers! It is such a huge honor to be here today. I have been a fan of Jen’s blog for a very long time.

My name is Lindsay & I run a blog called Southern Lovely.
I am a busy mom of three little ones, who constantly keep me running. Whenever I have free time, I enjoy creating. It’s my outlet, really.

Today I am going to share how to make a beadboard decorative tray, that can be used for any holiday, or really any type of centerpiece. Inspiration was taken from here.
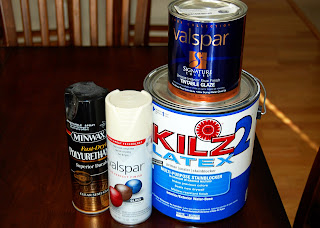
Supplies needed:
Strip of molding/trim
Bead board
Liquid Nails
Primer
Paint
Glaze
Before I went to Lowes to purchase my supplies, I figured out my measurements, which allowed me to have my bead board cut directly in the store. FYI–my measurements were 10×24 inches.


Here’s What I did:

This is where my handy husband came in–using a Miter saw, he cut the molding to fit on the already cut bead board.

Then apply liquid nails to secure it all together.

Next I primed the entire piece, then painted & glazed.

I used this technique to glaze it.

Basically you dip a sponge brush in the glaze, paint where you’d like it to go, then wipe the excess off with a damp cloth. It’s pretty much fool proof. 🙂

Once it was all dry, I sprayed it with a protective coat.


Now that you have a beautiful new tray, here is the fun part–decorating!

Since this is a Thanksgiving centerpiece, here is what I added.


Glass jars, purchased from the Dollar Store
Berry twigs–from Michaels on sale for $1/each
Sticks–from Michaels, you could even use some from outside
Beans–Navy & Pinto
Candles


Festive & easy, right!

I am really excited to have this little tray to work with from now on. It will be fun to switch out the centerpieces each season.


I also made the little burlap runner, which I will be posting the tutorial on my blog soon.

So, what do you think–did I do okay posting on Jen’s awesome blog?? I was a bit nervous, lots of pressure. 🙂

Thanks for having me! If you want to check out more DIY’s, sewing projects or just plain crafting, stop by & say hi!
Photobucket

Lindsay – thanks for such a great tutorial. I love your beadboard centerpiece!!

Here are a few more awesome ideas from Southern Lovely:

DIY Storage Bins

DIY Tights

Fall Wreath

Be sure to head over to Southern Lovely to see all of Lindsay’s wonderful ideas!!

xxoo

PS — And, did you win one of the TEN giveaways from TT&J’s First Giveaways Days??

I hope so!! Another Giveaway Day spotlight day is coming up on Monday!!

Have a Wonderful Wesnesday!!

PS — I am sharing 10 Thankful Kids Crafts that will bring the spirit of Thanksgiving into your Home today at The New Home ec 🙂

Posted By: Jen · In: decorating, diy, Thanksgiving

Win $2,500 for the Holidays — in the Naughty or Nice Contest!!
Getting Organized — My Family Message Center {take two}

You’ll Also Love

DIY Halloween Bat Mantel Ideas
Embrace the Beauty of Early Fall Decorating: DIY Ideas and Delicious Recipes
make a dog playhouse out of a box. all the instructionsMake an Adorable DIY Dog Playhouse Out of a Box!

Comments

  1. Carrie says

    November 10, 2011 at 10:16 AM

    Love the idea from your guest poster. Simple and elegant all at once.

  2. Amanda says

    November 10, 2011 at 7:29 AM

    I totally went by the Dollar Store on the way home yesterday and picked up some of those glasses! Thanks for the inspiration!

  3. sibylle says

    November 10, 2011 at 6:38 AM

    love the berry twigs, i could decorate with them all year around, lol!

  4. Southern Fried Gal says

    November 9, 2011 at 9:57 PM

    Cute idea and it is styled nicely for fall. I love the fall wreath – adorable. Thanks for sharing new friends!

  5. Vio says

    November 9, 2011 at 9:33 PM

    Hey, I am having my first giveaway ever!… 🙂 Wanna join it? http://scribblesfromjourney.blogspot.com/2011/11/giveaway-to-be-thankful-for.html

  6. Sue says

    November 9, 2011 at 9:12 PM

    The tray is wonderful, but my favorite are the tights! Oh so cute!!

  7. Lindsey says

    November 9, 2011 at 7:33 PM

    Love this!!

  8. Natalie says

    November 9, 2011 at 6:46 PM

    cuuuuute! Yay, one more thing for my to-do list! 🙂

  9. Jessica@nucheysmommy says

    November 9, 2011 at 6:10 PM

    That’s a great idea with the bead board!!! Nicely done 🙂

  10. Jayme C says

    November 9, 2011 at 5:36 PM

    Love this! Really loving that I have all the supplies to knock one of these out before Thanksgiving! Thanks for the tutorial! 🙂

  11. Nike@ChooseToThrive says

    November 9, 2011 at 4:15 PM

    Lindsay,
    I love the bead board and molding combo! Your display is beautiful with your gorgeous base and punch of rich fall colors. So, so elegant and stunning.

  12. Leah says

    November 9, 2011 at 2:07 PM

    Fantastic tutorial, Lindsay!!! I hope to do one for myself now… I feel so inspired!

  13. ashley says

    November 9, 2011 at 12:31 PM

    Love the fabulous centerpiece! Lindsay rocks!!

  14. gail says

    November 9, 2011 at 12:15 PM

    I love that beadboard centerpiece! I have the scraps in my pile to make that right now! Thanks for a great tute!
    gail

  15. Leah says

    November 9, 2011 at 10:14 AM

    Fabulous centerpiece! So simple and festive!

  16. Karen Weight says

    November 9, 2011 at 10:05 AM

    I love it! I have some beadboard and molding. I need to make this!

  17. Kelli says

    November 9, 2011 at 9:03 AM

    That is too cute! I love beadboard!

  18. katie mcfarland says

    November 9, 2011 at 7:24 AM

    Love it! I think I’ll be trying to recreate this weekend. My table is in DIRE need of some festivness.

    I wonder if you could Increase the size of the “tray” and make it a big frame for the Fireplace and surround it with similar things. HMMM…the possibilities are endless!!!

  19. Beth says

    November 9, 2011 at 7:22 AM

    LoVe it!! You did a fabulous job! Thanks for sharing! Smiles~Beth

  20. Cookbook Queen says

    November 9, 2011 at 6:26 AM

    I am so loving this!! It’s only 7:30 am and I’m already shouting measurements and Lowes supplies for my husband to pick up 🙂

  21. A Mother and A Daughter says

    November 9, 2011 at 6:19 AM

    Love that beadboard tray! And I’m going to have to make some of those tights! ~ Barbara

  22. Jessica @ Two Shades of Pink says

    November 9, 2011 at 5:25 AM

    YAY LINDSAY! This is just gorgeous! I really love this!

  23. Heidi @ Decor & More says

    November 9, 2011 at 4:54 AM

    Cool project! You will get some serious mileage out of that awesome tray. Thanks for sharing!

  24. evelyn says

    November 8, 2011 at 11:50 PM

    very pretty LIndsay! you never cease to inspire me! your awesome!!!

Hi! I'm Jen Hadfield. I'm a mom of 5 restoring an 1891 home in the heart of Salt Lake City. I love being creative and sharing simple ideas to make your life easier and more beautiful!

Receive the Latest Crafts, DIY, Recipes and More in your INBOX!

Follow us on Pinterest! It's awesome!

Top Posts & Pages

Spruce up Your Outdoor Space with a DIY Recirculating Fountain! (tutorial)
A New Deck in Under 30 Minutes!
Copycat Panera Spinach and Artichoke Egg Soufflés - SO good!
How to Change a Recessed Can Light into a Pendant Light with No Remodeling!
12 Must-Have Items to Pack on an Alaskan Cruise!
5-Minute T-Shirt Neckline Refashion


Popular Posts

  • Spruce up Your Outdoor Space with a DIY Recirculating Fountain! (tutorial)
    Spruce up Your Outdoor Space with a DIY Recirculating Fountain! (tutorial)
  • A New Deck in Under 30 Minutes!
    A New Deck in Under 30 Minutes!
  • Copycat Panera Spinach and Artichoke Egg Soufflés - SO good!
    Copycat Panera Spinach and Artichoke Egg Soufflés - SO good!
  • How to Change a Recessed Can Light into a Pendant Light with No Remodeling!
    How to Change a Recessed Can Light into a Pendant Light with No Remodeling!
  • 12 Must-Have Items to Pack on an Alaskan Cruise!
    12 Must-Have Items to Pack on an Alaskan Cruise!
  • 5-Minute T-Shirt Neckline Refashion
    5-Minute T-Shirt Neckline Refashion
  • DIY Secret: How to Print on Post-It Notes (and Free Printable Template)
    DIY Secret: How to Print on Post-It Notes (and Free Printable Template)

As seen in


Amazon Affiliate

Tatertots & Jello is a participant in the Amazon Services LLC Associates Program, an affiliate advertising program designed to provide a means for sites to earn advertising fees by advertising and linking to amazon.com.
  • About Me
  • Advertising
  • Get Featured

Copyright © 2025 Tatertots and Jello · Privacy
This site is a place for positive discussion and ideas. Negative talk, comments that disparage others, and similar are not welcome and may be removed.