Tatertots and Jello

COLORFUL HAPPY HOME -- Daily DIY, Decor, Craft and Recipe Tutorial

  • My Home
    • 1905 Cottage
    • Daybreak House
  • DIY
    • DIY Projects and Ideas
    • Organizing
    • Tutorials
    • Printables
  • Decor
    • Spring Projects
    • Summer Projects
    • Fall Projects
  • Crafts
    • Kids Crafts
    • Painting Projects
    • Paper Projects
    • Sewing
    • Wreaths
  • Holidays
    • Valentines Day
    • Easter
    • Halloween
    • Thanksgiving
    • Christmas
    • HAPPY Holidays Series!
  • Recipes

Explore

  • my home
  • diy
  • decor
  • crafts
  • holiday
  • printables
  • recipes

Connect

Home » christmas » Make a Bejeweled Christmas Tree {holiday tutorial}!!

christmas, crafts, diy, holiday, tutorial, upcycle · November 18, 2011

Make a Bejeweled Christmas Tree {holiday tutorial}!!

Tatertots & Jello is a participant in the Amazon Services LLC Associates Program, an affiliate advertising program designed to provide a means for sites to earn advertising fees by advertising and linking to amazon.com.

Hi, my name is Anna, and I blog at My Life and Kids. I’m thrilled to be visiting at Tatertots & Jello today!

I had three kids in three years and whew has my life changed! Just a few years ago I had a job I loved, a house in the city and a social life. Now I stay home with my three kids, I live in the suburbs, I wear mom jeans, AND I drive a minivan! In my spare time, I blog about it all at My Life and Kids.

Today, I’m going to share one of my favorite holiday projects with you.

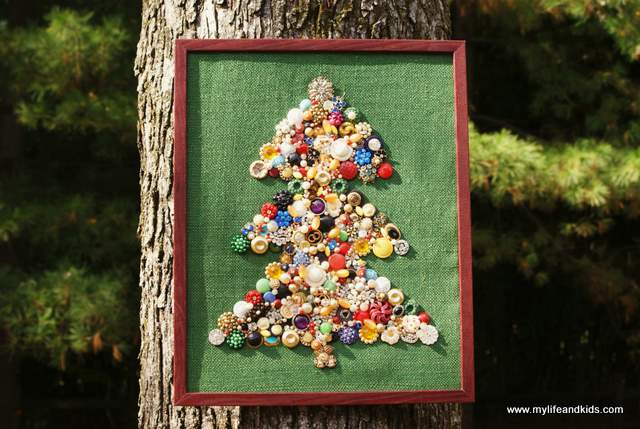
Jewelry Christmas Tree

Here’s What You’ll Need

Frame (without glass)
Cardboard cut to fit the frame
Fabric to use as your background (I used green burlap)
Tape to hold your background fabric onto your cardboard
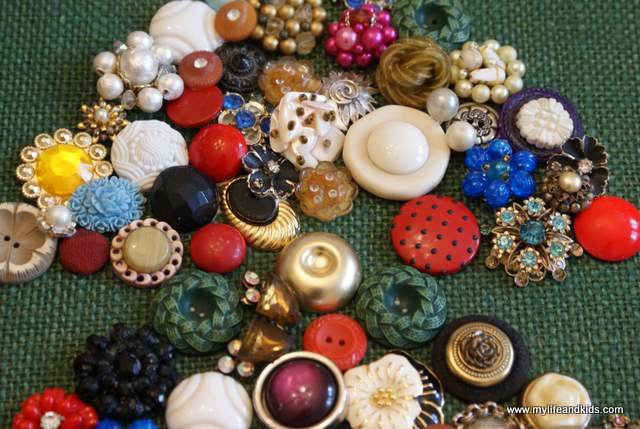
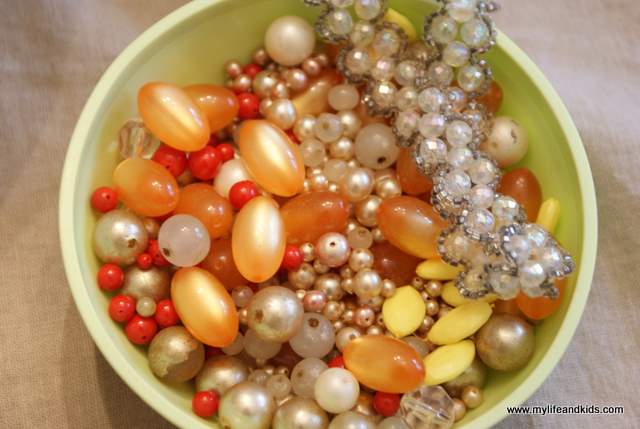
Costume jewelry, necklaces and/or buttons (you can pick these things up at yard sales – or visit grandma’s house)
Elmer’s Glue

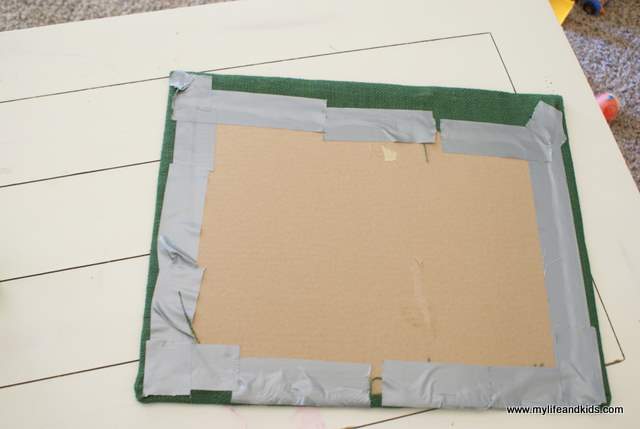
First, I cut my green burlap to fit my cardboard backing and covered the cardboard – keeping it in place with some duct tape. (Don’t worry – you won’t see the back!)

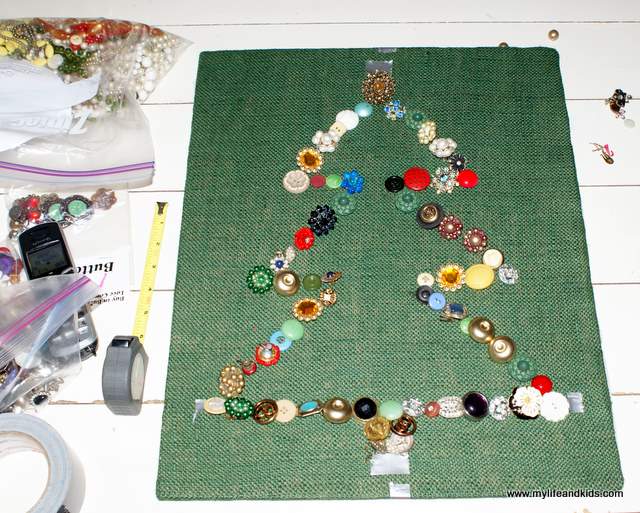
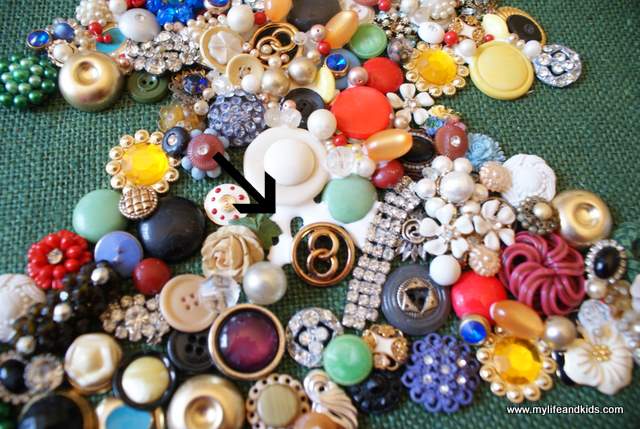
Then I went through my costume jewelery and created the general outline of my tree (no gluing yet). I taped off the center so that my tree would be nice and straight.

I also spent a fair amount of time pulling clasps off of earrings so that they would lay flat on my Christmas tree.

Once I was happy with the shape of my tree, I used Elmer’s glue to glue down every individual piece of jewelery in the outline shape.

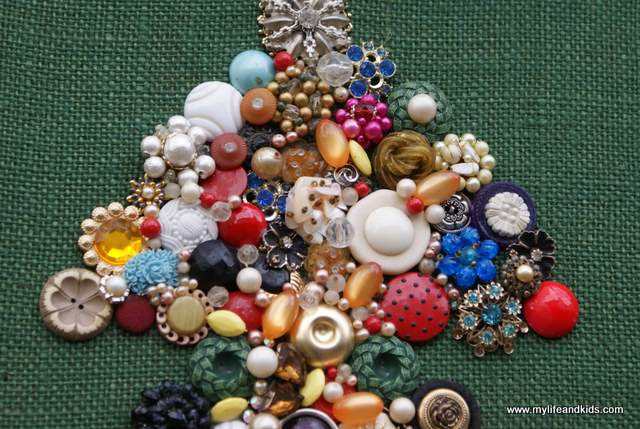
Then – I started filling in the middle of my tree. Gluing each piece as I went.

When I was finished with this step, I had a fairly flat jewelry Christmas tree with several holes in it.

To fill in the gaps, I cut apart several old necklaces.

I filled the gaps with glue, and I sprinkled in my necklace beads.

It was a little like icing a cake. I let everything dry overnight, and the next morning, I held my tree over a bucket and stood it up. I gave it a few pats on the back to shake off any loose beads.

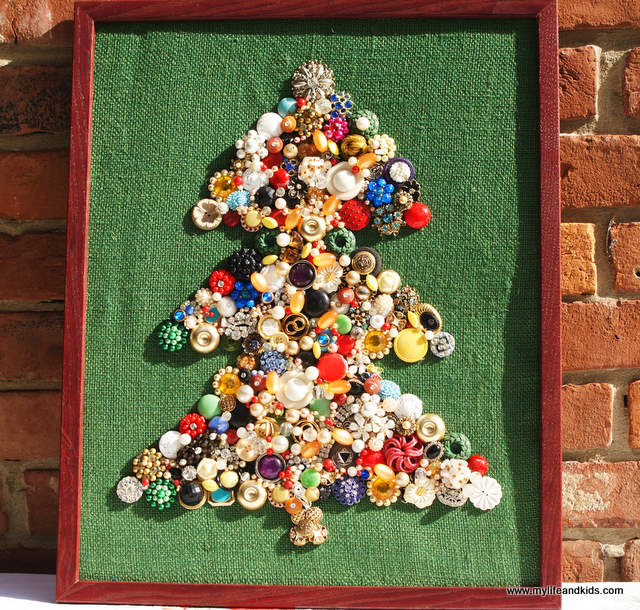
Then I fit it into my frame and admired my jewelry Christmas tree!

For more fun holiday projects, stop by My Life and Kids or find me on Facebook.

While you’re there, you can learn

my secret to a happy marriage (please don’t tell my husband!)

my tip for cleaner bathrooms 

my answer when people ask, “Do you like staying home?“

AND why my mom has to use the coffee shop drive through.

Thanks Anna!! That is such an AWESOME project!!  Here are a few more fabulous projects from Anna:

Mod Podge Trees

And Anna thrifts too!!

Head over to My Life and Kids and give Anna a little TT&J love!!

xoxo

PS — Are you looking for some handmade items to make for the guys in YOUR life? Kojo Designs is having a great series right now — Guy Gifts. I’m sharing a little project I made for my hubby today.

Plus, I’m spotlighting one of my new favorite blogs at SNAP today – come over and see who it is!

And, it’s Friday!!! Time to show off YOUR Great Ideas!! Come join us for The Weekend Wrap Up Party — my favorite time of the week!! The party starts @ 6 PM MST.

Happy Friday!!!

xoxo


This post sponsored by Oh My Crafts:


Posted By: Jen · In: christmas, crafts, diy, holiday, tutorial, upcycle

Making the Perfect French Macaron!!
Weekend Wrap up Party – – and For All Time Clocks Giveaway!!

You’ll Also Love

17 Farmhouse and Cottage Valentine's Day ideas. Fast and beautiful ways to bring the spirit of Valentine's Day into your home.Easy 10-Minute Valentine’s Day Wall Art [and free templates!]
Pretty Summer and Father’s Day Ideas
eos lip balm elvesDIY eos Holiday Gnomes Craft!

Comments

  1. Divya N says

    December 25, 2011 at 6:17 AM

    this is a lovely project and we were just leaving out my old stash and wondering what to do with them…I guess I got my answer

  2. Lisa says

    December 17, 2011 at 10:17 AM

    I love this!
    I’ve got some many old buttons and beads, this would be a great way to use them

  3. n says

    December 11, 2011 at 6:02 AM

    Hi Jen
    Just love the button wreath idea sooo much.
    Just wanted to sharing what my 6-9 year old art students are doing to recycle everyday items into art. http://ecogreen4fun.blogspot.com/

    Please feel free to leave a comment. We love the feedback.

    Cheers Neko

  4. Laura Bray says

    November 30, 2011 at 10:53 AM

    Such a speedy, yet, WOW! project. Thanks for sharing!

  5. Barbara Glass says

    November 29, 2011 at 9:53 PM

    My mom had a pattern for a Christmas tree like yours but it called for small holes in the backing for Christmas lights to go through.

  6. Amanda says

    November 28, 2011 at 6:47 PM

    I made a tree like that too! I call it a Vintage Costume Jewelry Tree. Check it out @ http://burlapanddenim.com/2011/11/costume-jewelry-christmas-tree/

  7. SuzanneM says

    November 21, 2011 at 5:54 PM

    My Grandmother used to make these. So pretty! I lost one of the ones she made and still feel pretty terrible about it. Maybe I can make a new one? Thanks for the inspiration.

  8. Donna O'Neil says

    November 21, 2011 at 2:43 PM

    What a great project! Thanks for sharing.

  9. Katie says

    November 19, 2011 at 7:56 AM

    What a cute Christmas tree – looks like the perfect project to do with my kids!

  10. Kelly @ Eclectically Vintage says

    November 18, 2011 at 6:24 PM

    What a great re-use of vintage jewelry -which I have a ton of!

  11. Mrs.B says

    November 18, 2011 at 5:08 PM

    Such cute projects!

  12. Stevie M says

    November 18, 2011 at 4:25 PM

    My mom made one of those with all of her mom’s old jewelry the year after she died. I hope to inherit it one day! Yours turned out wonderfully 🙂

  13. SouthernScraps says

    November 18, 2011 at 4:18 PM

    Gorgeous! I did this at Easter and made a cross with some thrift store costume jewelry finds.

  14. Jenny says

    November 18, 2011 at 2:07 PM

    My Aunt made something similar to this for my Memaw over 15 years ago! This one is way cuter though!

  15. Kimmy Davis says

    November 18, 2011 at 10:33 AM

    I love this craft! I have so many “blah” beads, I’m going to use those to make this great project. Thanks for the idea!!

  16. Kelli says

    November 18, 2011 at 8:32 AM

    That is such a cute Christmas tree!

  17. Adventuresindinner says

    November 18, 2011 at 8:27 AM

    This is just lovely. My favourite part is that it is using all materials that you already had. Kids really do change everything. Two years ago it was my husband and I and a large cat. Lots of free time and lots of time to be super committed to work. Today (at 41) it’s the husband, a kiddo (almost two) and my 89 year old father-in-law and we reno’d the house to double its size this year. Crazy but great. Love that you introduced us to this great blog.

  18. Marjorie says

    November 18, 2011 at 8:01 AM

    Believe it or not, my husband’s 93 year old grandmother has one of these hanging in her home that she made quite some time ago! I have always loved it!

  19. Anna says

    November 18, 2011 at 6:28 AM

    Thanks so much for having me! Very exciting!
    XOXO

  20. My Duong says

    November 18, 2011 at 4:02 AM

    I love this! It has such a great vintage look! Thank you for sharing!

  21. Jodi Hall says

    November 18, 2011 at 3:03 AM

    That button tree is just too cute!

Hi! I'm Jen Hadfield. I'm a mom of 5 restoring an 1891 home in the heart of Salt Lake City. I love being creative and sharing simple ideas to make your life easier and more beautiful!

Receive the Latest Crafts, DIY, Recipes and More in your INBOX!

Follow us on Pinterest! It's awesome!

Top Posts & Pages

Spruce up Your Outdoor Space with a DIY Recirculating Fountain! (tutorial)
Copycat Panera Spinach and Artichoke Egg Soufflés - SO good!
The 12 BEST Patriotic Flag Fruit and Veggie Platters!
The BEST Fresh Strawberry Cream Cheese Cake Recipe!
Weight Watchers Zero Points Watermelon Strawberry Popsicles
DIY Black Painted Window Frames


Popular Posts

  • Spruce up Your Outdoor Space with a DIY Recirculating Fountain! (tutorial)
    Spruce up Your Outdoor Space with a DIY Recirculating Fountain! (tutorial)
  • Copycat Panera Spinach and Artichoke Egg Soufflés - SO good!
    Copycat Panera Spinach and Artichoke Egg Soufflés - SO good!
  • The 12 BEST Patriotic Flag Fruit and Veggie Platters!
    The 12 BEST Patriotic Flag Fruit and Veggie Platters!
  • The BEST Fresh Strawberry Cream Cheese Cake Recipe!
    The BEST Fresh Strawberry Cream Cheese Cake Recipe!
  • Weight Watchers Zero Points Watermelon Strawberry Popsicles
    Weight Watchers Zero Points Watermelon Strawberry Popsicles
  • DIY Black Painted Window Frames
    DIY Black Painted Window Frames
  • How to Make a Simple Garden Planter Box
    How to Make a Simple Garden Planter Box

As seen in


Amazon Affiliate

Tatertots & Jello is a participant in the Amazon Services LLC Associates Program, an affiliate advertising program designed to provide a means for sites to earn advertising fees by advertising and linking to amazon.com.
  • About Me
  • Advertising
  • Get Featured

Copyright © 2023 Tatertots and Jello · Privacy
This site is a place for positive discussion and ideas. Negative talk, comments that disparage others, and similar are not welcome and may be removed.