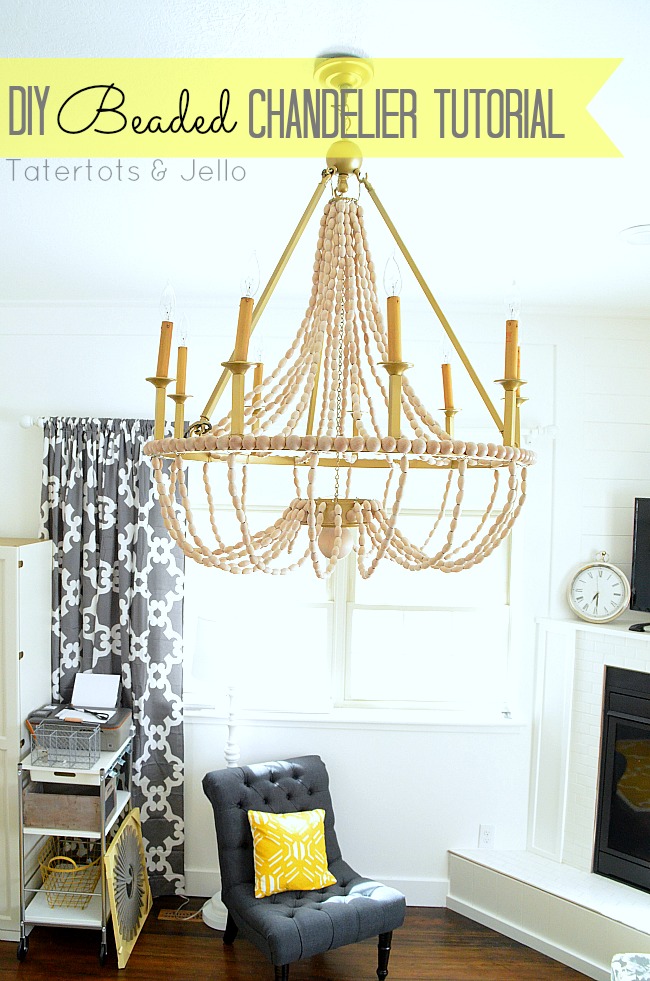
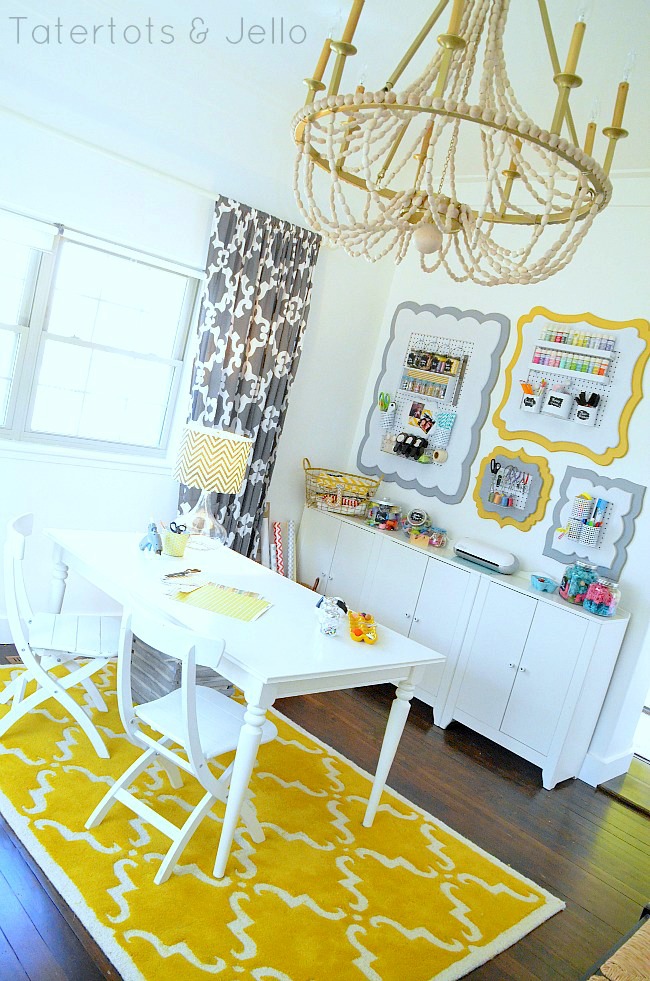
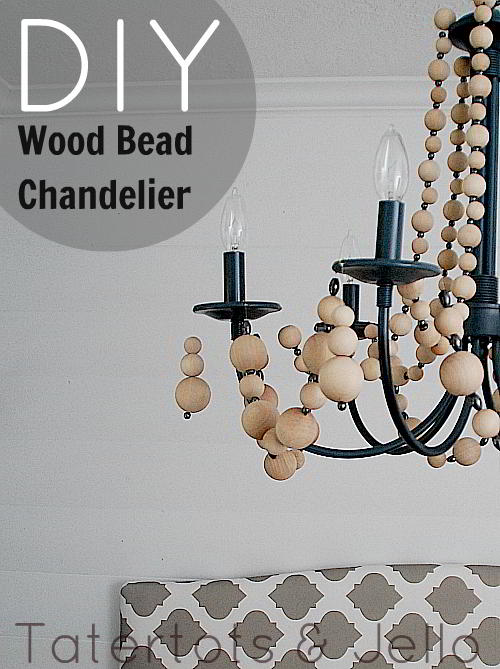
When I was designing my new office, I knew I wanted to make a wooden bead chandelier as the focal point.
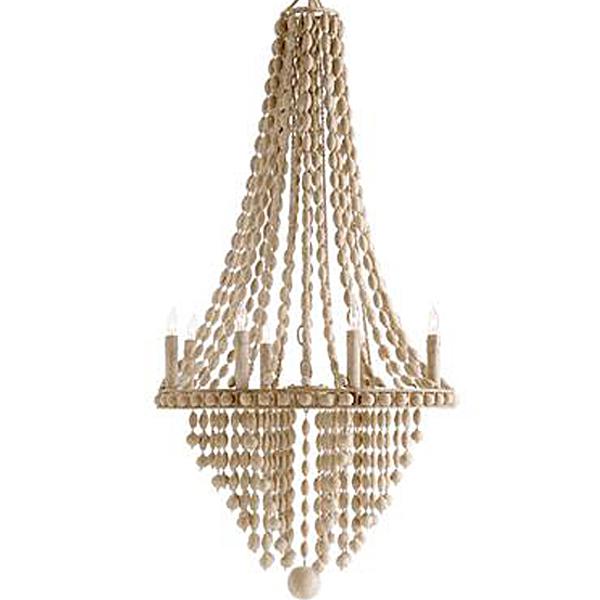
I had a chandelier in mind — the Arterior Maurice Chandelier — that was between $1,600 – $2,000 to buy. I ended up making my own beaded chandelier for about $250 and it’s bigger too — 32 inches in diameter by 3.5 feet in height.
Here’s how I did it:
You can buy unfinished beads in bulk. I bought mine here —
And since I was trying to replicate the Maurice Chandelier, I knew I wanted to keep the beads unfinished, for a kind of Restoration Hardware-ish kind of feel.
Here’s what you need to make this chandelier:
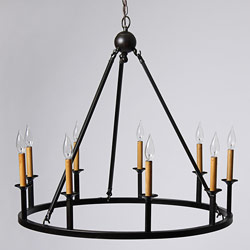
- You need a light fixture – mine is from Overstock.com
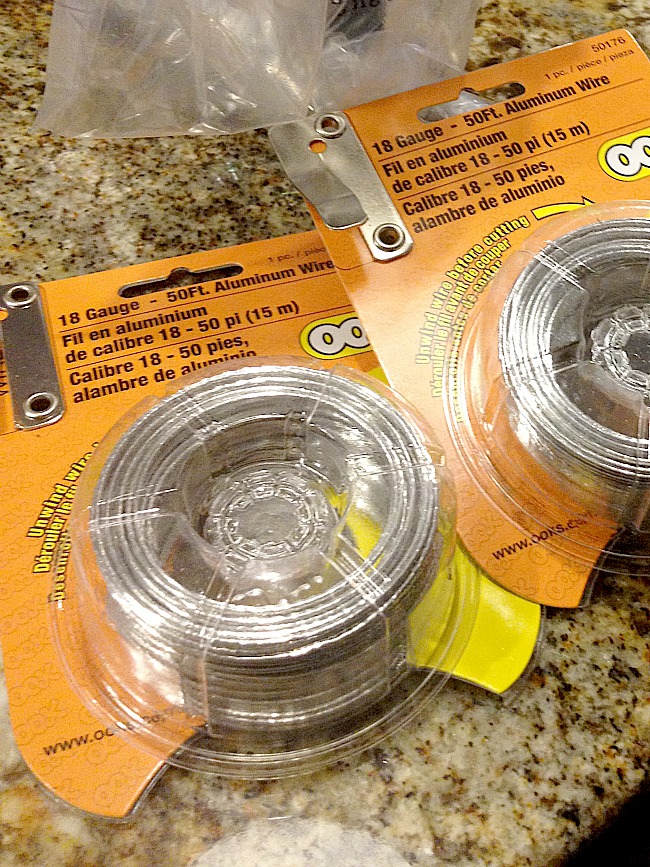
- 16-gauge wire (you can buy it at your hardware store in the picture-hanging area)
- 1,000 oval or round 1-inch beads
- 100 half-round 1-inch beads
- 1 large 4-inch round ball
- Spray paint
- 36 inches of gold chain
- round headpin
- e9000
- hot glue and glue gun
Here’s What To Do:
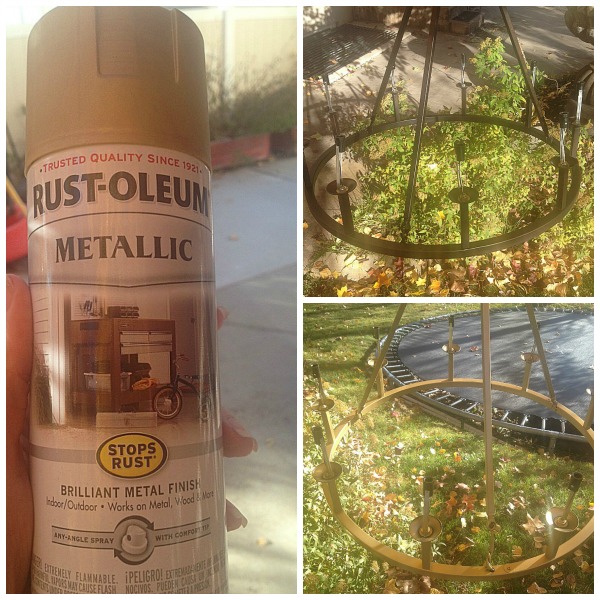
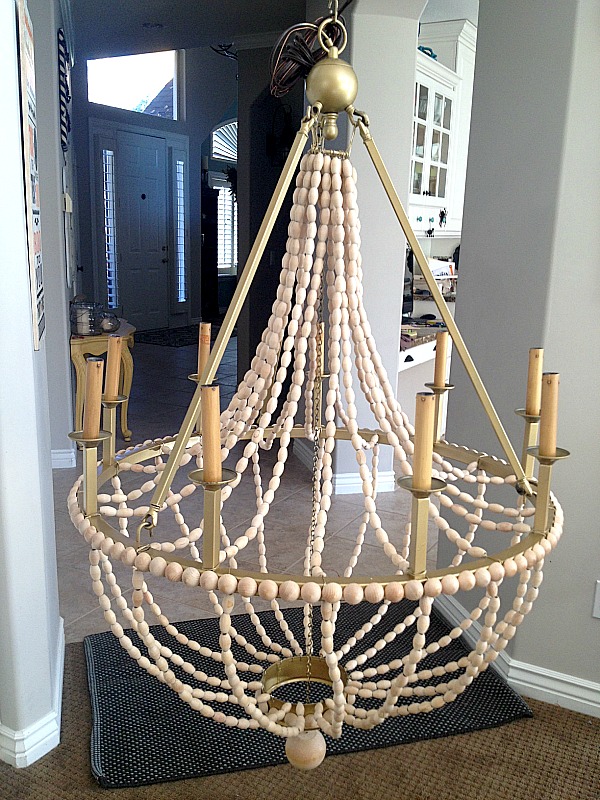
- Spray Paint the fixture. I used Rustoleum’s Metallic Gold Paint
- I found a big metal ring at the hardware store and hung it in-between the three cross-pieces at the top of the fixture with wire.
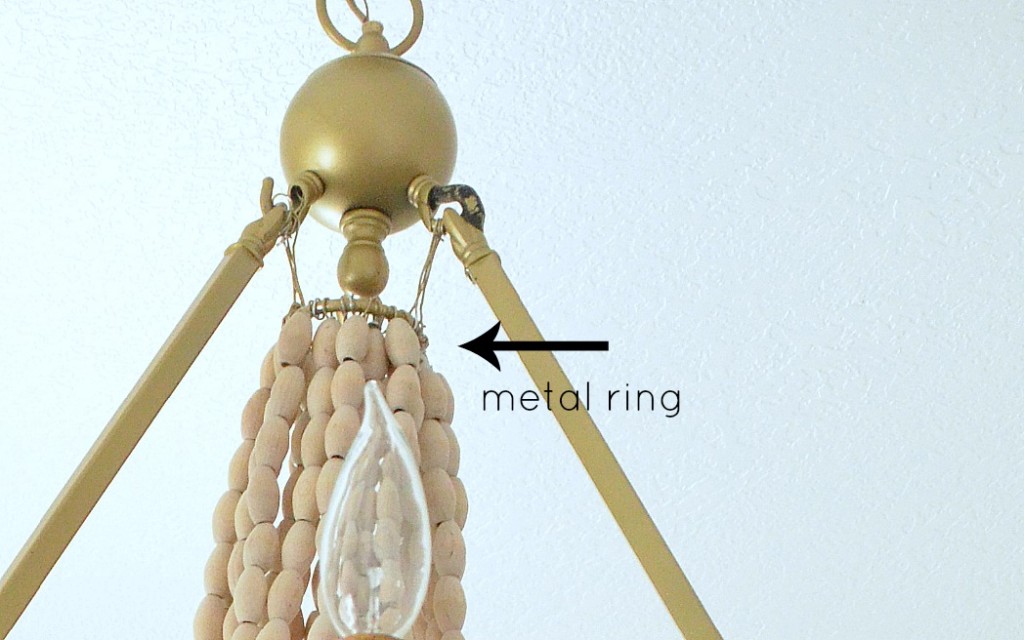
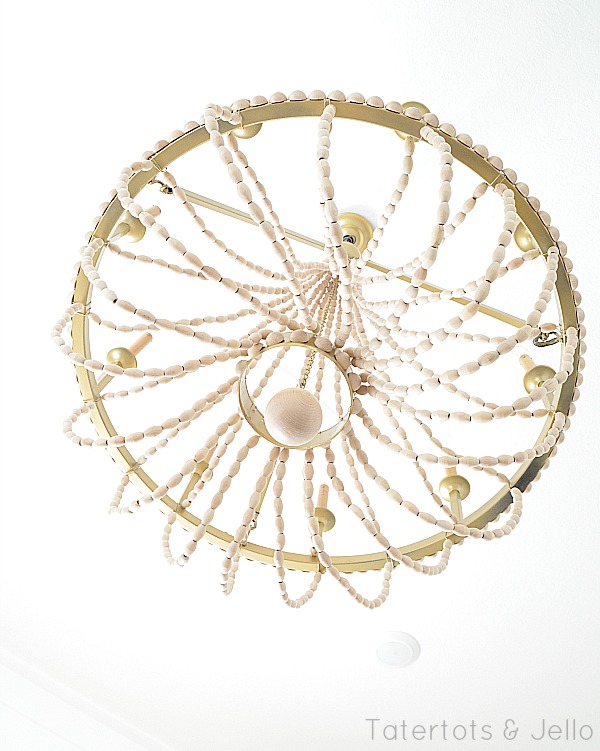
- Then bead the top part of the light fixture. I cut 18 pieces of wire 30 inches in length. And then threaded 28 beads per strand. I wrapped the top of each strand around the metal ring at the top and then wrapped the bottom around the round metal circle of the light fixture. I wrapped one per light and then another in between each light — for a total of 18 strands.
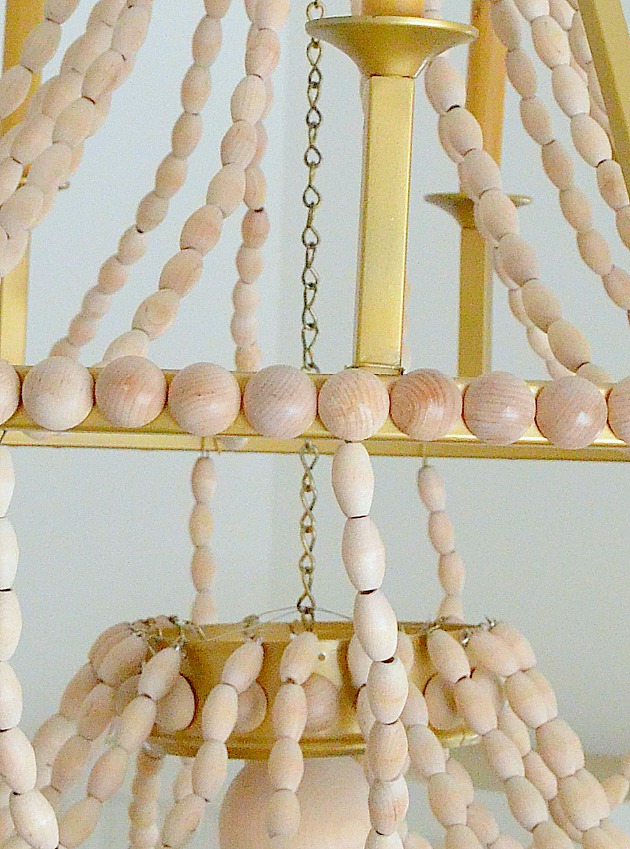
- Then I hot glued the half-round wood beads onto the outside of the round metal light fixture. I used about 100 half-round beads for this.
- Once the top was done, I took a piece of metal plumbing fixture that was round and punched 18 holes in it — all the way around. And then spray painted it. I punched holes in it with a Crop-o-dile tool.
- I then cut another 18 pieces of wire and beaded 20 beads on each strand. I wrapped each strand around the same places on the round light fixture as the other strands and then threaded it through the hole in the round plumbing fixture at the bottom of the light fixture and wrapped it around and cut off the excess.
- After cutting off the excess wire, I sprayed some of the gold paint into a cup and used a small paint brush to touch up the wires so they were the same gold as the rest of the light fixture.
- The last thing I did was I hung a chain in the middle of the light fixture, through the metal ring at the bottom and attached the large ball to the end with a round headpin and some e9000.
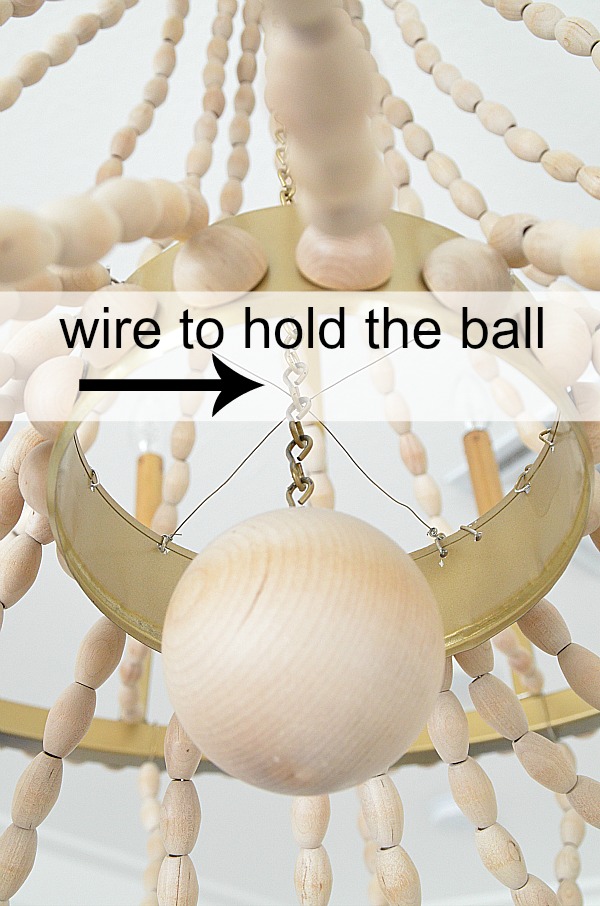
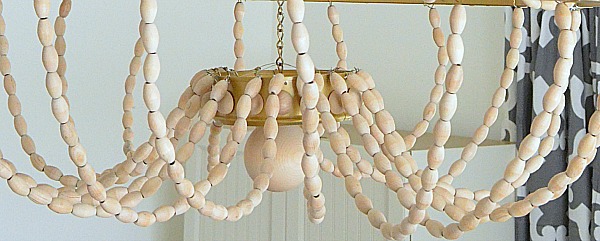
When I hung the light fixture in my office, I discovered that it was WAY too long for the room. It ended up being almost 5 feet in length. And as a result you could hit your head on the big ball at the bottom. I had to find a way to make the chandelier shorter.
This is what I did: I took two piece of the 16-gauge wire and cut two 24-inch lengths. Then I pushed the round metal circle up to swag the beaded wires. One it was swagged up, I took the two wires and attached them to the holes in the round plumbing fixture and then threaded it though the chain about 8 inches below the round metal plumbing fixture, making an x with the wires. This holds the swag beaded wire and makes the whole light fixture much shorter.
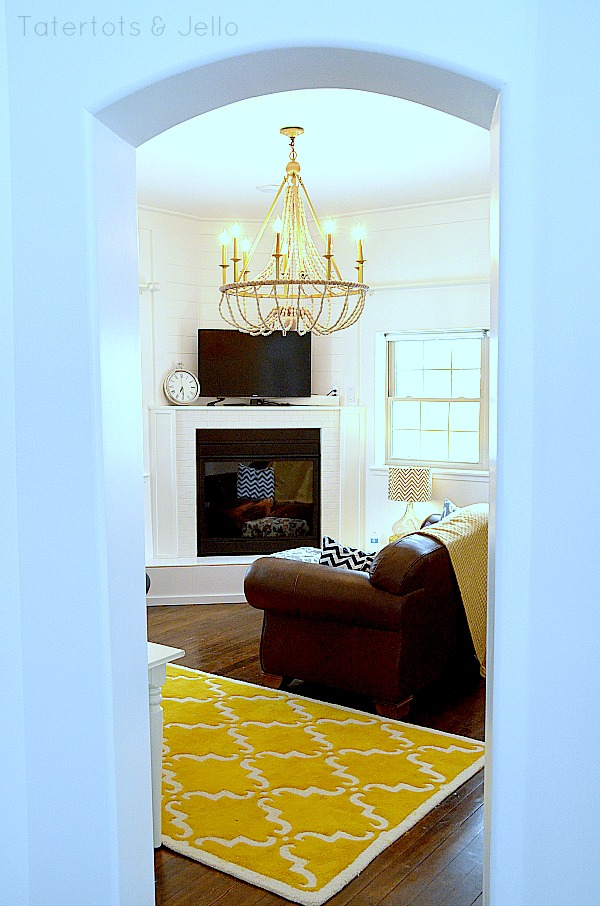
I really really love the way this chandelier is the focal point of the room. And I also love that it cost me a fraction of the original chandelier!!
Have you ever made a DIY light fixture?
Share your ideas in the comments!!
Here are a couple other light fixtures I’ve made:

16 Beaded Chandelier Tutorials
Have a Creative Day!!
xoxo


You did an amazing job! I love it so much more that the inspiration piece – I probably will never tackle a job like this but I did make a light for my breakfast nook – It is made of 2 fruit baskets from Target – I am pretty pleased with how it turned out – I hung it up too – !
http://instagram.com/p/g7PO8lIz3G/?modal=true
(this may be a repeat
You did an amazing job! I like yours better than the inspiration piece. I probably will never tackle something like this, but just incredible! I did do a light fixture for my breakfast nook and I am pretty pleased with how it turned out – It is made of two fruit bowls from target and I cut out the bottom of the one and added an edison bulb – and hung it as well. Pretty proud of myself if I do say so myself 🙂
http://instagram.com/p/g7PO8lIz3G/?modal=true
I have that same overstock chandy and would NEVER have thought of this! brilliant. I still love mine as it is but maybe one day i’ll want a change and this tutorial will be perfect! thanks for sharing!
This post inspired me to redo this terrible frosted glass 80s suburban style fixture in my new house. All I had to do was take the glass off and attach two gold craft hoops to the gold fixture. Then I got about a dozen beaded gold and pearl necklaces from a wholesaler in my neighborhood. Using the shorter length of necklace to space out the hoops, I then laid longer strands over the hoops to give a nice layered effect. The whole thing took me around 1 hour and the effect is truly stunning. Looks like a $400-600 fixture and it only cost $60 in materials!
YAY!! Do you have a picture of it? I would love to see!!
xoxoxo
Moi » Awesome!
Love your office! Where did you get your rug?
Hi Alison!
I got the rug from rugsusa.com.
xoxo
So gorgeous! I love it! I also shared it on my blog today: http://www.vixenmade.com/2013/04/diy-home-projects.html
Thanks for sharing it!! I appreciate it so much!!
xoxox
You must have had a pre-wired spot for this. I have cathedral ceilings with no attic, obviously. How do you think the wood beaded one would look swagged? I don’t have a great visual imagination.
Janet
Hi Janet!
We wired it through the attic, but I have swagged the light fixture in my dining room and I think it looks great – here’s a picture of it — http://instagram.com/p/VNXDE4plOp/
xoxo
Wow! This is amazing! You did a great job 😉 I’d love to try this one day.
Jamie @ somuchbetterwithage.com
i love this! it’s so awesome!
Thanks my friend. I really do love it so much 🙂
xoxo
Where did you get the curtains?
Hi Laura!
The curtains are from zgallerie 🙂
xoxo
This is great I love it! I love the whole room actually. Where are your curtains from?
Hi! The curtains are from zgallerie 🙂
That was awesome work.How beautifully you created this chandelier .You have got such a innovative mind.After seeing this work i have became a huge fan of yours.
Thanks so much!! That really made my day!
xoxo
Nope, you don’t sleep! Love it and pinning to bhg 🙂 Nicely done!
Thanks Jessica!! That means so much to me 🙂
xoxoxo
I want to know where you got the rest of the items for your office. I love all of it!
Thanks Melissa!! I got the frames in my organizational wall from Cut It Out Frames, the table is from Ikea, I have a cart with my printer which is also from Ikea and my chairs are from Ikea too!
xoxo
Gorgeous! You are the chandelier beading queen!
haha!! I might have an obsession with chandeliers. They are so fun to bead!! Thanks for the comment, my friend!
xoxo
Sooooo fabulous Jen!! And what a great tutorial too! I love how it turned out!
Thanks Bev!! I am so excited to see you at SNAP!!
xoxo
Wow! Very impressive. Looks fabulous!
Ah thanks Erika!! I really do love it!!
oxxo
Beautiful and so creative!
Thanks so much Syndey!! I appreciate your comment so much!!
xoxo
This is OVER the top Gorgeous!!! I so want it and I so want to make one… This seriously looks like something out of a magazine.. The best part is you get to look at it and admire all your hard work.. Not to mention getting to say, ” I made that” when you get the wonderful question, “Where did you get it?” LOL!! You did an AMAZING job!! LOVE it!
xo
Thanks Angelina!! I agree — it’s so satisfying to create something that you love. I really do love it. And everything you make is amazing. It really means a lot to me that you love it!
xoxo
WOW! it is stunning!
Thanks so much!! It really was so much fun to make!!
xoxo
Wow, this is fantastic! Great job Jen!
Thanks so much Jenna! I really appreciate it!!
xoxo
that’s awesome! thanks for linking to other ideas too. great, unique statement fixture!
Thanks Paige!! Yes, there is so much talent around. I love sharing other people’s ideas too. I love seeing the creativity!
xoxo
REALLY beautiful. I think my favorite one of yours yet!
Thanks so much!! That really means so much to me!!
xoxo
Very unique! And looks fantastic!
Thanks Shelly!! It really was so much fun to make!
xox