Tatertots and Jello

COLORFUL HAPPY HOME -- Daily DIY, Decor, Craft and Recipe Tutorial

  • My Home
    • 1905 Cottage
    • Daybreak House
  • DIY
    • DIY Projects and Ideas
    • Organizing
    • Tutorials
    • Printables
  • Decor
    • Spring Projects
    • Summer Projects
    • Fall Projects
  • Crafts
    • Kids Crafts
    • Painting Projects
    • Paper Projects
    • Sewing
    • Wreaths
  • Holidays
    • Valentines Day
    • Easter
    • Halloween
    • Thanksgiving
    • Christmas
    • HAPPY Holidays Series!
  • Recipes

Explore

  • my home
  • diy
  • decor
  • crafts
  • holiday
  • printables
  • recipes

Connect

Home » christmas » Guest Project — make Glittered Burlap Paper Mache Letters!!

christmas, guest tutorials, holiday, paper craft · December 16, 2010

Guest Project — make Glittered Burlap Paper Mache Letters!!

Tatertots & Jello is a participant in the Amazon Services LLC Associates Program, an affiliate advertising program designed to provide a means for sites to earn advertising fees by advertising and linking to amazon.com.
Hello to all the Tatertots and Jello readers!
I’m Allison from
The Soladay Family
I am so excited to share an easy project with you today!
Easy = doable in my book.

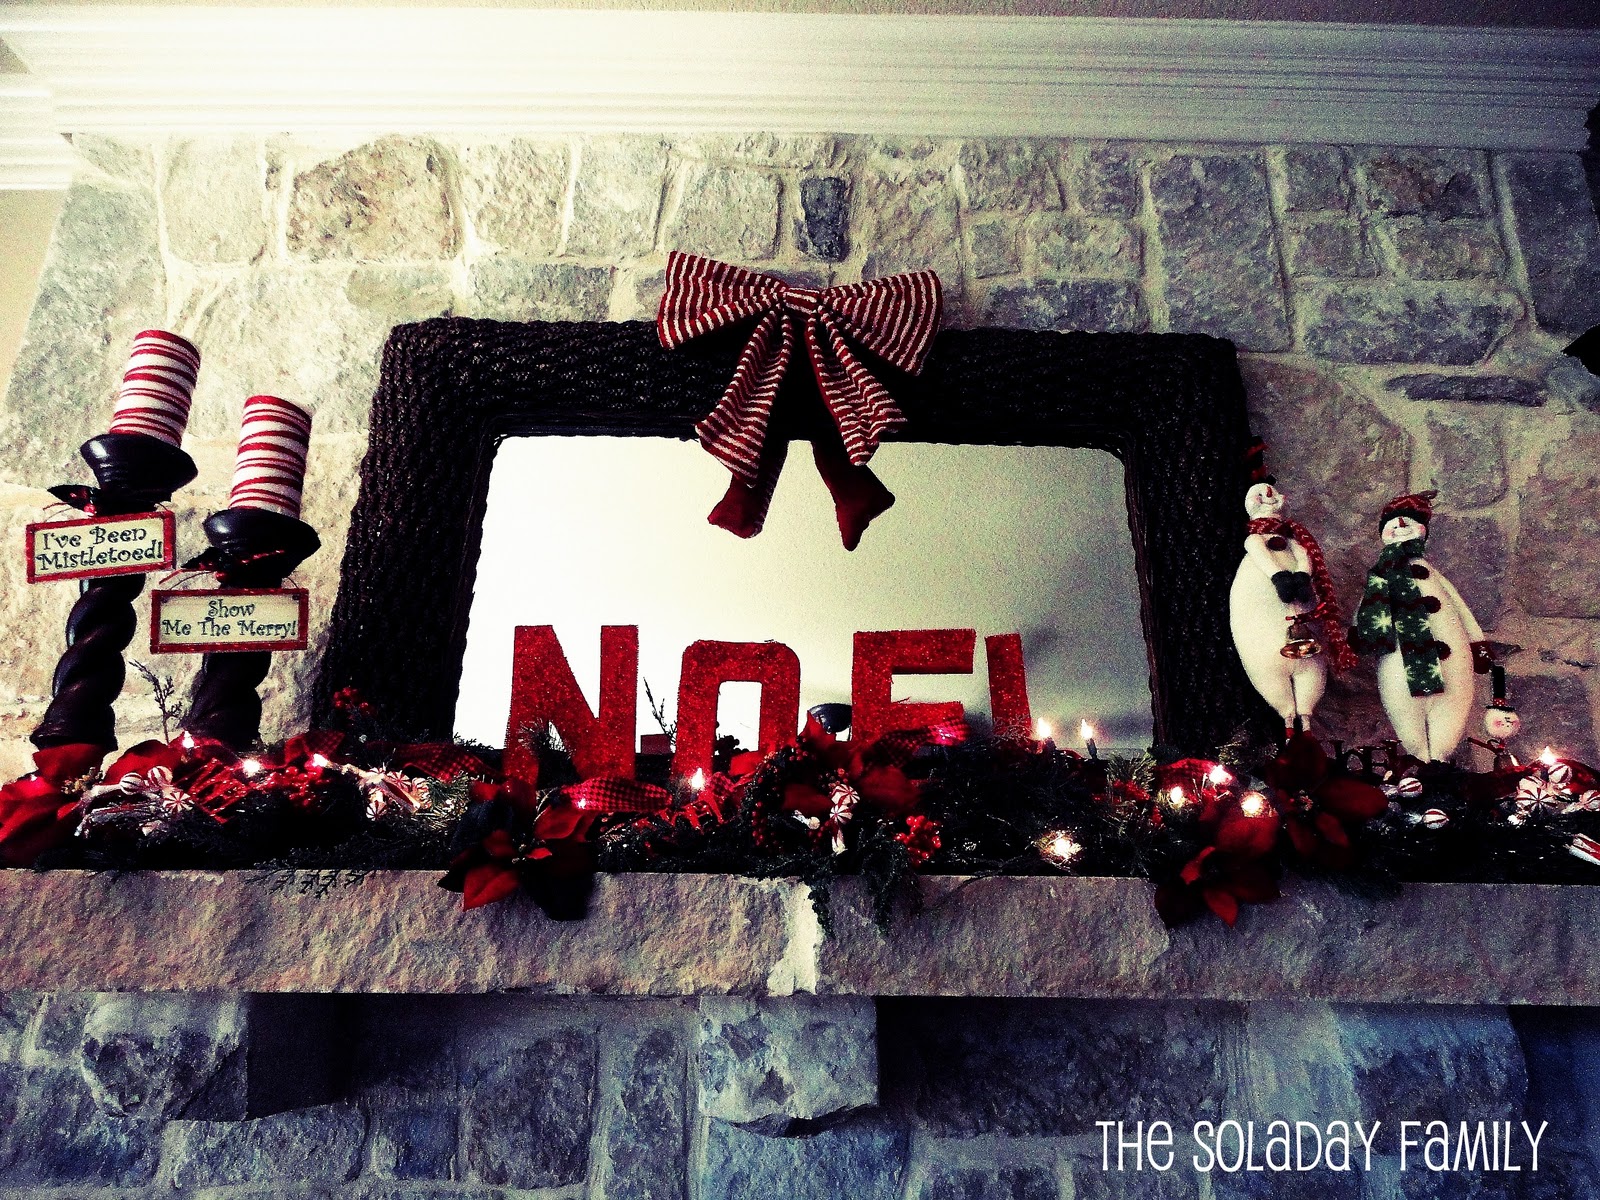
I am constantly decorating and redecorating our mantle…especially during the holidays.
You can see our Halloween mantle here.
I start by clearing everything off…minus the mirror…laying out my decorations and going for it.
I always have a general idea in mind of what I want the finished product to look like,
but it never looks exactly like my original vision.
If you are a follower of my blog, then you know I love to decorate with words,
so I decided to incorporate this love into our Christmas decor.
This is where this project came to life.
Here’s what you’ll need:
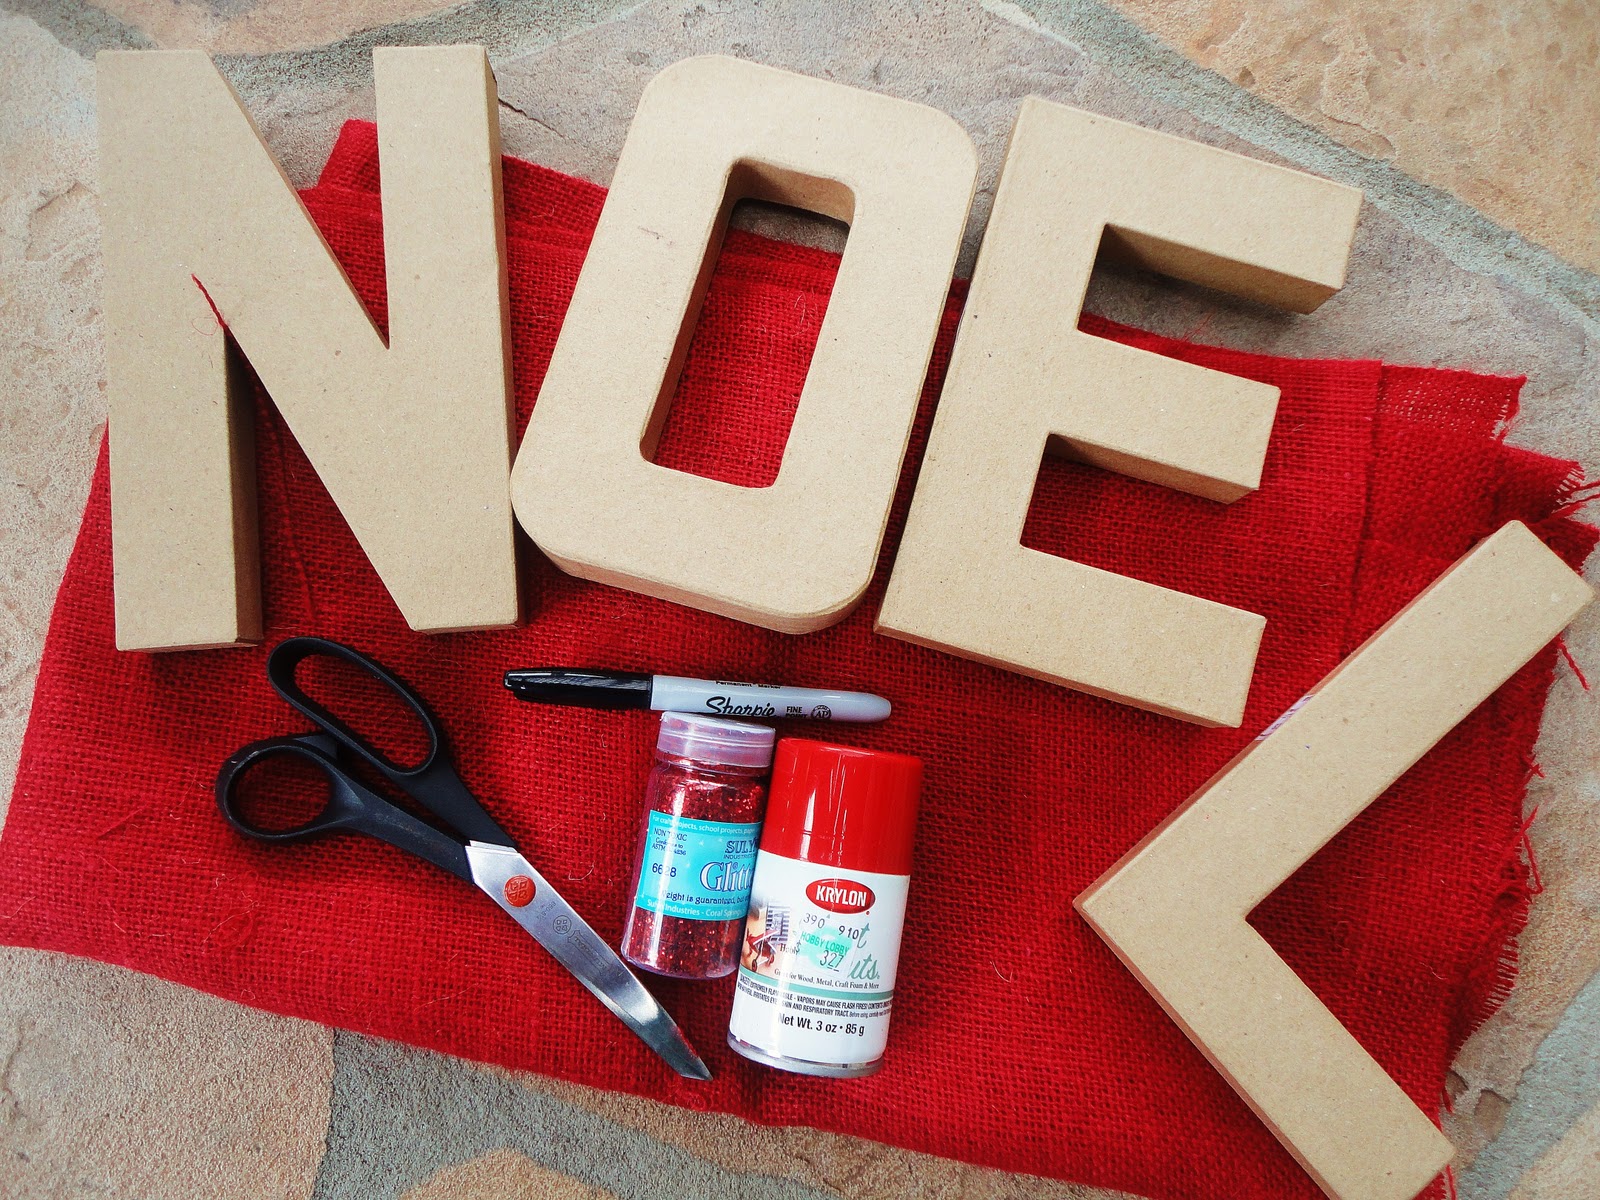
* Paper mache letters spelling your desired word…in my case NOEL.
* Enough burlap fabric to cover the front of your letters…in my case 1/2 a yard of red burlap was plenty.
* Black Sharpie
* Red glitter
* Red spray paint
* Sewing scissors…I found through trial and error, that they work better than regular scissors.
* Spray adhesive (not pictured)
* Clear top coat (also not pictured
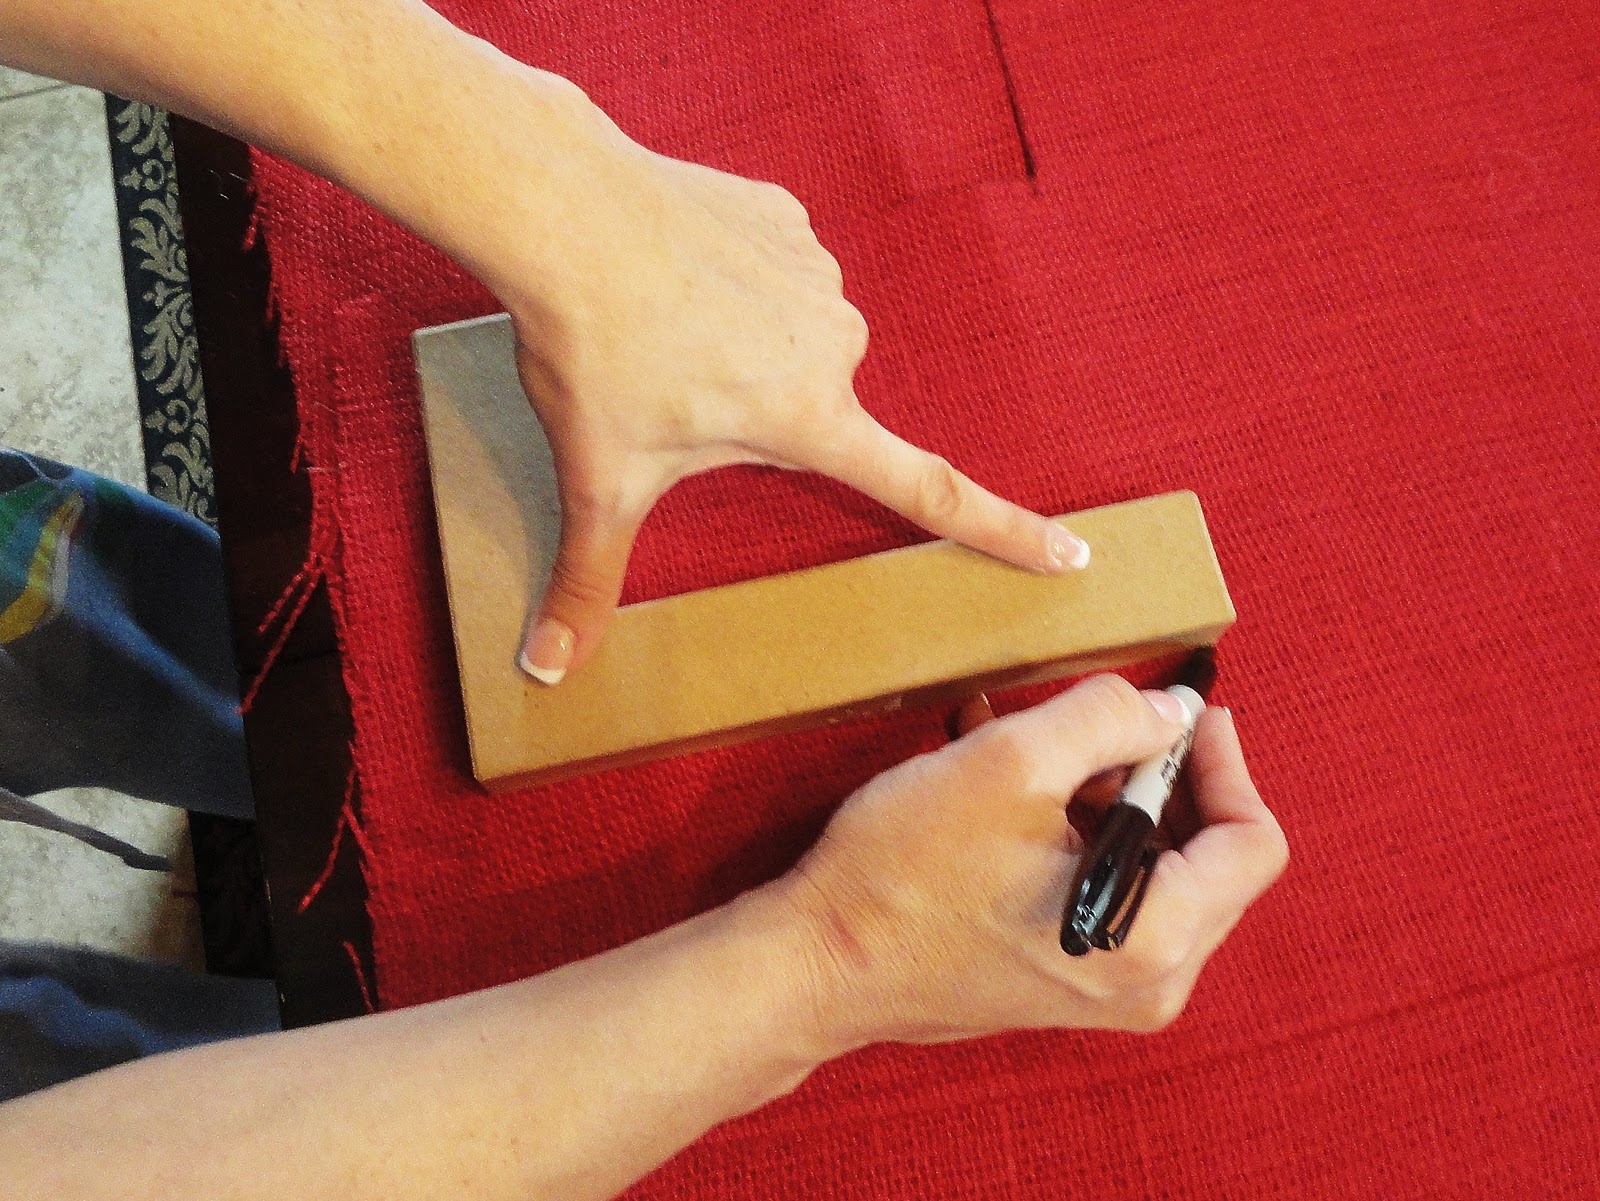
1. The first step in this project is to trace the letters onto the burlap.
I found the best way to do this is to place the letters face down
so when you cut them out, you won’t see the sharpie like this:
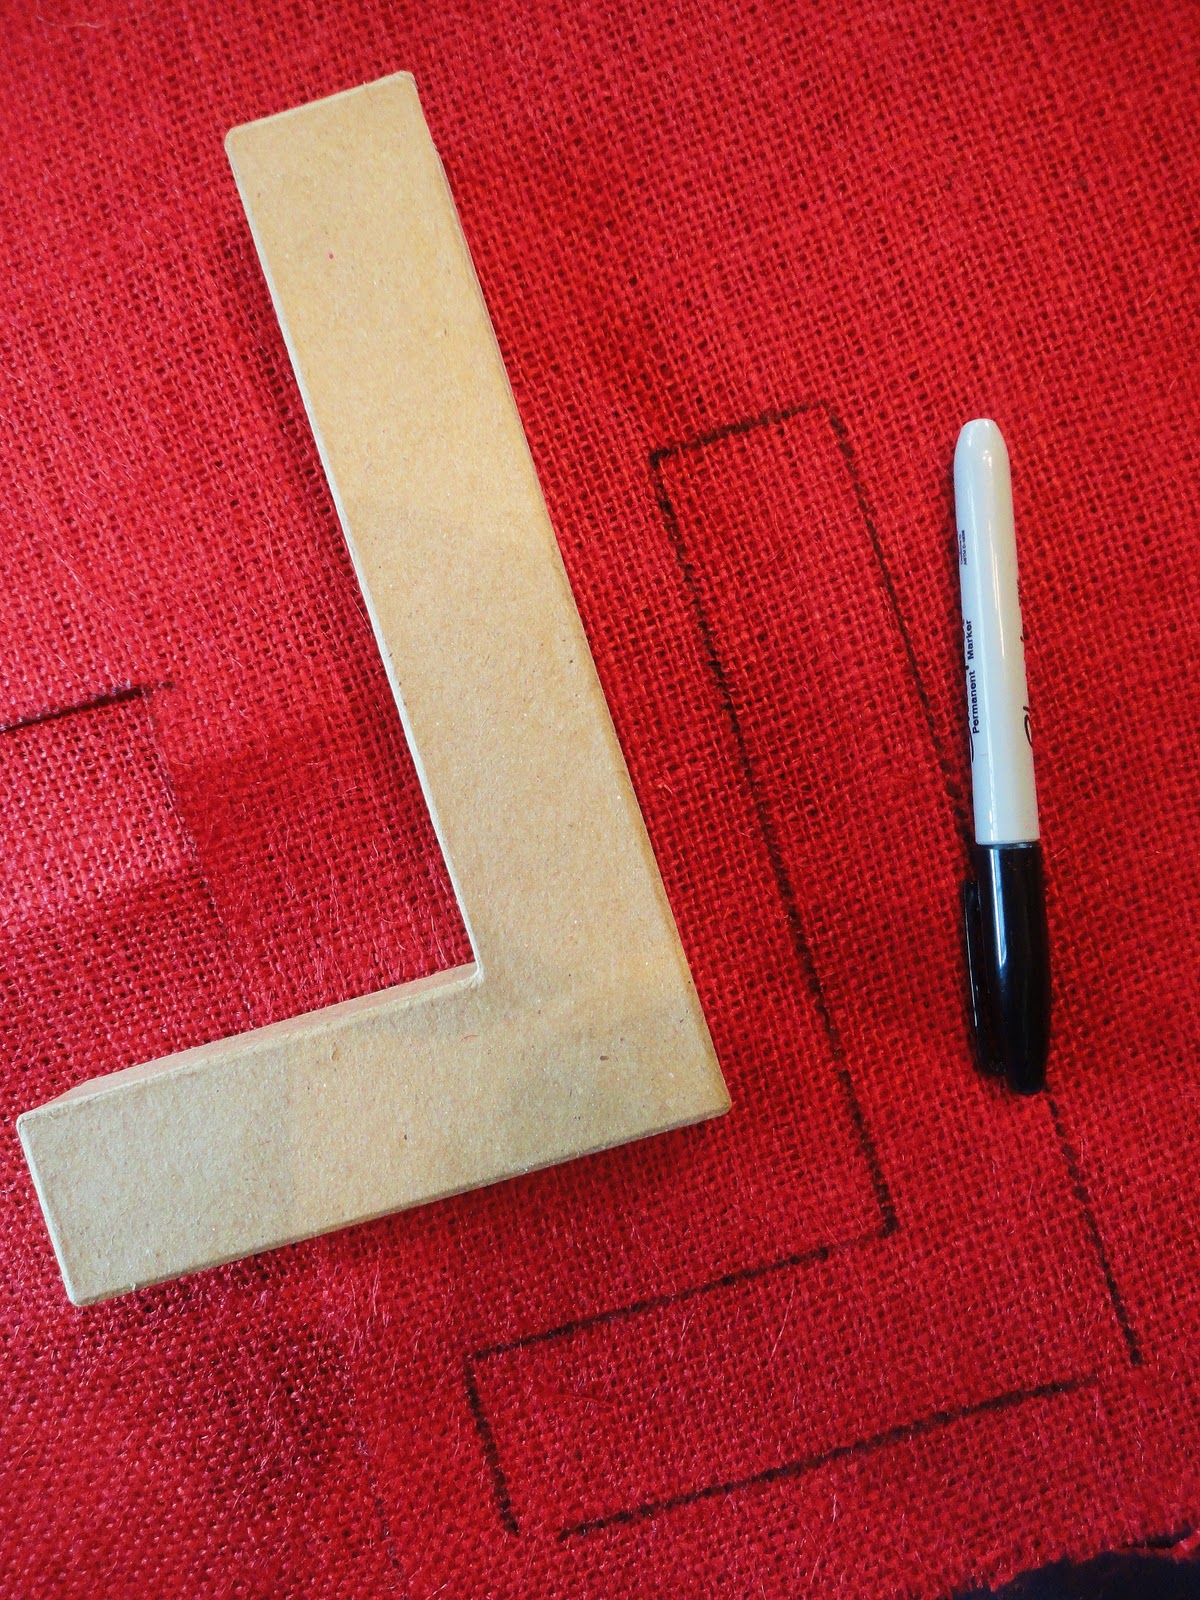
2. The next step is to cut out all the letters:
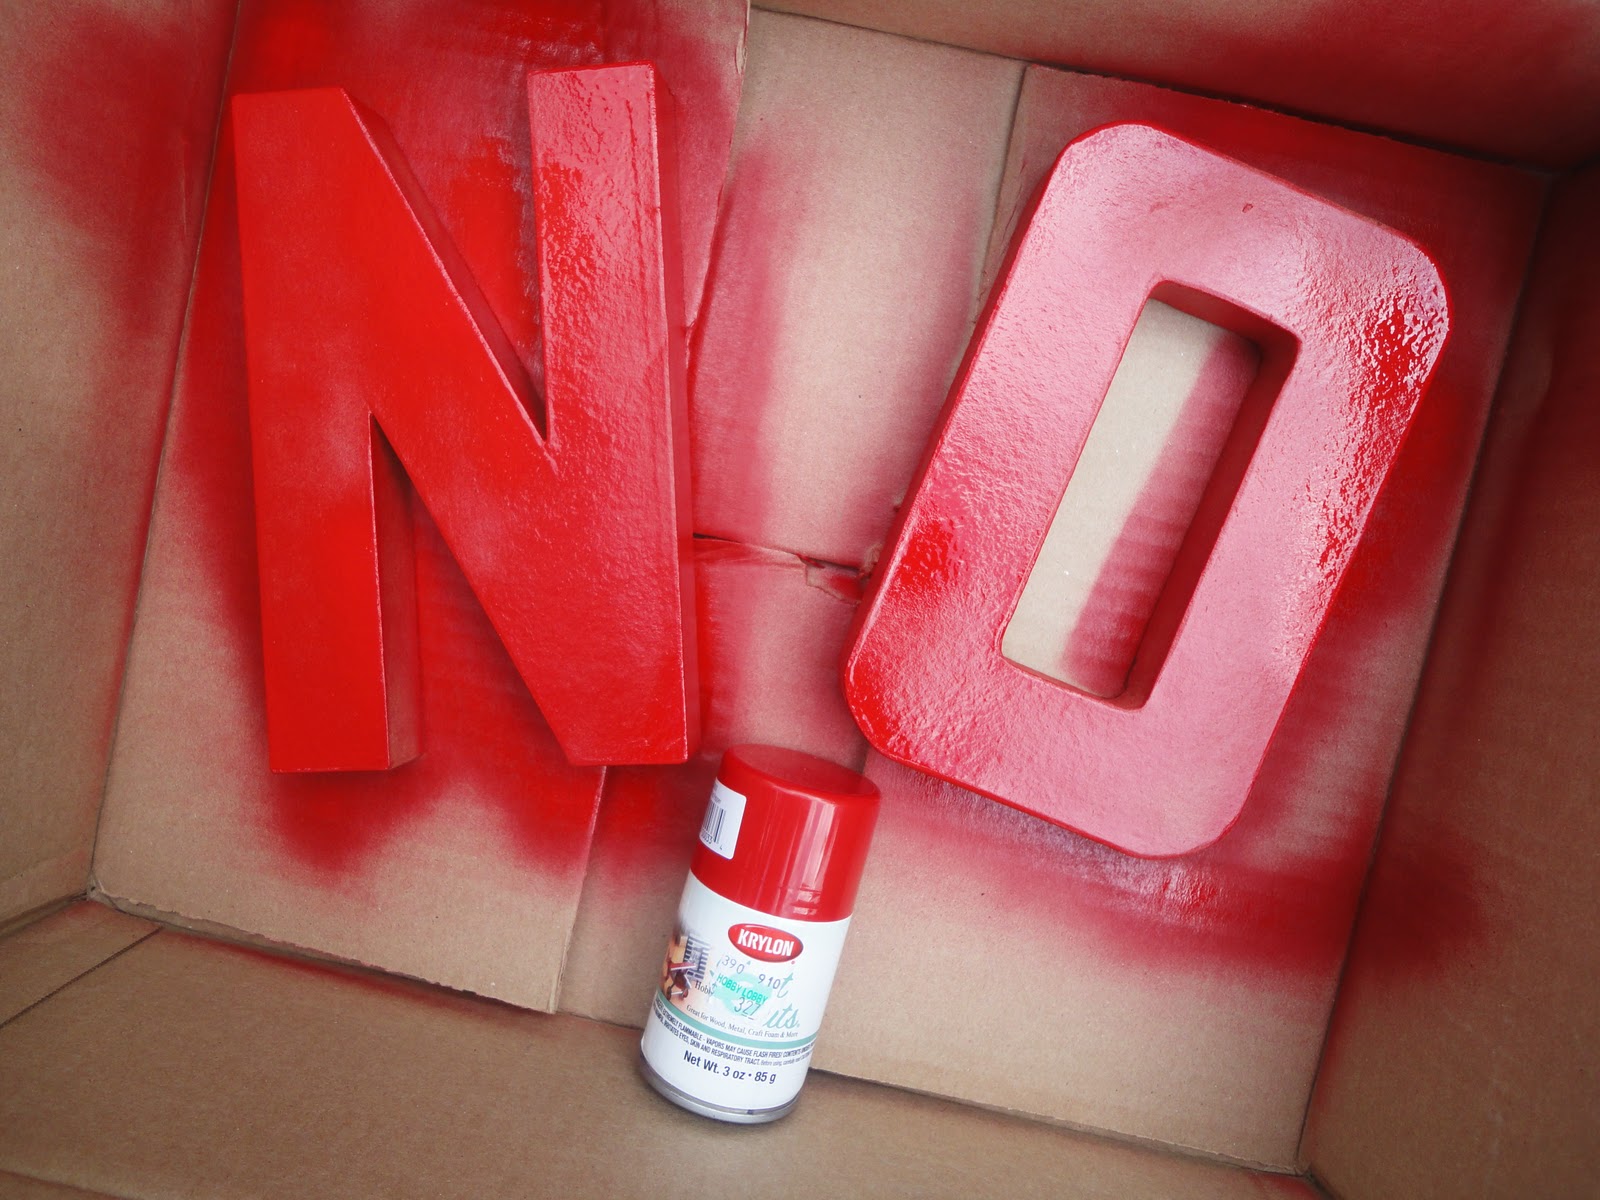
3. Now spray all sides of the letters red:
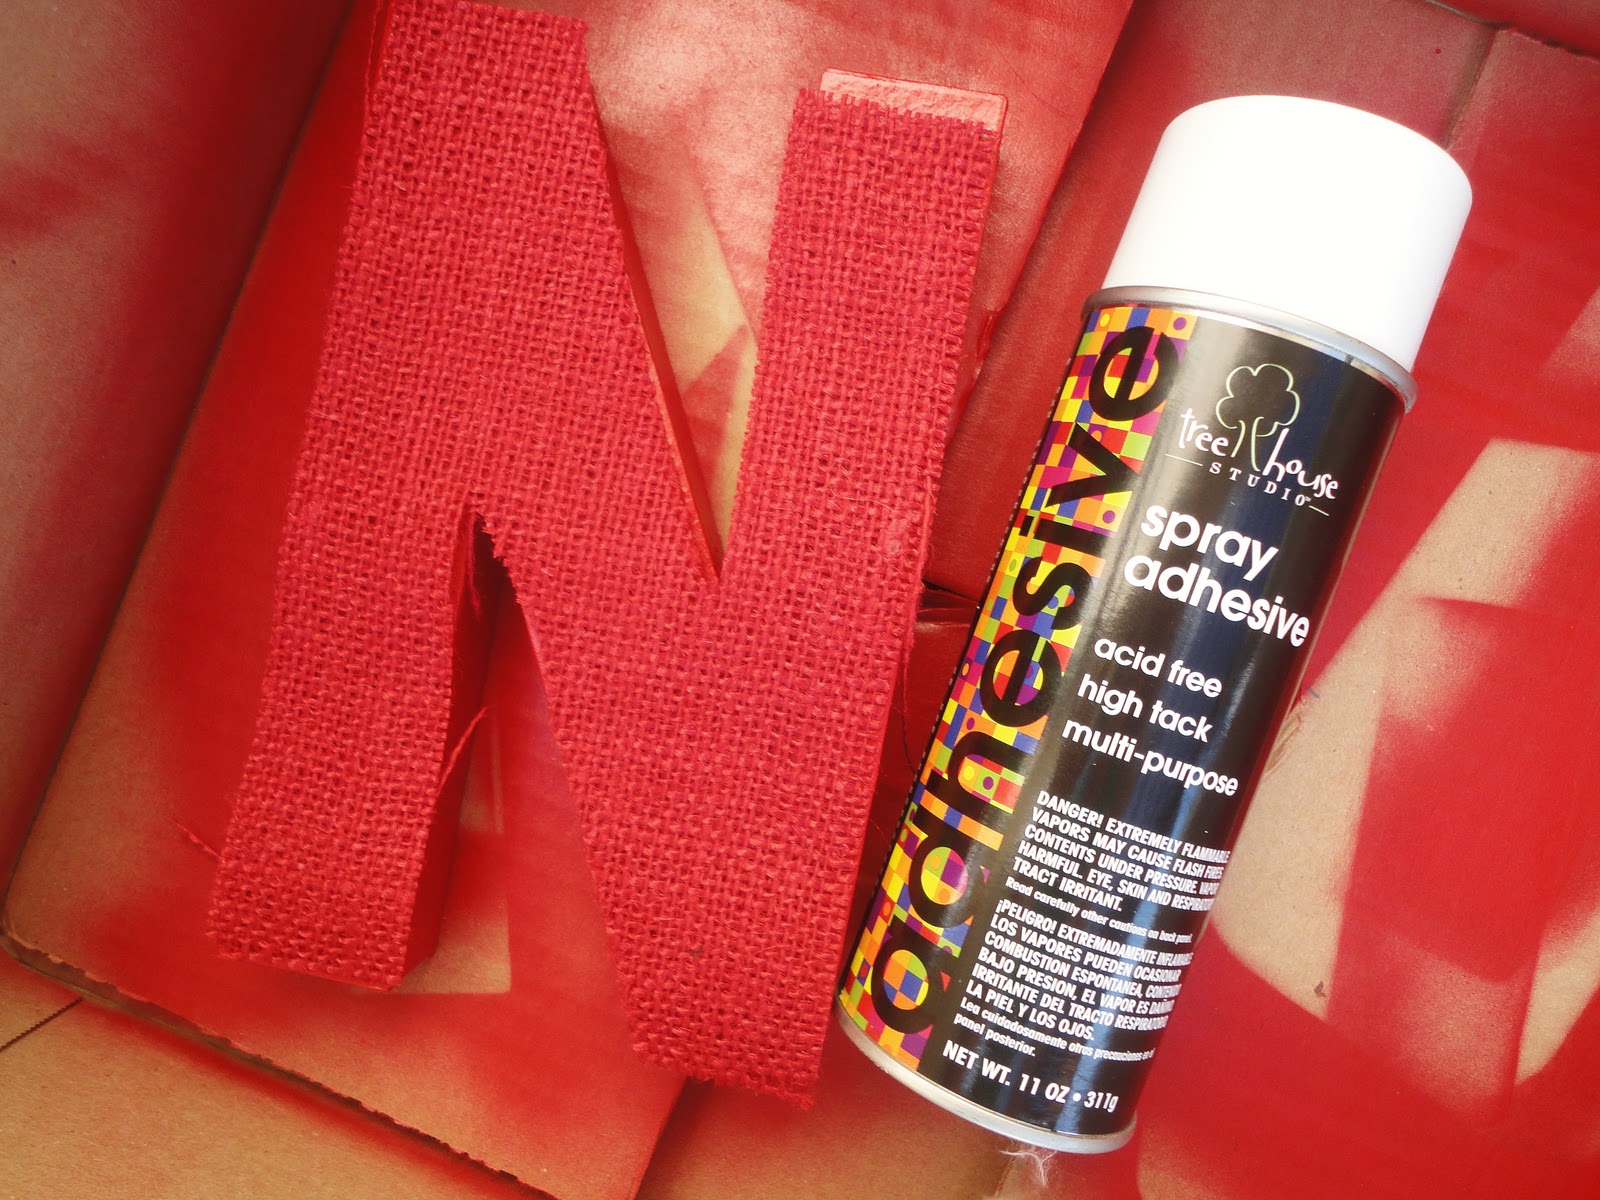
4. Once the letters have completely dried, coat just the front
of the letters with a generous amount of spray adhesive, and adhere the burlap to the letters:
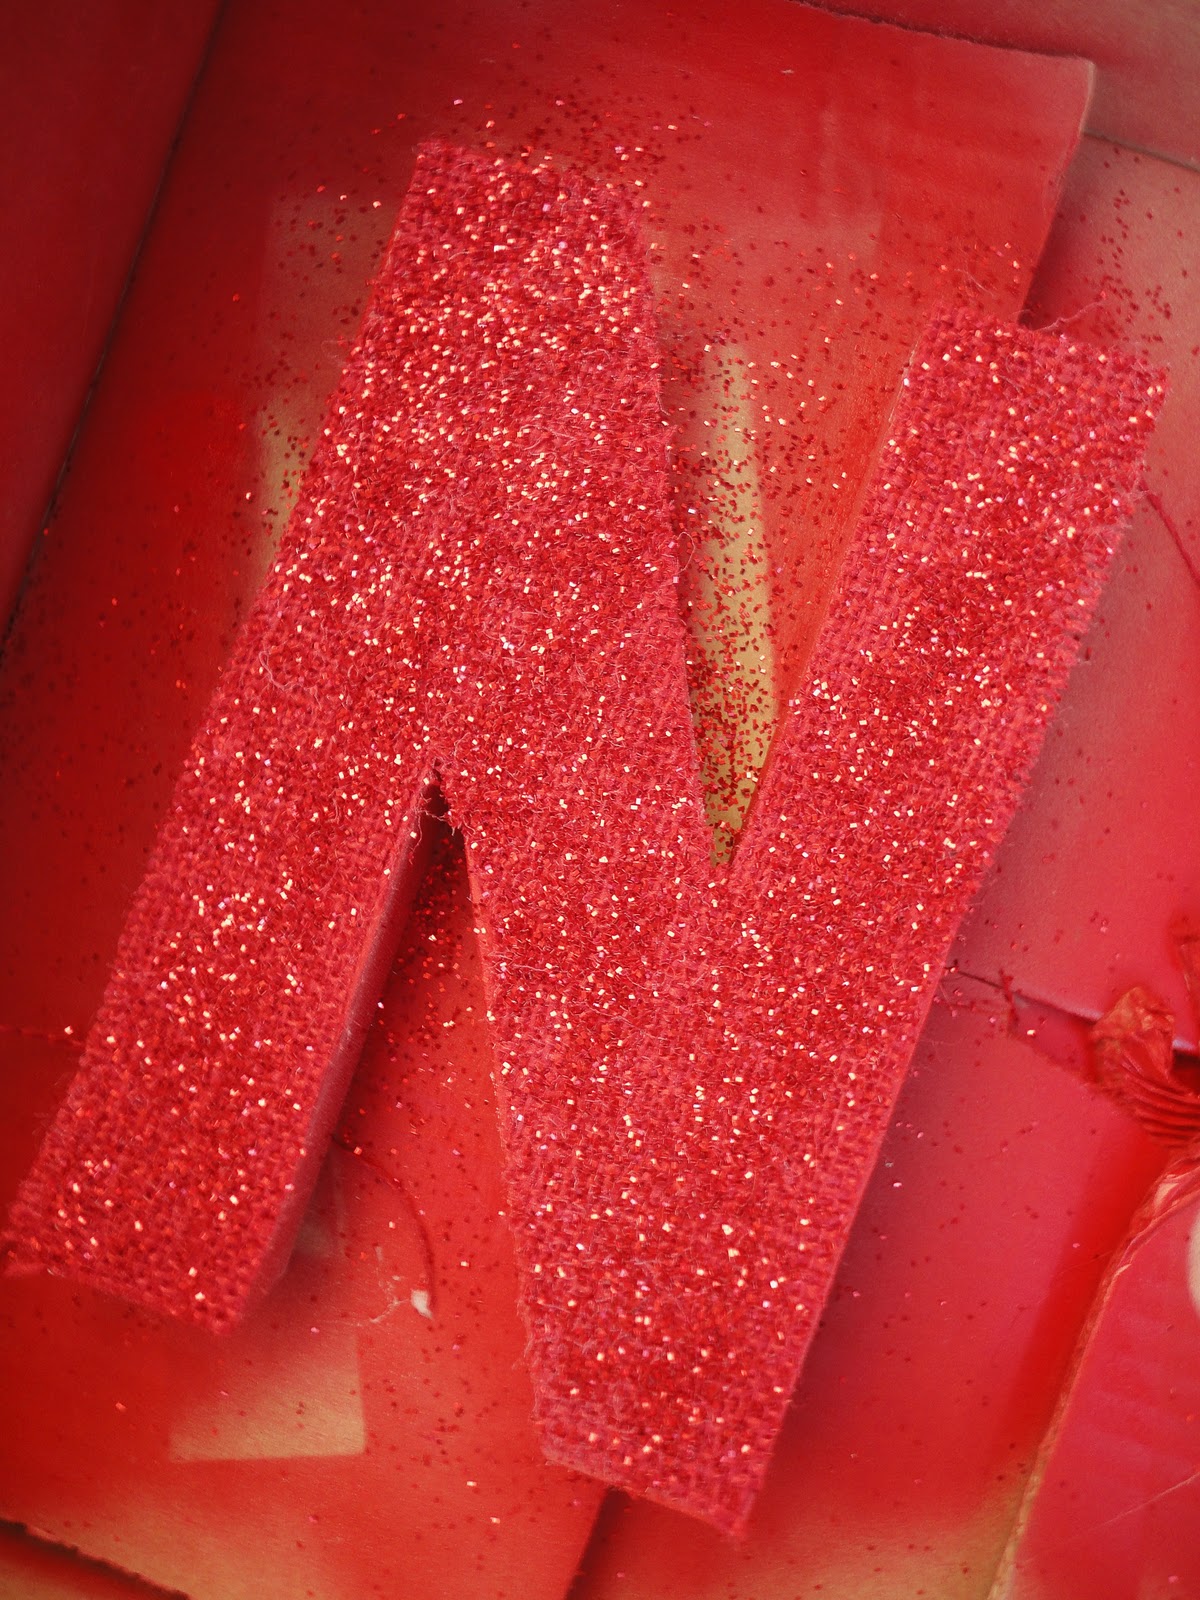
5. Next, spray the burlap with a generous amount of spray adhesive,
and coat it with the glitter.
Don’t be afraid to overdo it, friends.
You can never have too much glitter!
Once you are satisfied with your bling,
spray the front of the letters with a clear top coat,
available in the spray paint section, to keep the glitter in place.
On a side note, keep this clear coat stuff in your craft room 24/7.
I use it all the time.
For instance, I sprayed my monogrammed, polka dot painted pumpkins with it in early September,
and the paint lasted outdoors in the elements for over 2 months.
6. After the letters are dry, let the fun begin!
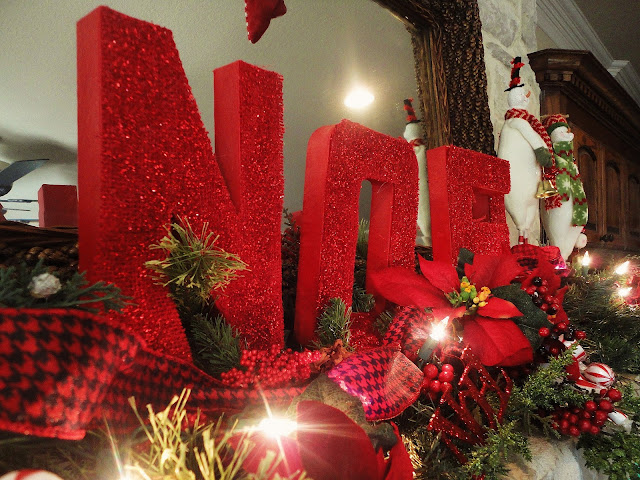
I decided to use mine on our mantle.
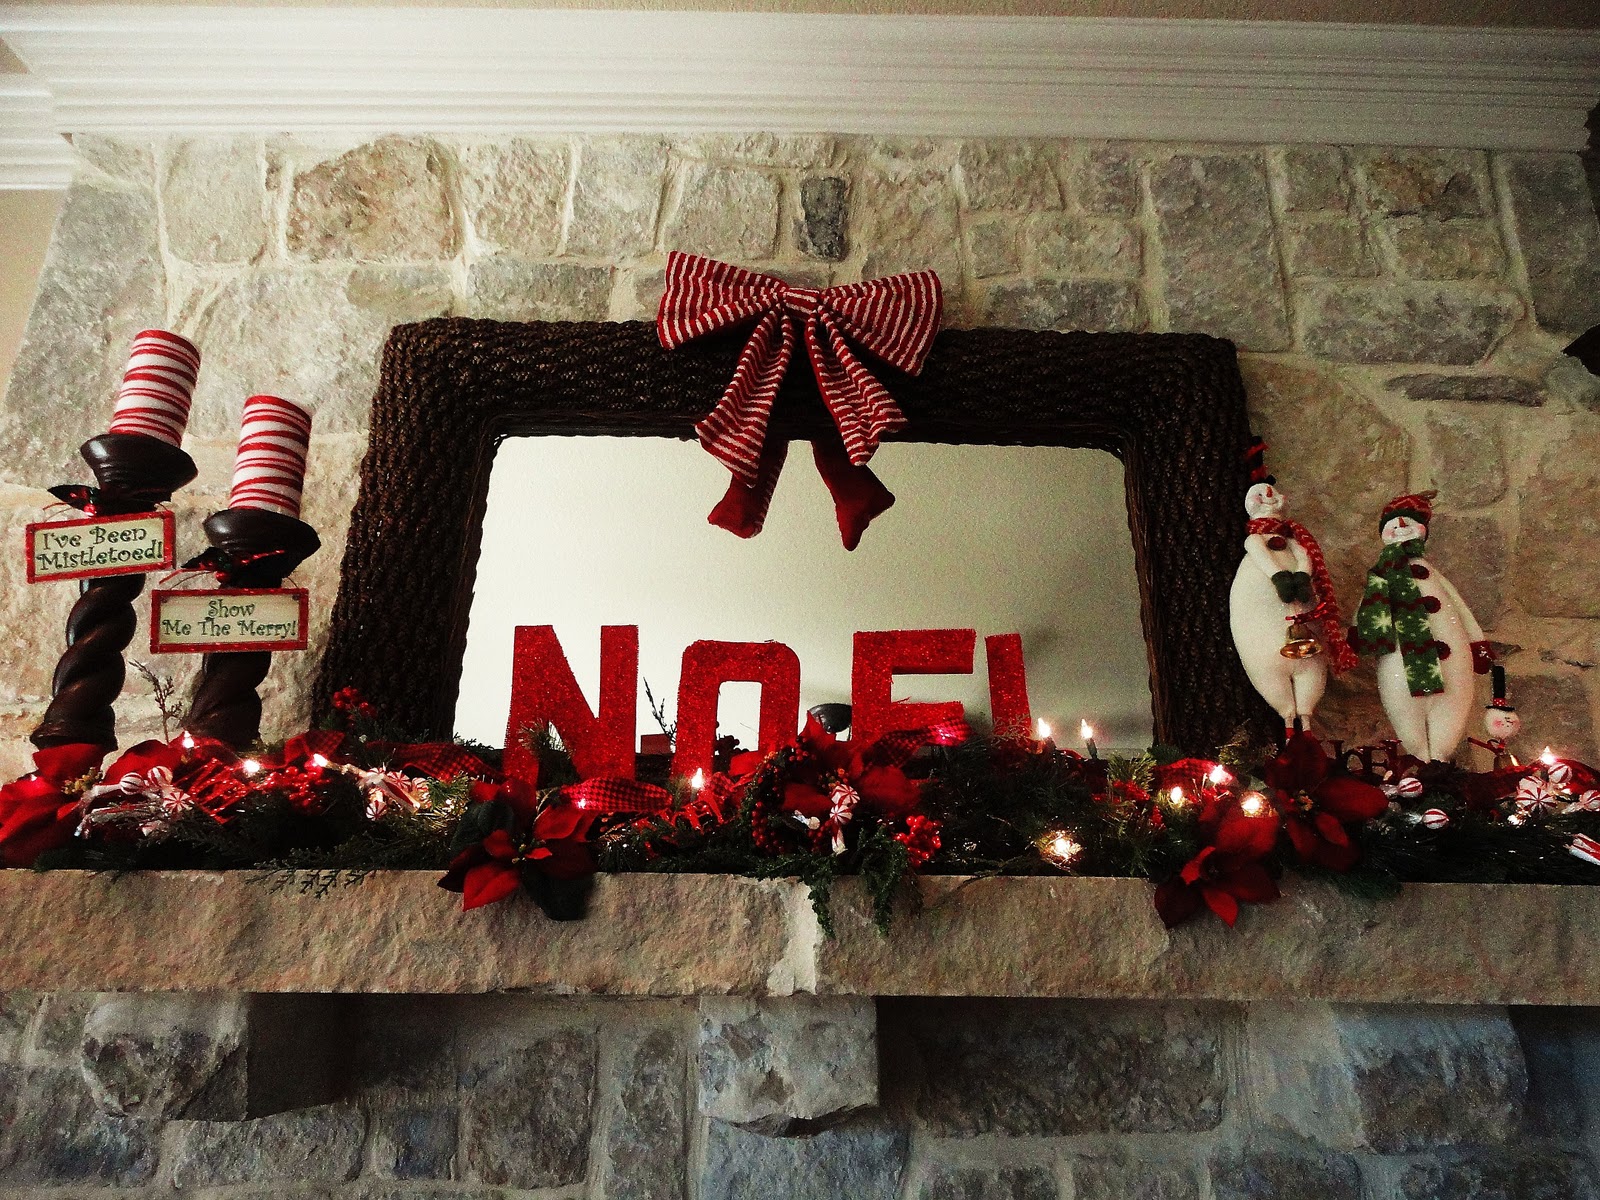
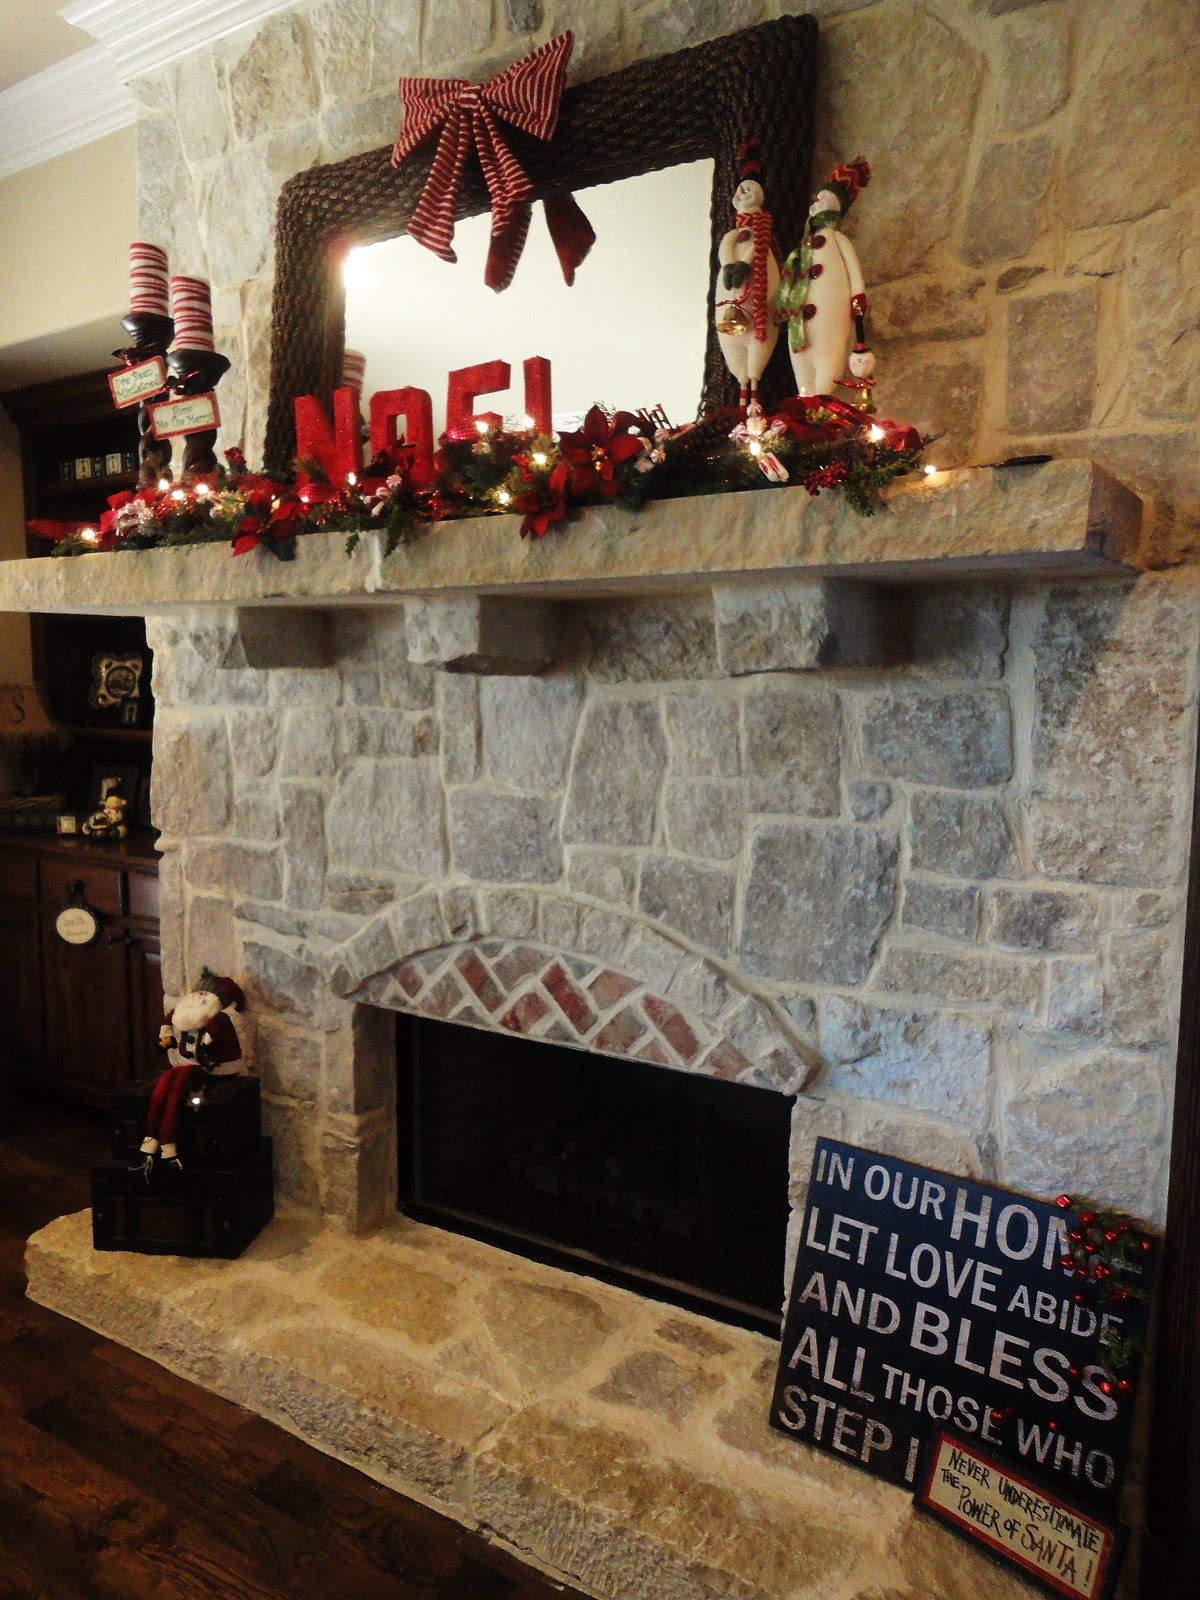
 They really sparkle!
And I love the way they look with everything else the mantle.
I can see these letters done in traditional burlap with
silver glitter in a natural holiday decor setting, used in a tablescape,
one large letter hung over the mantle
or on the front door from a ribbon or a strip of burlap,
the numbers “25” for the Christmas holiday,
the numbers “2011” for a New Year’s celebration.
The possibilities are endless and can extend way beyond the holidays!
Thank you so much for having me as a guest!
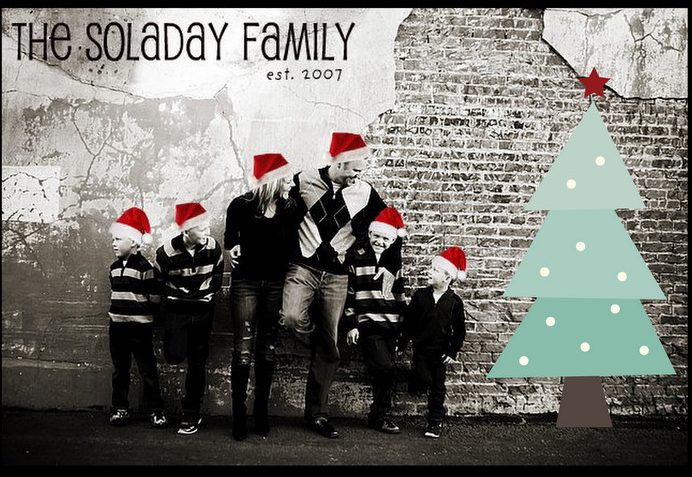
Happy holidays from The Soladay Family!
Thanks Allison!! 
That Sparkly NOEL is awesome! And your mantel is beautiful!!
I think Allison is just amazing! Here are some of my favorite projects she has shared:
{Magnetic Chalkboard Teacher Gifts}
{Thankful Tree}
{Mirror turned Chalkboard}
Such great ideas! Be sure to check out  The Soladay Family!!!
xoxo

Posted By: Jen · In: christmas, guest tutorials, holiday, paper craft

Christmas Cookie Exchange, a Party Craft Idea and some winners!
Guest Post – Make Drop Cloth Elf Stockings!!

You’ll Also Love

Welcome Home Saturday – Christmas Ideas!
mother's day brunch ideasGreat Ideas — 20 Homemade Mother’s Day Brunch Ideas!
12 Weight Watchers Holiday Recipes @ Tatertots & Jello12 Weight Watchers Holiday Recipes!

Comments

  1. Anna says

    December 23, 2010 at 10:59 PM

    You could do the same to a V, trade out the N and have LOVE for Valentines day with minimal effort… I think I'll give this a try!

  2. Vivienne says

    December 20, 2010 at 3:14 AM

    Adorable! I love their family portraits too!

  3. starnes family says

    December 18, 2010 at 1:50 AM

    Love this, Allison! I figured you bought the letters. Even better to make them yourself! Would never think to use burlap + glitter.

    Love it.

  4. Kendra says

    December 17, 2010 at 6:32 AM

    I love glitter and burlap! This is such a cute project! Dissapointed I didn't make it to Pier 1 Imports yesterday to meet you! I'm sure it would have been awesome! 🙂

    happy holidays!

  5. Elz says

    December 17, 2010 at 5:08 AM

    Glitter & Burlap? YES! What a great idea- LOVE for Valentine's Day or a wedding, Joy, Celebrate, etc for a party, surprise…the list goes on and on.

  6. Sue (Someone's Mom) says

    December 16, 2010 at 10:20 PM

    What a great idea and the mantel looks wonderful! This idea can be used for many different things!

  7. MamaMimi says

    December 16, 2010 at 8:16 PM

    Oh my gosh…that's SUCH A cute idea!!! Thanks for sharing!

  8. The Blonde Duck says

    December 16, 2010 at 8:03 PM

    How pretty!

  9. Lauren says

    December 16, 2010 at 7:48 PM

    beautiful! I love it! 🙂

    poppielane.blogspot.com

  10. The Soladay Family says

    December 16, 2010 at 6:38 PM

    Thank you so much for including my project! I love all the inspiration on your blog!

  11. Kassi @ Truly Lovely says

    December 16, 2010 at 6:09 PM

    Cute!! I really love the chalkboard ideas!!! I hope to get some chalkboard paint and try some of those soon!

  12. berg4 says

    December 16, 2010 at 6:05 PM

    Such sparkly letters! Great idea thanks for sharing

  13. Lindalou says

    December 16, 2010 at 5:15 PM

    These are so cool and actually very doable. I think they would be awesome in silver or gold too,

  14. Kerri says

    December 16, 2010 at 5:07 PM

    What a great tutorial! I love decorating with big letters and words as well – it's so whimsical and makes a great statement. Thanks for sharing.

  15. MiMi says

    December 16, 2010 at 4:43 PM

    Oh my goodness!! That's adorable! Red burlap?! YES PLEASE!!!

  16. vintage vine says

    December 16, 2010 at 4:42 PM

    Awesome job on this project!!!!

  17. Kelli @ RTSM says

    December 16, 2010 at 4:40 PM

    This is such a cute idea! I love the glitter and burlap together:) I have been glittering a few things at my house today too!

  18. Takin' time to smell the flowers! says

    December 16, 2010 at 4:20 PM

    Cute project! & I love the family pic's too. Merry Christmas♥

Hi! I'm Jen Hadfield. I'm a mom of 5 restoring an 1891 home in the heart of Salt Lake City. I love being creative and sharing simple ideas to make your life easier and more beautiful!

Receive the Latest Crafts, DIY, Recipes and More in your INBOX!

Follow us on Pinterest! It's awesome!

Top Posts & Pages

Spruce up Your Outdoor Space with a DIY Recirculating Fountain! (tutorial)
A New Deck in Under 30 Minutes!
Copycat Panera Spinach and Artichoke Egg Soufflés - SO good!
DIY Secret: How to Print on Post-It Notes (and Free Printable Template)
12 Must-Have Items to Pack on an Alaskan Cruise!
Mother's Day Cup Holder Gift Basket


Popular Posts

  • Spruce up Your Outdoor Space with a DIY Recirculating Fountain! (tutorial)
    Spruce up Your Outdoor Space with a DIY Recirculating Fountain! (tutorial)
  • A New Deck in Under 30 Minutes!
    A New Deck in Under 30 Minutes!
  • Copycat Panera Spinach and Artichoke Egg Soufflés - SO good!
    Copycat Panera Spinach and Artichoke Egg Soufflés - SO good!
  • DIY Secret: How to Print on Post-It Notes (and Free Printable Template)
    DIY Secret: How to Print on Post-It Notes (and Free Printable Template)
  • 12 Must-Have Items to Pack on an Alaskan Cruise!
    12 Must-Have Items to Pack on an Alaskan Cruise!
  • Mother's Day Cup Holder Gift Basket
    Mother's Day Cup Holder Gift Basket
  • The BEST Fresh Strawberry Cream Cheese Cake Recipe!
    The BEST Fresh Strawberry Cream Cheese Cake Recipe!

As seen in


Amazon Affiliate

Tatertots & Jello is a participant in the Amazon Services LLC Associates Program, an affiliate advertising program designed to provide a means for sites to earn advertising fees by advertising and linking to amazon.com.
  • About Me
  • Advertising
  • Get Featured

Copyright © 2025 Tatertots and Jello · Privacy
This site is a place for positive discussion and ideas. Negative talk, comments that disparage others, and similar are not welcome and may be removed.