Hey there! I’m Talitha and I blog over at Love, Pomegranate House! Christmas is my favorite holiday! I love all the movies, music, and lights. Oh and let’s not forget the treats. The food may be the best part of the season. I mean, yes, family and closeness and blah blah blah. But treats. I am thrilled to be here today sharing an awesome recipe for these adorable Cream Cheese Mints. It is perfect for the holidays, either to hoard and eat at home or to share with neighbors and friends.

Lucky for all of us, this recipe makes plenty (about 250 mints) so you have enough to give away and still have some left over to eat yourself… while hiding in a closet so no one knows how many you ate.
Ingredients:
- 1 (8oz) brick of cream cheese; room temperature
- 2 tbsp butter; room temperature
- 1 tsp peppermint extract
- 4 1/2 – 5 cups powdered sugar
- food coloring


Directions:
- Line a large baking sheet with wax paper. (Do as I say, not as I did… my bad.) Set aside.
- Using a stand mixer or a hand mixer, combine cream cheese and butter. Once well combined, add in peppermint extract.
- Slowly add powdered sugar 1/2 cup at a time until thick. The mixture should be stiff enough to hold a peak and not wilt when the mixer is off. This is normally in the 4 1/2 to 5 cups of powdered sugar range.
- Add food coloring to cream cheese mixture until desired color is reached. If doing multiple colors, divide cream cheese and then dye. (My mints required 1 drop of red and 3 drops of green.)
- Put cream cheese mixture into a piping bag fitted with a medium star tip and drop nickel sized amounts on lined baking sheet. (To make the “kiss” shape, hold tip 1/2-inch above the baking sheet, squeeze bag until circumference is about that of a nickel, and then pull up quickly.)
- Place tray in freezer for 2 hours to allow the mints to firm up. Store in an airtight container in the refrigerator.


I placed my mints in a mason jar to give to neighbors.

Tie off the jars with a little baker’s twine and these tags I whipped up and you are set to give them as a gift!

And because I like you all so much, you can download my tags HERE for free!
These mints are absolutely delicious and make the perfect gift for your neighbors! Plus, I mean, they are freaking adorable. Thank you so much for visiting with me and thanks, Jen, for having me here at TT&J! Make sure to come visit me at Love, Pomegranate House! Merry Christmas all! XOXO.
*********
Thanks Talitha! Those look so delicious and so easy too! Talitha has so many great ideas on her blog. Here are a few I think you’ll love:

Use her pretty Christmas Chalkboard Printables for your holiday decor.

And, she has some amazing DIY projects going on right now. This DIY Tufted Wingback Headboard is just beautiful!
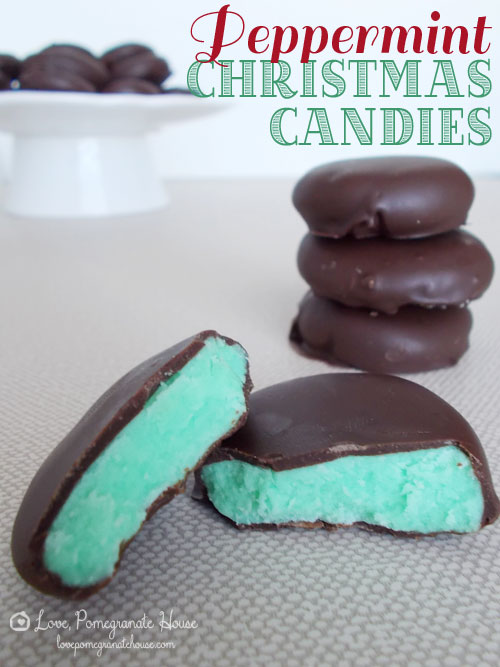
And, she also shares delicious recipes like these Peppermint Christmas Candies! They would be so perfect for neighbor gifts!
Visit Love, Pomegranate House and

- 1 (8oz) brick of cream cheese; room temperature
- 2 tbsp butter; room temperature
- 1 tsp peppermint extract
- 4 1/2 – 5 cups powdered sugar
- food coloring
- Line a large baking sheet with wax paper. (Do as I say, not as I did… my bad.) Set aside.
- Using a stand mixer or a hand mixer, combine cream cheese and butter. Once well combined, add in peppermint extract.
- Slowly add powdered sugar 1/2 cup at a time until thick. The mixture should be stiff enough to hold a peak and not wilt when the mixer is off. This is normally in the 4 1/2 to 5 cups of powdered sugar range.
- Add food coloring to cream cheese mixture until desired color is reached. If doing multiple colors, divide cream cheese and then dye. (My mints required 1 drop of red and 3 drops of green.)
- Put cream cheese mixture into a piping bag fitted with a medium star tip and drop nickel sized amounts on lined baking sheet. (To make the “kiss” shape, hold tip 1/2-inch above the baking sheet, squeeze bag until circumference is about that of a nickel, and then pull up quickly.)
- Place tray in freezer for 2 hours to allow the mints to firm up. Store in an airtight container in the refrigerator.


Hi!
Because of butter as ingredient, how long can we keep in room Temp
Thanks Ylli
Hi! You can keep these mints out in a covered container for one week at room temperature 🙂
nope! sat in the freezer for 3 hours and never firmed up. just became a lumpy sticky mess in the container. cute idea, but doesnt look like anyone has been able to get them dry enough to do anything with. its just cream cheese icing recipe so i can reuse for cupcakes anyway.
I’m having trouble getting my mints to harden and I need them for graduation party this Sunday, can you help me please? Flavor is wonderful! Thx and please HELP
Made these last night. Put in freezer for two hours, then let sit out over night. Still soft when picked up. Please advise. Thanks.
What would be the difference in flavor between using peppermint or mint extract? Which do most prefer? I have seen several recipes using one or the other. Thanks for the help!!
I have to say they are pretty tasty! Thanks for the recipe! I just made them as a treat for a few people on my list! My red however came out a bit on the dark pink side and my green looks dark. I will need to adjust my color drops next time along with the size I piped on the wax paper. As the mints aren’t quite uniformed! But the nonetheless I’m proud of myself in the ease of learning how to pipe for the first time and not screwing it up! 🙂 I ended using my medium size baking pans and filled 2 plus a smaller pan and paper plate :o. I had run of pans plus the size of my mints were maybe a size of a dime.
try the recipe without the butter to see if they do better. Go to: realwomen.phillycanada.com
and search for cream cheese mints – this recipe does not use butter nor does it say to put in the freezer
Although, I havent made them yet but will attempt this weekend.
You can also present your web link on numerous
short article directory sites. A superior landing page on a website can helps to gain the
trust of clients and keep them coming back again and again on your page.
And don’t stop with the domain name; include your keywords in your file names as
well. How can you apply SEO to your graphics-intensive website.
For example, a sub-page of this hypothetical site might be.
An app version is also downloadable which makes it easier for you to read, organize,
and share the topics that interest you.
Please tell me how to get them dry enough to put in jars for gifts! I’ve tried twice, they’re very firm but when I take them out of the freezer, they stick to my fingers!
Thanks!
This recipe is delicious! However, mine never hardened. How do you get them hardened so they are packageable.
I may*** have piped some directly into my mouth!!! AMAZING!!!
Do these have to stay refrigerated forever till eaten? I want to use as neighbor gift but need to beable to say keep refrigerated or not
Thank you! I can’t wait to try these!
I .adequate these yesterday and I’m wondering if they ever get hard? Mine after hours and hours in yhe freezer are pretty and perfectly shaped but as soon as they sit on the counter for a few mins soften right up. They still keep their shape but when you try to pick them up they are soft.
Should i have added more icing sugar?;I added 5 cups
hi I was just wondering if you could make these ahead and freeze them?
Thanks
How long can they can they be stored in the fridge? They look yummy!
These look ah-mazing! Almost too cute to eat (almost…). Love them in the jar!
Happy beginning of non stop baking season!!!
Has anyone received a reply regarding posted comments???