
I can’t even put into words HOW EXCITED I am to be here today
sharing with you the first Halloween Project that I’ve done this year…
Thank Y♥U Jen for having me.
…….
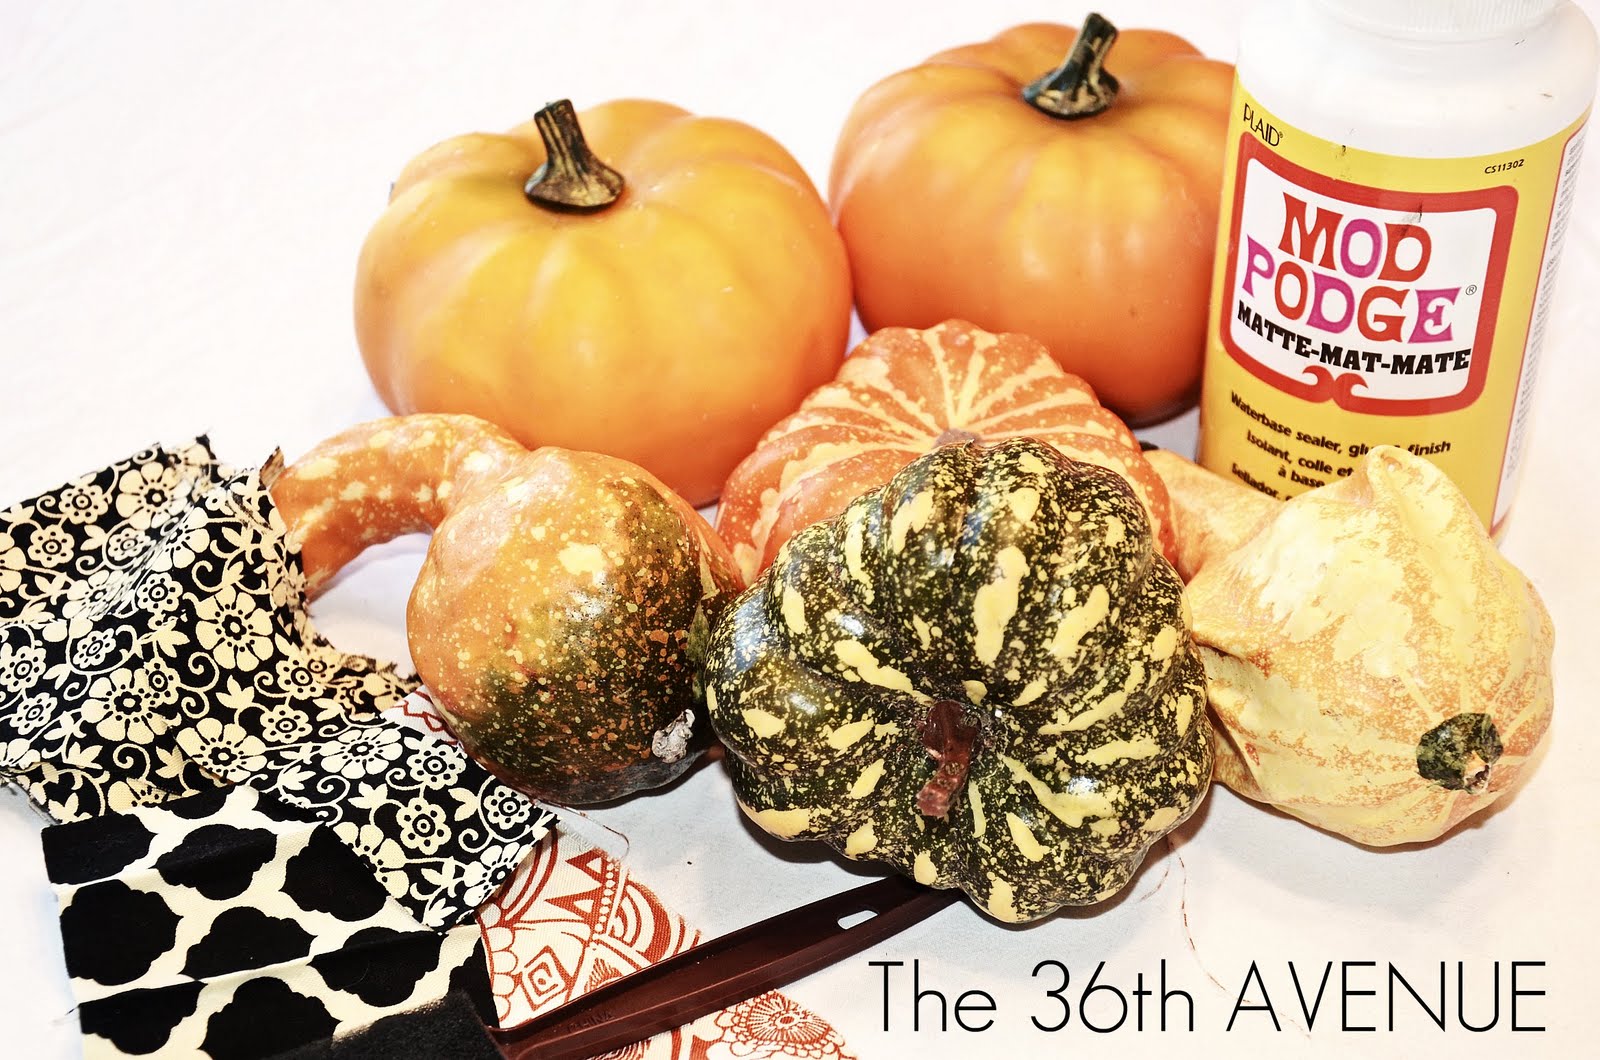
For this project you’ll need:
Old foam or plastic pumpkins, leftover fabric,
Mod Podge, brushes and regular Acrylic Craft Paint…
1st:
Remove the pumpkin stems..

2nd:
Cut a bunch of strips of fabric.
{the length will depend on the size of your pumpkins}
I cut the ends of mine in an arrow shape, it was a LOT easier to work with them this way…

3rd: Let the mess begin…
Apply an even coat of Mod Podge to the section of the pumpkin you are working on.
Start gluing the strips one by one on the surface of the pumpkin overlapping them until
you cover the entire area… After apply one more coat on top of your “fabric pumpkin” If you have never worked with Mod Podge before
DON’T PANIC… it will dry CLEAR.

…I decided to paint the stems in a butter cream color.
Don’t worry about doing this perfectly, it looks better to let the old finish come through. I wasn’t joking when I said messy…

While some of the pumpkins were drying I decided to paint the reminder of them the same
color as the stems…

and I added some dark stain mixed with glaze to antique them a little bit…

4th:
After wiping off the excess stain with a damp cloth, it was
Time to HOT glue the stems back!

I think… we are done! Are you ready to see them?
Here they are….

a closer look…

If you ever wonder where the fabric came from…
allow me to show you the pillows that I made to go with the entire look..

I can’t wait for the end of the month to dress up my entire home…
I love Halloween!
Jen, thank you again… you are EXTRAORDINARY!
……………………………….
and there’s also a GIVEAWAY!

Desiree is giving away FOUR full sets of the vinyl stencils she used to make her pillows: Mr & Mrs. Skulls + Names + Est. Year
{ IF YOU PREFER YOU CAN CHOOSE REGULAR VINYL }
TO ENTER THIS GIVEAWAY:
Head over to The 36th AVENUE for the details.


Thanks Desiree!!
I love your pillows and pumpkins!!
Check out these other amazing projects that Desiree has created —

Her “Little Benches” make me smile!

How adorable are these Dry Erase School Boards?

And I want to make one of these Back to School Sharpie Shirts! So clever.
Be sure to check out The 36th AVENUE.
And if we are lucky Desiree will be sharing a monthly tutorial here on TT&J.
I just love her style!!!
oooh – and don’t forget to go over for her giveaway today!
PS — Check out this fun series from Brooke at All Things Thrifty! It’s all about blogging. I , along with other fun bloggers, are sharing some blogging tips and tricks. Today I am sharing 5 things that have helped my blog grow.


This post sponsored by


I LOVE the Mod Podge pumpkins. What a great, simple solution to dressing up a timeless Halloween decoration. I featured the idea on my blog’s “Best of Halloween Decor” list today: http://doordiy.wordpress.com/2011/10/17/most-wonderful-time-of-the-year/. I love seeing how other people decorate for one of my favorite holidays of the year! Thanks for sharing!
New to the website – LOVE, LOVE, LOVE all the ideas and contents! Have definately made you a “Favorite” on my desktop!
love the giveaway!! Both of your blogs are in my all time favorite blogs!!
Love the giveaway! Both of your blogs are some of my favorites!!
Super cute and very non-traditional for Halloween. I love it. Thanks for sharing.
LOVE it! Thanks for the giveaway on 36th avenue
I just started using mod podge (I cannot believe it took so long for me to start!) and I love this idea!
modge podge makes pumpkins MUCH more fun!
Hey Jen and Desiree’, I think you are both uber talented! Thanks for sharing it with all of us <3
Kim@todayismysome-day » You are welcome!! Thanks for the sweet comment!!
xoxo
The tutorials you post are great for me because I’ve never done a lot of these crafty things…but I’m slowly learning and loving all your site has to offer! Thank you!!
The stools are so cute!
I love your modge podge pumpkins…. it inspires me to try new and fun things with ordinary things = )
Love these pumpkins! Too cute! Between you and 36th Avenue, I’m always being inspired!
Both of you ladies are amazingly awesome!
You gals are so crafty it should be ILLEGAL for y’all to get together!
Best,
Emily from Nap Time Is My Time
Thank you for all your amazing ideas!! You, like our friends at 36th Ave., are such an inspiration!! Love your stuff!!
I love Desiree! And I’m quite fond of your bloggy self too!
I really love coming to visit your blog everyday! Love 36th Ave too!!!!!!
You are amazing! I just love seeing the things that you will come up with next! Thanks for sharing your talents with us.
These are adorable pumpkins. I can’t wait for the stores around here to get their gords out so I can Mod Podge away. So cute, Desiree!
And Jen, of course is so awesome too. So many great projects on Tatertots and Jello. No really, I mean it. I’m not just saying so because I want that adorable vinyl that Desiree is giving away. I swear.
What a lovely tutorial, I will make it certainly, many thanks.
Greetings Yvonne