Tatertots and Jello

COLORFUL HAPPY HOME -- Daily DIY, Decor, Craft and Recipe Tutorial

  • My Home
    • 1905 Cottage
    • Daybreak House
  • DIY
    • DIY Projects and Ideas
    • Organizing
    • Tutorials
    • Printables
  • Decor
    • Spring Projects
    • Summer Projects
    • Fall Projects
  • Crafts
    • Kids Crafts
    • Painting Projects
    • Paper Projects
    • Sewing
    • Wreaths
  • Holidays
    • Valentines Day
    • Easter
    • Halloween
    • Thanksgiving
    • Christmas
    • HAPPY Holidays Series!
  • Recipes

Explore

  • my home
  • diy
  • decor
  • crafts
  • holiday
  • printables
  • recipes

Connect

Home » fashion » Guest Project — Brassy Ruffle Top!

fashion, guest tutorials, refashion · August 11, 2010

Guest Project — Brassy Ruffle Top!

Tatertots & Jello is a participant in the Amazon Services LLC Associates Program, an affiliate advertising program designed to provide a means for sites to earn advertising fees by advertising and linking to amazon.com.
Hello, hello! My name is Megan and I am the creative force behind Brassy Apple! I am a sewing pattern designer and passionate DIY-er! I love to share my tutorials, photography and ideas on the Brassy Apple Blog.
Just like Jen I love a good refashioning project! I got hooked on upcycling t-shirt’s this spring and thought it would be fun to create and share a new design!
Brassy Ruffle Top
Materials:
2 matching T-shirts (1 needs to be your size)
scissors
measuring tape
thread
sewing machine
optional: rotary cutter, mat and ruler
Step 1: Rounded Neck line – cut out the neck hole
V-neck – Leave the neck alone
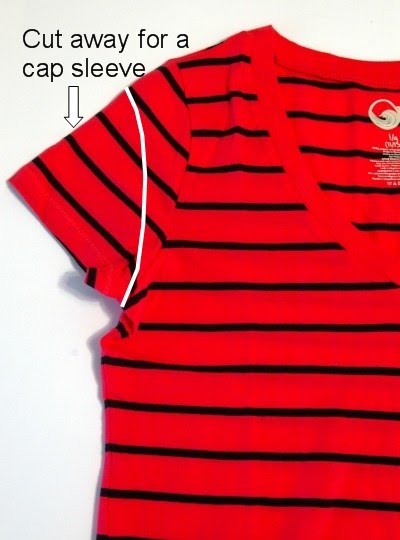
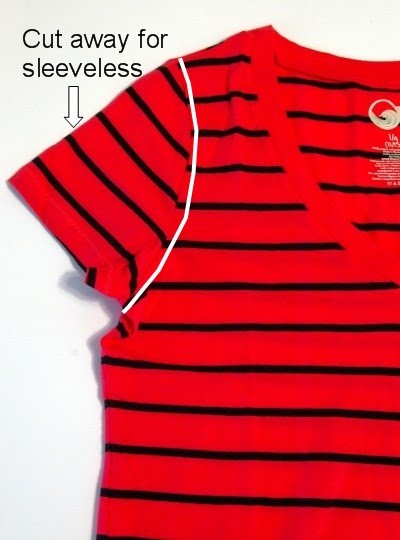
Step 2: Leave the sleeves on or cut them at an angle for cap sleeves (1st photo) or cut them all the way off (2nd photo) for a sleeveless look following the diagrams below
Step 3: Using your scissors, cut up the middle of the top layer of the t-shirt.
Step 4: Fold back and under the neckline so the point is in the middle of your chest or lower if you want a deeper V. Taper from the middle point up each side through the neckline.
Pin into place. Repeat on the opposite side. Sew  and trim the excess fabric from the underside. Set aside.
Step 5: Creating the ruffles – Take the 2nd t-shirt and square off the bottom hemline if necessary. Cut three 5″ wide strips (1st photo). Cut each piece at the side seams creating 2 separate pieces (2nd photo).
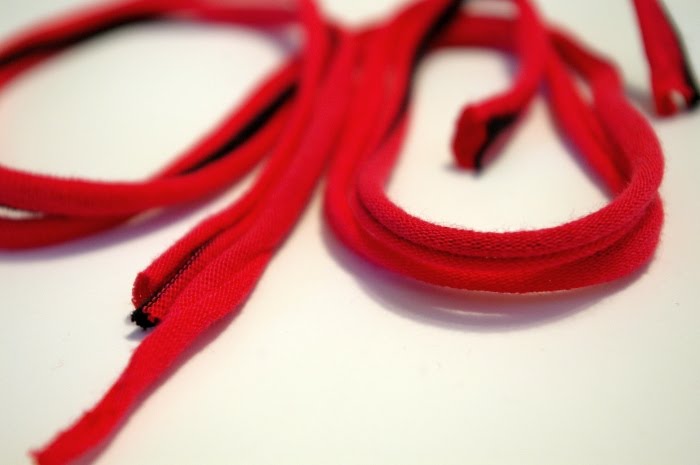
Cut a 1/2″ wide strip. Cut at the side seams creating 2 pieces the same length. Gently pull on each end to make the knit roll into a “tube”. These will the front ties.
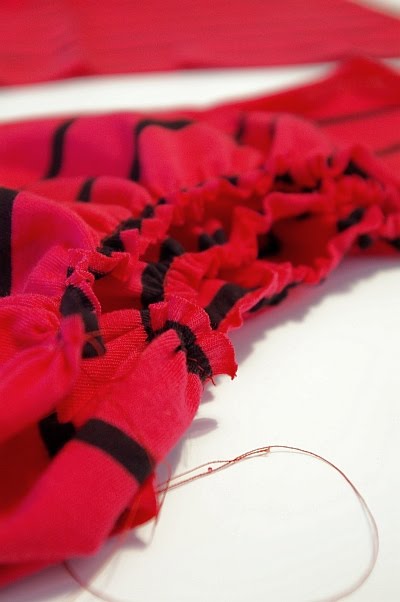
Step 6: Using a basting stitch – sew along the top edge of each strip. Do not backstitch at either end.
Step 7: Gently pulling the thread from the underside of the strip, gather or ruffle each strip.
Step 8: Lay out your t-shirt flat working on one side of the front. Starting at the bottom, place a ruffled strip matching it up with the bottom hemline. Adjust the ruffle to fit between the side seam and the inside cut edge. Pin in place
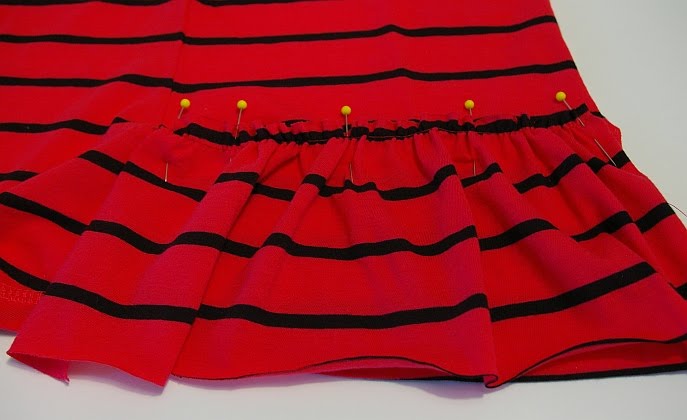
Step 9: Place 2nd ruffled strip above the 1st and overlap bottom of the ruffle 1/4 – 1/2″ to the top of the 1st ruffle. Pin and repeat with the 3rd strip. Follow the same steps to place the ruffled strips on the opposide side.
Step 10: Place 1 end of the 1 of the ties at the inside edge of the top 3rd ruffled strip. Pin.
Step 11: Stitch each ruffled layer into place by using a straight or zig zag stitch and sewing over the gathering thread line.
Step 12: Repeat on the other side. And you are done!!! Dress it up or down – just have fun wearing it!
Meg- what a fantastic project!! Thank you so much for sharing it with us!!
Meg is amazingly talented.
She is the one that got me excited about upcycling and making clothing refashions! I love her sense of color and style. Not only is she a fabulous seamstress, but she decorates, makes kid crafts and creates amazing patterns for her shop too!

{Dollar Store DIY Chandelier}
{Upholstered Headboard made from a door}


{Ruffled Shirt}

{Fabric Fortune Cookies}

Be sure to go over to Brassy Apple and see all of Megan’s colorful, creative ideas!!
Have a Great Day!
XOXO

Posted By: Jen · In: fashion, guest tutorials, refashion

More Great Ideas!
20 Headboard Ideas

You’ll Also Love

Things I Love This WeekWelcome Home Saturday – Things I Love This Week!
Free Printable Patriotic BannerFree Printable Patriotic Banner
how to bleach dye clothesHow to Bleach Dye Clothes – a Great Teen or Tween Craft!

Comments

  1. Joanne says

    August 13, 2010 at 2:55 PM

    Thanks for sharing such a cute top idea!

  2. Kelli @ RTSM says

    August 12, 2010 at 1:24 PM

    Such a cute shirt! I love the pink chandelier too:)

  3. [email protected] says

    August 12, 2010 at 7:54 AM

    Cute top!

  4. Carolyn @ My Backyard Eden says

    August 11, 2010 at 11:04 PM

    Definitely going to add this one to my list of things to try!

  5. Nancy's Couture says

    August 11, 2010 at 10:36 PM

    OOOOOOOOHHHHH!!!! I absolutely love every one of her projects!!!!!

  6. Teauna says

    August 11, 2010 at 8:05 PM

    Love it! My daughter thinks I need to make her one for school! Thanks for the great ideas!

  7. Louley's Belles says

    August 11, 2010 at 6:23 PM

    LOVE IT!!!!!

  8. jessica says

    August 11, 2010 at 5:16 PM

    oh my that is an amazing top — thank you for the instructions!

  9. Danielle says

    August 11, 2010 at 4:47 PM

    I love that dollar store chandelier! Gee I wish I was that creative!

  10. posidanielle says

    August 11, 2010 at 3:51 PM

    love the top!! I can't wait to try it!!

  11. Megan says

    August 11, 2010 at 2:26 PM

    Thanks Jen for letting me share my tutorial on your blog today! 🙂

    xo

    Meg

  12. Lettered Cottage says

    August 11, 2010 at 1:56 PM

    WOW! Those tops are TOO CUTE!
    Thanks for featuring her on your blog today…what a talented lady!

    Layla 🙂

  13. ShadowCase says

    August 11, 2010 at 1:54 PM

    Jen, thanks for spotlighting her–this looks easy enough that even I could try it. I think it would especially be great for making for my girls for school–they would look so cute in one of these!

Hi! I'm Jen Hadfield. I'm a mom of 5 restoring an 1891 home in the heart of Salt Lake City. I love being creative and sharing simple ideas to make your life easier and more beautiful!

Receive the Latest Crafts, DIY, Recipes and More in your INBOX!

Follow us on Pinterest! It's awesome!

Top Posts & Pages

Copycat Panera Spinach and Artichoke Egg Soufflés - SO good!
Spring Mushroom and Moss Wreath
DIY Secret: How to Print on Post-It Notes (and Free Printable Template)
DIY Black Painted Window Frames
Spruce up Your Outdoor Space with a DIY Recirculating Fountain! (tutorial)
How to Change a Recessed Can Light into a Pendant Light with No Remodeling!


Popular Posts

  • Copycat Panera Spinach and Artichoke Egg Soufflés - SO good!
    Copycat Panera Spinach and Artichoke Egg Soufflés - SO good!
  • Spring Mushroom and Moss Wreath
    Spring Mushroom and Moss Wreath
  • DIY Secret: How to Print on Post-It Notes (and Free Printable Template)
    DIY Secret: How to Print on Post-It Notes (and Free Printable Template)
  • DIY Black Painted Window Frames
    DIY Black Painted Window Frames
  • Spruce up Your Outdoor Space with a DIY Recirculating Fountain! (tutorial)
    Spruce up Your Outdoor Space with a DIY Recirculating Fountain! (tutorial)
  • How to Change a Recessed Can Light into a Pendant Light with No Remodeling!
    How to Change a Recessed Can Light into a Pendant Light with No Remodeling!
  • How to Make a Simple Garden Planter Box
    How to Make a Simple Garden Planter Box

As seen in


Amazon Affiliate

Tatertots & Jello is a participant in the Amazon Services LLC Associates Program, an affiliate advertising program designed to provide a means for sites to earn advertising fees by advertising and linking to amazon.com.
  • About Me
  • Advertising
  • Get Featured

Copyright © 2023 Tatertots and Jello · Privacy
This site is a place for positive discussion and ideas. Negative talk, comments that disparage others, and similar are not welcome and may be removed.