Tatertots and Jello

COLORFUL HAPPY HOME -- Daily DIY, Decor, Craft and Recipe Tutorial

  • My Home
    • 1905 Cottage
    • Daybreak House
  • DIY
    • DIY Projects and Ideas
    • Organizing
    • Tutorials
    • Printables
  • Decor
    • Spring Projects
    • Summer Projects
    • Fall Projects
  • Crafts
    • Kids Crafts
    • Painting Projects
    • Paper Projects
    • Sewing
    • Wreaths
  • Holidays
    • Valentines Day
    • Easter
    • Halloween
    • Thanksgiving
    • Christmas
    • HAPPY Holidays Series!
  • Recipes

Explore

  • my home
  • diy
  • decor
  • crafts
  • holiday
  • printables
  • recipes

Connect

Home » christmas » Gift Wrapping Idea — Make Magnet Gift Tags!!

christmas, crafts, diy, holiday, paper craft · December 23, 2010

Gift Wrapping Idea — Make Magnet Gift Tags!!

Tatertots & Jello is a participant in the Amazon Services LLC Associates Program, an affiliate advertising program designed to provide a means for sites to earn advertising fees by advertising and linking to amazon.com.
 

I spent the day yesterday running errands and trying to get my Christmas put together. So now — on to the wrapping!! And, if you are wrapping too – I’d love to share a little project I made — Magnet Gift Tags.

These little gift tags are fun because they brighten up your package, plus they have a little magnet on top that the receiver can keep and use all year long!

Magnet Gift Tags

Supplies:

Metal Sheet — I found mine at my craft store. But Home Depot also sells magnet sheets in the roofing area.

Dimensional Magic (or similar glaze)

Scrapbook Paper (this is a great way to use up leftover paper)

Embellishments

Ribbon

Magnets

Bottlecaps — if you don’t have any saved, you can buy a pack of 6 at Hobby Lobby.

Fabric Scraps

Here’s What You Do:

1.  Cut out a 1 inch square of scrapbook paper. You can use a punch, or a template to make the circle precise.

2. Glue the circle to the bottom of the bottlecap. I used Mod podge. Then put a layer of mod podge over the top of the paper. Let dry.

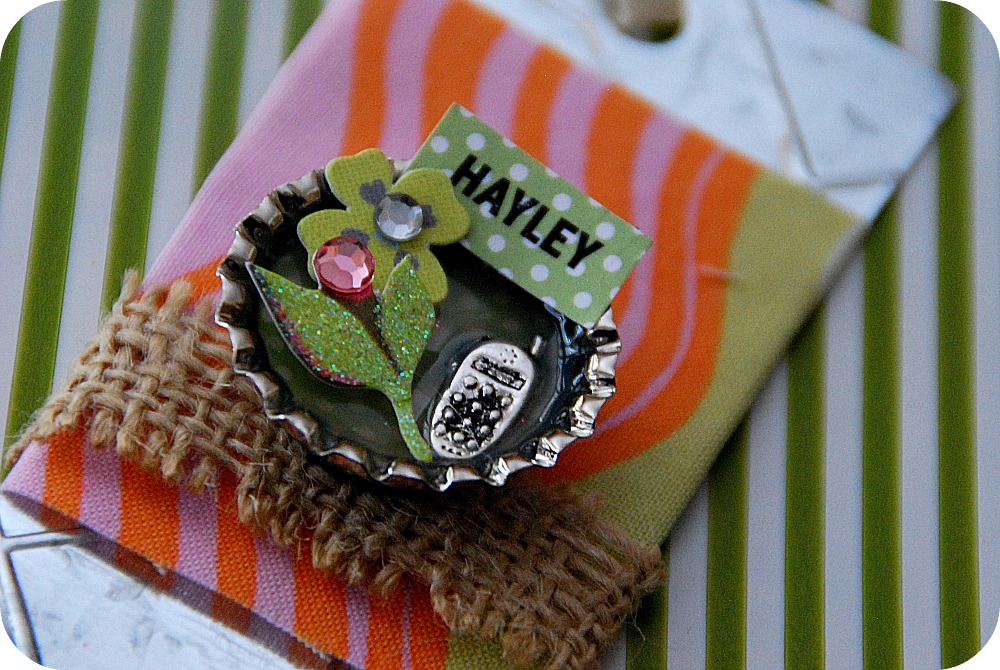
3. Fill the bottlecap up with the Dimensional Magic glaze. While the glaze is wet, you can add some little buttons or charms. And you can also sprinkle some glitter on the top of the glaze. Let the glaze dry overnight.

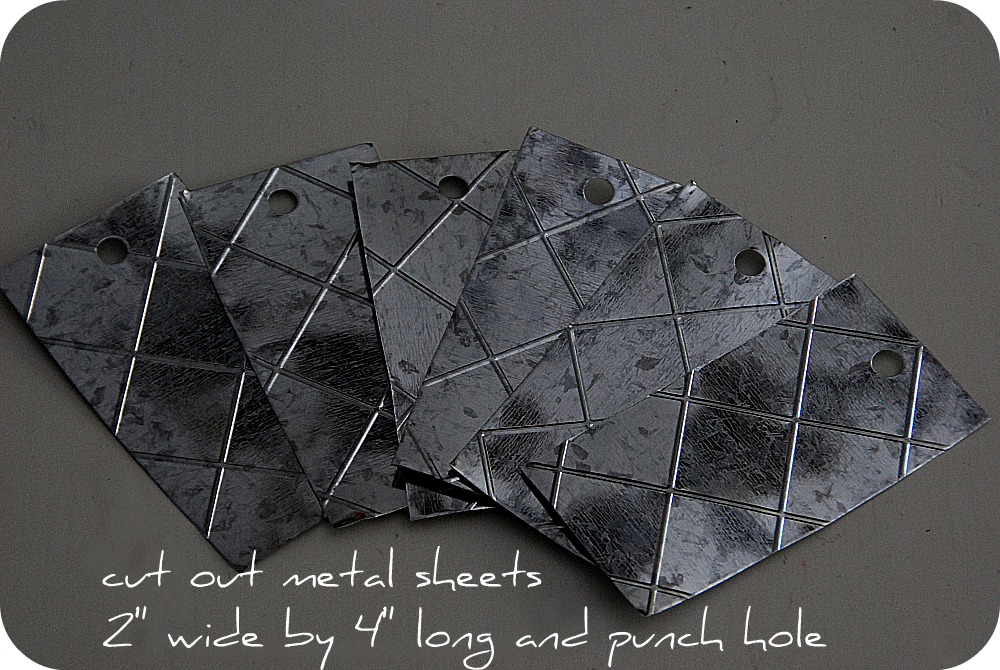
4. While the bottlecaps are drying, work on the tags. Cut out your metal tags. If you are using thick metal sheeting, use tin snips. I cut my tags to 2 inches in width by 4 inches in length. Punch a hole at the top, middle of each tag.

5. Hot glue a square of fabric to the middle of the metal tag.

6. Hot glue additional ribbon and/or other embellishments to the tag.

7. Add some fabric to the top of the tag and loop though the punched hole.

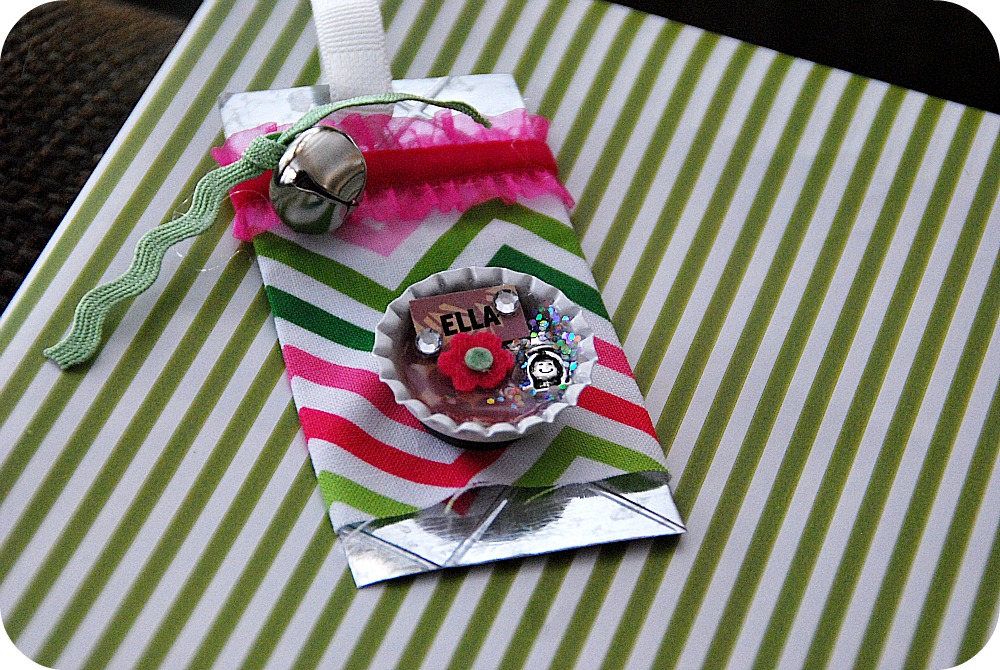
8. When the bottlecaps are dry, hot glue any other embellishments to the top. I copied the names of the recipients to the bottlecap by cutting some scrapbook paper into 8.5 x 11 sheets and running them through my printer.

9. Hot glue a magnet to the back of each bottlecap and attach the bottlecap to the metal tag.

And these Gift Tags can be used for any occasion – so make up a batch to have on hand for Birthdays, Anniversaries, Valentine’s Day or pretty much any type of gift! 
Happy Wrapping and Happy Holidays!!
I originally shared this tutorial on Simply Modern Mom’s Tag You’re It Party — check out all of the wonderful wrapping and tag ideas. You will love it!!!
xoxoMerry Christmas, my friends!!! 

PS —

Blue Cricket Design


Becca @ Blue Cricket Design is doing a fantastic offer on Groopdealz today — $2 Charlie Bug Party Hat PDF Pattern by Blue Cricket Design ($8 Value)
Awesome deal!!

Posted By: Jen · In: christmas, crafts, diy, holiday, paper craft

Guest Project — Great Last Minute Gift Idea {with free printable}
Merry, Merry Christmas!!!

You’ll Also Love

Tissue Paper Valentine Tree Centerpiece. Use inexpensive sheets of tissue paper to create a sweet valentine tree for a centerpiece of focal point!Tissue Paper Valentine Tree Centerpiece
9 Bright Printable Holiday Gift Tags
Paper Bag Leaf Garland. Upcycle your old paper grocery store bags into a warm and vibrant paper leaf garland for a mantel or shelf for Fall!Paper Bag Leaf Garland

Comments

  1. Cynthia Shaw says

    November 30, 2011 at 11:54 AM

    I just love these metal tags. I am in the process of making some now. I just wish I more little things to stick in the caps!! So so cute! Thank you for sharing this idea!!

  2. Jennifer (mom of 4) says

    November 15, 2011 at 6:41 PM

    Love it! Thanks for sharing!

  3. Molly says

    April 25, 2011 at 4:44 PM

    Where do you find the cute embellishments? I have been looking all over for them for a similar project and have had no luck!

  4. PeaceLoveApplesauce says

    March 31, 2011 at 3:53 PM

    I featured this on my blog today, hope you don't mind!!

    xoxo- Terri
    http://www.peaceloveapplesauce.com/2011/03/things-to-try-thursday-magnetic-gift.html

  5. rinks says

    February 21, 2011 at 8:19 AM

    these are beautiful!!!…thanks for sharing!!!

  6. Jami says

    February 18, 2011 at 2:58 PM

    I am in love with these! I don't know how I missed this post, but I'm bookmarking it. I guess I need to find out what else I've missed. LOL
    Great stuff, as always, Jen!

  7. Jen says

    January 20, 2011 at 12:11 PM

    My girls have some bottle cap magnets (worn as necklaces) that they LOVE, so thank you so much for sharing how to make them! I think they would be so fun to make – hopefully I can track down supplies 🙂

  8. Swedie says

    January 10, 2011 at 7:10 PM

    What a wonderful fun idea!! Now if I could only get some dimensional Mod Podge, I would be good to go!

  9. Vivienne says

    December 28, 2010 at 11:12 PM

    Those are so stinkin' cute I don't think I can stand it! I'm kicking myself that I have to wait a whole year to do it now!
    🙂
    Hope you had a super Christmas!
    xoxo

  10. Jenn Erickson says

    December 28, 2010 at 2:46 AM

    Jen, this is a truly brilliant project. I love it, and am printing it out for a "must do" for next year's holiday gifts. Thank you!

  11. Amanda says

    December 25, 2010 at 2:28 AM

    Very cute! These could be very useful in the future. Thanks for sharing.

    Ninth Street Notions

  12. Katherine Purcell says

    December 24, 2010 at 6:37 AM

    These are beautiful, and totally functional! I can't wait to make these. I've recently subscribed, and I am thrilled that I did! Great idea 🙂

  13. Emily {WhipperBerry} says

    December 24, 2010 at 2:25 AM

    You are absolutely too cool! These are amazing! You have a gift darling. I don't think I can wait 'til next year to give these a try. Merry Christmas!

  14. Kelli @ RTSM says

    December 23, 2010 at 10:10 PM

    This is such a fun idea! I love that the magnet can be used all year too!

  15. Carrie says

    December 23, 2010 at 9:52 PM

    that's a really really really awesome idea 😉 Next year, for sure!

  16. Allison says

    December 23, 2010 at 6:26 PM

    SUCH a cute idea!

  17. Dawn (Bee and Rose) says

    December 23, 2010 at 5:10 PM

    Fabulous tutorial! My daughter and I have everything in hand to do this today! Thanks for the inspiration!

  18. Connie says

    December 23, 2010 at 4:53 PM

    Oh man! These are so cute and original! You rock Jen!

  19. Kassi @ Truly Lovely says

    December 23, 2010 at 4:28 PM

    These are so awesome!!! They would make fun little tags for anytime!

  20. Jaclyn says

    December 23, 2010 at 4:21 PM

    Wish I had more time to make these!!! Super cute!

  21. Lyndee @ A Recovering Craft Hoarder says

    December 23, 2010 at 3:59 PM

    I saw somebody already asked this, but I have the same questions. I am TOTALLY going to make these and then use them for next year, but how do you make the edges nonlethal?

  22. Jenglamgirl says

    December 23, 2010 at 3:36 PM

    Jen these are so darn cute and clever. I love how you personalized them to your kids. Very darling. My SIL sent me the cutest bottle cap magnets with pics of my kids in them, I HEART THEM! My fav. magnets on the fridge! Loves to you and your family this holiday, Merry Christmas! XO XO Jen

  23. PeaceLoveApplesauce says

    December 23, 2010 at 3:26 PM

    I love, love, love these!!!!!!!!!!

  24. Michelle @ Sweet Something Design says

    December 23, 2010 at 3:05 PM

    Jen, these are genius! I love a good bottle cap project! 🙂 Merry Christmas!

  25. Erin @ In Between Laundry says

    December 23, 2010 at 2:22 PM

    I adore these! I wish I wasn't done with wrapping already… they're going on next year's list!

  26. Alicia says

    December 23, 2010 at 2:14 PM

    very very cute! you could do these any time of year. thanks for the inspiration 🙂

  27. PEACHES says

    December 23, 2010 at 2:01 PM

    Are you kiddding me!?! You can't be taunting us with an idea THIS GOOD 2 days before Christmas! I'm supposed to be making pies….now I have to run to the store for rootbeer just to get some bottle caps. Oy!

    I think the pies will need to come from the freezer section this year. These are to dang cute to pass up!!!!

  28. Madigan at madiganmade says

    December 23, 2010 at 1:16 PM

    Wow… what a clever idea! I need to try Dimensional Magic, it looks very cool. Are the edges of the metal sharp? Did you have to sand them at all?
    Simply darling!!

  29. Admitted Fabricaholic says

    December 23, 2010 at 12:35 PM

    what a great idea! Thanks for the inspiration 🙂

  30. Life In The Thrifty Lane says

    December 23, 2010 at 9:36 AM

    Thanks for the tutorial. The tags are adorable!

  31. Leanne says

    December 23, 2010 at 8:42 AM

    Those are absolutely darling. Thanks for sharing how to make them. Merry Christmas!

  32. Michelle-esque says

    December 23, 2010 at 8:24 AM

    Oh man this is my favorite tutorial yet! Thank you so much for sharing! I am definitely going to book mark this! 🙂

Hi! I'm Jen Hadfield. I'm a mom of 5 restoring an 1891 home in the heart of Salt Lake City. I love being creative and sharing simple ideas to make your life easier and more beautiful!

Receive the Latest Crafts, DIY, Recipes and More in your INBOX!

Follow us on Pinterest! It's awesome!

Top Posts & Pages

Copycat Panera Spinach and Artichoke Egg Soufflés - SO good!
Spring Mushroom and Moss Wreath
DIY Secret: How to Print on Post-It Notes (and Free Printable Template)
DIY Black Painted Window Frames
Spruce up Your Outdoor Space with a DIY Recirculating Fountain! (tutorial)
How to Make a Simple Garden Planter Box


Popular Posts

  • Copycat Panera Spinach and Artichoke Egg Soufflés - SO good!
    Copycat Panera Spinach and Artichoke Egg Soufflés - SO good!
  • Spring Mushroom and Moss Wreath
    Spring Mushroom and Moss Wreath
  • DIY Secret: How to Print on Post-It Notes (and Free Printable Template)
    DIY Secret: How to Print on Post-It Notes (and Free Printable Template)
  • DIY Black Painted Window Frames
    DIY Black Painted Window Frames
  • Spruce up Your Outdoor Space with a DIY Recirculating Fountain! (tutorial)
    Spruce up Your Outdoor Space with a DIY Recirculating Fountain! (tutorial)
  • How to Make a Simple Garden Planter Box
    How to Make a Simple Garden Planter Box
  • How to Change a Recessed Can Light into a Pendant Light with No Remodeling!
    How to Change a Recessed Can Light into a Pendant Light with No Remodeling!

As seen in


Amazon Affiliate

Tatertots & Jello is a participant in the Amazon Services LLC Associates Program, an affiliate advertising program designed to provide a means for sites to earn advertising fees by advertising and linking to amazon.com.
  • About Me
  • Advertising
  • Get Featured

Copyright © 2023 Tatertots and Jello · Privacy
This site is a place for positive discussion and ideas. Negative talk, comments that disparage others, and similar are not welcome and may be removed.