Tatertots and Jello

COLORFUL HAPPY HOME -- Daily DIY, Decor, Craft and Recipe Tutorial

  • My Home
    • 1905 Cottage
    • Daybreak House
  • DIY
    • DIY Projects and Ideas
    • Organizing
    • Tutorials
    • Printables
  • Decor
    • Spring Projects
    • Summer Projects
    • Fall Projects
  • Crafts
    • Kids Crafts
    • Painting Projects
    • Paper Projects
    • Sewing
    • Wreaths
  • Holidays
    • Valentines Day
    • Easter
    • Halloween
    • Thanksgiving
    • Christmas
    • HAPPY Holidays Series!
  • Recipes

Explore

  • my home
  • diy
  • decor
  • crafts
  • holiday
  • printables
  • recipes

Connect

Home » diy » DIY Wall Art & Bow Tutorial

diy, guest tutorials, paper craft · July 29, 2015

DIY Wall Art & Bow Tutorial

Tatertots & Jello is a participant in the Amazon Services LLC Associates Program, an affiliate advertising program designed to provide a means for sites to earn advertising fees by advertising and linking to amazon.com.

Welcome to the Summer of Paper series – where we’ve invited fabulous guests to create projects using supplies from my Home + Made paper decor line.

unnamed

Hi! I’m Valerie and I’m the creator and author of Occasionally Crafty, where I share my love of simple, beautiful projects with other busy women.  

I’m also a wife and mother, an avid reader, a sometimes crafter, and a lover of all things music. After graduating from BYU with a degree in music education, I moved to Phoenix to teach high school band. I left her teaching career to raise her three kids (currently 10, 8, and 5). My favorite thing to make is anything seasonal/holiday, and I’m happiest when I’m at home with my family, snuggled up with a good book. 
I’m so excited to share how I turned these beautiful scrapbook papers from Jen Hadfield’s new line of materials into a beautiful wreath-inspired DIY Wall Art featuring your favorite photo or quote!

 I absolutely love the papers in this new Jen Hadfield Home+Made pack of papers.  The color combinations are so perfect, and I love the mix of subtle and bold designs.  I am not a scrapper; however, I love to use papers in my home decor projects.

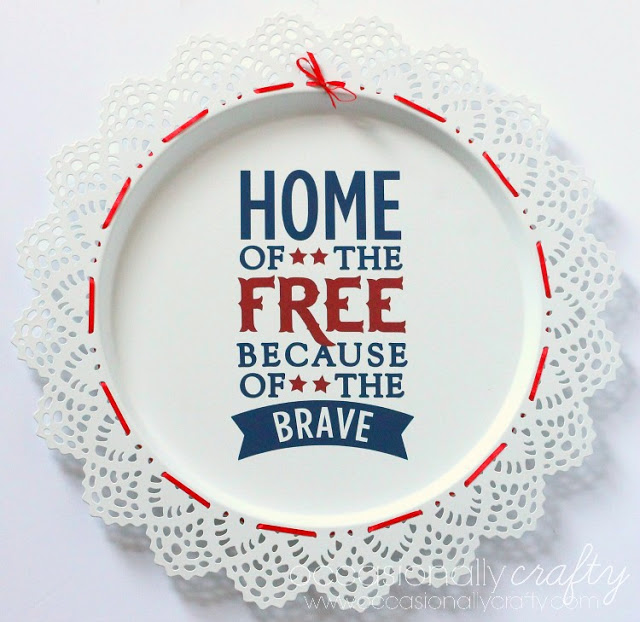
To make this DIY Wall Art, you’ll need the following:

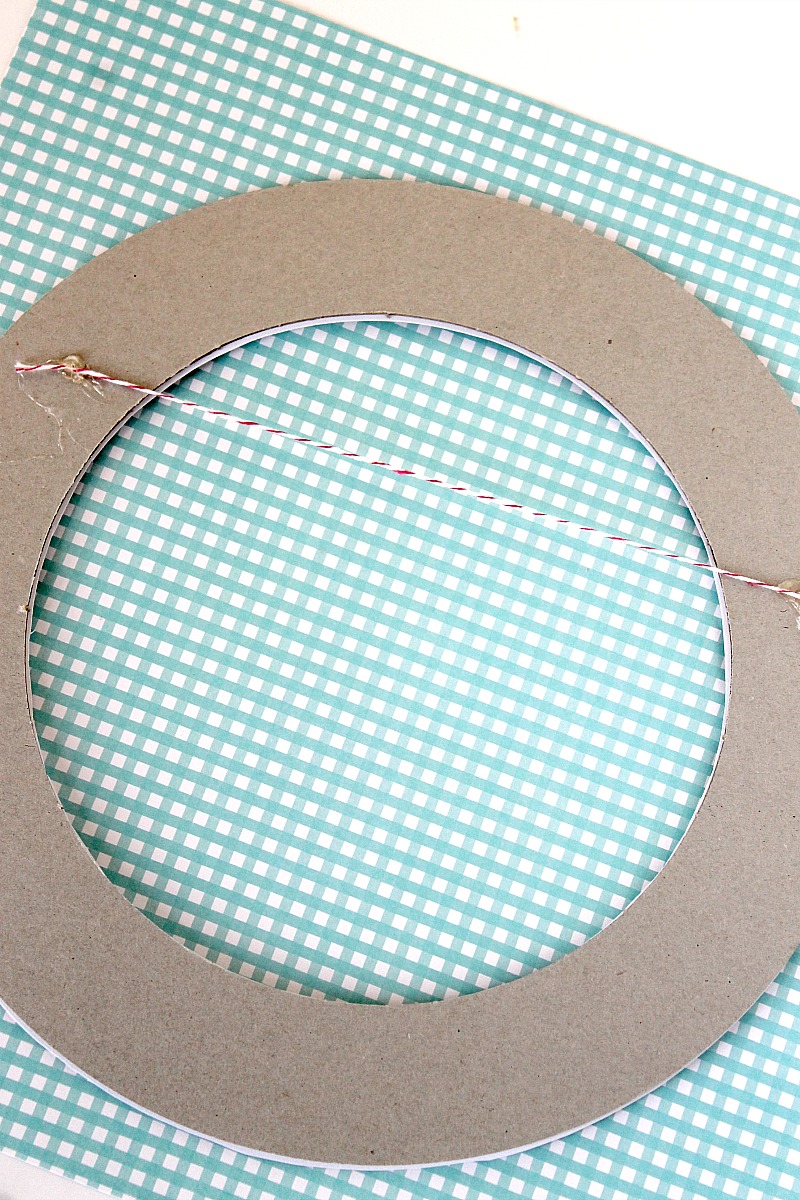
  •  Flat chipboard or cardboard circle (mine is 10 inches)
  • Coordinating scrapbook paper
  • Mod Podge
  • Glue pen or other adhesive
  • Scissors
  • Bow template (download yours here)
  • Twine
  • Quote or photo for center

Directions:

  • Trace your cardboard circle onto desired scrapbook paper, then cut out the paper to fit.
  • Paint a thin layer of Mod Podge onto your circle, and carefully apply your paper to the top.  Smooth out any bubbles and allow to dry.
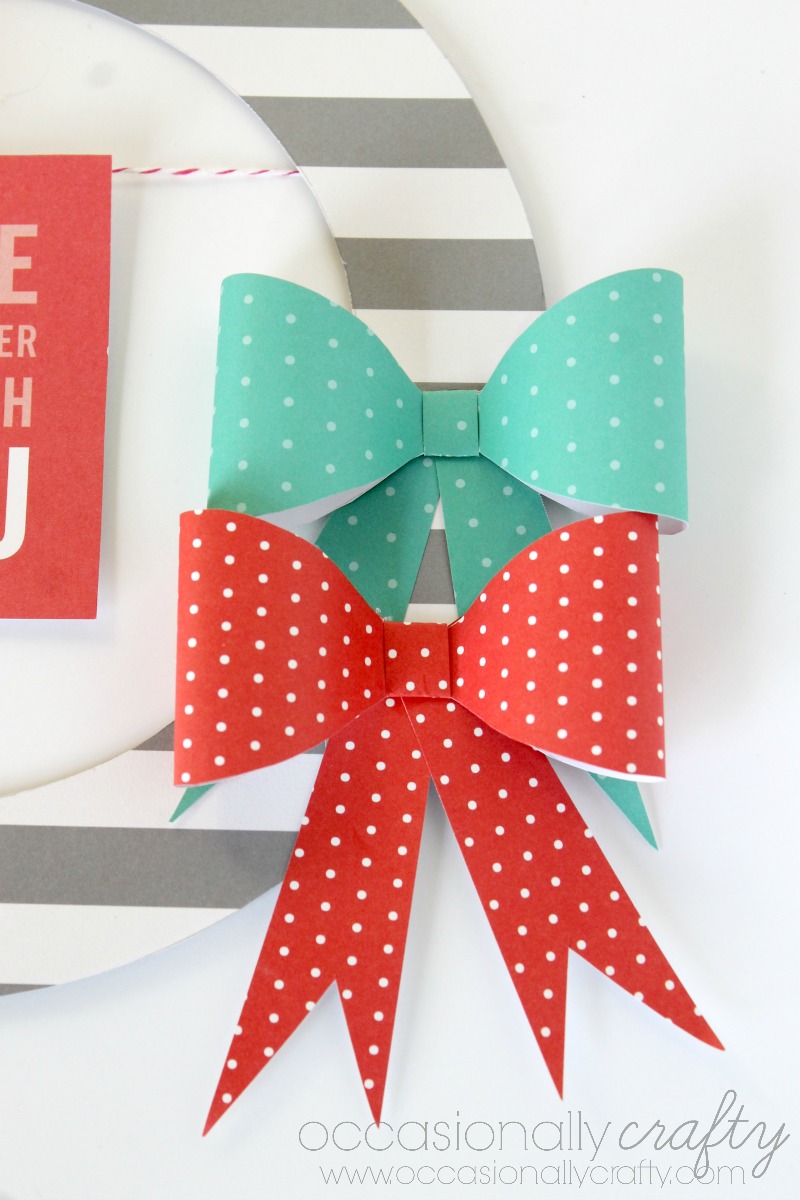
  • Meanwhile, create your bow(s).  Print out the template and cut the pieces out.  I use cardstock for a more solid template.  Trace the pieces onto your scrapbook paper.  Each bow is made up of one hourglass shaped piece, one tab and two ribbon tail pieces.  You can get 2 bows out of a standard 8.5″x11″ piece of paper.
  • Follow the steps below to create your bow:


1.   Put some glue into the center of the hourglass shaped piece.  Bring one end to middle and press, then bring the other end into the middle, slightly overlapping the first, to make your bow shape.  Secure other end with glue.
2.  Use a paperclip to hold your bow together while the glue dries.

3.  In the meantime, take your tail pieces.  Slightly overlap them and secure with glue.  You can use another paperclip if you need to to hold them together while they dry.

4.  Remove the paperclip from your bow.  Center it on the back side of your tab piece, with the overlapped ends facing up towards you.

     5.  Wrap the ends of the tab piece around the center of your bow, slightly overlapping and  securing with glue.  Hold together with a paperclip while it dries.
     6.  When the bow and tab are dry, place the bow piece on top of your tails.  Secure with glue.
     7.  Hold the entire bow together with a paperclip until the glue is dry
     8.  Set bow(s) aside and return to your circle form.
  • I chose to hang a quote from the center of my circle.  This was one of many sweet quotes on one of the pages included in the paper pack.  They are perfect for this project, or as journaling cards for scrapping or Project Life.
  • Turn your circle form over and attach baker’s twine or ribbon to the back of the circle using hot glue.  Make sure it is pulled taut.
  • While the glue dries, cut out and print your quote (or photo) and get it ready to hang.  I used a mini clothespin to hang it from the twine.
 Attach your cute paper bow(s) as desired).  I layered two different colors.
Now you have the perfect conversation piece to hang on your wall, door, or wherever you want a little bit of cuteness.
Thank you to Jen for the opportunity to post here today!  I hope to get to know you better over on my blog, or you can follow me on social media below.  See you soon!
**********
Thanks Valerie! I just love everything about this wreath. So cute, and so easy to make too! Valerie has lots of other fun ideas on her blog, here are a few I know you’ll love:
blogger-image--1603939409

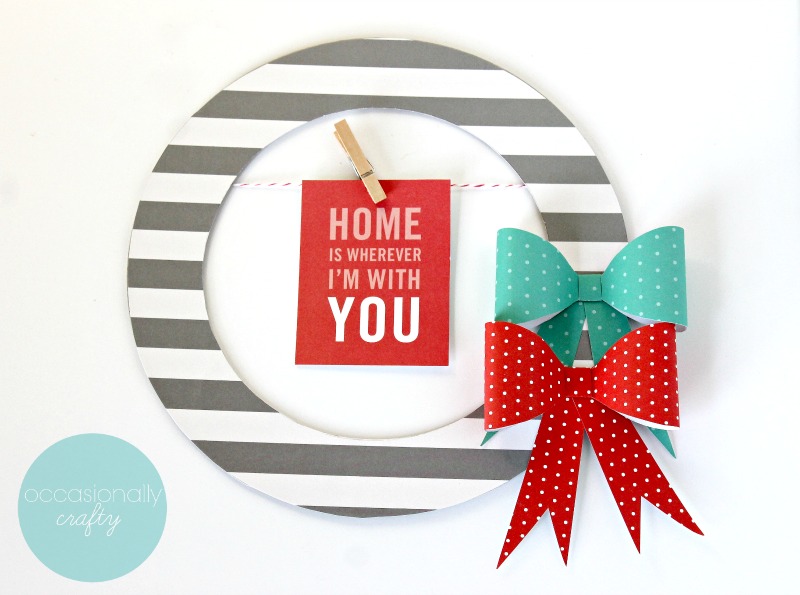
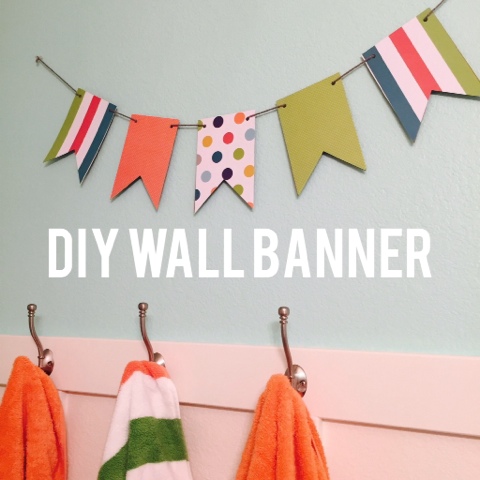
I love this pretty  DIY Wall Banner that would be so fun hanging anywhere in your home!

Double Peanut Butter Chocolate chip Cookies 2

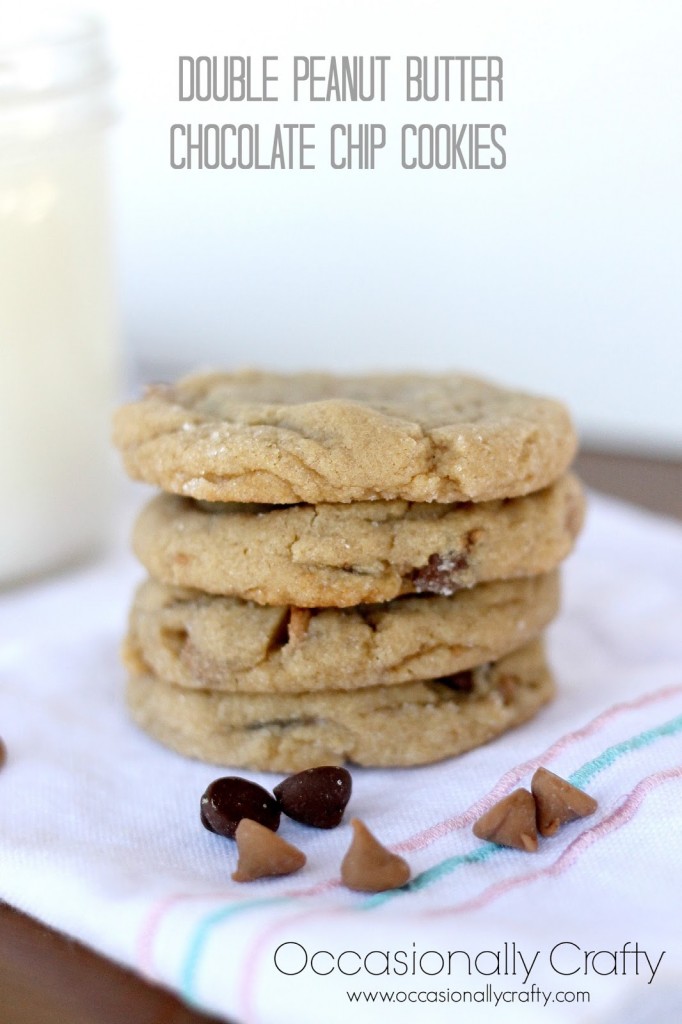
And, she shares great recipes, like these Double Peanut Butter Chocolate Chip Cookies!

Home of the Free Patriotic Vinyl Charger

and I love this Vinyl Wall Charger project she made with her Silhouette!

Make sure to follow Occasionally Crafty and
pinterest.32x32.icon.circle
Follow Occasionally Crafty on Pinterest
instagram.32x32.icon.square
Follow Occasionally Crafty on Instagram
facebook.32x32.icon.circle
Follow Occasionally Crafty on Facebook
twitter.32x32.icon.circle
Follow Occasionally Crafty on Twitter
And if you’d like to try this project she shared today, you can find my Home + Made line at craft and hobby stores near you!
unnamed
xoxo
jen signature

Posted By: Jen · In: diy, guest tutorials, paper craft

No Bake Mini Peanut Butter Chocolate Pies
High School Diary Project

You’ll Also Love

DIY Daisy Paper Chain Banner – Easy Spring Decor Tutorial
DIY Halloween Bat Mantel Ideas
DIY Disco Ball Halloween Art

Comments

  1. blog says

    September 20, 2015 at 10:33 PM

    interstellar light the road run about, that also isn’t likely to be what along while time will walk so far.Unless is meet that kind of the conjunction

  2. Polo Ralph Lauren Sale Uk says

    July 30, 2015 at 7:53 PM

    Wording out of time period of Bob Solomon located in the vicinity of Forehead Bracket in Hebrew College or university excavationDoing the job on the Forehead Mount with Jerusalem, Hebrew School involving Jerusalem archaeologist Dr .. Eilat Mazar offers discovered the primary alphabetical published word ever uncovered inside the metropolis.The inscription is definitely etched using a significant pithos, a new neckless earthenware vessel uncovered together with six to eight other individuals for t

  3. Rachel@mydisorganizedlife says

    July 30, 2015 at 9:10 AM

    I love this Valerie! I think I just found my new favorite quote, too!

  4. Georgia @ Silver Spiral Studio says

    July 29, 2015 at 8:38 PM

    This is too cute!! Thanks for sharing!! 🙂

Hi! I'm Jen Hadfield. I'm a mom of 5 restoring an 1891 home in the heart of Salt Lake City. I love being creative and sharing simple ideas to make your life easier and more beautiful!

Receive the Latest Crafts, DIY, Recipes and More in your INBOX!

Follow us on Pinterest! It's awesome!

Top Posts & Pages

Spruce up Your Outdoor Space with a DIY Recirculating Fountain! (tutorial)
A New Deck in Under 30 Minutes!
12 Must-Have Items to Pack on an Alaskan Cruise!
Copycat Panera Spinach and Artichoke Egg Soufflés - SO good!
DIY Secret: How to Print on Post-It Notes (and Free Printable Template)
Mother's Day Cup Holder Gift Basket


Popular Posts

  • Spruce up Your Outdoor Space with a DIY Recirculating Fountain! (tutorial)
    Spruce up Your Outdoor Space with a DIY Recirculating Fountain! (tutorial)
  • A New Deck in Under 30 Minutes!
    A New Deck in Under 30 Minutes!
  • 12 Must-Have Items to Pack on an Alaskan Cruise!
    12 Must-Have Items to Pack on an Alaskan Cruise!
  • Copycat Panera Spinach and Artichoke Egg Soufflés - SO good!
    Copycat Panera Spinach and Artichoke Egg Soufflés - SO good!
  • DIY Secret: How to Print on Post-It Notes (and Free Printable Template)
    DIY Secret: How to Print on Post-It Notes (and Free Printable Template)
  • Mother's Day Cup Holder Gift Basket
    Mother's Day Cup Holder Gift Basket
  • The BEST Fresh Strawberry Cream Cheese Cake Recipe!
    The BEST Fresh Strawberry Cream Cheese Cake Recipe!

As seen in


Amazon Affiliate

Tatertots & Jello is a participant in the Amazon Services LLC Associates Program, an affiliate advertising program designed to provide a means for sites to earn advertising fees by advertising and linking to amazon.com.
  • About Me
  • Advertising
  • Get Featured

Copyright © 2025 Tatertots and Jello · Privacy
This site is a place for positive discussion and ideas. Negative talk, comments that disparage others, and similar are not welcome and may be removed.