Tatertots and Jello

COLORFUL HAPPY HOME -- Daily DIY, Decor, Craft and Recipe Tutorial

  • My Home
    • 1905 Cottage
    • Daybreak House
  • DIY
    • DIY Projects and Ideas
    • Organizing
    • Tutorials
    • Printables
  • Decor
    • Spring Projects
    • Summer Projects
    • Fall Projects
  • Crafts
    • Kids Crafts
    • Painting Projects
    • Paper Projects
    • Sewing
    • Wreaths
  • Holidays
    • Valentines Day
    • Easter
    • Halloween
    • Thanksgiving
    • Christmas
    • HAPPY Holidays Series!
  • Recipes

Explore

  • my home
  • diy
  • decor
  • crafts
  • holiday
  • printables
  • recipes

Connect

Home » christmas » Holiday Party Yard Signs (Ho, Ho Ho!)

christmas · December 15, 2014

Holiday Party Yard Signs (Ho, Ho Ho!)

Tatertots & Jello is a participant in the Amazon Services LLC Associates Program, an affiliate advertising program designed to provide a means for sites to earn advertising fees by advertising and linking to amazon.com.

big.holiday.party.signs.tatertotsandjello.com

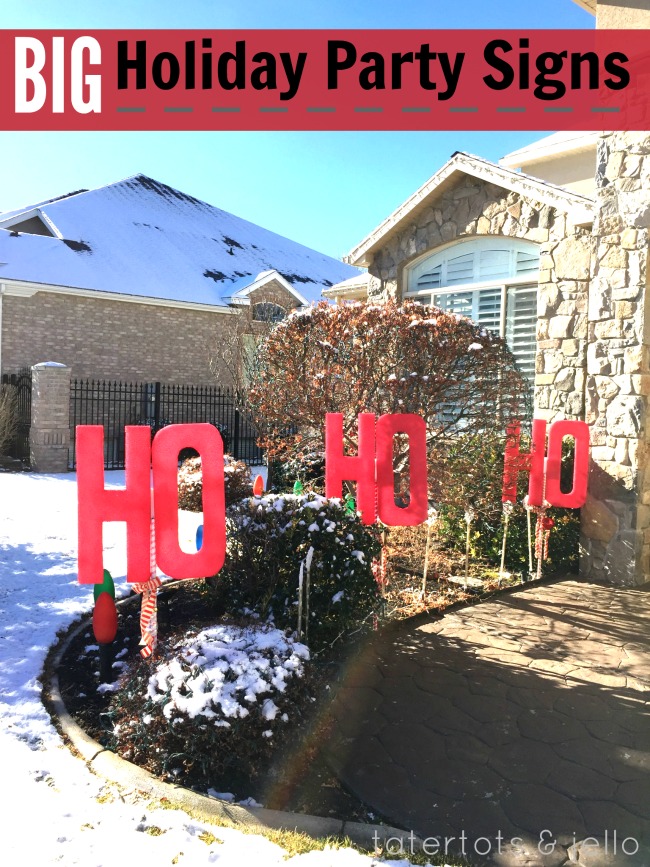
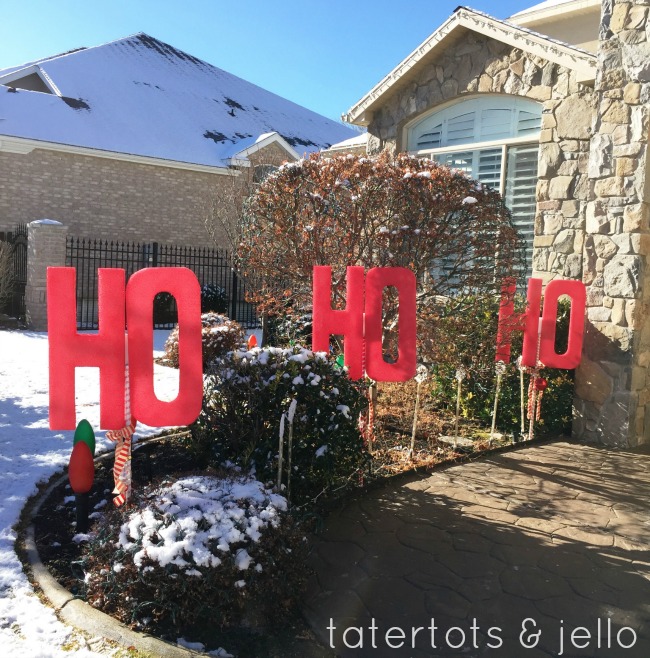
I love being part of the Floracraft Make It Fun Team. And when they sent me this month’s materials, I knew I could make something huge out of the new, Michaels exclusive Floracraft sheets (about 12 x 28 inches!). And so I did! They’re perfect to welcome guests to a holiday party!

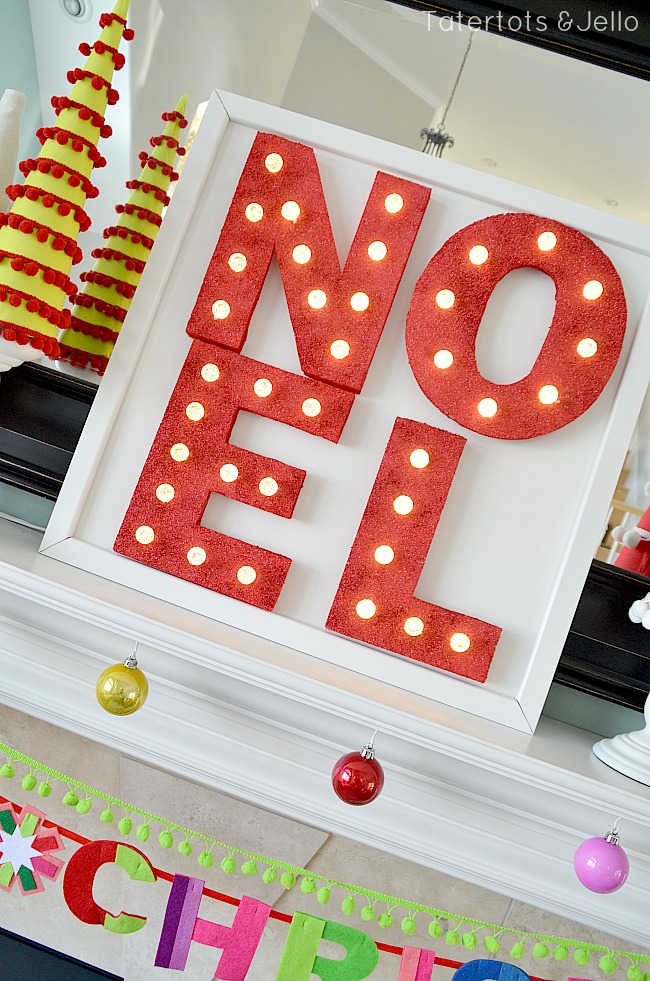
(Don’t forget to check out another of my favorite Floracraft projects I made last year:)

noel marquee letters made out of styrofoam

 Foam NOEL Marquee letters!

Here’s how you can make the giant yard letters:

ill.cut.the.ho


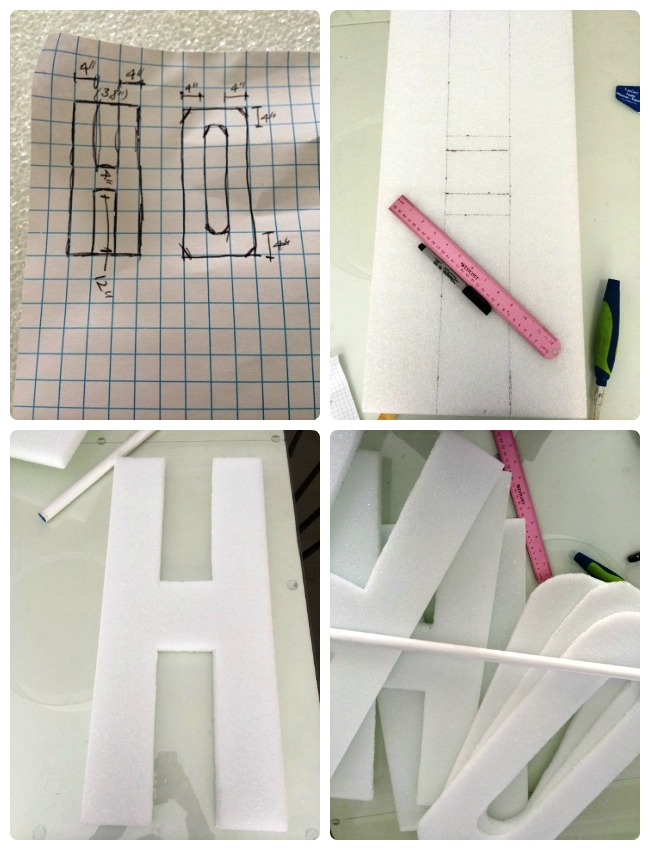
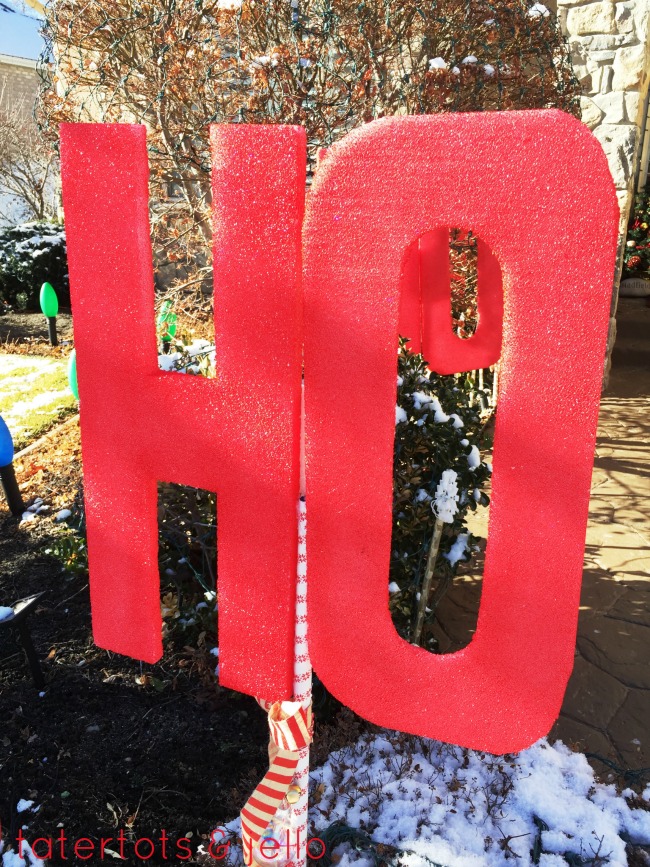
First, sketch your letters to get the proportions correct. Because I made mine giant, the math was easy: I made the letters 4 inches thick. If you make yours smaller, adjust accordingly. Luckily the “H” and “O” letter shapes are pretty easy to make.

Then measure and cut your H and O letters. I used an awesome Floracraft foam cutter (see upper left photo below) – it was much faster than the hot wire cutter, but less precise.

Use these first letters as templates for the other two of each. Now, here’s what I did next:


some.painted.hos


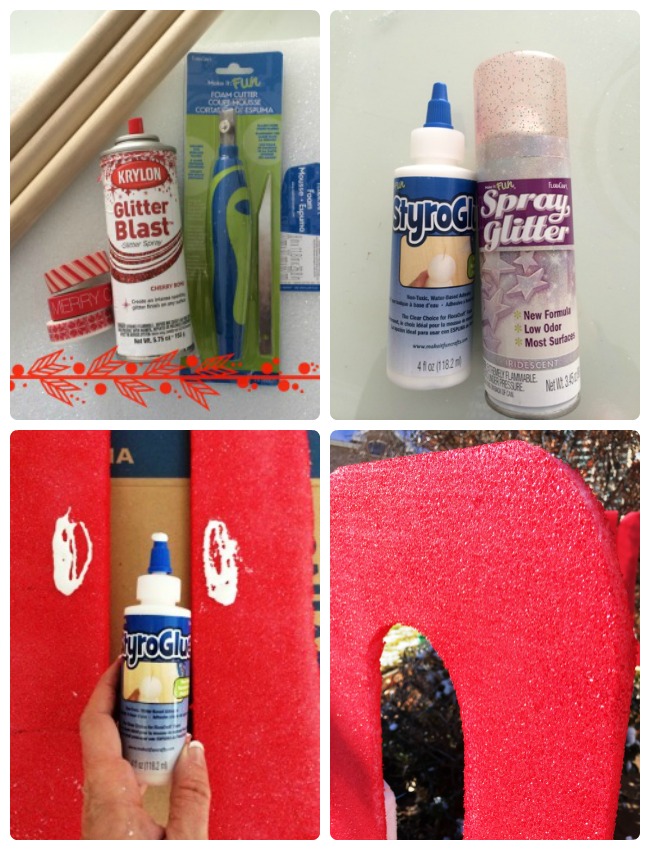
Then I prepped my project. I cut three roughly 8 x 8 inch white foam squares from the scraps as part of the backing.

I used Krylon plastic paint for the big H and O letters — I think it works better on Styrofoam. (I have some Styrofoam painting tips in this post.) While it dried, I worked on the dowels.

I also painted three 3/4″ dowels with white paint. If I had to do this over again, I would have also tapered one end of each to make them easier to put in the ground. Once the paint dried, I wrapped festive washi tape in a candy-cane-stripe pattern on each.

Then I took the spray glitter after the H and O letters had dried and added a sparkly coat on top. Once those were dry, I used StyroGlue and hot glue to put the letters and sticks together.

Once joined, I added some festive ribbon, ornaments and bells to the sticks. (Check it out in the photo below.)

my.styrofoam.brings.all.the.hos.to.the.yard


You can get all kinds of great foam craft ideas by visiting the Make It: Fun site and by following along with FloraCraft on their Pinterest boards and Facebook page, and be sure to check out the other projects the team made.

some.big.ho.in.the.yard.dude


Have a festive day! 

xoxo

jen signature


This post sponsored by FloraCraft. See my disclosures.

Posted By: Jen · In: christmas

Favorite Slow Cooker Recipe: Tuscan Potato Soup!
HAPPY Holidays: Easy Neighbor Gift Idea

You’ll Also Love

DIY Gingerbread Christmas Wreath
DIY Tissue Paper Holiday TreesDIY Tissue Paper Holiday Trees
Sweetening the Season: Gingerbread Decor Ideas for a Festive Christmas

Comments

  1. Sharon says

    December 16, 2014 at 5:10 AM

    I love your idea for Christmas yard signs! They are so festive and fun! Thank you!

  2. jen @ Tatertots & Jello says

    December 16, 2014 at 12:19 AM

    Thanks so much!!

    xxo

  3. Jean says

    December 15, 2014 at 9:54 PM

    These look great! I can think of lots of other occasions for their use too

Hi! I'm Jen Hadfield. I'm a mom of 5 restoring an 1891 home in the heart of Salt Lake City. I love being creative and sharing simple ideas to make your life easier and more beautiful!

Receive the Latest Crafts, DIY, Recipes and More in your INBOX!

Follow us on Pinterest! It's awesome!

Top Posts & Pages

Spruce up Your Outdoor Space with a DIY Recirculating Fountain! (tutorial)
Copycat Panera Spinach and Artichoke Egg Soufflés - SO good!
12 Must-Have Items to Pack on an Alaskan Cruise!
A New Deck in Under 30 Minutes!
DIY Secret: How to Print on Post-It Notes (and Free Printable Template)
DIY Fountains to Make Your Yard Amazing!


Popular Posts

  • Spruce up Your Outdoor Space with a DIY Recirculating Fountain! (tutorial)
    Spruce up Your Outdoor Space with a DIY Recirculating Fountain! (tutorial)
  • Copycat Panera Spinach and Artichoke Egg Soufflés - SO good!
    Copycat Panera Spinach and Artichoke Egg Soufflés - SO good!
  • 12 Must-Have Items to Pack on an Alaskan Cruise!
    12 Must-Have Items to Pack on an Alaskan Cruise!
  • A New Deck in Under 30 Minutes!
    A New Deck in Under 30 Minutes!
  • DIY Secret: How to Print on Post-It Notes (and Free Printable Template)
    DIY Secret: How to Print on Post-It Notes (and Free Printable Template)
  • DIY Fountains to Make Your Yard Amazing!
    DIY Fountains to Make Your Yard Amazing!
  • How to Change a Recessed Can Light into a Pendant Light with No Remodeling!
    How to Change a Recessed Can Light into a Pendant Light with No Remodeling!

As seen in


Amazon Affiliate

Tatertots & Jello is a participant in the Amazon Services LLC Associates Program, an affiliate advertising program designed to provide a means for sites to earn advertising fees by advertising and linking to amazon.com.
  • About Me
  • Advertising
  • Get Featured

Copyright © 2025 Tatertots and Jello · Privacy
This site is a place for positive discussion and ideas. Negative talk, comments that disparage others, and similar are not welcome and may be removed.