This month for our #LowesCreator challenge we were asked to make something for our Valentine’s Decor. I love these challenges because they really make me stretch my creativity. I wanted to make something I could use year after year in our home.
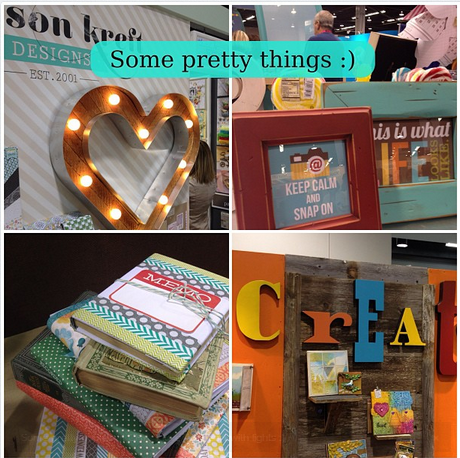
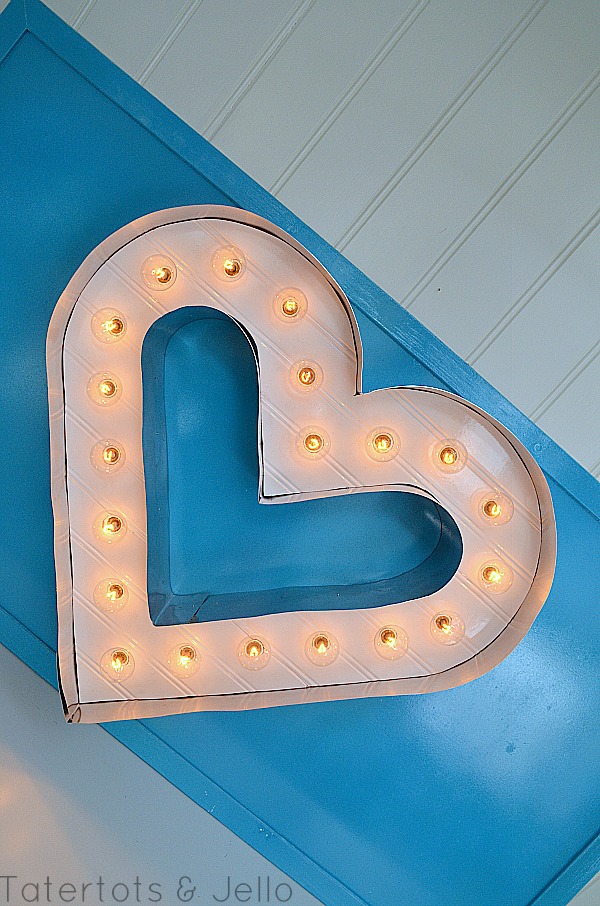
I’ve been inspired by marquee letter projects, but many have been made from materials like foam core and poster board. I wanted to build something permanent that could be used as a permanent decorative element in a room. And I saw one that inspired me at the CHA show from Allison Krefts’s booth. That one had wood in the middle and I thought it would be fun to make a Heart Marquee Light with beadboard in the middle and metal on the inside and outside.
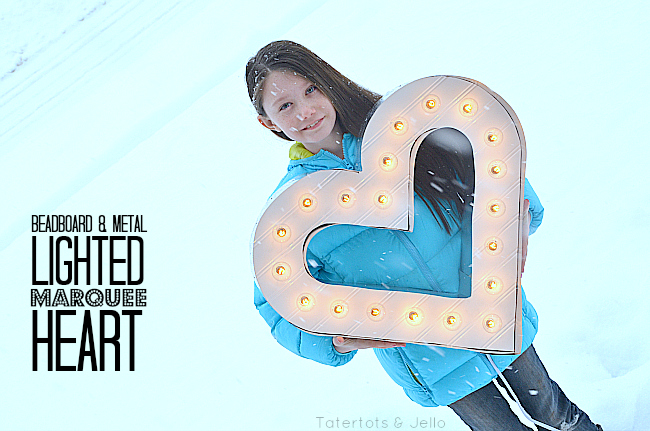
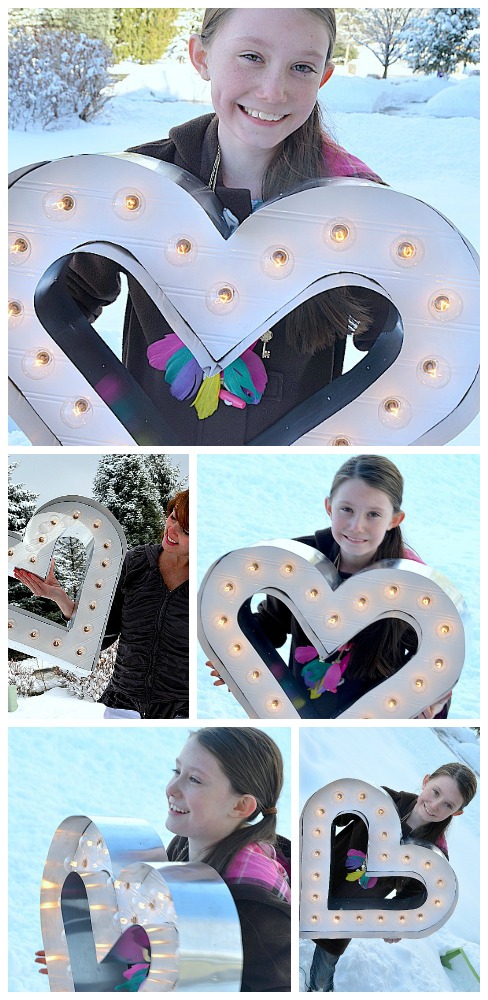
I also love how big this heart turned out. And it would make such a fun photography prop to shoot kids, engagement or wedding pictures or in a photo booth!
Note: When you try this, you may not want to do every single thing I did — that’s totally OK! I think we might have over-built this a bit.
Here’s how we made a lighted marquee letter heart:
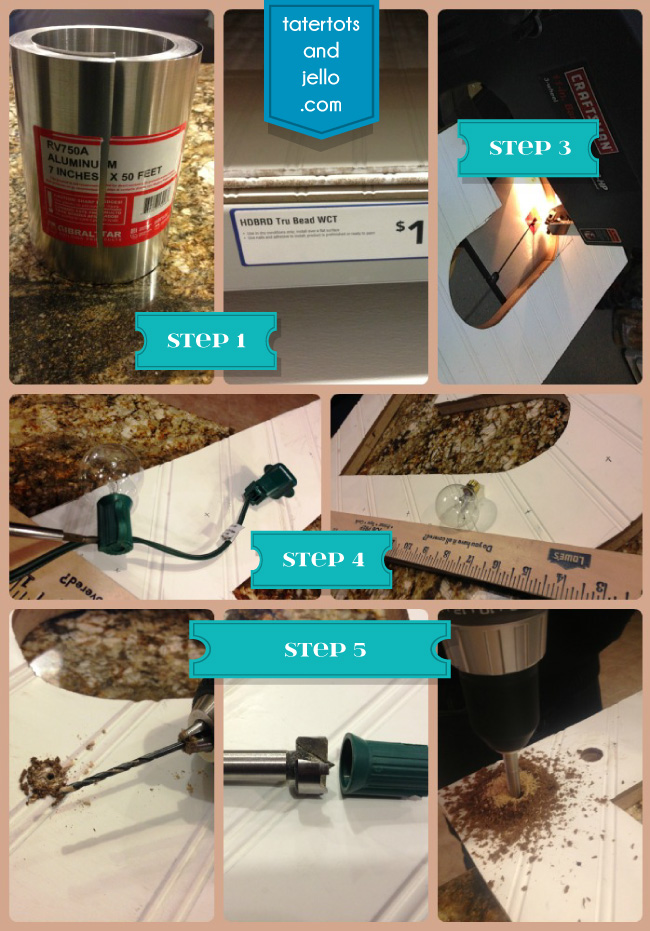
1. buy “handy board” 2×2, lights, wainscoting (about 2×4), liquid nails, white spray paint, roll of roofing aluminum, leftover 2×2 or similar board, small nails, screws.
2. Sketch the shape on the board, or on a piece of paper of the same size. use a ruler and dishes of appropriate size. We wanted a heart that was about 4″ wide. Cut the wainscoting to about 2×2 and transfer your shape to the front of the wainscoting with pencil. Guess roughly at light placement to make sure you have enough. run liquid nails around the edge of where you will need to glue the wainscoting to the particle board — why? Because it’s going to be a pain to try to cut through liquid nails instead of wood — so if you can avoid it, do. Let the adhesive dry.
3. Use a scroll saw if you have one, a band saw if you don’t and a jigsaw as last resort to cut the shape. Take your time; the beadboard will be more difficult to cut than the particle board. I used a RotoZip to get the cuts just right.
4. Estimate how many lights you will need. We knew that we had 24-light strings, so we didn’t want many more than those. We also noticed that the bulbs took up about 1 1/4″ each, so to leave enough room on each side we knew the holes needed to be at least 3″ apart. Mark the center of the holes on your heart — in our case, we simply centered them from side to side on the heart and tried to put them as close to 3″ apart as we could. We also started with one light at the very bottom so the sides would be symmetrical. (You could have marked the light holes on the paper, too, if you’re more of a planning type. But we wrote in pencil, so it was easy to change the holes as needed.)
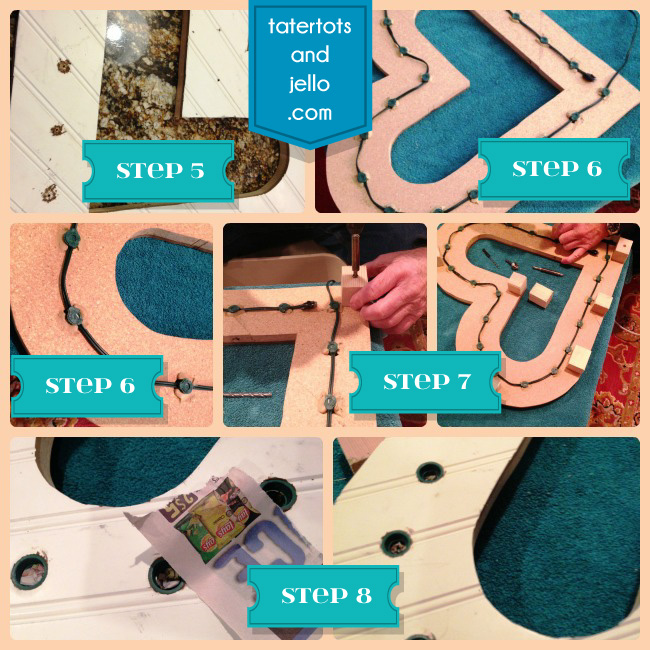
5. We used a small drill bit and then a Forstner bit that was the same size as the light receptacles. We recommend you drill each light hole first with the small (i.e. 3/16″ or so) drill bit and then come back and drill with the Forstner bit. Use the biggest, strongest drill you have. It will create a lot of sawdust and take some time (in fact, this step took the longest of any!). (If you really want to be particular, you can come back with another large drill bit and taper the sides a bit so the lights fit even better in the holes.
6. Next, we put the lights in the holes. You could do this quickly if you drill each hole large enough to accommodate the entire light receptacle. Drop a bit of liquid nails in the back of each hole to hold the light in place.
[Optional: If you feel up to it, you can do like we did and actually rewire the light string. We pried the back off of each light receptacle. It was pretty easy: they just snap in and small metal pieces pierce the wire to make the electrical connection. If you do so, we recommend that you pry each light off, marking the location with a small piece of electrical tape (so you don’t later leave any exposed wire). Use a large pair of snips or pliers to snip the gutter/shingle clips from the lights. Glue each light receptacle in place, making sure you make the wire channel go in the right direction so the wire will go smoothly from one light to the next. After the glue (Liquid Nails) dries, go back with your cord and receptacle backs and snap the cord in place for each receptacle. You can then cut off the end plug from the wire along with any leftover receptacles; cap and tape the wire ends. (We had four extra receptacles.) We also then cut the plug end and spliced on a longer, white extension cord. You don’t have to do this — we just thought it made for a neater project.]
7. Then, cut about 10 or so small pieces (1 1/2″ to 2″) of 2×2 pine we had left over from another project to make supports to go in the back. These supports help take the weight of the project and can also be used for mounting. We just screwed them into the back of the particle board at strategic locations using wood screws.
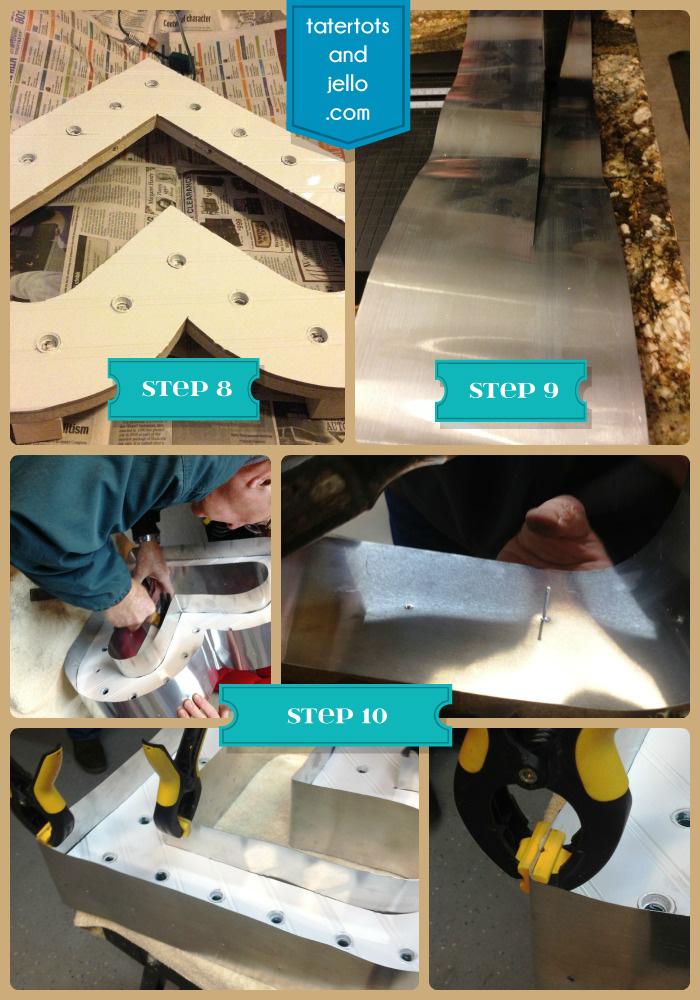
8. Now, stuff a small piece of newspaper in each receptacle, making sure you cover the gold electrical contacts. Spray paint the heart whatever color you like (we used a glossy white) — and make sure that if you have green wires/receptacles like we did that you cover those with white paint too. Give it plenty of time to dry.
9. While you’re waiting for it to dry, estimate the length of aluminum you’ll need for both the inside and outside frames. We bought approximately 7″-wide aluminum, so we had to trim it to size. We chose about 4 1/2″ for our desired width — enough to protect the bulbs in the front and also provide a cavity in the back for the wiring and supports. We needed about 80″ on the outside and 60″ on the inside. We used a paper cutter to make nice straight cuts.
10. Once the paint is dry, you can attach the aluminum to the inside and outside. (It’s good to have two people if you can.) Remember to put the smoothest side in the front (probably the side you didn’t cut). Bend 4″ to 6″ around the bottom of the heart and use a ruler or other hard object to make a nice 90″ bend in your aluminum. Bend the aluminum as tightly as you can around the outside of the heart, nailing every 4″ or so as you go. We used a nail gun with small brads, but you could use a hammer and nails as well. (Tip: make a little template to make sure you’re getting your nails far enough in from the front (and not too much). It’s not the end of the world, but it’s easy to accidentally go too far back and make more holes in the aluminum than you want. We used a bit of liquid nails on the ends to keep the ends flat.
11. Screw in the lightbulbs and be festive!
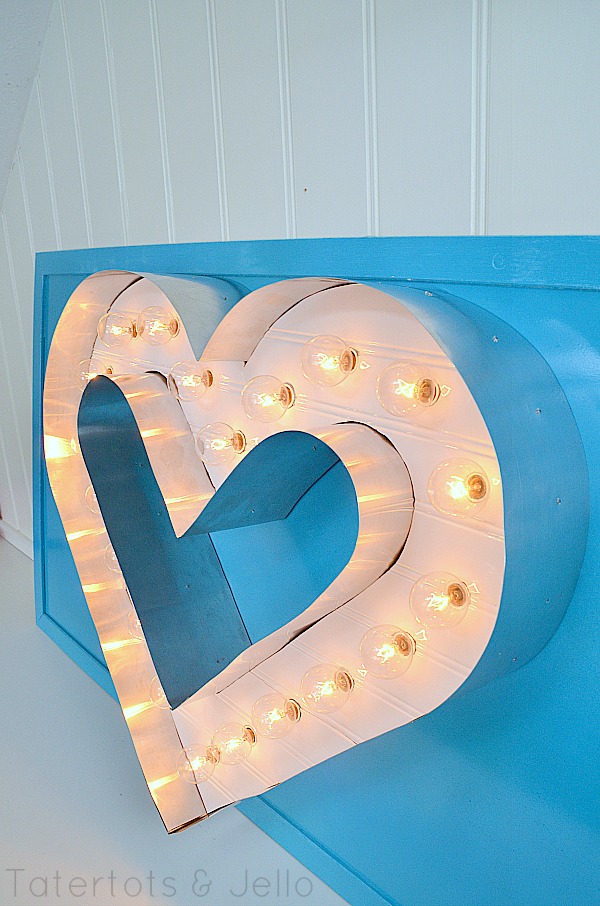 More tips: Depending on how you’re planning to hang it, you might want to put hangers in the supports, or, like we did, just use some strong picture wire and eye hooks. Of course, you can test the bulbs as you go to make sure you didn’t goof anything up. You may also want to attach a dimmer extension cord to your project!
Thanks to Lowes for the gift card they sent me to make this project.
You can follow along with Lowe’s on Facebook for more great ideas and sign up for their FREE Creative Ideas Magazine with TONS of great DIY ideas and instructions!!
Have a Creative Day!!
xox






This is so awesome! I have been wanting to make a marquee sign for a while. This just makes me want to even more!
Amanda @ A Mother’s Craftuition
Hi, Love this! I was wondering if the metal is sharp enough to cut you after you cut it? Also do you have anything on the back to hang it with? Thanks
Theresa » The metal is kind of sharp; I used work gloves just in case. But the front and back are not sharp. I used eye hooks and picture wire to hang it. Thanks for commenting!
Wow!! Gotta say, I’m super impressed by your beautiful marquee heart. We recently crafted a lighted marquee “M” and blogged about it. Amateur work by comparison, but here’s the link: http://honeybadgerhome.com/2013/04/21/our-diy-light-up-marquee-letter/
You’re post makes me want to create another lighted marquee — such lovely attention to detail and a clever idea to hang above a bed. Thank you! 🙂
Love it. I’m going to attempt to make one with pink lips!!! : )
How fun! I need to make one to put in my kids’ room!
I featured it on my Sunday Social 🙂 http://justdoityall.com/decor/sunday-social-1/
this is truly incredible, jen! i have had a major crush on the marquee signs lately, but have been too scared to try! this is awesome.
xo
kellie
Oh wow! This looks amazing. I also have been inspired by the marquee tutorials around the blogosphere, but didn’t like how they were made from paper. I think this is definitely the way to go. And you make it look so easy. Thanks for the tutorial.
Thanks for showing how… Linda
Thanks for the comment Linda!! Have a wonderful weekend!!
xoxoxo
Absolutely amazing! Looks like a whole lotta work,but so worth it. Great job.
It was Joann – but it turned out so great. I really do love it.. Thanks for the sweet comment!
xoxox
Wow. 🙂
LOL – thanks Aly!
xoxo
I LOVE it Jen!! You are so creative! xo
Thanks Amy!! You are the best. Love you!
xox
That is pretty incredible! I would love make something like that for my daughters room. Right now she’s got Christmas fairy lights on her shelves and won’t let me take them down as they are her “nightlight”. I think this would be a much cleaner look.
It would be so cute in a girl’s room!!! I had a reader make one by cutting out a heart out of wood and drilling holes in it and then putting the globe lights through it. It was an easier way to do it, and it turned out great. Let me know if you make one. I would love to feature it Alex.
xoxox
It’s so fun, Jen!! I love it!
Thanks my cute friend! I hope you had a wonderful birthday. I adore you!!
xoxox
Wow! Another great project with Glenn 🙂
SO DANG CUTE! I adore it! Hugs, jen
Thanks cute Jen! Happy weekend!!
xoxo
Hi Jen, Bev shared your post on FB today, and I just had to come to see how you made this wonderful valentine marquee. Positively love it! Sharing with my FB fans as well. Happy Valentine’s day!
Jenn/Rook No. 17
Thanks so much for sharing it Jenn. You really made my day!
xoxo
Really, really, really – like REALLY- amazing! Beautiful project, Jen!
Thanks Michelle!! I love it when I have something in mind and it turns out the way I imagine it to. Thanks for the sweet comment!
xxo
Are you kidding me?! This is amazing! My girls need this in their room now. Thanks for sharing your genius!
haha! You are so sweet Amanda!! Thanks for the cute comment!
xoxo
IN LOVE.
I adore you cute Bridget!
xoxox
Love this! What did it cost to make?
Hi Edwina!!
It depends on how many of the materials you already have on hand. In general probably between $30-$40.
xoxo
So adorable!!!
Thanks Emily. I just adore you.
oxox
Okay, I’m sending you some money so you can make me one!! Great job… you amaze me:-)
Love you Amy!! Thanks and I will totally make you one. You amaze ME.
xox
This is great! What a creative way to light up a little space! My boys would love this in their reading corner! Thanks for the awesome tutorial, Jen!
It would be so fun in a reading corner!! I am making a J to go in my office on an inspiration wall I am creating. I love seeing it lit up at night 🙂
xoxo
This is very cool!
Wow! That’s so fun!! And wonderful that it will last year after year.
I love this! I snapped a pic from a magazine a few months back with the intent of making one. Thanks for the instructions! Its super cute!
That would make an awesome photo prop!! Love that it’s lighted!!!