Tatertots and Jello

COLORFUL HAPPY HOME -- Daily DIY, Decor, Craft and Recipe Tutorial

  • My Home
    • 1905 Cottage
    • Daybreak House
  • DIY
    • DIY Projects and Ideas
    • Organizing
    • Tutorials
    • Printables
  • Decor
    • Spring Projects
    • Summer Projects
    • Fall Projects
  • Crafts
    • Kids Crafts
    • Painting Projects
    • Paper Projects
    • Sewing
    • Wreaths
  • Holidays
    • Valentines Day
    • Easter
    • Halloween
    • Thanksgiving
    • Christmas
    • HAPPY Holidays Series!
  • Recipes

Explore

  • my home
  • diy
  • decor
  • crafts
  • holiday
  • printables
  • recipes

Connect

Home » guest tutorials » Guest Project — Make a Hanging Fabric Yo-Yo Valentine!!

guest tutorials, holiday · January 16, 2011

Guest Project — Make a Hanging Fabric Yo-Yo Valentine!!

Tatertots & Jello is a participant in the Amazon Services LLC Associates Program, an affiliate advertising program designed to provide a means for sites to earn advertising fees by advertising and linking to amazon.com.


Hello folks! We are so excited to be a doing a guest post on Tatertots and Jello! Jen is a fantastic blog host who always features wonderful talent and we are truly grateful for this opportunity to share our blog with all of you.

{GRAB A BUTTON}


Today we are sharing with you a tutorial on how to make a simple and super-cute 

hanging fabric Yo-Yo Valentine!

First, gather your supplies:
Embroidery Hoop (4 inch hoop used here)
Red fabric
White fabric
Decorative Button
Embroidery floss


Start by placing your red fabric in the embroidery hoop, smooth out all of the bumps and creases, and tighten the screw.
Next, make your fabric yo-yo!


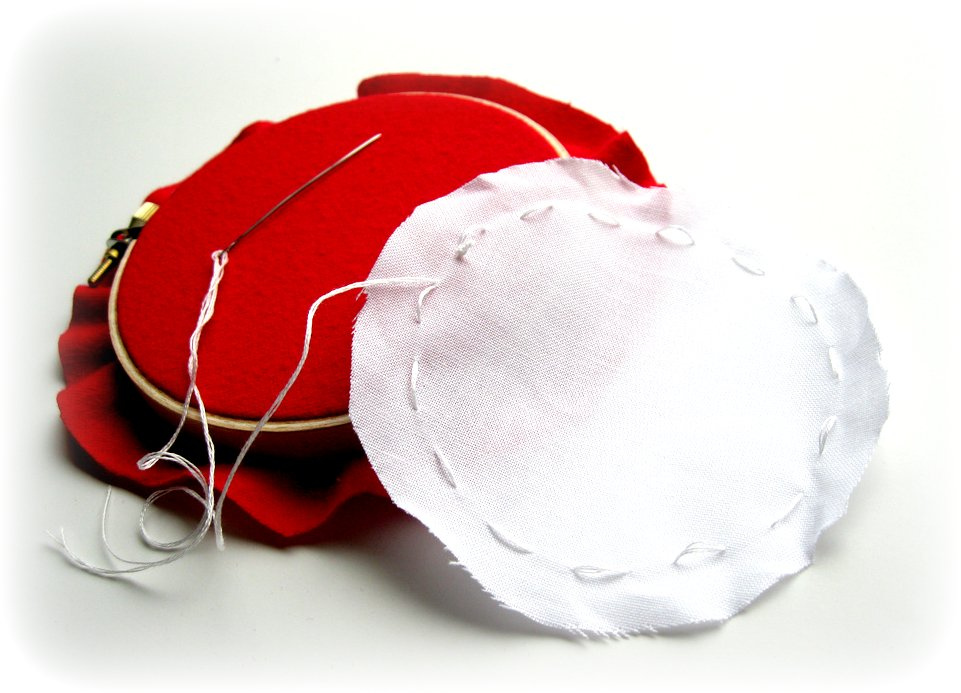
There are many tutorials online on how to make a fabric yo-yo. They are simple to make by hand, or you can purchase “yo-yo makers” at most craft supply or fabric/notions stores.

Heather Bailey has an easy-to-follow handmade yo-yo tutorial here.


Once the yo-yo is complete, it’s time to sew on your decorative button.
Sew the button to the yo-yo, then sew the yo-yo to the red fabric inside the hoop. You can sew it any place you like. Right above the center looks the best when turning the Button Yo-Yo into a flower.
Now it’s time to hand-stitch the stem with the green embroidery floss.
Don’t forget to stitch the leaf in a heart shape — that’s what makes this a Yo-Yo Valentine!
Once the stitching is complete, you will want to make the edges of the embroidery hoop presentable. Wrap the red fabric hanging out of the hoop towards the back. Hot glue the fabric to the wooden hoop, from the inside, or just tape it all together. Hot gluing it will make it hang closer to the wall, but taping it works fine if you plan on setting it on a shelf to display.
That’s all there is to it! This is such a quick and easy craft and adds the perfect *pop* of color to any Valentine’s Day display.
Don’t want to make your own? Visit our PeppermintPlum Etsy shop to purchase one of ours, already made and ready to ship!


Enjoy!


 – Tammy + Annie –


Thanks , Tammy & Anni!! 

What a sweet handmade Valentine’s Day gift idea!!
Here are some other great projects from Peppermint Plum:
http://4.bp.blogspot.com/_dVtUOiGmnug/TTIrbT7-d5I/AAAAAAAAAPo/DKxydhUJ93k/s1600/Topper+Instructions.jpg
{Free Printable: Love Toppers}
{Winter White Wreath}
http://3.bp.blogspot.com/_dVtUOiGmnug/TQv1o_i4aEI/AAAAAAAAAHQ/1QsNQRidXEg/s640/title.jpg
{Paper Candy Pouches}
{GRAB A BUTTON}
Be sure to check out Peppermint Plum for all sorts of fresh ideas!! 
xoxo

Posted By: Jen · In: guest tutorials, holiday

Great Ideas — ♥ Valentine’s Day ♥ {1}
Super Sized Valentine Subway Art!!

You’ll Also Love

Heartfelt DIY Valentine’s Day Ideas
Last-Minute Valentine’s Day Ideas
Tissue Paper Valentine Tree Centerpiece. Use inexpensive sheets of tissue paper to create a sweet valentine tree for a centerpiece of focal point!Tissue Paper Valentine Tree Centerpiece

Comments

  1. [email protected] says

    January 19, 2011 at 10:02 PM

    That's really sweet and I love that you can leave it up past Valentine's! Thanks for the how-to, I'll be spreading the word.

  2. Wendy says

    January 17, 2011 at 12:43 PM

    love it!

  3. Wendy says

    January 17, 2011 at 12:43 PM

    love it!

  4. Bellenza Wedding Bistro says

    January 17, 2011 at 9:24 AM

    I can just imagine the many applications for these adorable fabric yoyos by just modifying the decorations–baby showers, birthday parties, Christmas, even Halloween! Thanks for the great tutorial.

  5. Amy @ Positively Splendid says

    January 17, 2011 at 4:59 AM

    Oh my goodness – these make my heart happy! What a darling project!

  6. Katie's Nesting Spot says

    January 16, 2011 at 11:35 PM

    Ohmigosh this is so super cute, I love the heart shaped leaves!!!

  7. MiMi says

    January 16, 2011 at 9:01 PM

    VERY cool!

  8. Wendy says

    January 16, 2011 at 7:25 PM

    Those are charming! Really cute.

  9. Michelleesque says

    January 16, 2011 at 7:01 PM

    Oh I love this idea, especially the sewn paper bag! Perfect for V-day!

  10. Allison says

    January 16, 2011 at 6:21 PM

    Love these project ideas! The yo yo Valentines are adorable, and those candy pouches are ingenious 🙂

  11. ~*~ saskia ~*~ says

    January 16, 2011 at 6:16 PM

    Love love it! Perfect for V-day x

  12. Sarah @ Handbags*N*Pigtails says

    January 16, 2011 at 6:10 PM

    Oh my goodness Im loving those candy pouches! What a cute idea:)

  13. Brinkmeyer says

    January 16, 2011 at 6:07 PM

    Adorable! I love that wreath and the candy pouches, too! Thanks for sharing!

    Denise @ Simply Weekends

  14. Jen-CraftOManiac says

    January 16, 2011 at 5:49 PM

    SO CUTE, LOVE IT! jen

  15. Sixpence and a Blue Moon says

    January 16, 2011 at 5:22 PM

    How sweet these would be to give as a valentine. I love these! Thanks for the inspiration. 🙂

  16. Julie @ CalleLillyCafe says

    January 16, 2011 at 5:15 PM

    Love those candy pouches! super cute! and those embroidery hoops? I have some big ones for my shop! love them!

Hi! I'm Jen Hadfield. I'm a mom of 5 restoring an 1891 home in the heart of Salt Lake City. I love being creative and sharing simple ideas to make your life easier and more beautiful!

Receive the Latest Crafts, DIY, Recipes and More in your INBOX!

Follow us on Pinterest! It's awesome!

Top Posts & Pages

Copycat Panera Spinach and Artichoke Egg Soufflés - SO good!
Spruce up Your Outdoor Space with a DIY Recirculating Fountain! (tutorial)
12 Must-Have Items to Pack on an Alaskan Cruise!
A New Deck in Under 30 Minutes!
DIY Fountains to Make Your Yard Amazing!
How to Change a Recessed Can Light into a Pendant Light with No Remodeling!


Popular Posts

  • Copycat Panera Spinach and Artichoke Egg Soufflés - SO good!
    Copycat Panera Spinach and Artichoke Egg Soufflés - SO good!
  • Spruce up Your Outdoor Space with a DIY Recirculating Fountain! (tutorial)
    Spruce up Your Outdoor Space with a DIY Recirculating Fountain! (tutorial)
  • 12 Must-Have Items to Pack on an Alaskan Cruise!
    12 Must-Have Items to Pack on an Alaskan Cruise!
  • A New Deck in Under 30 Minutes!
    A New Deck in Under 30 Minutes!
  • DIY Fountains to Make Your Yard Amazing!
    DIY Fountains to Make Your Yard Amazing!
  • How to Change a Recessed Can Light into a Pendant Light with No Remodeling!
    How to Change a Recessed Can Light into a Pendant Light with No Remodeling!
  • DIY Secret: How to Print on Post-It Notes (and Free Printable Template)
    DIY Secret: How to Print on Post-It Notes (and Free Printable Template)

As seen in


Amazon Affiliate

Tatertots & Jello is a participant in the Amazon Services LLC Associates Program, an affiliate advertising program designed to provide a means for sites to earn advertising fees by advertising and linking to amazon.com.
  • About Me
  • Advertising
  • Get Featured

Copyright © 2025 Tatertots and Jello · Privacy
This site is a place for positive discussion and ideas. Negative talk, comments that disparage others, and similar are not welcome and may be removed.