Tatertots and Jello

COLORFUL HAPPY HOME -- Daily DIY, Decor, Craft and Recipe Tutorial

  • My Home
    • 1905 Cottage
    • Daybreak House
  • DIY
    • DIY Projects and Ideas
    • Organizing
    • Tutorials
    • Printables
  • Decor
    • Spring Projects
    • Summer Projects
    • Fall Projects
  • Crafts
    • Kids Crafts
    • Painting Projects
    • Paper Projects
    • Sewing
    • Wreaths
  • Holidays
    • Valentines Day
    • Easter
    • Halloween
    • Thanksgiving
    • Christmas
    • HAPPY Holidays Series!
  • Recipes

Explore

  • my home
  • diy
  • decor
  • crafts
  • holiday
  • printables
  • recipes

Connect

Home » diy » DIY Outdoor Gravel Pit Play Area

diy, guest tutorials, kids, outdoor projects, summer projects · June 27, 2016

DIY Outdoor Gravel Pit Play Area

Tatertots & Jello is a participant in the Amazon Services LLC Associates Program, an affiliate advertising program designed to provide a means for sites to earn advertising fees by advertising and linking to amazon.com.
221
221Shares

Hi! I’m Meredith, and I blog over at Perfection Pending and I’m back with a fun idea for an outdoor gravel pit play area.

I’m not much of a DIY’er and definitely am better at parenting tips, and fun essays on parenting, but I’m super excited about this idea my husband and I had for an outdoor gravel pit play area for our kids.

DIY Gravel Pit Play Area

Last fall, my husband was building a new gate and fence for our backyard. We had a big pile of dirt in the yard for a long time and my three kids would not leave it alone! They played there constantly and had so much fun just moving the dirt around. When we got the fence finished, we had this little square space in our backyard that was now fenced off, and we thought it would make the perfect play area for the kids.

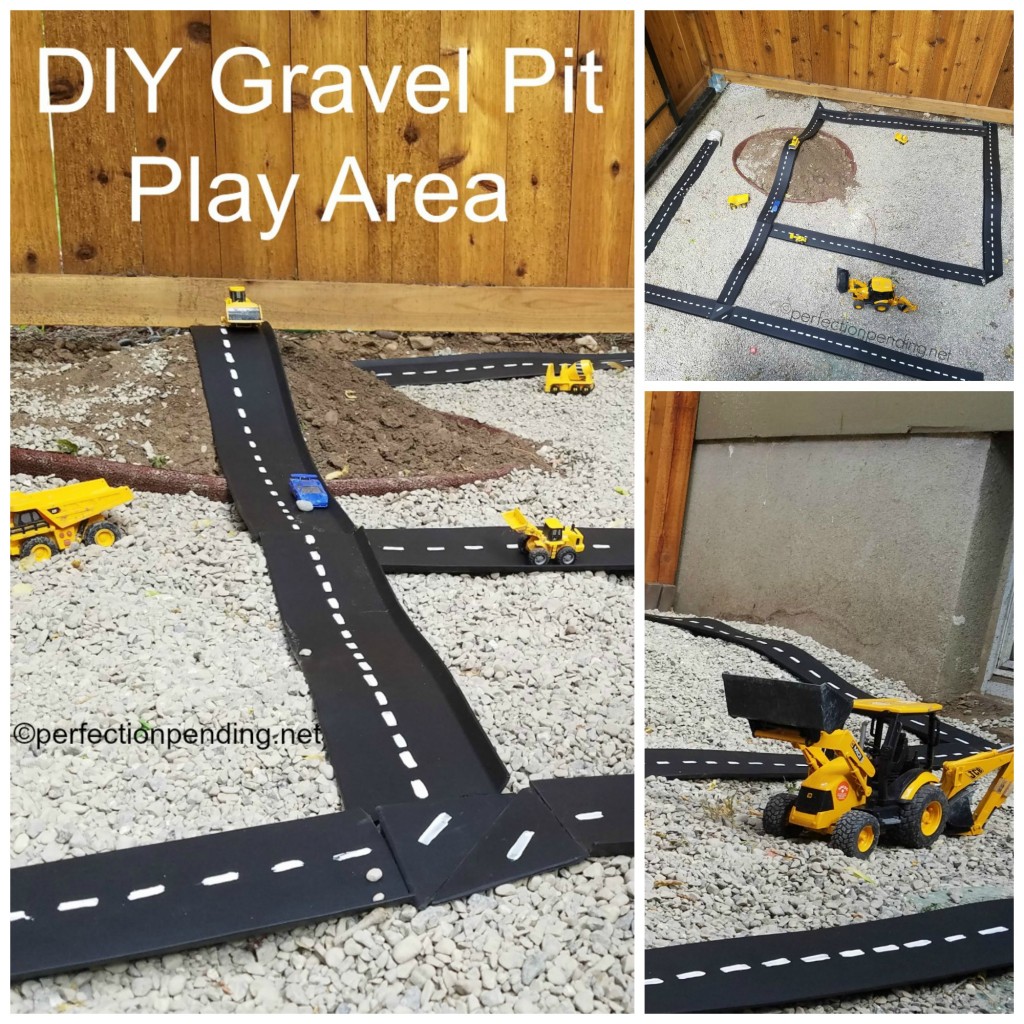
Since we have a cat, we didn’t want to fill it with sand or dirt and have it turn into a giant litter box, so we opted to make a little gravel pit instead. Now the kids love having a place to play with their cars and trucks, and it has a little dirt mound too.

Outdoor gravel pit play area

First, we had to spend some time leveling out the area. This was actually the hardest part because it had lots of rocks that were too big to keep there, and we hand sifted them out. Then, we added the dirt back in and worked on leveling it.

After that, we went shopping for gravel. At first, we thought we’d want something super smooth so the kids would have no problem playing in it. But, ultimately decided on 1/4 inch gravel instead of small pebble rocks that would have been smoother because the cost was so much cheaper. It has worked out great so far!

Our play area was just under 50 square feet and we wanted the gravel to be about 4 inches deep for plenty of digging fun, so it turned out we needed about 1600 lbs. of gravel. It was easy to get in one truck load.

We left a little dirt mound in the middle for a hill, and filled in the rest with the gravel. For the dirt mound we found flexible edging in the garden section of Home Depot.

For the roads, we searched high and low for for something that would look like roads, but be light weight enough for the kids to move around an manipulate.

Gravel Pit Play Area

We thought about bricks or tiles of some sort, but I didn’t want anything that would be breakable and possibly hurt the kiddos while they were playing.

I finally settled on rubber baseboards of all things! They are like these from Home Depot, except I was able to purchase them individually for about $3/piece in the store. I only bought about 5 or 6 and it was plenty for our space.

Last, I took some white primer and painted the lanes on the baseboards and cut them with an exacto knife to different lengths. They were the perfect solution because they are light weight, look like roads, and easy to move around. We cut small triangles for the turns out of one of them too.
DIY Gravel Pit Play Area Collage

It’s a fun play area now that my kids love and so do the neighborhood kids. You could fill yours with shovels and buckets, or anything else that the kids can use for digging. We are going to add a little fairy garden in the corner for my daughter too eventually, even though she loves playing with the trucks as much as the boys. We’re big fans of construction vehicles if you can’t tell.

I hope you’ll stop by my blog and check out some of my other fun posts. You might like these:

10-Things-All-Moms-Say-All.-Summer.-Long.

If you’re about to lose your mind with how much you repeat yourself in the summer, you might like my funny post about 10 Things All Moms Say All Summer Long.

Fruit-By-the-Foot-Birthday-Printables-684x1024

And grab this easy party favor idea for any birthday parties you’re throwing this Summer.

ebook-final

And, I recently published an eBook on Amazon about how I grew my Facebook following by 28,000 followers in just six months. Find more about that here.

*****

Thanks Meredith! What a fun idea for a play area!

Make sure to visit Perfection Pending and

pinterest.32x32.icon.circle
Follow Perfection Pending on Pinterest
instagram.32x32.icon.square
Follow Perfection Pending on Instagram
facebook.32x32.icon.circle
Follow Perfection Pending on Facebook
twitter.32x32.icon.circle
Follow Perfection Pending on Twitter
xoxo
jen signature
221
221Shares

Posted By: Jen · In: diy, guest tutorials, kids, outdoor projects, summer projects

Great Ideas — 18 Farmhouse Projects Part Three!
Patriotic Wood Tray DIY and giveaway

You’ll Also Love

DIY Picture Calendar for Preschoolers
Happy Holidays: Reindeer Food Tubes
Happy Holidays: Naughty or Nice Bucket
Hi! I'm Jen Hadfield. I'm a mom of 5 restoring an 1891 home in the heart of Salt Lake City. I love being creative and sharing simple ideas to make your life easier and more beautiful!

Receive the Latest Crafts, DIY, Recipes and More in your INBOX!

Follow us on Pinterest! It's awesome!

Top Posts & Pages

Spruce up Your Outdoor Space with a DIY Recirculating Fountain! (tutorial)
A New Deck in Under 30 Minutes!
DIY Secret: How to Print on Post-It Notes (and Free Printable Template)
12 Must-Have Items to Pack on an Alaskan Cruise!
Copycat Panera Spinach and Artichoke Egg Soufflés - SO good!
How to Change a Recessed Can Light into a Pendant Light with No Remodeling!


Popular Posts

  • Spruce up Your Outdoor Space with a DIY Recirculating Fountain! (tutorial)
    Spruce up Your Outdoor Space with a DIY Recirculating Fountain! (tutorial)
  • A New Deck in Under 30 Minutes!
    A New Deck in Under 30 Minutes!
  • DIY Secret: How to Print on Post-It Notes (and Free Printable Template)
    DIY Secret: How to Print on Post-It Notes (and Free Printable Template)
  • 12 Must-Have Items to Pack on an Alaskan Cruise!
    12 Must-Have Items to Pack on an Alaskan Cruise!
  • Copycat Panera Spinach and Artichoke Egg Soufflés - SO good!
    Copycat Panera Spinach and Artichoke Egg Soufflés - SO good!
  • How to Change a Recessed Can Light into a Pendant Light with No Remodeling!
    How to Change a Recessed Can Light into a Pendant Light with No Remodeling!
  • Mother's Day Cup Holder Gift Basket
    Mother's Day Cup Holder Gift Basket

As seen in


Amazon Affiliate

Tatertots & Jello is a participant in the Amazon Services LLC Associates Program, an affiliate advertising program designed to provide a means for sites to earn advertising fees by advertising and linking to amazon.com.
  • About Me
  • Advertising
  • Get Featured

Copyright © 2025 Tatertots and Jello · Privacy
This site is a place for positive discussion and ideas. Negative talk, comments that disparage others, and similar are not welcome and may be removed.

221