Tatertots and Jello

COLORFUL HAPPY HOME -- Daily DIY, Decor, Craft and Recipe Tutorial

  • My Home
    • 1905 Cottage
    • Daybreak House
  • DIY
    • DIY Projects and Ideas
    • Organizing
    • Tutorials
    • Printables
  • Decor
    • Spring Projects
    • Summer Projects
    • Fall Projects
  • Crafts
    • Kids Crafts
    • Painting Projects
    • Paper Projects
    • Sewing
    • Wreaths
  • Holidays
    • Valentines Day
    • Easter
    • Halloween
    • Thanksgiving
    • Christmas
    • HAPPY Holidays Series!
  • Recipes

Explore

  • my home
  • diy
  • decor
  • crafts
  • holiday
  • printables
  • recipes

Connect

Home » christmas » Happy Holidays: DIY Holiday Chargers

christmas, diy, guest tutorials, HAPPY Holidays, holiday · November 7, 2013

Happy Holidays: DIY Holiday Chargers

Tatertots & Jello is a participant in the Amazon Services LLC Associates Program, an affiliate advertising program designed to provide a means for sites to earn advertising fees by advertising and linking to amazon.com.
Hi, I’m Emily from 52 Mantels and I am SO excited to share this tutorial for DIY holiday chargers (made from cardboard cake circles!). These are such an inexpensive way to add a little interest to your festive holiday tables. And, who doesn’t love a festive table?!
tatertotsandjello.happy_.holidays.2013

I bought a package of 6 14-inch cake circles for a couple bucks at my local craft store (don’t forget to bring a coupon!) and then used supplies I already had. Which means I got a set of pretty chargers for less than a gingerbread latte. How awesome is that?! 🙂

DIY Holiday Chargers

Supplies:
  • package of 14-inch cake circles
  • black paint and roller (I used chalkboard paint, because it’s what I had!)
  • festive fabric scraps
  • alphabet stencils
  • decoupage glue in matte finish
  • decoupage glue in glitter finish
  • paint brush


Steps:
  • Paint the backside of your cake circles with black paint. Let dry completely.
  • Gather fabric scraps and cut into squares.
  • Decide on holiday words and gather the appropriate alphabet stencils (I used the words: JOY, HOPE, LOVE & PEACE)
  • Trace each letter onto the backside of fabric squares- one letter per square. Be sure to flip letter backwards so that it’s facing the correct position when you flip your fabric!
  • To attach the letters to the black chargers, apply a thin layer of matte decoupage glue to the top of your charger. Arrange your letters appropriately.
  • Paint over the entire charger with the matte decoupage glue.
  • Let the glue dry to the touch.
  • Go over the charger again with your glitter decoupage glue.
  • Let the glue dry completely before using. When these are completely dried and cured, you should be able to use a very damp cloth to wipe off any food spills.


Of course, the glitter decoupage is totally optional, but I think it adds a nice, shimmery touch! I can’t wait to see how the candle light catches it on Christmas night. It’ll be so pretty, don’t you think?


I like these so much, I’m thinking about making something similar for Thanksgiving. Or, maybe just for all-year use. The possibilities are endless!

Come visit me sometime at 52 Mantels. I’d love to see you there!


52 Mantels is a blog about all things home including occasional mantel makeovers, easy DIY projects, seasonal crafts and simple recipes! I’m blessed to be the stay-at-home mother to one adorable little girl and the lucky wife to an ever-supportive hubby (who puts up with my endless projects!).


 **********

Thanks Emily! What a great and inexpensive way to make your holiday table look more festive! Check out 52 Mantels for tons of other great ideas too!

Here are a few of my favorite projects of hers:

colorblock necklace with duct tape 52mantels.com

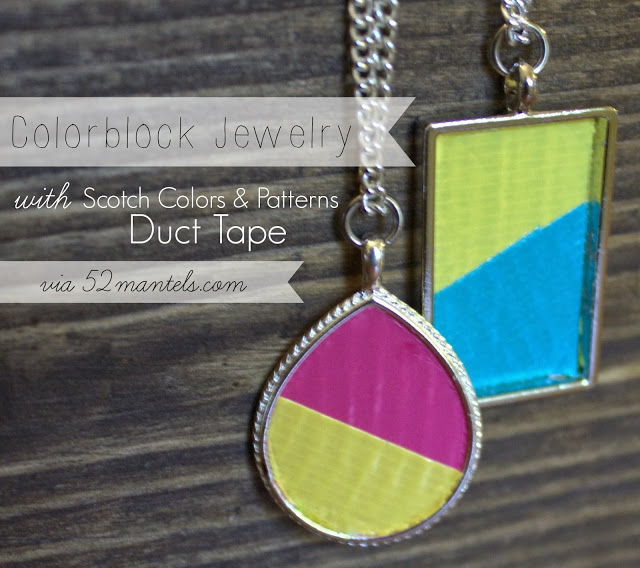
This Colorblock Jewelry she made is a great way to add color to an outfit!! And, she made it out of duct tape! How awesome is that? This could be a fun gift idea for your teen/tweens’ friends!

IMG_5920

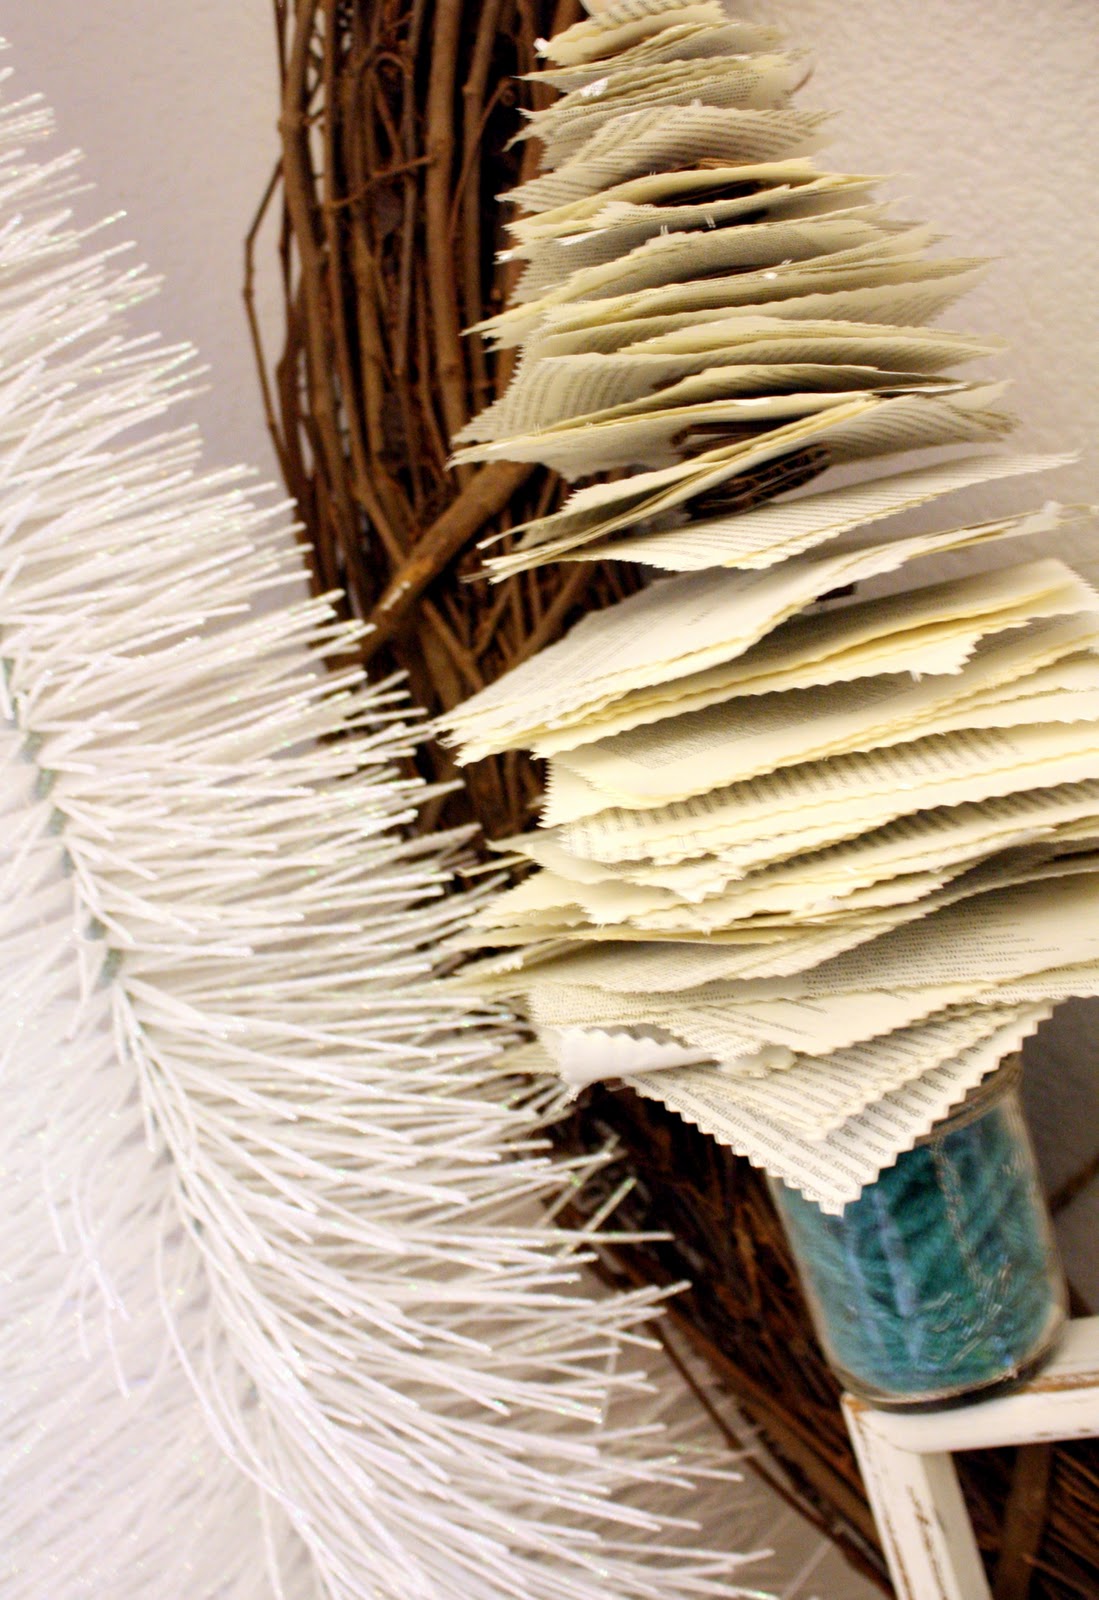
This Anthropologie Inspired Paper Christmas Tree is so creative and simple!

plate+wall+details+52mantels.com[1]

I also love her plate wall! The colors are fantastic!

Visit 52 Mantels

and

pinterest.32x32.icon.circle
Follow 52 Mantels on Pinterest
instagram.32x32.icon.square
Follow 52 Mantels on Instagram
facebook.32x32.icon.circle
Follow 52 Mantels on Facebook
twitter.32x32.icon.circle
Follow 52 Mantels on Twitter

Happy Holidays projects and ideas featured on TatertotsAndJello.com

Follow the HAPPY Holidays Event at Tatertots & Jello
all through the holidays with awesome tutorials, recipes, decorating ideas and more from some amazing blogs!
xoxo
jen signature

Posted By: Jen · In: christmas, diy, guest tutorials, HAPPY Holidays, holiday

Happy Holidays: Washi Tape Owl Ornaments
Gift Idea: DIY Instagram Coasters in Custom Box!

You’ll Also Love

DIY Halloween Bat Mantel Ideas
make a dog playhouse out of a box. all the instructionsMake an Adorable DIY Dog Playhouse Out of a Box!
Make a DIY Marble Kitchen Pedestal

Comments

  1. bathroom faucets ferguson says

    May 29, 2014 at 6:28 PM

    Hola! I’ve been reading your blog for a while now and finally got the courage to go ahead and give you a shout out from Atascocita Tx!
    Just wanted to tell you keep up the great job!

  2. TT says

    November 13, 2013 at 5:52 PM

    Um, you’re calling painted cardboard a charger? Dude, how *very* budget.

  3. Cory says

    November 9, 2013 at 4:43 PM

    Cute idea! What are the gold scalloped items under your chargers? Would use those as placemat chargers at our next soirée! Thank you!

  4. Kim {Stuffed Suitcase} says

    November 8, 2013 at 4:27 PM

    These are so cute! I especially like the thought that you could paint and decorate the other side differently and have 2 holiday chargers in one! 🙂

  5. Steph @ Crafting in the Rain says

    November 8, 2013 at 9:37 AM

    So pretty Emily!

  6. Amy Gable says

    November 8, 2013 at 7:41 AM

    I just found my next project. That would be the best for Thanksgiving!

  7. Brandi @ Nest of Bliss says

    November 8, 2013 at 6:06 AM

    What a fun idea! I love those napkins with the reindeer. Is the reindeer apart of the napkin or just sitting on top? Either way, love that idea!

  8. Confeti en los bolsillos says

    November 8, 2013 at 2:24 AM

    Es genial!! Gracias
    Confeti en los bolsillos

  9. Jen says

    November 7, 2013 at 10:41 PM

    Such a great idea Emily. Thanks for sharing it!!

    xoxo

  10. erin @ house envy says

    November 7, 2013 at 2:26 PM

    Emily, your chargers are such a great idea! I love that you can customize them with whatever decorations fit your decor for the season. Well done!

Hi! I'm Jen Hadfield. I'm a mom of 5 restoring an 1891 home in the heart of Salt Lake City. I love being creative and sharing simple ideas to make your life easier and more beautiful!

Receive the Latest Crafts, DIY, Recipes and More in your INBOX!

Follow us on Pinterest! It's awesome!

Top Posts & Pages

Spruce up Your Outdoor Space with a DIY Recirculating Fountain! (tutorial)
A New Deck in Under 30 Minutes!
DIY Secret: How to Print on Post-It Notes (and Free Printable Template)
12 Must-Have Items to Pack on an Alaskan Cruise!
Copycat Panera Spinach and Artichoke Egg Soufflés - SO good!
Mother's Day Cup Holder Gift Basket


Popular Posts

  • Spruce up Your Outdoor Space with a DIY Recirculating Fountain! (tutorial)
    Spruce up Your Outdoor Space with a DIY Recirculating Fountain! (tutorial)
  • A New Deck in Under 30 Minutes!
    A New Deck in Under 30 Minutes!
  • DIY Secret: How to Print on Post-It Notes (and Free Printable Template)
    DIY Secret: How to Print on Post-It Notes (and Free Printable Template)
  • 12 Must-Have Items to Pack on an Alaskan Cruise!
    12 Must-Have Items to Pack on an Alaskan Cruise!
  • Copycat Panera Spinach and Artichoke Egg Soufflés - SO good!
    Copycat Panera Spinach and Artichoke Egg Soufflés - SO good!
  • Mother's Day Cup Holder Gift Basket
    Mother's Day Cup Holder Gift Basket
  • How to Change a Recessed Can Light into a Pendant Light with No Remodeling!
    How to Change a Recessed Can Light into a Pendant Light with No Remodeling!

As seen in


Amazon Affiliate

Tatertots & Jello is a participant in the Amazon Services LLC Associates Program, an affiliate advertising program designed to provide a means for sites to earn advertising fees by advertising and linking to amazon.com.
  • About Me
  • Advertising
  • Get Featured

Copyright © 2025 Tatertots and Jello · Privacy
This site is a place for positive discussion and ideas. Negative talk, comments that disparage others, and similar are not welcome and may be removed.