
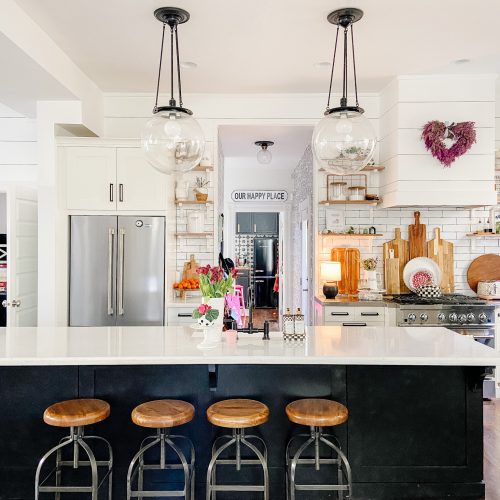
The kitchen remodel is almost done — wooo!!
I just have one more project that I am going to finish up this week. Here are my DIY Pendant Lights. I found some lights that I really wanted from a store online, but they were $140 each, and four would = $560, not including the converter kits to change my lights from recessed to pendant. So I had to come up with something different.

I ended up buying some $7 basic light shades from Target. Then I covered them with some pretty material that I ordered from Fabric.com.

To cover the shades:
- I took the shade and copied the size onto a two sheets of paper taped together, rolling it along the paper and tracing it.
- I added 1 inch to the top of the measurement so I would have some room to roll the fabric under the top and bottom of the shade.
- I used the paper as a pattern and cut out four pieces of fabric.
- Then I used spray adhesive to glue the fabric to the shade and used mod podge to adhere the fabric to the shade when I rolled it under the top and bottom of the shade.
- I matched up the seams and cut away the excess.

Once I got them done, I realized that the part that holds the shade onto the lamp was upside down for a pendant light. Uggggh!! I thought I would have to start over.

Luckily I have a very handy husband and father-in-law who figured out how to bend the wires holding the middle part up to the top so it would work for my purposes. All he did was cut the wires with some heavy-duty wire cutters and bend them to fit at the top with some pliers. Then reattached the circle mechanism to the top. I was so happy!!

I bought some converter kits from Lowe’s that are made to screw into existing recessed lights and magically they transform the lights into pendants without the need of an electrician! And for $20, so cool. And another cool fact is that if I ever got tired of the pendants and wanted to go back to recessed lights, all I have to do is take the kit off and it looks the same. No painting or any other work required!

The light kits come with some wire that hangs down and you can add your light to the bottom of the wire. I didn’t think that look finished enough. So I spend a long time trying to figure out how to make it look more finished. I wanted a matching rod to give the lights a more polished look, but most of the rods I found were way too heavy. I finally found some copper tubes at Lowes. I took them and hack sawed them to the right length and then spray painted them silver.


Then we threaded the wire through the rods and through the top part of the converter kit. We did have to cut the wires and then re-attach them together once we threaded them through the tubes. You strip the plastic off the wires and then twist the wires together and twist them into an electrical cap. You need to have someone who knows what they are doing help with this part. It’s just like re-wiring any type of light fixture.
Once we had the wire threaded through the tube and re-attached, we discovered we had to pull the wire up through the top of the kit and I had a gap. Uggggh!! I thought I was foiled again. But we persevered LOL!! My father in law came up with the idea of a very short length of the same tubing in a slightly larger circumference to cover the gap and fit over the top of the other tubing. Then we epoxied the two tubes together to the top of the ceiling piece.

And it ended up looking great!! Very polished – which is what I was looking for. And instead of $560, this project cost me $44, plus the cost of the converters.

So now I have some pretty pendants in my kitchen!!
The full reveal is coming up soon 🙂

Have a Beautiful Monday!!
xoxo

I’m linking this up:

And Beth’s:


Hi, I have been ALL over the Fabric.com website and I can’t find the fabric that you used to cover your lampshades. Do you know the fabric name?
How did you reattach the UNO fitter on top of the part of the light that light bulb screws into? I currently have pendant but would like to switch to a fabric shade. All shades do not fit over what the light bulb screws into. Was your similar?
[email protected] » I’m not sure what that filter is … the kits we got don’t have that. They replace the light at the top and come with a matching shade frame.
Looks amazing! Love the colors in the space.
Thanks Jessica!!
xxoxo
Oh how wonderful they turned out. I’ve just bought my first house and looking forward to some of the DIY projects I’ve found to transform my house into a Home. Thanks for sharing your tutorial.
You’ve done it again… So clever! Your whole kitchen is just stunning! I’m excited cuz this doesn’t have to go in my Someday file. We can tackle this project next weekend! Thanks for sharing all the little challenges along the way, too. Makes me feel better about those moments in my own projects!
I LOVE these! We are definitely planning to do this in our kitchen since this is exactly what I’ve been wanting! I do have a question though – how did you reattach the ring inside?
So I bought these converter kits from a catalog and they are super easy. BUT I don’t like the glass that is tan frosted.
So first I bought clear glass and did the DIY Mercury glass…but no, they are just a little to small to screw on.
SO now I want to do the drums….but NO they wont fit where the spider thing is. Sooo I’m trying to look at your photo and see where you reattached it after you cut it off. I’m not super handy, could I just cut the circle or will that not work?
Your whole kitchen is darling. Do you mind sharing where you got the stools to? So cute!
Thanks
Great tutorial and a beautiful kitchen – I can’t wait to see how it all turns out!
Wow really effective and inexpensive. I never thought of getting that creative but it doesn’t look to difficult. Thanks great post.
LOVE it! I am especially loving the turq. under the bar area and the cute decor on top of your cabinets. They look like mine and give me idea;s)
Wow! Outstanding job! I love the fabric and the converter kits are wonderful! I really dislike Target’s lamp shades! The “harp” used for traditional lampshades isn’t needed with their lamps…which could be good…but they are forever getting lopsided, which makes me crazy. Glad your hubs is so handy!
Cheers!
Love these…. looks great!
Hello! I love your lamps! Thank you for sharing. I also love the rest of your kitchen and my husband and I have looked at it for inspiration. If you don’t mind me asking, what color blue did you use for your island? I have been searching for a color and your color is perfect. Thank you so much for all of your inspiration 🙂
Amy B.
Love the lights Jen! Your kitchen is so fresh and bright! Looking forward to seeing you at SNAP!
Jen
The lights look fantastic! I’m wondering where you got your stools from? I’ve been looking for some like that but haven’t found any that I like yet, and I love those. Thanks!
omg. seriously. amazingly adorable! i love love love these!
thanks for sharing…and the kitchen is beautiful! love those colors!xo
Love your new drum shade pendants…as much as I love mine!
I did this very same project…in the very same fabric back in May ’11 check it out here
http://elegantnest.blogspot.com/2011/05/fabric-covered-lamp-shades.html
This was one of my very first posts on my new blog.
I had the same issue with the shades…but just went ahead and hung them upside down and think they look OK. So excited to see your solution and how you added the tubing to the cord.
You obviously have great taste in design 😉
LOVE your new hanging drum shade pendants…as much as I love mine!
I did this very same project…with the very same fabric back in May ’11…check it out here http://elegantnest.blogspot.com/2011/05/fabric-covered-lamp-shades.html
This was one of my very first posts on my new blog.
I had the same issue with the shades…but just went ahead and hung them upside down and think they look OK. I am so excited to see your solution and how you added the tubing.
You obviously have great taste in design 😉
Jen, the kitchen looks amazing! I love how the pendants turned out. 🙂
OMG…can’t have enough of your ideas. Was directed here for the DIY necklace to inspire brides on my blog to be a DIY bride but I myself can’t stay away. Awesome work.
OMG. I had to run out and buy the converters today! So my question is where in Lowes do I find the tubing? I tried to look for it but I wasn’t quite sure what I was looking for. My DIY is half way done, but without the tubing the lamp shades are hanging lopsided and it is driving me a little nuts. Need to fix ASAP. Thanks for the inspiration! Will post when completed!
Hi Janice!
The tubing was kind of by the electrical supplies; check near plumbing, too. You probably need to ask someone to find it. I am not sure what it’s use is normally. It was in a upright bin with more metal rods of different widths. I can’t wait to see your lights. Send me a link when you are done, ok? You do have to cut the wires to thread them through the tube, but it’s easy to re-connect the wires with wire caps just like you would in a regular light fixture. (Make sure you have someone who knows what they’re doing for electrical stuff.)
xoxo
wow I learned so much from this post! Definately filing this away in my “gonna try this someday” stash! I absolutely love (and am entirely jealous of) your kitchen!
This is so awesome…what cool fixtures! Your kitchen is gorgeous! 🙂
Awesome lights! I can’t wait for the full reveal of your kitchen! I’m already in love with your island.
Amazing Jen! Your perseverance and problem solving are simply A {{to the}} MAY {{with a beautiful}} ZING — and the results — as polished as you envisioned! Love your kitchen and can’t wait to see the whole reveal! Oh, and thanks for telling me about the recessed lighting converters — I had no idea they existed!
They are awesome!
These look GREAT! Good for you! I have a flourescent (sp?) light panel that I detest, but I don’t know how to change it without spending a fortune AND losing a lot of lighting. (I’ve heard that going away from flourescent makes for a dark kitchen….) One day I will get brave and figure something else out. Yours looks great!
I had one of those in my house in California, Rhonda. I took out the fluorescent fixture and then added recessed lights in the inverted part. And then crown molding where the ceiling went up into the box. It turned out really cute!
Thanks for the nice comment!!
xoxoxo
Jen
Totally in love with your kitchen…totally….can I come live at your house?
Come on over!!
xoxox
I’m sure you’ll tell us soon enough… but what paint color is that fantastic aqua/turquoise?
Thanks Rhonda!!
I have a few different aqua paint colors going on, Martha Stewart Rain Water and Martha Stewart Aegean Blue 🙂
xoxox
Jen
These are lovely! You and your handy helpers did an excellent job.
Love the lights!
And your kitchen is gorgeous!
Love your new lights! Too cute! Can’t wait til the full reveal! Its looking gorgeous!
Wow, those are truly beautiful! I love, love the fabric. They look so perfect in that kitchen space, too. What a neat idea. I would love to do some creative lighting in my little girl’s room when she gets older (she’s only 14 months old now), and that is a neat idea. My husband is not-so-handy, so I might enlist my Dad’s help. Thanks for the inspiration!
Great job!!! Looks way more expensive and definitely worth the extra work, lol.
That was a very clever idea and I love the way they look. Now you have something no one else has (well, until they read this) and look at all the money you saved. Things are looking beautiful!
Love the little peeks. Can’t wait for the reveal!! How fun =)
Ohmygosh this is AWESOME!!!! I wish I had recessed lights to tinker with! i have one singular boob light that i am going to hopefully convert to a chandelier or something fun — this is a gorgeous makeover girl!!! cant wait for the full reveal!
Love these Jen. What a fantastic job and I’m so happy you had just the right assistants to help make it all work on such an amazing budget. Gorgeous!
OK….I’m just so in love with your kitchen and I am totally forwarding this to my husband!!!
Wow! They look totally gorgeous!! I can’t wait to see the final reveal now! 🙂
WOW I love your color scheme!! LOOKS great!
I absolutely love the pendants…I have recessed lighting and I had no idea you could do this relatively easy!
These are awesome and I really like the material you used! You make it look so easy 🙂 Thanks for sharing!
Happy Monday!
Kristin
Looks awesome! I love the look and totally want to try this in my new house. Thanks for sharing all the details!
These are absolutely gorgeous Jen! Love them! So glad your hubby was able to fix them for your needs!! He is a keeper!
Aw- thanks Amy!!! Love you!
xoxox
Jen
I just ran out and bought the kits and installed my own! Awesome! I linked your post to mine here: http://craftyimaginings.blogspot.com/2012/01/who-knew-recessed-converts-to-pendant.html
Very cute, Jen! I would have thought I was all done too when I noticed the wires were wrong for the hanging!
Your perseverance totally paid off. The pendants look fantastic! Great job Jen.
Love the shades! So pretty! Can’t wait to see the full reveal!
looks great! good job.
Love them, Jen! I’m so glad you shared about the light kit! We have recessed lights in our kitchen & my husband nixed my suggestion for a pendant light because of that! (Slyly rubbing my hands together) Now…I can have my way with those lights. :p
Wow these look great! Good thinking on your families part with all the little fixes & problem solutions that they came up with. They turned out wonderfully!
I can not believe all the amazing things you do…
Way to figure things out! I’ve always wondered how those conversion kits work, so thanks for showing a picture. I’ve contemplated getting some for the kitchen.
Look forward to seeing the whole space 🙂
Clever, very clever. The kitchen looks awesome. Can’t wait for the full reveal.
I LOVE making lights! YOURS are fabulous! Your whole kitchen is cool!
jen!
i don’t know where to begin. amazing. i’m drooling. so fun. love your pictures too!
xo
kellie
Those pendants are awesome Jen! We have two stained glass pendant lights that hang over our bar, and I think it would be so fun to change them out for some fabric colored shades like yours!
LOVE IT! Have been thinking about giving that a try for my kitchen as well, great tutorial!
I am so excited now that I’ve seen your post! I has no idea that these conversion kits existed. I have two lights in my kitchen that I would love to convert….I may run to Lowe’s right now!
PS>Your kitchen is looking beautiful!
Julie
Well done. Love them. What a saving too. Love the stencil print as well. xo, enjoy your week. jen
Jen! These look so awesome! You are seriously so creative and they turned out looking like they were made that way! Also great choice of fabric…I love the print!
You are so clever, this is so neat!
Jen-
Your aluminum tubes look like they made all the difference! It looks FANTASTIC! Is it wrong that I want to come over and just take a good look around? 🙂
Heidi@HomemadeBeautiesByHeidi
very cool! Me likey!!!
You amaze me! They look great…way to go on the teamwork! Smiles~Beth
Jen – I have always liked the idea of those converter kits, but I have always disliked having just the wire hanging – what a great solution – thanks for sharing! Take care, Laura
Love this!! I have one recessed light (over the kitchen sink) that I’ve been wanting to do this to for a while. I’m inspired to start now!
I am in awe of this project. I have 4 can lights in my pool house and while they offer good light, I want to do something to bring the ceiling down and add some color. Great idea. I now am off to Lowes to get those converters.
Hello Jen,
Oh super job, I love your new kitchen pendant lights.
Smiles, Paula
Say what??? This is awesome. I might have to do this for our dining room!!! Beautiful, Jen. And I love that you covered the cord up with aluminum tubes!
Your new lights are gorgeous!!! How awesome that you have your hubs & FIL to give you a hand when you need it (my FIL is an electrician and we often call on him at my house). 🙂 Looking forward to your kitchen reveal…I love what I see so far!
I love these. The converters make this a project anyone could do, and the price point is great!
Turned out great! Can’t wait to see the reveal!
I love those, Jen! They look professionally done. The pattern on the shades is lovely. Great job!
Fabulous idea, the finished look is just stunning and at a fraction of the cost.
Thank you for another useful post.
awesome – can’t wait to see pics of your whole kitchen!
What a great idea and the outcome is beautiful. Thanks for sharing this project with us.
These are just beautiful! So chic and I can’t believe how cheap you were able to make these for. I’m having a giveaway today for a pillow cover, and the fabric on your pendants is one of the favorites that I picked out. I just love it. Great job, and thanks for sharing!
What a brilliant idea, & fantastic execution! I loved the way that you kept thinking up solutions to make sure you got to your end goal. Great Job!!
Can’t wait for the full reveal!
xx