Tatertots and Jello

COLORFUL HAPPY HOME -- Daily DIY, Decor, Craft and Recipe Tutorial

  • My Home
    • 1905 Cottage
    • Daybreak House
  • DIY
    • DIY Projects and Ideas
    • Organizing
    • Tutorials
    • Printables
  • Decor
    • Spring Projects
    • Summer Projects
    • Fall Projects
  • Crafts
    • Kids Crafts
    • Painting Projects
    • Paper Projects
    • Sewing
    • Wreaths
  • Holidays
    • Valentines Day
    • Easter
    • Halloween
    • Thanksgiving
    • Christmas
    • HAPPY Holidays Series!
  • Recipes

Explore

  • my home
  • diy
  • decor
  • crafts
  • holiday
  • printables
  • recipes

Connect

Home » sewing projects » Stenciled Faux Roman Shades {tutorial} — Kitchen Sneak Peek

sewing projects · August 19, 2011

Stenciled Faux Roman Shades {tutorial} — Kitchen Sneak Peek

Tatertots & Jello is a participant in the Amazon Services LLC Associates Program, an affiliate advertising program designed to provide a means for sites to earn advertising fees by advertising and linking to amazon.com.


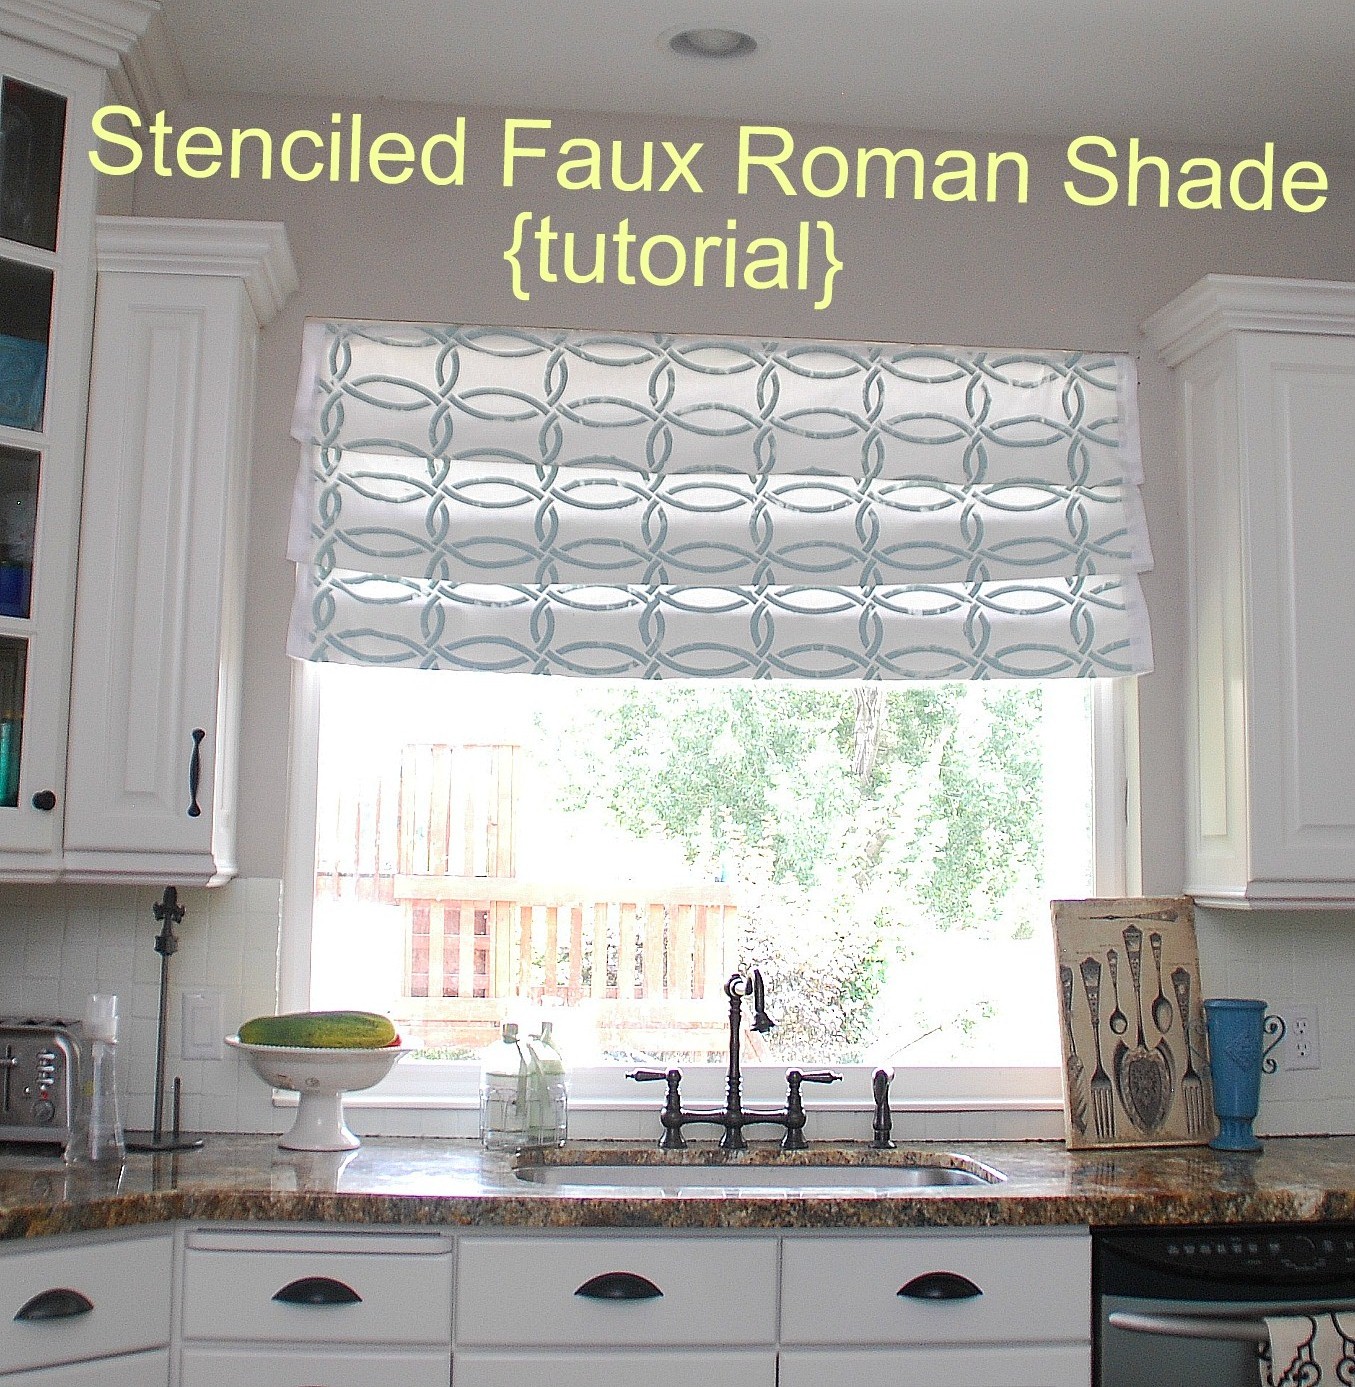
I’m still working on my kitchen redo. I decided I wanted to change things up and make a Roman Curtain for the window above my kitchen sink. And in the spirit of keeping it real, I just want to let you know that the first version was a total sewing fail. I tried to make it no-sew AND Faux and let’s just say that hot glue and white canvas do not mix LOL!

So I started over.

Here’s what I did: 

1. I measured the window and added 3 inches to the length and 2 inches to the 2width. I used my Royal Design Studios Stencil — Chain Link.
2. I found the easiest way to stencil the pattern was the Roller Lite Touch Up Kit from Home Depot.
3. I laid the stencil on the upper corner of the canvas. 
4. After each section, I matched the existing stencil up to the hash marks to be sure it was straight. 
5.I did this until the whole fabric was covered.
6. I used a iron to heat set the paint into the canvas.
7.I used an old bed sheet to make a liner. I stitched the sheet to the canvas, making a “pillow case” and then folded 2 inches at the top over to make room for the spring rod.
8. Then I inserted the rod into the casing and hung the curtain. 
Keeping it real — I discovered that the curtain was a little small for the space, so I sewed some white grosgrain ribbon on each side of the curtain to make it fit the space better. I also think it dresses up the curtain. 

After I made the panel, I posted about it on my TT&J Facebook page, and mentioned was going to make it into a regular roman shade and then Richella from Imparting Grace sent me an email and told me about her “Faux Roman Shade Tutorial” and it was genius.

 [IMG_3532_2_4.JPG]

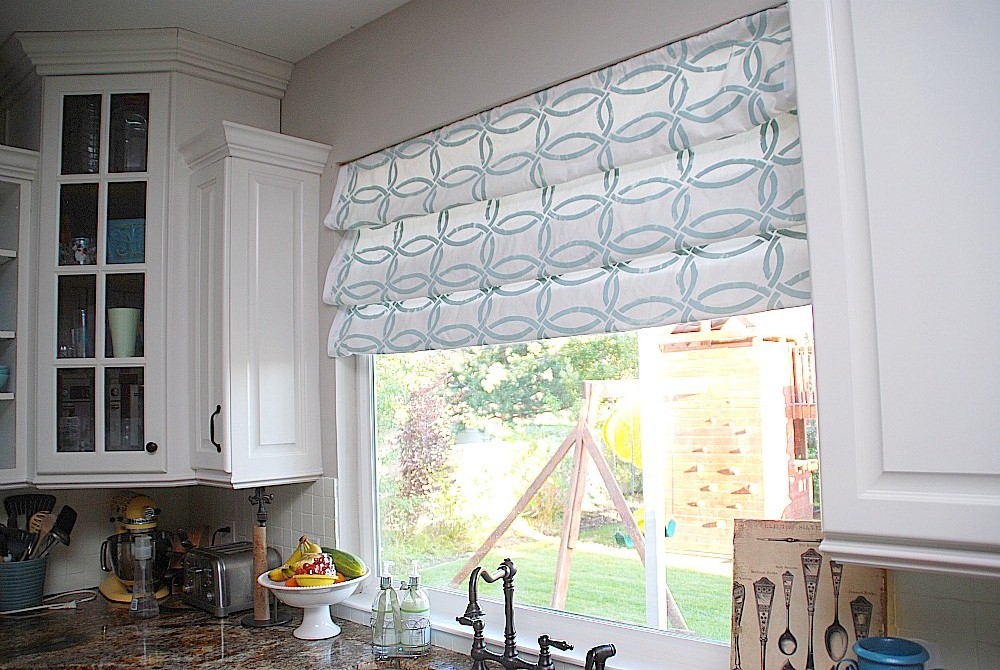
So I did that! I just inserted two more adjustable spring rods in the window opening and then just folded the panel over the rods to create panels. Be sure to check out her tutorial for more details!!

Super easy. And since I don’t really need privacy in this window since it overlooks an open space, I thought this was a good solution!

I love that the paint in the curtain is the same as my kitchen island!! 

It was hard to get a picture of the actual color of the paint since the sun coming in the window made the paint look so much darker than it really is. The paint is really a really light bluish-green color. The name of the paint is Martha Stewart Rainwater.

I have to say that I love Royal Design Studio Stencils. Their stencils are made out of a heavier material that doesn’t stretch, like some of the other stencils I have tried. And my favorite part? They have marks on the stencil that line up with the previous stenciled areas. So it is super easy to keep the stencil straight and lined up! And I love all of their modern designs!! You can find out about all of their designs at their main website!
Have a Colorful Day!! 
xoxo
PS — It’s Friday!! My favorite day of the week!! Why?? Because it’s the day I get to see what YOU have been working on and feature YOU! Come link up YOUR ideas at the Weekend Wrap Up Party!! It starts at 6 pm {mst}.
book worm apple1 Nine {Free} Back to School Printables!
And, Are you getting for Back to School?? I am sharing NINE Back to School Printable Ideas over at Babble’s Home Ec!!

 PPS — I am linking up to these fun parties – check them out!

The DIY Show OffBCD 125UndertheTableandDreaminggiveawaysTidy Mom I'm Lovin It Fridays


Posted By: Jen · In: sewing projects

"Summer Social" Guest Project — Make Friendship Bracelet Kits {with free printable}
Weekend Wrap Up Party — and $100 to UUPP {inspiring prints}!!

You’ll Also Love

Make Your Home Cozier with Boucle!
15 Best Kitchen Ideas for 2023!
Update a Dated 90’s Kitchen on a Budget

Comments

  1. Jennifer Schaible says

    April 12, 2013 at 1:59 PM

    7.I used an old bed sheet to make a liner. I stitched the sheet to the canvas, making a “pillow case” and then folded 2 inches at the top over to make room for the spring rod.

    Step 7 was so helpful to me as I’d really been trying to figure out how to make the liner. Thanks so much for the tutorial, everything turned out so lovely!

  2. Dawn Engstrom says

    January 17, 2012 at 11:55 AM

    I just found you! My Dad an I are planning to build a banquette in my kitchen this spring and would love to see YOURS in it’s entirety. The stenciled napkin pillows were a great find for me. Any chance you have a picture of it with the table and chairs?
    THANKS SO MUCH! Keep inspiring all of us!
    Dawn in Omaha, Ne.

  3. Dawn Engstrom says

    January 17, 2012 at 11:53 AM

    I just found you! My Dad an I are planning to build a banquette in my kitchen this spring and would love to see YOURS in it’s entirety. The stenciled napkin pillows were a great find for me. Any chance you have a picture of it with the table and chairs?
    THANKS SO MUCH! Keep inspiring all of us!
    ~Dawn in Omaha, Ne.

  4. Amanda says

    November 23, 2011 at 8:53 AM

    I love your big window over the sink.

  5. Ruth says

    August 27, 2011 at 4:38 PM

    I absolutely love these. I want to try something like this in my kitchen.

    Ruth

  6. Jen says

    August 26, 2011 at 12:25 PM

    Thanks for the idea! We are in the middle of a kitchen redo, and I love the idea to do a roman shade.

  7. Dee Burns says

    August 25, 2011 at 3:05 AM

    Jen, you did an incredible job on your "Roman Shade". Love the stenciling. Using fabric I painfully make the real ones for myself, friends and neighbors. I used to Stencil all the time, however, not on such a large scale. You have inspired me to give this a try.
    I am so glad I found your Blog from A Little Bit of Bling…Thanks Julie.

    Thanks
    Dee B

  8. Katie @ The Crafty Blog Stalker says

    August 23, 2011 at 3:07 PM

    I love the thought of painting on fabric for the curtains!

    I would love if you would come share with my week long link party at The Crafty Blog Stalker! http://thecraftyblogstalker.blogspot.com/2011/08/blog-stalking-thursday-4.html

  9. laura says

    August 23, 2011 at 2:46 AM

    Looks great! I have been looking for a simple faux roman! I will have to give this a shot!

    Laura O
    lorrinteriors.blogspot.com

  10. Becca says

    August 23, 2011 at 2:37 AM

    I love it, I'm in the process of picking curtains and now I'm inspired to make my own!!

  11. celebrate CREATIVITY in all its forms says

    August 23, 2011 at 2:07 AM

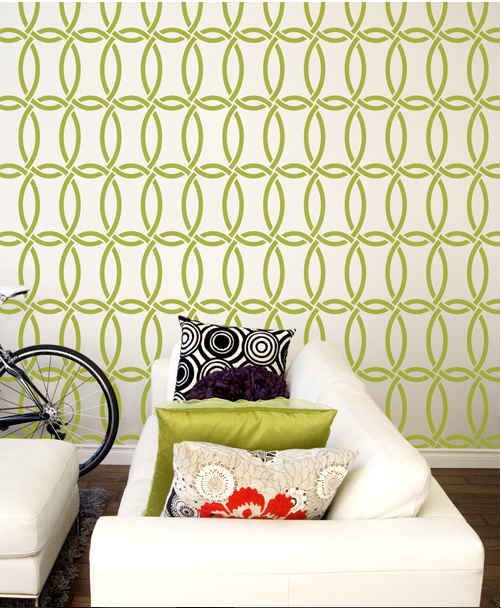
    Amazing stencilling job. I've used Royal Design Studio stencils before and they're fab to work with.

    Great job. Such patience you have too. Popping over here from TCB and it's a pleasure to browse your site.

  12. Melanie says

    August 22, 2011 at 5:51 PM

    Jen, thanks for making our Royal Design Stencil look SO FREAKIN AWESOME! As much as I love this design on a wall I think I LOVE seeing it on your Roman Shades even more. Clever, clever lady, you are!

  13. nest of posies says

    August 22, 2011 at 4:16 AM

    ohmygoodness gracious!

    the kitchen is so you!!! the colors, the stencil, the happiness of it all. it all looks perfect together. i know you must be pleased.

    xo
    kellie

  14. Kara says

    August 22, 2011 at 3:39 AM

    Oh Jen, it turned out just beautiful! I adore that color of blue! I love the idea of using the paint from your island so that it matches perfectly. You are such a smartie pants!

  15. Tres Chere Vintage Market says

    August 21, 2011 at 8:36 PM

    Actually can you just give me your kitchen? I'm totally in love with it.
    http://trescherechattel.blogspot.com/

  16. Michelle says

    August 21, 2011 at 4:48 AM

    This is such a great idea Jen!! I love how it came out and can't wait to see more of your kitchen!

  17. Shirley says

    August 20, 2011 at 2:31 PM

    Love that stencil design, it looks amazing!

  18. Kelli @ RTSM says

    August 20, 2011 at 12:00 AM

    I love the stencil and the color! It looks amazing!

  19. Vivienne @ the V Spot says

    August 19, 2011 at 11:55 PM

    This turned out great! I'm glad you posted the fail for the new sew shade. (#1, it helps to dispel the rumor that you have clones; and #2, I would have grabbed the glue gun first and this tells me not to…)
    xoxo

  20. Lina - Fancy Frugal Life says

    August 19, 2011 at 11:55 PM

    I lov ethis project!! What a great stencil 🙂

    Lina
    Fancy Frugal life

  21. Jen-CraftOManiac says

    August 19, 2011 at 11:50 PM

    LOVELY, THEY LOOK SO GREAT. LOVE THE PATTERN. I also spy white… of course I love that too. I want white in my kitchen as well. xo luvs- jen

  22. Richella says

    August 19, 2011 at 11:49 PM

    Your shade looks awesome, Jen! You were so kind to include a link to my tutorial–thank you! I'm so glad my simple method worked for you.

    Your whole kitchen is looking absolutely wonderful. It's fun to watch it unfold!

  23. Tanya Anurag says

    August 19, 2011 at 10:49 PM

    The shades look so cool after being stenciled. Great job!!

  24. Beverly @ FlamingoToes.com says

    August 19, 2011 at 8:48 PM

    This is gorgeous Jen! The stencil is perfect and I LOVE the way the shade looks! So so pretty!!

  25. adriane@fortheloveofpainting says

    August 19, 2011 at 8:23 PM

    I love the stenciling…I would love to feature this on my blog next week! http://www.fortheloveofpainting.com

  26. Stacy says

    August 19, 2011 at 8:14 PM

    LOVE IT!!! It is good to know that even the mighty Jen can have a craft fail every now and them 😉 Can't wait for the whole reveal!

  27. Denissa says

    August 19, 2011 at 7:19 PM

    So pretty Jen!! 🙂 The transformation is amazing! Can't wait to see all of it 🙂
    I'm dying to paint my island now! I was wanting to do beadboard or maybe board & batten, but I think paint would be A LOT easier! lol

    Denissa
    xoxo

  28. BeingBrook says

    August 19, 2011 at 6:02 PM

    Beautiful job! Love the stenciling.

  29. Mary Beth says

    August 19, 2011 at 5:36 PM

    Your blind is simply lovely!

  30. MiMi says

    August 19, 2011 at 5:01 PM

    Cute!
    It's so hard to make faux roman shades. LOL I actually know that one!

  31. notyet100 says

    August 19, 2011 at 4:30 PM

    Wow u r so good with everything 🙂

  32. Amanda @ Serenity Now says

    August 19, 2011 at 4:29 PM

    First of all, I want to tell you how cool it is that you shared a "Fail" picture with us. Sometimes it is easy to look at the "big" crafty bloggers and think about how perfect they are–they must never make mistakes. Thanks for being real. 🙂

    Second of all, your window looks amazing! I love the stencil pattern and the gorgeous color. 🙂

  33. Vanessa says

    August 19, 2011 at 3:40 PM

    So pretty, I love it!

  34. Michelle L. says

    August 19, 2011 at 3:34 PM

    Fabulous fabulous! I love the stencil and the ribbon edges – what a clever idea for fixing a too-skinny curtain (I always end up with those, somehow)!

  35. Michele {The Scrap Shoppe} says

    August 19, 2011 at 2:46 PM

    It looks great, Jen! I love that color on the white fabric. It really pops! And what a great windown to look out of. Its HUGE!!

  36. Look around the corner says

    August 19, 2011 at 2:23 PM

    wow great idea love it !!!!!!!!!!!! thanks for sharing.

    Eveline

  37. Jenny says

    August 19, 2011 at 2:00 PM

    Looks so FAB!! This is another project on my to-do list, so this was a timely tutorial. I'm bookmarking it for future reference! I am contemplating using a shower curtain with a super-cute pattern as my fabric. Love the idea of using an old sheet as the liner – brilliant!

  38. Jenny says

    August 19, 2011 at 1:59 PM

    I love the way it turned out! Thanks for the tutorial!

    Jenny
    [email protected]
    http://daysofchalkandchocolate.blogspot.com

  39. Brynwood Needleworks says

    August 19, 2011 at 1:41 PM

    Jen:
    Your project turned out just great and is wonderful in the window! Love the pattern, the color AND the "faux-ness". Have a great weekend.
    xoxo
    Donna

  40. Robyn Rasmussen says

    August 19, 2011 at 1:16 PM

    I love this idea! It is on my Pinterest board of things to do! I loved it So much, in fact, that I have decided to feature you as one of my top 5 blogs I follow on my Follow me Friday's post this week! Please come and check it out: http://hotmomshelpfultips.blogspot.com/2011/08/follow-me-fridays-link-party.html
    -Robyn

  41. Christina says

    August 19, 2011 at 12:35 PM

    Looks fantastic!
    Thanks for the tutorial 🙂
    xo

  42. LisaM says

    August 19, 2011 at 12:24 PM

    LIKE!

  43. Kathy @ Creative Home Expressions says

    August 19, 2011 at 12:06 PM

    That looks fantastic, Jen! I have Richella's tutorial in the back of my mind for using in my daughter's place and a friend's. I think it will work out nicely for the windows I have in mind.

  44. laxsupermom says

    August 19, 2011 at 11:17 AM

    Looks terrific! I love how you used the leftover island paint on the faux roman to tie it all together. Thanks for sharing.

  45. Kari at A Grace Full Life says

    August 19, 2011 at 11:09 AM

    I love your kitchen so far!!! Gorgeous…:)

  46. Madigan at madiganmade says

    August 19, 2011 at 10:38 AM

    I knew you'd figure it out! Beautiful job and I love that stencil. Plus, I love the ribbon detail… it was 'meant to be'!

    Can't wait to see the whole space!

  47. Paula says

    August 19, 2011 at 9:18 AM

    I love how you stenciled the fabric with paint to match your island. Richella's faux roman shade idea is a perfect solution for your kitchen window. It looks great!

Hi! I'm Jen Hadfield. I'm a mom of 5 restoring an 1891 home in the heart of Salt Lake City. I love being creative and sharing simple ideas to make your life easier and more beautiful!

Receive the Latest Crafts, DIY, Recipes and More in your INBOX!

Follow us on Pinterest! It's awesome!

Top Posts & Pages

Spruce up Your Outdoor Space with a DIY Recirculating Fountain! (tutorial)
A New Deck in Under 30 Minutes!
DIY Secret: How to Print on Post-It Notes (and Free Printable Template)
12 Must-Have Items to Pack on an Alaskan Cruise!
Copycat Panera Spinach and Artichoke Egg Soufflés - SO good!
Mother's Day Cup Holder Gift Basket


Popular Posts

  • Spruce up Your Outdoor Space with a DIY Recirculating Fountain! (tutorial)
    Spruce up Your Outdoor Space with a DIY Recirculating Fountain! (tutorial)
  • A New Deck in Under 30 Minutes!
    A New Deck in Under 30 Minutes!
  • DIY Secret: How to Print on Post-It Notes (and Free Printable Template)
    DIY Secret: How to Print on Post-It Notes (and Free Printable Template)
  • 12 Must-Have Items to Pack on an Alaskan Cruise!
    12 Must-Have Items to Pack on an Alaskan Cruise!
  • Copycat Panera Spinach and Artichoke Egg Soufflés - SO good!
    Copycat Panera Spinach and Artichoke Egg Soufflés - SO good!
  • Mother's Day Cup Holder Gift Basket
    Mother's Day Cup Holder Gift Basket
  • How to Change a Recessed Can Light into a Pendant Light with No Remodeling!
    How to Change a Recessed Can Light into a Pendant Light with No Remodeling!

As seen in


Amazon Affiliate

Tatertots & Jello is a participant in the Amazon Services LLC Associates Program, an affiliate advertising program designed to provide a means for sites to earn advertising fees by advertising and linking to amazon.com.
  • About Me
  • Advertising
  • Get Featured

Copyright © 2025 Tatertots and Jello · Privacy
This site is a place for positive discussion and ideas. Negative talk, comments that disparage others, and similar are not welcome and may be removed.